Best Of
Re: New Article on CO
The first fallacy here is that only 400-500 people die of CO poisonings every year. The only way to determine someone died from CO is with an autopsy. Less than 1% of people that die are autopsied. Usually that is when there is a suspicious death or someone dies in a fire. Did you know that If a person dies in a fire but it was fumes not fire, the life insurance doesn't have to pay the accidental double inssurance. I used to teach in class if you are the beneficiary of anyone's life insurance and there in a fire, try to be a little more generous and just jump in the fire. I am kigging11s
The next problem is the amount of diseases or health issues that are causes by low level CO exposure over time. Heart disease, liver disease,, lung disease, Alzheimer, Parkinson, sight, hearing, learning ailiity etc.
What makes some one think CO from the kitchen is going to easily diffuse through the house?
I got involved with the Low Income Weatherization programs in 1988. Based on the training they were giving I think they were trying lower the amount of low income persons. They got pretty upset with me. Why should you trust someone that is in the HVAC business versus someone who only has hearsay?
Bob Harper is one of the smartest people I know. If he could learn from me I am flabbergasted!! We. really want everyone to learn the truth. It is not embarrassing that you don't know the truth, it is embarrassing that it is not important enough for your customers to learn the truth.

Re: New Article on CO
Hi, I imagine most people are unaware of the many faces of CO, but I've let Allison know about this thread, and with luck, he'll come by and fill in the gaps. 🤞
Yours, Larry

New Article on CO
Hi, Allison Bailes has just published an interesting article on CO and the ways we can be poisoned by it, even in an all electric house. 🙀 Here's the link:
Yours, Larry
Re: Fire in roof unit of Historic Detroit Skyscraper
oh, it was the detorit public schools building when i went to wsu.
 mattmia2
Re: Compliance with NYC heating laws & resident comfort: send heat all day, or only when code requires?
Hello from the future - 5 months later, I have set up a server and built a screen-scraper daemon to pull all the heating data from the proprietary server every 5 minutes, 24/7. That, plus a dashboard and some Python based analytics, are giving me better information on the system than I ever had before. FIndings:
- Heat is surprisingly well distributed throughout the building; we don't seem to have big differences by exposure or height, except on the 20th floor. (And I have found that we are not using portable heaters, they are part of Wallmaster heat pump units.
- Our nighttime setback to 74F, morning boost to 76F, daytime setpoint of 75F was overheating the building and spiking our peak steam demand precisely during the ConEd 6am-11am penalty period. I set the building to run at 74F day and night, no more morning peaks, no complaints so far.
- The building is still running about 1F higher than setpoint at all times, so I'm considering dropping our setpoint to 73F all day.
- Despite the lack of insulation, the building is so thermally massive, we can shut off the heat for 12 hours for repairs on a cold day and still remain within legal temperatures.
 dschwarz
Re: Recommendations for replacing a baseboard radiator with toe-kick radiator
@Alan (California Radiant) Forbes @EdTheHeaterMan thank you both for taking the time to share all of your detailed answers and insights, and identifying where I can simplify. Much appreciated! I think I am clear now how to proceed.
John
 jsantoku
Re: Near boiler piping
All my experiments have me agreeing with WM’s head of training as quoted below. I have never seen anyone present any evidence to the contrary.

Re: Recommendations for replacing a baseboard radiator with toe-kick radiator
Thanks Alan. I was quite busy today and started to answer this at about 3:59 PM then came back to it three times. That's why I was napping. LOL
@jsantoku asked "
- Regarding the valve vs MonoFlo® tee:
- Wouldn't a globe valve be better than a ball valve for adjusting flow?
- What about putting this valve in the return pipe of the kickspace radiator branch (i.e., between the radiator and the tee connecting to the main pipe) to increase the resistance through this branch instead of putting this valve inline in the main pipe?
A full-port valve is best. When completely open, the path of least resistance is straight through. A ball valve is less expensive than a gate valve. Common globe valves are not full port. Placing a valve in the branch circuit is not necessary if there is a full port valve between the tee thru fittings, because there would be little or no flow to restrict when the full-port valve is fully open.
Finally, the restriction in a diverter tee is fixed; there is no adjustment available when using that arrangement.
- - - -
- Is my thought that I can avoid the need to wire anything into the boiler controls but instead buy a
low-temp (110ºF) aquastat(such as this one) and connect it to the K42 Twin-Flo III kickspace heater. And then I just need to supply 120V to the radiator? Do I even need a dedicated branch circuit?I believe that aquastat is already included and prewired in the heater you selected
- - - -
- - - -
- Is my understanding that supply to the current kitchen radiator on the side with the elbow, and that would align with the main flow (see attached image).
I am not sure what you are asking here but here is what I would do:
- Drain the boiler system
- Remove the kitchen radiator.
- Cut the risers to the kitchen radiator in the basement.
- Connect the kitchen supply to the kitchen return using 3/4" pipe so the piping is the same as if the radiator had never been there.
- Install two 3/4" × 3/4" × 1/2" tee fittings with a ball valve between the two tee fittings in the pipe installed in Step 4.
- Connect the kickspace heater to the two 1/2" branch openings on the tee fittings.
- Fill and purge the system as you would any baseboard loop.
- To remove all air from the kickspace heater, continue purging that loop with the valve installed in Step 5 closed.
- Once all air is purged, open the valve installed in Step 5 and operate the system.
- After the system reaches operating temperature, slowly close the ball valve to about a 45° angle and determine whether that provides sufficient restriction to allow proper flow through the kitchen kickspace heater.
- Observe the system for several days If the kitchen is too hot open the valve slightly.
- If the kitchen is too cold, close the valve slightly.
- Do not close the ball valve more than about 80% (approximately 75° from the fully open position of 90°).
- - - -
- - - -
- - - -
- To avoid letting air into the system at any point, what are your suggestions on the following?
- Initial stage (prior to install/ drain where the radiator is):
- Should I close the last valve for the supply part of the loop (after the pump in the upper right of the photo) and close the first valve for the return (bottom right by the expansion tank I think)? And then cut the tubing to and from the kitchen radiator I'm removing, and install ball valves inline with the main pipe there?
- You are overthinking this
- Final stage (recharge/ purge through the radiator):
- Should I also install a
boiler drain valveoff of the return pipe after the new radiator and before the ball valve inline in the main? And hook a hose up to this and into a bucket? (See attached image).
- Again over thinking. just purge as usual with one more step on the Kickspace loop. purge with valve open until air free, then with valve closed until air free.
- Should I flip the
fast-fill levelon thepressure reducing valve(below the boiler) until the gauge reaches 12-15 PSI while the gate valve between the radiator branch tees is closed and the new radiator drain valve (downstream of the radiator), to force air out of the new radiator?
- You can go above 15 PSI, just don't get too close to 30 PSI. I like to stop at about 25 PSI, but if you go over by accident don't worry, the relief valve will release any excess pressure so you don' damage anything. …and it is only water
- And then open the gate valve between the radiator branch tees and and open the drain valve near the expansion tank, to force air out of the rest of the system?
- already explained above
- "The PEX connecting to the kitchen radiator is actually 1/2" PEX and not 3/4" PEX, that seems to be the case for at least a few of the radiators, but I'm not sure where or why it converts between 3/4" and 1/2"."
This can be a problem on a series loop, if that is how the system is piped. It is usually not much of a problem on a 3/4" single-pipe loop with diverter tees.
With a branch system: Think of the 3/4″ pipe as the main highway, and the 1/2″ pipes as the exit ramps that feed each radiator.
on a series loop: If you have a highway with construction and all the traffic needs to funnel down to one lane, then there is a traffic jam
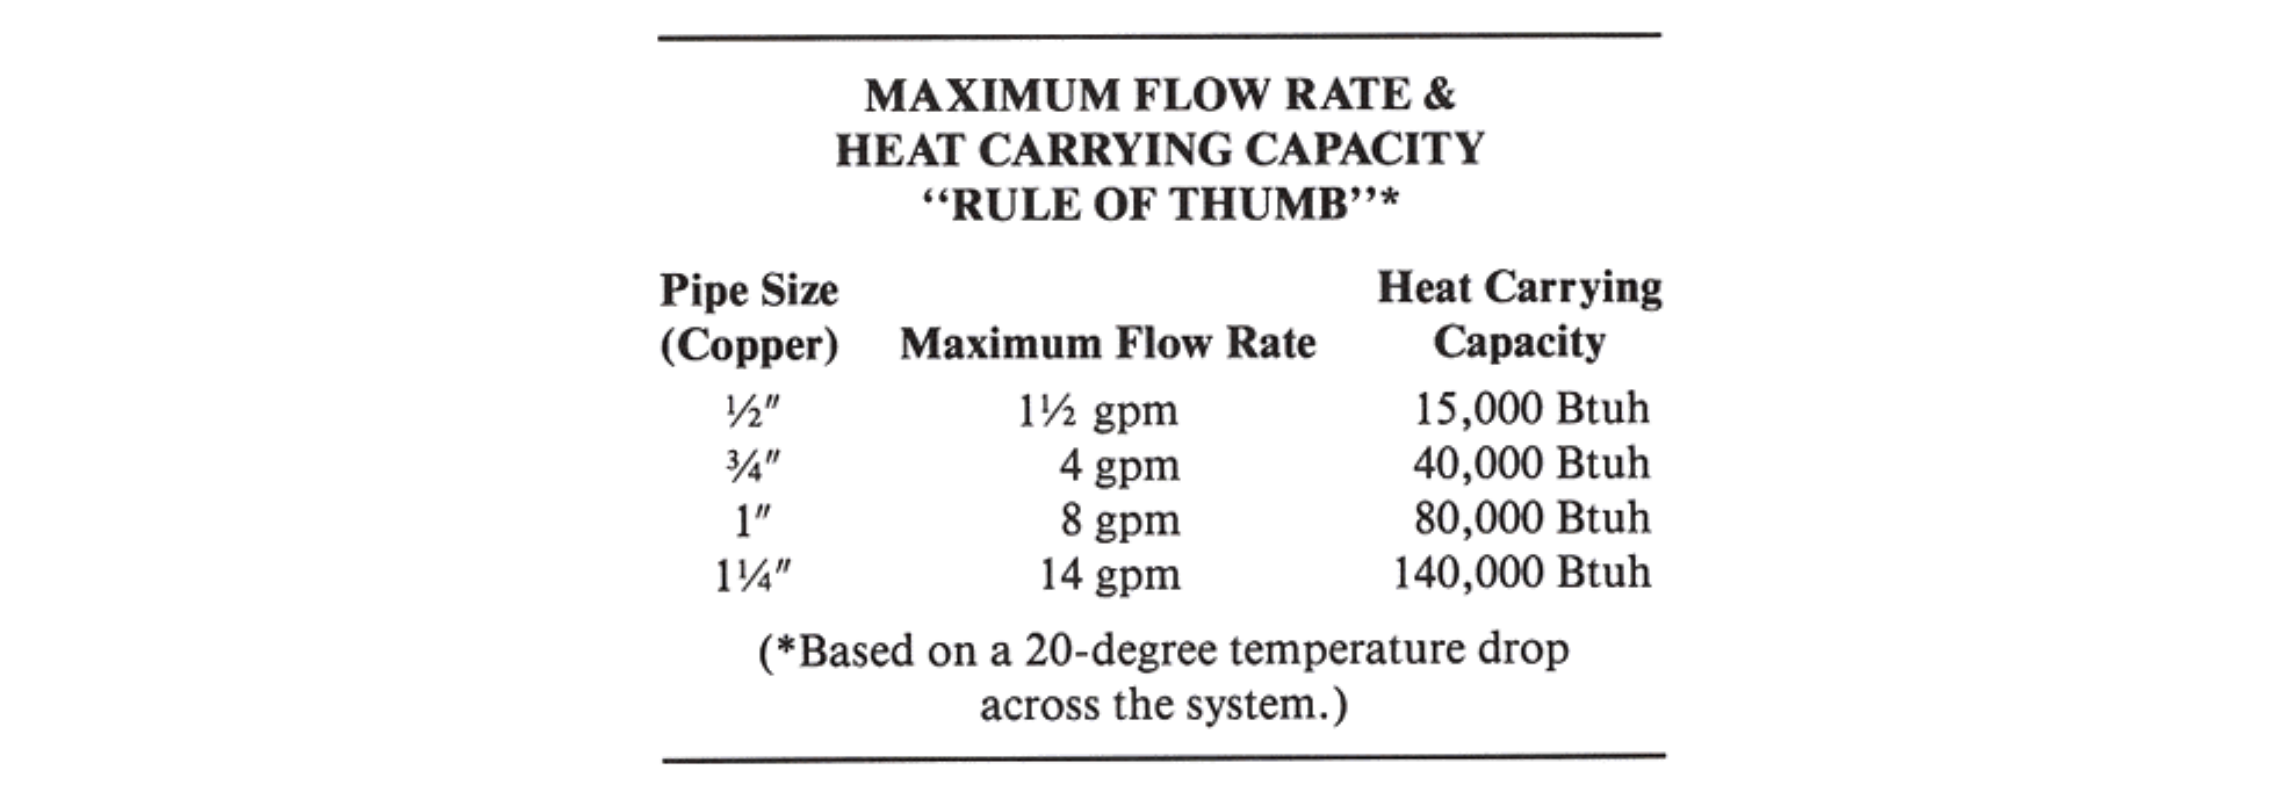
Using a rule-of-thumb calculation, the flow through 1/2" pipe, to stay quiet and avoid velocity noise, should not exceed about 1.5 gallons per minute (GPM). Based on a 20° temperature change (ΔT), 1.5 GPM would only be able to move about 15,000 BTU per hour through that loop.
So, a series of pipe sizes that includes any significant length of 1/2" pipe would limit that branch or loop to about 15,000 BTU/hr.
If there is a 3/4" main pipe that stays 3/4" from start to finish (from the boiler supply to the boiler return), that pipe can move about 4 GPM without creating noise. At a 20° temperature drop, that would move about 40,000 BTU/hr.
So having a series loop like this with any 1/2" pipe could limit how much heat can be delivered from the boiler to the radiators.
However, if the 3/4" pipe is the main loop and there are 1/2" branches coming off of it, then the 3/4" main can still move about 40,000 BTU/hr from the boiler, while the 1/2" branches can supply up to about 15,000 BTU/hr to each radiator without a problem.
Does that make sense? For more about your system here is a simple book that is easy to understand when it comes to what is happening inside your heating system Zoning Made Easy.

Re: Recommendations for replacing a baseboard radiator with toe-kick radiator
It may be Ed's nap time, so I'll answer.
1a) A globe valve is OK, but since the handles are usually round, its' hard to tell what position they're in. Just don't use a gate valve.
1b) That won't help you at all. It'll make it worse by adding to the loop's pressure drop. You want a valve between the tees to force water through the loop.
2) The kickspace heater already comes with one of those. It delays power to the fan until the water temperature reaches setpoint.
3) I'd say you're correct. They usually install vents on the outlet.
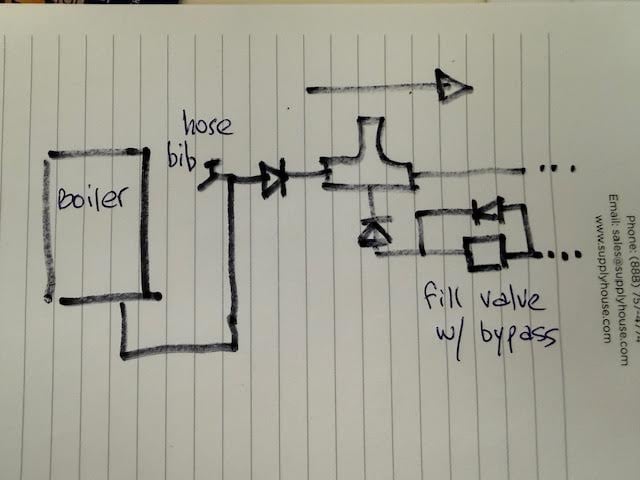
4) You can isolate as necessary when you set about to do your work. The best thing to do for purging is to install a purge assembly as shown. You can do all your purging from the boiler room and it purges everything, including the boiler. Otherwise, you're doomed for hours of wasting water and frustration. Dan Holohan taught this to me many years ago; Wetstock I?, (aka A Gathering of Wetheads) 1993? It's the first thing that gets installed on my systems.
BTW and not that it matters to anyone, I hate kickspace heaters. They're noisy at best and after a few years, the fan starts to hit the housing and then gets even noisier. I prefer a towel warmer where possible. On an end cabinet if there is one.

Re: Quieter zone valves than Taco Zone Sentry
Just to wrap this up, I did install the valves that hot rod recommended. It totally solved my noise problem, they are silent and have been running now for a few years with no problems. Thank you, Bob very much!
https://s3.amazonaws.com/s3.supplyhouse.com/product_files/656354%20-%20Product%20Overview%20-%20Caleffi.pdf
 jeff4444