Recommendations for replacing a baseboard radiator with toe-kick radiator

Hi HeatingHelp community, I'm planning to replace a baseboard radiator in my kitchen with a toe-kick radiator (so I can install some cabinets).
I've got some questions regarding the plumbing and electrical involved in this.
For a little background:
- My house's hydronic heating system includes
- 6 baseboard radiators on the main floor (I need to keep the rest as is but just replace the kitchen radiator)
- 2 small baseboard radiators on the 2nd floor.
- Lochinvar fire tube boiler`
- Half of the kitchen spans a crawlspace and the other half spans the basement, which has a finished ceiling, so only part of the plumbing is exposed (what's below one end of the radiator). This was all done before we bought the house a couple years ago…
- I believe the system is all on a single loop, since I see only two pipes into the ceiling above the boiler. I think the primary bedroom radiator right above the boiler and crawlspace behind the boiler is first in the loop.
- I believe the system has 1 primary loop and 1 secondary loop. Please correct me if I'm wrong, given the included photo.
Plumbing questions:
- Do I need to install an additional secondary loop just for the toe kick radiator? If so, I'll have a few more questions…
- If no, then what's the proper way to to connect it?
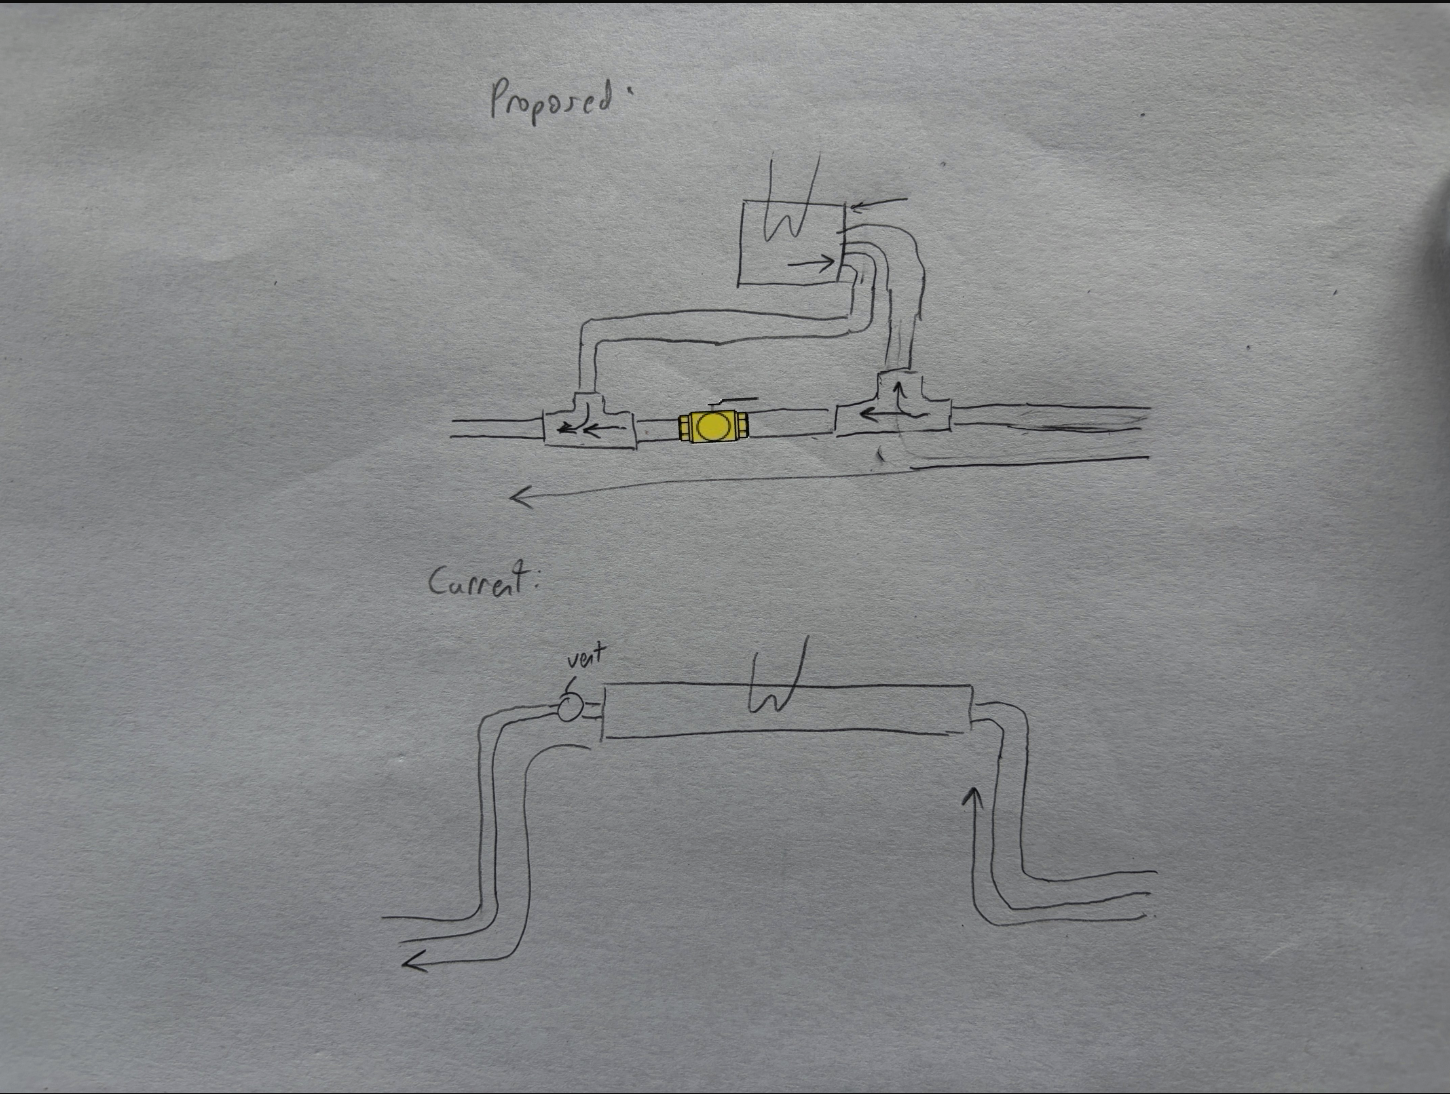
- Based on my research, I could use 2 monoflow tees to connect to the 1/2" PEX of the main loop. The 1/2” PEX to/from from the toe kick would be a bypass off the main loop (to avoid pressure loss on the downstream radiators in the loop). I've include a quick sketch of this.
- Is PEX-B with copper crimp rings fine for this install (I have these tools)? Or should I use copper pipe with crimp fittings or sweat fittings?
Electrical questions:
- I understand the toe-kick radiator should be attached to a 120V circuit, right?
- Do I need to also wire the toe-kick radiator to the boiler control system, so that it kicks on with the thermostat? If so, I'll have some questions around parts for this, and how exactly to connect?
- I understand there might be a low-temperature aquastat option to avoid wiring to the boiler controls, is this correct?
Radiator recommendations?
- This is the one I've been seeing most commonly: Beacon Morris K84 Twin-Flo III Kick Space Heater. The kitchen I need to heat is about 160 sq ft.
With your responses, keep in mind that I'm a homeowner who has done some minor plumbing and some 120/240V electrical work at home, but I don't have a ton of experience…
Thank you for any answers or recommendations!
Comments
-
I honestly recommend you try to consider something else. I ran a toe kick in my one bathroom, hated it so much I disconnected it. Because we super insulate that bathroom on a remodel, turns out we didn’t need heat at all.
Without knowing your btu needs, or the layout, Are you sure you even need heat to replace the radiator?
Is there an option for panel radiators? I had a customer do two tall, narrow, flat panel radiators on each side of a dining room slider in an open kitchen and it provides plenty of of heat. You could even do all toe kicks with flat, radiant baseboard.0 -
So to start with your 3/4" baseboard loop can have up to 67 feet of 3/4" baseboard (average number) based on the 600 BTU per SqFt of baseboard heating element. this is of course a maximum and it appears that you don't come anywhere close to that. The next thing is that the Beacon Morris is a 1/2" pipe connection. With that being placed in series with the 3/4" baseboard then the smaller diameter pipe needs to be the governing factor in how much heat that loop can carry. So piping the kickspace heater is not as simple as you might thing,
Edward Young Retired
After you make that expensive repair and you still have the same problem, What will you check next?
0 -
Your situation is completely different. You are removing heat emitters and replacing them with a different type of heat emitter in a large room. You are not working on a small bathroom with other rooms adjacent to it. let me look a little closer at your total situation and see what is best for you.
Edward Young Retired
After you make that expensive repair and you still have the same problem, What will you check next?
0 -
Everything you have said sounds exactly correct. There is one change I would make to the crawlspace/basement piping where you remove the baseboards and replace them with the kickspace heater. I would add a ball valve on the run in order to throttle the proper amount of water diverted to the kickspace heater. It will also allow you to purge that loop by closing the run completely to force air out of the under-cabinet coil. Then you can return the ball valve to a partially open position that delivers the proper amount of heat.
Getting the proper balance for the under-counter heater with the ball valve is going to be a matter of trial and error. Some will recommend a diverter tee fitting or MonoFlo® tee. I would stay away from that and use the ball valve instead, because it gives you the control you need to adjust the flow to the heating element.
The smallest under-counter heater is all you need. Since you are only removing about 7 feet of baseboard element, the K42 Twin-Flo III kickspace heater is roughly equal to the output of the emitter you are removing. Unless the kitchen is too cold with that existing baseboard, you should not use the K84 Twin-Flo III kickspace heater. that may makew the room overheat or steal heat from other areas of the home.
Since you are using only one loop of 3/4" PEX tubing, there is a chance that your piping system can only handle about 36,000 to 38,000 BTU/h. If your home needs more than that on a design day, you may find that by using the larger heater, the system becomes out of balance and your rooms will not reach the thermostat set temperature.
This would only occur on the few days when you experience design conditions (the coldest days of the year), but if that happens, you may want to redesign the system with a larger 1" primary loop and branch off into two separate 3/4" PEX loops.
Edward Young Retired
After you make that expensive repair and you still have the same problem, What will you check next?
 1
1 -
Hi @EdTheHeaterMan, thank you for your detailed responses and insights.
I've got a couple follow-up questions:
- Regarding the valve vs MonoFlo® tee:
- Wouldn't a globe valve be better than a ball valve for adjusting flow?
- What about putting this valve in the return pipe of the kickspace radiator branch (i.e., between the radiator and the tee connecting to the main pipe) to increase the resistance through this branch instead of putting this valve inline in the main pipe?
- Is my thought that I can avoid the need to wire anything into the boiler controls but instead buy a low-temp (110ºF) aquastat (such as this one) and connect it to the K42 Twin-Flo III kickspace heater. And then I just need to supply 120V to the radiator? Do I even need a dedicated branch circuit?
- Is my understanding that supply to the current kitchen radiator on the side with the elbow, and that would align with the main flow (see attached image).
- To avoid letting air into the system at any point, what are your suggestions on the following?
- Initial stage (prior to install/ drain where the radiator is):
- Should I close the last valve for the supply part of the loop (after the pump in the upper right of the photo) and close the first valve for the return (bottom right by the expansion tank I think)? And then cut the tubing to and from the kitchen radiator I'm removing, and install ball valves inline with the main pipe there?
- Final stage (recharge/ purge through the radiator):
- Should I also install a boiler drain valve off of the return pipe after the new radiator and before the ball valve inline in the main? And hook a hose up to this and into a bucket? (See attached image).
- Should I flip the fast-fill level on the pressure reducing valve (below the boiler) until the gauge reaches 12-15 PSI while the gate valve between the radiator branch tees is closed and the new radiator drain valve (downstream of the radiator), to force air out of the new radiator?
- And then open the gate valve between the radiator branch tees and and open the drain valve near the expansion tank, to force air out of the rest of the system?
- Initial stage (prior to install/ drain where the radiator is):
- The PEX connecting to the kitchen radiator is actually 1/2" PEX and not 3/4" pex, that seems to be the case for at least a few of the radiators, but I'm not sure where or why it converts between 3/4" and 1/2".
Thanks in advance for any additional input!
John
0 - Regarding the valve vs MonoFlo® tee:
-
It may be Ed's nap time, so I'll answer.
1a) A globe valve is OK, but since the handles are usually round, its' hard to tell what position they're in. Just don't use a gate valve.
1b) That won't help you at all. It'll make it worse by adding to the loop's pressure drop. You want a valve between the tees to force water through the loop.
2) The kickspace heater already comes with one of those. It delays power to the fan until the water temperature reaches setpoint.
3) I'd say you're correct. They usually install vents on the outlet.
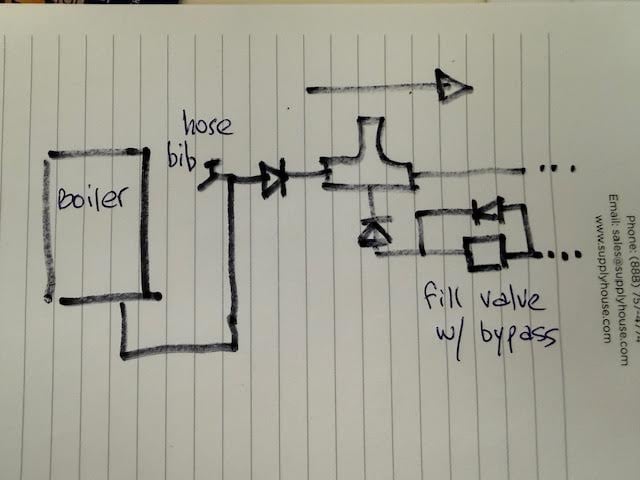
4) You can isolate as necessary when you set about to do your work. The best thing to do for purging is to install a purge assembly as shown. You can do all your purging from the boiler room and it purges everything, including the boiler. Otherwise, you're doomed for hours of wasting water and frustration. Dan Holohan taught this to me many years ago; Wetstock I?, (aka A Gathering of Wetheads) 1993? It's the first thing that gets installed on my systems.
BTW and not that it matters to anyone, I hate kickspace heaters. They're noisy at best and after a few years, the fan starts to hit the housing and then gets even noisier. I prefer a towel warmer where possible. On an end cabinet if there is one.
 8.33 lbs./gal. x 60 min./hr. x 20°ΔT = 10,000 BTU's/hour
Two btu per sq ft for degree difference for a slab1 -
Thanks Alan. I was quite busy today and started to answer this at about 3:59 PM then came back to it three times. That's why I was napping. LOL
@jsantoku asked "
- Regarding the valve vs MonoFlo® tee:
- Wouldn't a globe valve be better than a ball valve for adjusting flow?
- What about putting this valve in the return pipe of the kickspace radiator branch (i.e., between the radiator and the tee connecting to the main pipe) to increase the resistance through this branch instead of putting this valve inline in the main pipe?
A full-port valve is best. When completely open, the path of least resistance is straight through. A ball valve is less expensive than a gate valve. Common globe valves are not full port. Placing a valve in the branch circuit is not necessary if there is a full port valve between the tee thru fittings, because there would be little or no flow to restrict when the full-port valve is fully open.
Finally, the restriction in a diverter tee is fixed; there is no adjustment available when using that arrangement.
- - - -
- Is my thought that I can avoid the need to wire anything into the boiler controls but instead buy a
low-temp (110ºF) aquastat(such as this one) and connect it to the K42 Twin-Flo III kickspace heater. And then I just need to supply 120V to the radiator? Do I even need a dedicated branch circuit?
I believe that aquastat is already included and prewired in the heater you selected
- - - -
- - - -
- Is my understanding that supply to the current kitchen radiator on the side with the elbow, and that would align with the main flow (see attached image).
I am not sure what you are asking here but here is what I would do:
- Drain the boiler system
- Remove the kitchen radiator.
- Cut the risers to the kitchen radiator in the basement.
- Connect the kitchen supply to the kitchen return using 3/4" pipe so the piping is the same as if the radiator had never been there.
- Install two 3/4" × 3/4" × 1/2" tee fittings with a ball valve between the two tee fittings in the pipe installed in Step 4.
- Connect the kickspace heater to the two 1/2" branch openings on the tee fittings.
- Fill and purge the system as you would any baseboard loop.
- To remove all air from the kickspace heater, continue purging that loop with the valve installed in Step 5 closed.
- Once all air is purged, open the valve installed in Step 5 and operate the system.
- After the system reaches operating temperature, slowly close the ball valve to about a 45° angle and determine whether that provides sufficient restriction to allow proper flow through the kitchen kickspace heater.
- Observe the system for several days If the kitchen is too hot open the valve slightly.
- If the kitchen is too cold, close the valve slightly.
- Do not close the ball valve more than about 80% (approximately 75° from the fully open position of 90°).
- - - -
- - - -
- - - -
- To avoid letting air into the system at any point, what are your suggestions on the following?
- Initial stage (prior to install/ drain where the radiator is):
- Should I close the last valve for the supply part of the loop (after the pump in the upper right of the photo) and close the first valve for the return (bottom right by the expansion tank I think)? And then cut the tubing to and from the kitchen radiator I'm removing, and install ball valves inline with the main pipe there?
- You are overthinking this
- Should I close the last valve for the supply part of the loop (after the pump in the upper right of the photo) and close the first valve for the return (bottom right by the expansion tank I think)? And then cut the tubing to and from the kitchen radiator I'm removing, and install ball valves inline with the main pipe there?
- Final stage (recharge/ purge through the radiator):
- Should I also install a
boiler drain valveoff of the return pipe after the new radiator and before the ball valve inline in the main? And hook a hose up to this and into a bucket? (See attached image).- Again over thinking. just purge as usual with one more step on the Kickspace loop. purge with valve open until air free, then with valve closed until air free.
- Should I flip the
fast-fill levelon thepressure reducing valve(below the boiler) until the gauge reaches 12-15 PSI while the gate valve between the radiator branch tees is closed and the new radiator drain valve (downstream of the radiator), to force air out of the new radiator?- You can go above 15 PSI, just don't get too close to 30 PSI. I like to stop at about 25 PSI, but if you go over by accident don't worry, the relief valve will release any excess pressure so you don' damage anything. …and it is only water
- And then open the gate valve between the radiator branch tees and and open the drain valve near the expansion tank, to force air out of the rest of the system?
- already explained above
- Should I also install a
- Initial stage (prior to install/ drain where the radiator is):
- "The PEX connecting to the kitchen radiator is actually 1/2" PEX and not 3/4" PEX, that seems to be the case for at least a few of the radiators, but I'm not sure where or why it converts between 3/4" and 1/2"."
This can be a problem on a series loop, if that is how the system is piped. It is usually not much of a problem on a 3/4" single-pipe loop with diverter tees.
With a branch system: Think of the 3/4″ pipe as the main highway, and the 1/2″ pipes as the exit ramps that feed each radiator.
on a series loop: If you have a highway with construction and all the traffic needs to funnel down to one lane, then there is a traffic jam
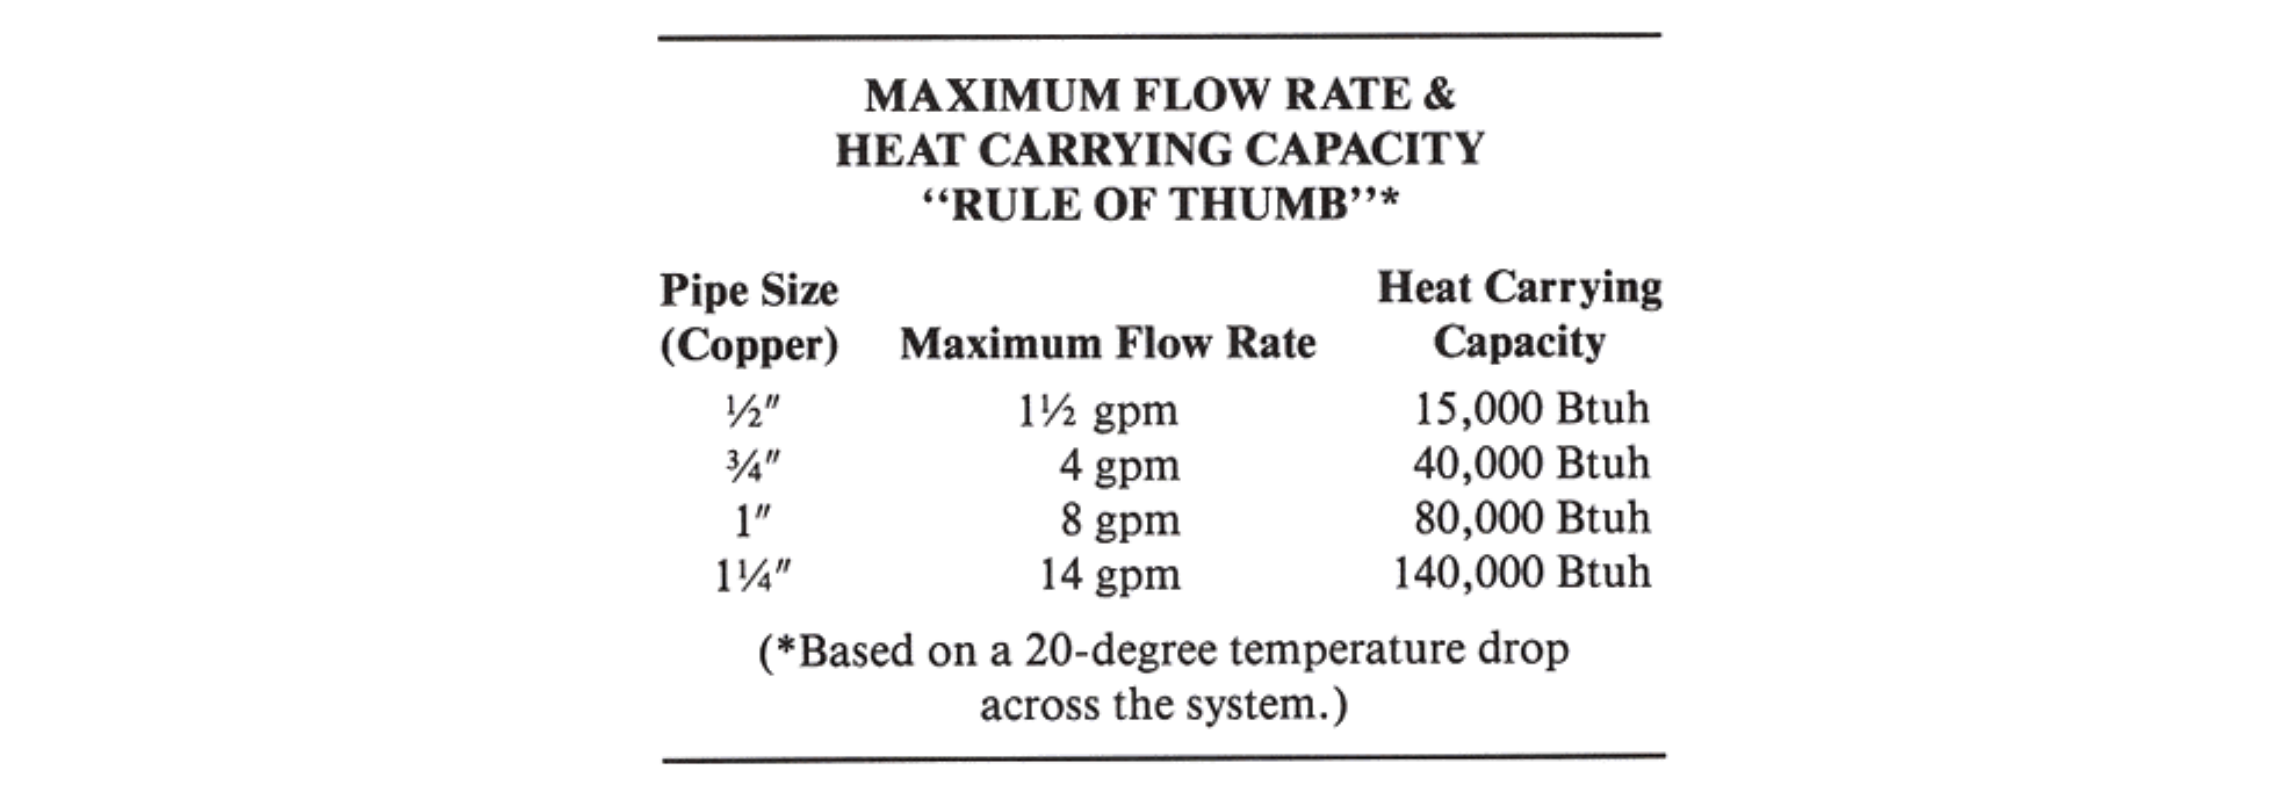
Using a rule-of-thumb calculation, the flow through 1/2" pipe, to stay quiet and avoid velocity noise, should not exceed about 1.5 gallons per minute (GPM). Based on a 20° temperature change (ΔT), 1.5 GPM would only be able to move about 15,000 BTU per hour through that loop.
So, a series of pipe sizes that includes any significant length of 1/2" pipe would limit that branch or loop to about 15,000 BTU/hr.
If there is a 3/4" main pipe that stays 3/4" from start to finish (from the boiler supply to the boiler return), that pipe can move about 4 GPM without creating noise. At a 20° temperature drop, that would move about 40,000 BTU/hr.
So having a series loop like this with any 1/2" pipe could limit how much heat can be delivered from the boiler to the radiators.
However, if the 3/4" pipe is the main loop and there are 1/2" branches coming off of it, then the 3/4" main can still move about 40,000 BTU/hr from the boiler, while the 1/2" branches can supply up to about 15,000 BTU/hr to each radiator without a problem.
Does that make sense? For more about your system here is a simple book that is easy to understand when it comes to what is happening inside your heating system Zoning Made Easy.
Edward Young Retired
After you make that expensive repair and you still have the same problem, What will you check next?
2 - Regarding the valve vs MonoFlo® tee:
-
It's my opinion trying to add monoflo tees or something off of the existing baseboard loop is not a good idea. Your better off with separate homerun to the toekick heater in the kitchen. Monoflows were originally design for radiators which offered little resistance to flow. So it work good when originally designed because everything was designed with radiators. Adding baseboard changes the equation. Unless you do the proper calculations you have assume that you'll get flow thru the toe kick. i've seen this done and fail a dozen times. there is to much resistance in the fittings and the toe kick heater. And depending on what pex fittings your gonna use the internal area of a pex fitting is small.
Then the kitchen heat becomes a slave to the thermostat controlling the main loop. What if the main loop is satisfied and the kitchen still needs more heat. Or if it overheats? shut the fan off every time it gets to hot? i put mine on its own thermostat. works great and keeps a steady temperature in the kitchen. I'm not crazy about the fan but i have become used to it and with the wife not complaining about it i'm in the clear. Not that i had an option. the whole kitchen is cabinets so no room for baseboard heat in kitchen.
2 -
@Alan (California Radiant) Forbes @EdTheHeaterMan thank you both for taking the time to share all of your detailed answers and insights, and identifying where I can simplify. Much appreciated! I think I am clear now how to proceed.
John 2
2


Categories
- All Categories
- 87.6K THE MAIN WALL
- 3.3K A-C, Heat Pumps & Refrigeration
- 59 Biomass
- 430 Carbon Monoxide Awareness
- 124 Chimneys & Flues
- 2.2K Domestic Hot Water
- 5.9K Gas Heating
- 120 Geothermal
- 168 Indoor-Air Quality
- 3.8K Oil Heating
- 78 Pipe Deterioration
- 1K Plumbing
- 6.6K Radiant Heating
- 394 Solar
- 16K Strictly Steam
- 3.5K Thermostats and Controls
- 56 Water Quality
- 51 Industry Classes
- 50 Job Opportunities
- 18 Recall Announcements