Replacing piping

I have purchased a home with a steam system and had it looked over by a local steam expert (thanks Dave!).
Aside from replacing crumbling flue duct and air valves on the radiators, among other things, he suggested I install a plug on a boiler riser for skimming. This is in the installation guide which was clearly not followed by the installer. The boiler is surging and is very sludgy as it has been run ~14 years without a skim.
Here is a view of the side. It's a Dunkirk PVSB-7D.

I have no problem doing duct work and replacing air valves, but I have no experience with anything but PVC piping (very light plumbing).
First, how can I remove the copper piping without damaging the boiler or existing header? I have a hack saw I can cut it with and will need to get a larger pipe wrench.
Here are two close ups.

I've read a fair bit of posts but I don't recall seeing a piping removal explanation.
Thank you in advance.
Tim
Comments
-
It should be iron, not copper and most likely should be the full size of the tapping. If you are going to rework it, get the manual for the boiler and follow the diagram in the manual. The joints also need to be arranged such that the piping expanding and contracting doesn't try to pull the sections of the boiler apart, it should be able to twist a little at a joint instead. You will most likely have to cut a little wedge with a hacksaw blade almost to the threads then use a chisel to break that section of the bushing out.1
-
Well you're in luck, sort of. No saws needed -- or wanted. The big fitting in the top picture is a union. That big nut will turn and release the two halves of the union. Then you can unscrew the half of the union which is threaded onto the copper and you'll be able to reuse it.
The riser shouldn't be copper anyway. It should unscrew from the boiler fitting. It may be obstinate, but you might just as well use it to do the twisting.
Both of the unscrewing jobs may be obstinate...
Then you'll put a short threaded black iron nipple in the opening in the boiler. Screw a T (run horizontal) onto that. Screw a plug into the opposite end from the boiler -- and there's your skim opening. Then you will go up again with threaded black iron to a 90 and a short nipple to the that union half you saved and put the union back together.
Somewhat easier said than done. You may be able to get a store to cut and thread the riser to the correct length for you -- that's the hardest part.
Don't forget pipe dope or thread compound or both... and you'll need a couple of big pipe wrenches.Br. Jamie, osb
Building superintendent/caretaker, 7200 sq. ft. historic house museum with dependencies in New England1 -
Sawzalling skllls matter here and there. But hopefully the copper will turn, dissimilar metals


1 -
I suppose I should've asked this in the original post, but is it okay to use Liquid Wrench or similar to help loosen the joints?
Thank you again.
Tim0 -
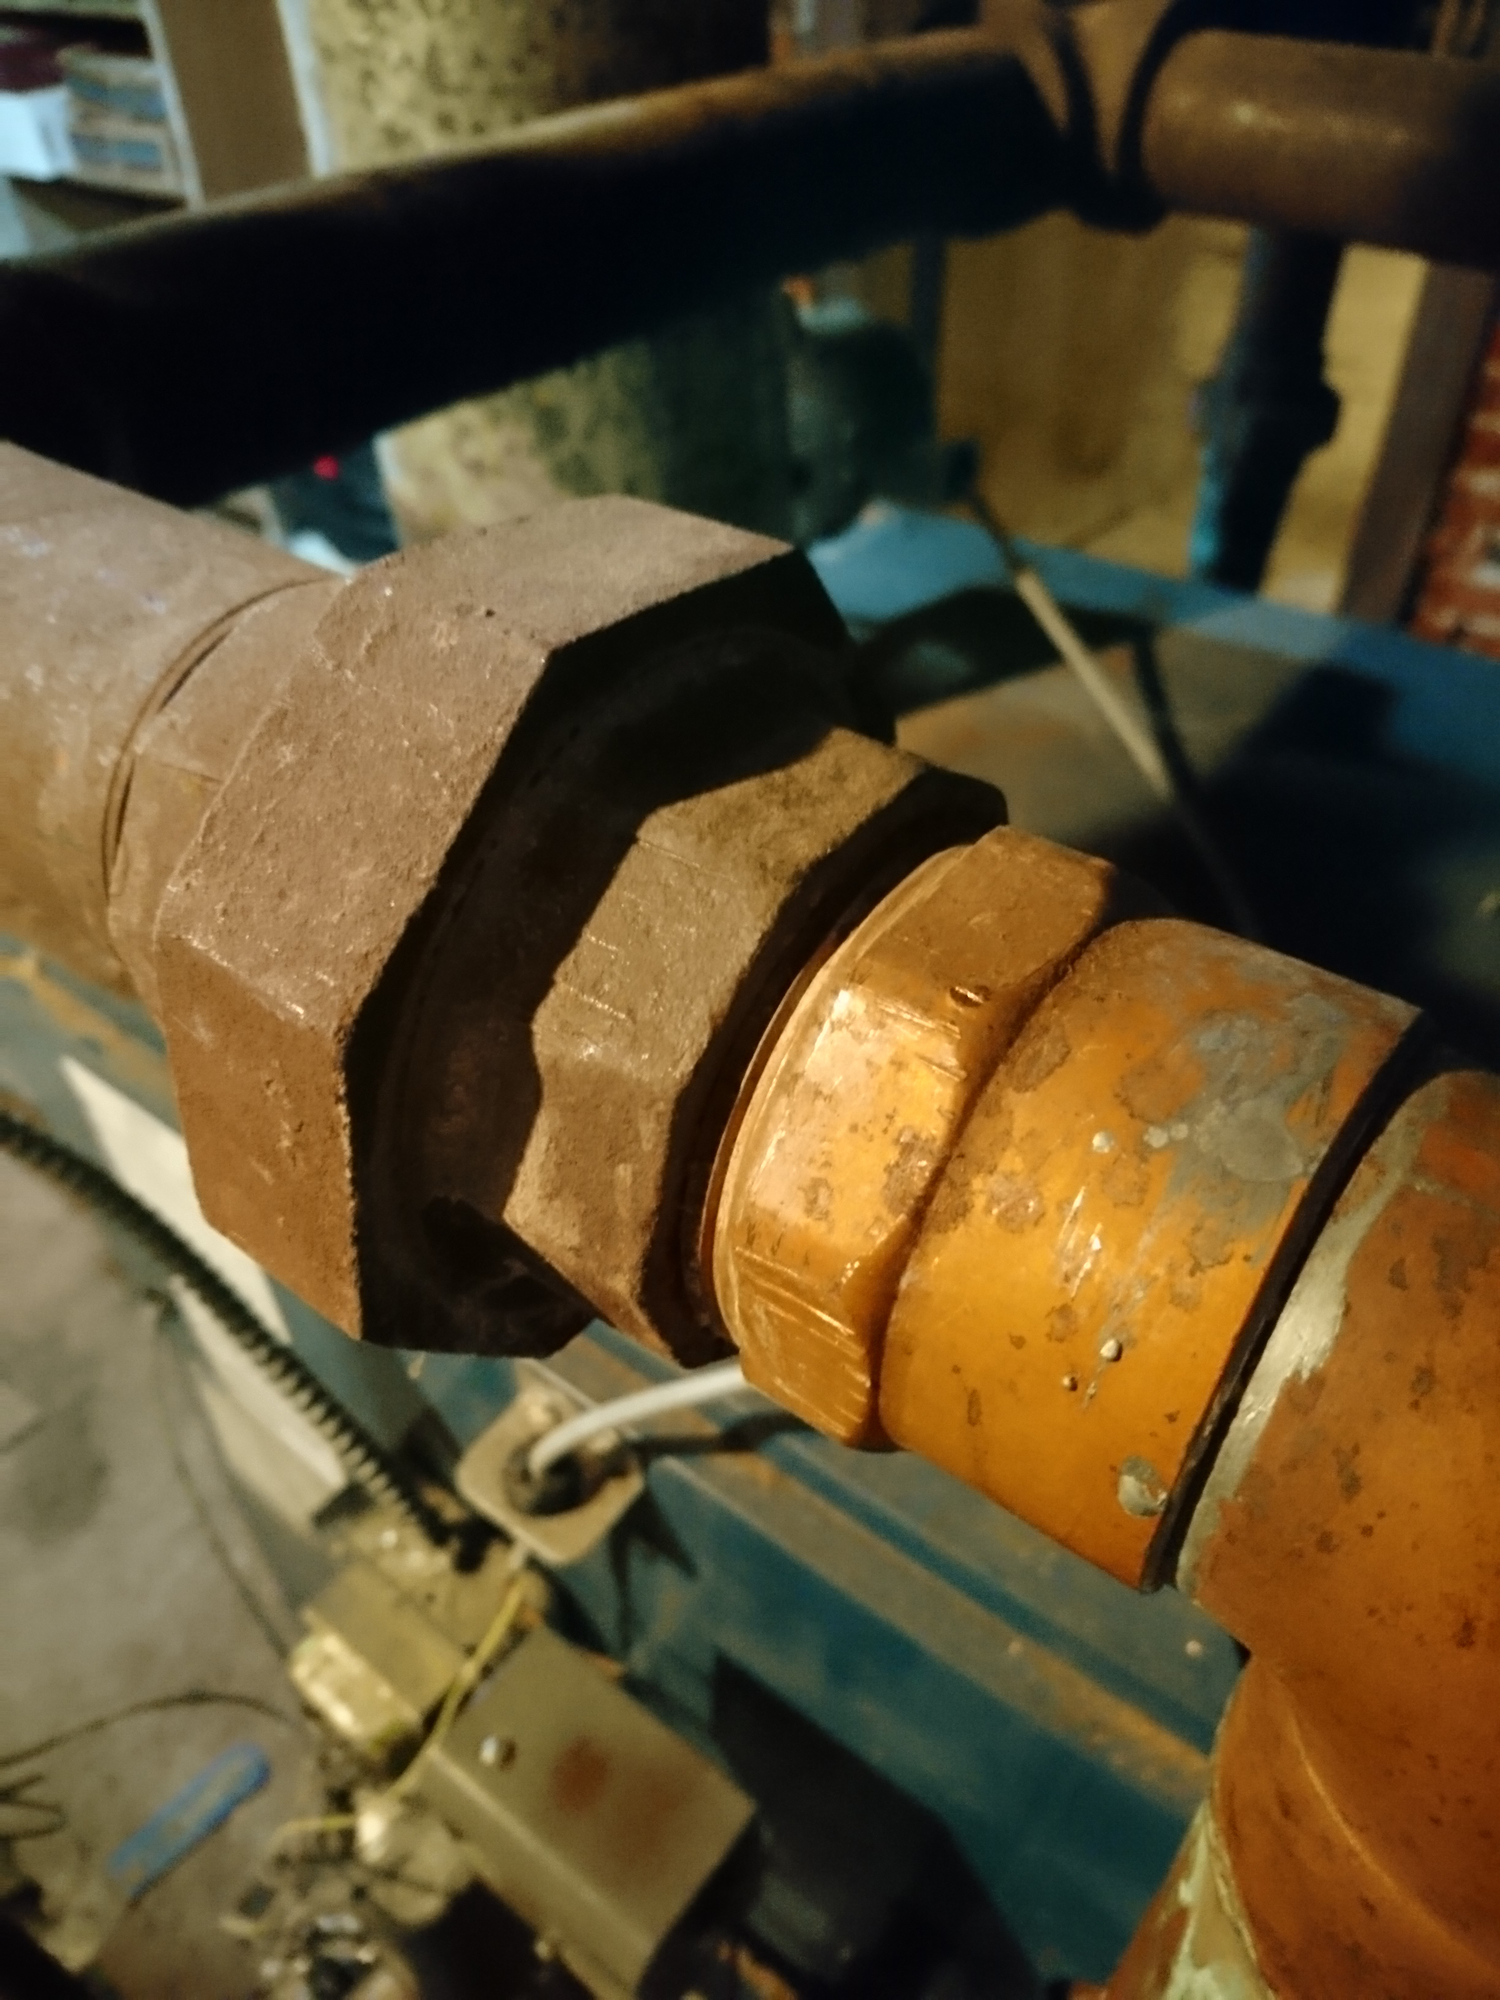
What is up with the third picture down? Looks like a copper union buried in the jacket. Maybe it's a copper x male union but still....????0
-
I thought that was a male adapter threaded in to a bushing but it does look more like a union the more I look at it.EBEBRATT-Ed said:What is up with the third picture down? Looks like a copper union buried in the jacket. Maybe it's a copper x male union but still....????
Either way follow the institutions for minimum size on the riser and the header.0 -
No problem. Whatever works...NYtimebomb said:I suppose I should've asked this in the original post, but is it okay to use Liquid Wrench or similar to help loosen the joints?
Thank you again.
TimBr. Jamie, osb
Building superintendent/caretaker, 7200 sq. ft. historic house museum with dependencies in New England1 -
Quick update. I ended up cutting the copper piping about halfway between the top and bottom elbows. A few Liquid Wrench applications, some framing hammer taps, and the top union joint started moving with the help of a 36" pipe wrench I found on craigslist.


The lower joint is tough to get at and hasn't budged yet but I'll keep at it.
Tim
0 -
That piping is too small- only 2-inch, and it needs to be 2-1/2-inch. You can see the bushing in the steam outlet. We see this a lot on Dunkirks, if only installers would read the freakin' manual.
It's also best to use both steam outlets instead of just one, especially on the larger models.
Here are the piping diagrams. The first is for using only one steam outlet:
Baltimore, MD, USA
Steam, Vapor & Hot-Water Heating Specialists
Oil & Gas Burner Service
Consulting 2
2 -
And here's what using two outlets should look like:
Baltimore, MD, USA
Steam, Vapor & Hot-Water Heating Specialists
Oil & Gas Burner Service
Consulting1 -
Apparently reading is not required to be a plumber or pipefitter.
Don't know how they could even pass a test
That's one reason we have fewer good mechanics.
The newer equipment and controls requires more reading ....not less1 -
As I say in my profession (I.T.), reading and comprehension are two different things.
Another quick update. I struggled getting anywhere loosening the copper to iron joints, so I cut again. I may approach the clean up as @GW mentioned, but with a dremel.
Below are close-ups of the outlet where I will end up putting the T.


So to my next set of questions.
At this point can I skim the system while I figure out obtaining parts? I found the installation manual with instructions on how to skim, I could do most of it until the blow down I suppose.
Should I / can I remove the jacket enough to get to the bushing in the above pictures? Do pipes get threaded both ways? I feel like lefty loosey is tightening the copper.
Whats the best way to measure pipe length so I can order parts accurately?
Thanks.
Tim0 -
the new pipe and dope will bring new oil with it so there isn't a whole lot of point in trying to skim until you re-pipe it.
I think that is a 2.5" x 2" bushing and you should use a 2.5" tee at least for the branch that becomes the riser and the nipple that goes in to the boiler. the idea of that riser is to slow the steam velocity down and let most of the water fall out of it, the smaller riser like it has now will pull more water up in to the header.
1 -
For Dunkirks use a 2 1/2 out of the boiler and the riser. However, in order to properly skim all section of the boiler, the skim port should reduce down to 1 1/2 inch because if you look in the boiler you will see that the bottom of the nipple ports are above the bottom of the 2 1/2 inch outlet pipe. The skim set up that Dunkirk recommmends has been wrong for decades.To learn more about this professional, click here to visit their ad in Find A Contractor.
 2
2 -
For all the Dunkirks we see here piped with a 2 1/2 x 2 bushing, and some wanting to correct the piping, removing that bushing could be a real chore.
For this HO it looks like an iron bushing with the remains of the copper male adaptor inside. Sawing carefully he might be able to remove the copper leaving the bushing.
I wonder about leaving the bushing and then short nipple to an increaser coupling to get to 2 1/2".......there is already a severe reduction in the boiler with those push nipples. Would a short bottleneck create much more problem if one went to 2 1/2 right away? Especially if using both sides for supply.
I noticed that reduction in the internal supply nipples years ago and posted about installing the 1 1/2" reducer for skimming.1 -
I am in the same boat with my Dunkirk near boiler piping having been bushed from 2 1/2 down to 2. I want to correct it but was wondering how difficult it would be to remove the bushing. Can't stand that installers can't follow instructions. Unfortunately it was from the previous owners and I had no say nor new better upon moving in.JUGHNE said:For all the Dunkirks we see here piped with a 2 1/2 x 2 bushing, and some wanting to correct the piping, removing that bushing could be a real chore. For this HO it looks like an iron bushing with the remains of the copper male adaptor inside. Sawing carefully he might be able to remove the copper leaving the bushing. I wonder about leaving the bushing and then short nipple to an increaser coupling to get to 2 1/2".......there is already a severe reduction in the boiler with those push nipples. Would a short bottleneck create much more problem if one went to 2 1/2 right away? Especially if using both sides for supply. I noticed that reduction in the internal supply nipples years ago and posted about installing the 1 1/2" reducer for skimming.0 -
From what I understand, the standard package is the boiler and 2 reducing bushings around Chicago. If you keep the 2 inch risers ( using both of them), I would certainly want a good 3 inch header with a big equalizer to dry out the steam.... like the side tapped Utica's.To learn more about this professional, click here to visit their ad in Find A Contractor.0
-
Are the reducing bushings part of the boiler kit from the factory or furnished by the supply house?
Any brand or just Dunkirk?
IIRC, there was a newer Dunkirk that called for 2 2" side connections and 2 1/2" header?
fxrgrunt; 2 " is less money and more available than 2 1/2".
Also, most people only have a pipe threader that does 2" max.
0 -
They are furnished by the supply house for Dunkirks. I've only bought 2 Dunkirks in the last 15 to 20 years when I was looking for an economy alternative to the Peerless 63/63 that we use most of the time.
I had very bad experience with incorrect installation manuals and bad factory support and stopped using thier products. I found once you have to pipe up 2 x 2 1/2 inch risers on all but the smallest 2 Dunkirks, the L+M is almost the same as the Peerless with a single 3 inch riser. Dunkirk seems to have really jacked up their pricing and are no longer competitive in the economy boiler market.
I think I saw that too...2 - 2inch side connections, but I think they are back to 2 1/2 inch. Also, the recommended piping has changed to using both 2 1/2 inch risers on anything 150,000 btu input and up. It used to be that a single 2 1/2 inch riser was all that was recommended for all sizes.To learn more about this professional, click here to visit their ad in Find A Contractor.0 -
You could do the same thing to remove the 2 x 2.5 bushing as well.JUGHNE said:
For this HO it looks like an iron bushing with the remains of the copper male adaptor inside. Sawing carefully he might be able to remove the copper leaving the bushing.
It probably isn't a great idea but if you did it you would have to use a tee with a 2" run and 2.5" branch(or a 2.5 x 2 reducer in the riser right at the tee with a close nipple) so the reduction wasn't in the horizontal so it wouldn't trap condensate at the bottom of the tee.JUGHNE said:
I wonder about leaving the bushing and then short nipple to an increaser coupling to get to 2 1/2".......there is already a severe reduction in the boiler with those push nipples. Would a short bottleneck create much more problem if one went to 2 1/2 right away? Especially if using both sides for supply.
0 -
Or a 2 x 2 1/2 eccentric coupling on the horizontal.
They do exist somewhere.0 -
Found one on ebay. Not sure if the link will work.
https://www.ebay.com/itm/2843738290
65?chn=ps&norover=1&mkevt=1&mkrid=711-117182-37290-0&mkcid=2&itemid=284373829065&targetid=1263094004306&device=m&mktype=pla&googleloc=9005552&poi=&campaignid=10454521886&mkgroupid=121089752846&rlsatarget=aud-412677883135:pla-1263094004306&abcId=2146002&merchantid=101566576&gclid=Cj0KCQjw-4SLBhCVARIsACrhWLVze3meQMsqgooXggONBCYq4Lev3pfJYEtps_refEj7poSNoT0yAdkaAt8EEALw_wcB
0 -
Or cut out the bushing and do it right. will cost a whole lot less than that fitting too.1
-
For those interested, here is a cleaned up link to the eccentric coupling. https://www.ebay.com/itm/284373829065
I appreciate all the discussion around this.
As an FYI the boiler is piped to both outlets the same way: 2.5" x 2" bushing to 2" copper.
I want to do the first outlet correctly since I'd like to redo all near-boiler piping in the future (there's plenty wrong).
Didn't have any real progress today on removing the copper+bushing. Will probably pickup some PB Blaster tomorrow, remove the sight glass, etc. to be able to open up the jacket a bit and give it all another go.
Cutting out the copper from the union bushing is eating up my Dremel wheels and I haven't found my super heavy duty ones. I do have a Ryobi 18V reciprocating saw but feel like it might be too jumpy for this work or I need to get a purposed blade.
I already know the answer but for sake of discussion... in the event I had to get this running ASAP I could, in theory, skim with what I've got now, figure out how to plug the open outlet and open union, and run on just the other outlet for the winter? Seems like many of you have probably seen worse...0 -
I would say you've cut it apart for a reason, you are having a problem, it isn't working well the way it currently is, so I would match the tapping up to where the mains connect at least or make it so you can connect to it full size as you replace the rest of it.
You can cut the bushing with a reciprocating saw if you are very careful, you have to pay very close attention to how deep the blade is and if it is parallel to the threads. If you do cut in to the threads a little you can probably still get it to seal with teflon tape and/or ball wicking. You would cut 2 slots then break that wedge out with a cold chisel.
The more cautious approach would be to use a hacksaw blade in this type of frame:
https://www.supplyhouse.com/Lenox-20975-975-Compact-Hand-Saw
If you only use one tapping and it is reduced your carryover problems with water in the mains which i assume is why you embarked on this project in the first place will be much worse because all of the output of the boiler will have to go through that one tapping and the capped part of the system won't be there to consume some of the steam produced.
1 -
Sawzall cutting carefully in 2 or 3 spots. Small Chisel and hammer until one section moves. Your going to nick the threads so a cheep pipe Tap can clean up the threads.
That's at least a 2 beer job!1 -
NYtimebomb, are you currently using both steam outlets?
From your pictures I only see one riser.
Just some trivia from the past postings on the Wall:
Icesailer, long ago poster, said for boiler plugs he had used a hole saw a little smaller than the plug. Just drill thru and you are left with a ring of threads to cave inward. It would need to be the right size and perfectly centered. I would suggest a piolet hole first.
Personally I have note done this but I can imagine it would take all of at least one hole saw, maybe two. 2
2 -
Thats interesting. I might try that sometime.JUGHNE said:NYtimebomb, are you currently using both steam outlets?
From your pictures I only see one riser.
Just some trivia from the past postings on the Wall:
Icesailer, long ago poster, said for boiler plugs he had used a hole saw a little smaller than the plug. Just drill thru and you are left with a ring of threads to cave inward. It would need to be the right size and perfectly centered. I would suggest a piolet hole first.
Personally I have note done this but I can imagine it would take all of at least one hole saw, maybe two.0 -
Using the reciprocating saw made removing the copper from the union joint much easier. A couple cuts, a flat headed screwdriver and some wacks with a hammer while the copper was still warm... I cut until I started seeing the very edge of the thread.

JUGHNE, both outlets are connected, but as you can see quite incorrectly...
I also discovered this bushing on the riser.
I did make progress on the one outlet. I managed to unscrew the copper from the bushing. I'll continue to work on the bushing but will have to call it this weekend whether or not I cut it out.

0 -
If you have luck getting that 2-1/2"×2" bushing out @The Steam Whisperer brought up a good point about bushing down the skim port. If you try skimming from the 2-1/2" tapping you will only be skimming mainly the end section. On the larger Dunkirk D249 series boilers they actually tell you to bush down the 4" outlet for skimming. For some reason they don't tell you in the PVSB series manual.0
-
Update, ended up cutting out the bushing. Definitely got some of the internal threads of the outlet. Did I do too much damage?

My suggestion for anybody doing this in the future is if you think you're at the threads you probably are. Here was probably my best cut.
Here I definitely went too far.
0 -
Even with Lots of practice you could accidently cut into the threads. Take your time on the other side. You can always cut more but you can't cut less.0
-
I don’t see a problem.Run a tap to clean it up. I’d use never-seize on the threads and big wrenches.0
-
I havr nicked the threads plenty of times. Teflon tape and pipe dope and you will be fine
 1
1 -
Your 3rd to the last picture demonstrates why one needs to use both side outlets.
And at 2 1/2".
It looks like a narrow hallway leading to a large fire escape door.
The people/steam hurrying to escape will trip over each other with only one "door" open on one end.1 -
You need to wick the threads. There’s a very recent discussion on here about it.
A very simple way to do it is this: take Teflon tape and tear off about 18”; twist that tight until it looks like a string; wrap that Teflon string into the male threads; repeat as needed to fill the threads. Then at least 8 wraps of Teflon tape followed by a high quality dope like Slicktight, Realtuff or Block.
It won’t leak.Bob Boan
You can choose to do what you want, but you cannot choose the consequences. 3
3 -
Here's a preview of the new piping. The 2.5" Tee is going to be the hardest part to tighten as it hits the sight glass piping. Any suggestions?
Also the existing riser (that will be replaced in the future) is 2" so I that is why there is a decreasing coupler in the mix.
 1
1 -
Remove the Sight Glass.
C A R E F U L L Y!
 1
1 -
I'd make the 2 1/2 nipple as long as possible to slow the velocity for as long as possible. It may help keep more water in the boiler, particularly if the boiler is under 200,000 input and you use both 2-1/2 inch risers.To learn more about this professional, click here to visit their ad in Find A Contractor.2
-
If you can bring that riser up to a reducing tee or reducing ell instead of reducing it in the middle.2


Categories
- All Categories
- 87.7K THE MAIN WALL
- 3.3K A-C, Heat Pumps & Refrigeration
- 59 Biomass
- 430 Carbon Monoxide Awareness
- 128 Chimneys & Flues
- 2.2K Domestic Hot Water
- 5.9K Gas Heating
- 121 Geothermal
- 170 Indoor-Air Quality
- 3.8K Oil Heating
- 79 Pipe Deterioration
- 1.1K Plumbing
- 6.6K Radiant Heating
- 396 Solar
- 16K Strictly Steam
- 3.5K Thermostats and Controls
- 56 Water Quality
- 51 Industry Classes
- 51 Job Opportunities
- 17 Recall Announcements