dealing with twists in the pex , not staple up. I have Omega extrusions now. YAY!

We started pulling the pex in today. We have about 2/3rd of a loop in and the tubing is getting some twists in it. What is a good strategy for dealing with that? We have staple up plates to go over it and thought we would stop pulling it in and start chasing it with the plates.
The pex is legendflex 1/2" from legend valve. It's a 3 layer pipe with the oxygen barrier covered with another layer. It does bend a tight radius and we are not having even a hint of kinking with it.
Comments
-
You have to hold the pex in one arm & flip it as you go. You'll feel it fighting you as it goes down...that is the time to flip it. Mad Dog
 2
2 -
Its easiest if you keep the roll of pex on an "unsspooling" reel. Rent or buy one, or make your own. The pex should NOT have any "stored twist" in it as you put it in place.
 2
2 -
This. Never lift it off the coil — always unspool. This also goes, by the way, for electrcial wiring… rope… cable…
Br. Jamie, osb
Building superintendent/caretaker, 7200 sq. ft. historic house museum with dependencies in New England 3
3 -
You can keep your spools & uncoilers...Ive used them all. Prefer my own arm...Done small and larger radiant & snowmelt jobs this way. Mad Dog
0 -
Thanks guys. I tried threading it through from one end, and not pulling loops through from the equipment room and enough for the home run as I have seen on countless videos now.
😩
My brothers and I got our **** kicked!
Now I get to pull it back out, re-coil it, actually figure out the turn back point and start over.
@Mad Dog_2 that is how we laid the floor in, and the ground loops. We rolled it out and flipped it when it asked for it. Thank you.
The staple down plates I got from Vevor are a joke. Nowhere as thick as advertised. As seems to be the case for me, I didn't know again what I didn't know.
We have switched gears and are now getting pricing on extruded aluminum plates like the uponor joist trak and the Legend duo, and the thermofin out of Montana.
I may just coil up this legenflex and save it for the next slab job, and switch to 3/8" as @hot_rod suggests in many cases. I think th legendflex is fine, but we are not spring chickens and any easy button I can push at this point in the build, I may push.
 1
1 -
Thanks guys. I tried threading it through from one end, and not pulling loops through from the equipment room and enough for the home run as I have seen on countless videos now.
Depending on your layout you will need a twist occasionally. With no twist at all you will be fighting. Like mad dog said you can feel it
The uponor extruded staple up (although “screw up” is a more accurate name but not desirable for marketing reasons) performed amazingly good in my deep personal experience of one install.
NJ Steam Homeowner.
Free NJ and remote steam advice: https://heatinghelp.com/find-a-contractor/detail/new-jersey-steam-help/
See my sight glass boiler videos: https://bit.ly/3sZW1el1 -
Thanks @ethicalpaul I have read some of your other helpful posts. I just got here. I am sorry I have two posts going in hydronics I suppose I will pick one and run with that. If my calcs of ~15BTU per SQ foot are good, my gut says switch to 3/8" tubing and keep the 250' total run lengths including the return. in extruded omega plates of course! I found a post with an IR study here from a while back and it is amazing how much better the heat is extracted from the tubing.
I made a fundamental error. I viewed the PEX as readily sending heat out into the bay and the staple up plates as a way to secure it. PEX does not readily "send the heat out". The tight fitting Omega style plates EXTRACT it out.
The good news is we figured it out on the first day, and that day included doing a bunch of other things like some joist blocking and squash blocks and routing plumbing through before totally contaminating the field with runs of PEX.
 1
1 -
Thanks for your kind words
I made a fundamental error. I viewed the PEX as readily sending heat out into the bay and the staple up plates as a way to secure it. PEX does not readily "send the heat out". The tight fitting Omega style plates EXTRACT it out.
This is a pretty common misunderstanding I think, nice job figuring it out quickly! I think I have read about people just chucking it into the joist bays.
NJ Steam Homeowner.
Free NJ and remote steam advice: https://heatinghelp.com/find-a-contractor/detail/new-jersey-steam-help/
See my sight glass boiler videos: https://bit.ly/3sZW1el1 -
I was not "chucking it in" I was going with a single source of information I fixated on. Radiantec uses staple up plus the foil plus the insulation method. I read all their info and was fat dumb and happy with it. Now I feel I have a better handle on it thanks to this site. I think the money up front for good heat extraction will pay dividends on lower SWT and higher efficiencies.
The heat pump is an inverter unit and I think it will run an ODR curve very well indeed.
ODR curve was just one bit of new information I picked up here.
I found this in the manual and if I can tweak the graph points it will do what I need.
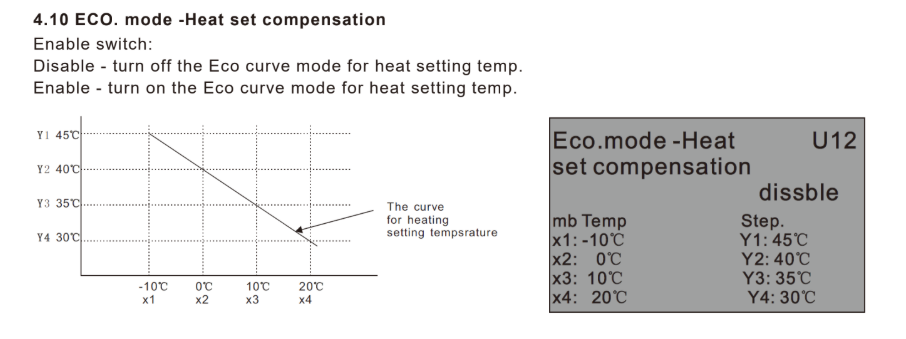
I can work with the X-axis values as they are. My heating temp is 23F so -10 C is not terribad.
0 -
By his use of “chucking it in”, I think Paul was referring to installs which completely ignored any manufacturer instructions. Not your specific install.
learning when to stop and try another approach reflects good judgement which in my case is only developed by bad experience. 😎2 -
yes I was just fleshing out how I got there and really how happy I am to be Here.
2 -
Rent or borrow an uncoiler, it makes it much easier to work the pex.
In a bind to do my own shop, I threw together this uncoiler. I made this with my shop stool and a bucket.
Getting and keeping the pex warm helps a lot, even out in the sunshine for an hour makes it easier to "loop"
 Bob "hot rod" Rohr
trainer for Caleffi NA
Living the hydronic dream3 -
Sometimes when you get yourself in a bind, or twist in this case, a coupler doesn't hurt. Not a fan of buried fittings but sometimes it is inevitable like when you reach the end of the spool and still have some length to run. Unlike a slab, at least with staple up, you can always get to the fitting if things go south.
Recently was pulling some pex, used a piece of 2x4 between two shelves to hold the coil up. Works in a pinch.
Important part with staple up is to air seal the rim joist area. This means spray foam or rigid foam sealed in place with canned foam. Air leaks there, besides increasing heat load, reduces the amount of heat you can get out of your floor heat, bad air leaks might mean the floor heat won't be noticeably warm.
1 -
It is new construction with ICF basement. The top of the pour was OK, but I dialed it in with a laser afterward so the sealing foam under the sill was tight and even.
The east end is hung on ledgers so I have walk out entries back, front, and carport. No steps.
The floor I can heat there is 15" from the outside wall line.
Then I stepped the stemwall down to acommodate traditional plate and rim boards, on the daylight end. I'll work at sealing that up more. The blower door test will tell the tale.
 1
1 -
Radiantec…the Scourge of the hydronic radiant heating world.
 2
2 -
A coupling or two is not a big deal. If you can use and expansion type coupling, I doubt you could even notice any pressure drop. Watts/ Heatway used to sell spliced Entran at a deep discount. The couplings were sealed under a shrink sleeve.
Bob "hot rod" Rohr
trainer for Caleffi NA
Living the hydronic dream0 -
An uncoiler is NOT needed. We got rid of ours long ago. Pull off several coils, flip the roll, now the coils will be coming off the opposite side of roll and will "cancel out" the coils from the other side. It is the same principal as reverse wound boxes of wire. Most times I only flip the roll approx every 50 feet of tube but each person needs to find their way.
1 -
I stopped by the office and they have two of these that I can use.
I spoke to Brad at Radiant in Bozeman. Nice guy. he said they had some 3/8" ThinFin C that had been stored in the wet and had some surface corrosion that I could get at a discount. if it is not in the "C" I don't care how it looks as long as it does the needful.
It will look great after the insulation goes over it and the sheetrock :)
About insulation: I have a kitchen island I don't want to heat, but I like the idea of just keeping the PEX grabbed over the whole length. My thought is to go ahead and put the track in and run it, but omit the insulation right under that island. That way the heat will be halved at least going into the subfloor. It is a conditioned basement below and that heat will not go to waste.
0 -
The first snowmelt we did, the Rep put 3!!!! Uncoilers on the material list. They were NOT happy when we cut the fat outta their Golden Egg list...ha ha. Mad Dog
2 -
Maybe leave the plates out from under the island or any cabinets really. The tube can still go across the area, but without the conduction, the heat output will be minimum.
Bob "hot rod" Rohr
trainer for Caleffi NA
Living the hydronic dream 3
3 -
I don't think this will halve the heat. The heat is traveling primarily via conduction, not radiation or convection. That part that is convection is going to tend to stay up in the joists anyway. But as others have said, it depends on your conditions in your basement. Since you say it's a conditioned space below you might find almost all the heat is going to go into the floor that would in the insulated areas.
@hot_rod 's suggestion (that I failed to see at first) is great though, leave the plates out in that area and you'll be gold
NJ Steam Homeowner.
Free NJ and remote steam advice: https://heatinghelp.com/find-a-contractor/detail/new-jersey-steam-help/
See my sight glass boiler videos: https://bit.ly/3sZW1el1 -
I thought of that. I figured it would be better to secure it as you had explained that it basically traps the tube so it can't walk, and just jacks some more internal stress into it rather than actually growing in length.
I see that a 4' section is not going to grow much so I was over-thinking that process. I had experiences with overheating a storage area before. My ski boots were under an old school waterbed that kept the space very warm. This accelerated the plastic degradation. Many years later I went skiing and did not notice the microcracking of the plastic.
On the first turn the boots just exploded. The entire sole section snapped off the upper and I went sailing down the slope like superman, skis sitting there in the snow. What do you do? pick up all your plastic litter and then ride the chair back down to rent some boots and skis.
 1
1 -
2400' of thinfin 3/8" is on the way. I'm stoked about getting this rolling, or unrolling as it were.
They said that before they had the extruder punch holes in it, they fastened it up with staples. I have access to a couple of narrow crown staplers and 5/8" staples so we might give that a go. Seems like it would be faster than 6000 screws.
0 -
I would consider mechanically, what a screw does that a staple can't. The time to turn in 6000 screws is nothing compared to the effective heating over the lifespan of the system. Don't be time wise and heating foolish. Ask yourself: "Why did the plate mfg. switch from staples to screws"?
2 -
unless you have a hole , the self drilling, drill point screws tend to push the plate away from the floor
Two pneumatic tools that work, a coil roofing nail gun with 3/4” nails. Find cheap tools at pawn shops. These two Makitas were pawn shop nailers , they have worked well on many jobs

Or the heavy duty Senco SNS 45XP will shoot thru the extruded plates.
If you do drill the plates and screw get a self feed screws tool

I guess it just depends on how fast you want your go
A short piece of 1/2 copper tube is a good alignment tool, solder a tee and make a handle to push it in and out
Bob "hot rod" Rohr
trainer for Caleffi NA
Living the hydronic dream1 -
The manufacturer rep mentioned it to me. I have some time to research it. A narrow crown staple has some great holding power. They are a bugger to extract.
Their motivation to put in screw holes may have been market driven. Everybody has a screw gun, not everybody has a good stapler and compressor on site.
0 -
Ring shank is another fastener with great holding power.
0 -
pretty much all nails and staples have a coating that acts as a glue, even 16d coated sinkers, for hand nailing, are hard to pull out with that coating, and drive in easier😉
The roofing nails I showed above are coated and ring shank
Home Depot, Lowes, Menards all rent compressors and air tools
The main issue with extruded plates is the tool has enough power to blast through. I had the Senco rep come to a jobsite and demo all the staplers, only that SNS 45 had enough fizz go punch through without damaging the tool.
I have used drilled plates and hex drive zip screws on small jobs, a bathroom for example, get a pair of gloves with magnetic backs to keep the screws at your finger tips
Bob "hot rod" Rohr
trainer for Caleffi NA
Living the hydronic dream2 -
Plates are here at last!
Stucco is done and we installed basement windows today. Moving along. Next big doings outside require the excavator, and I have a few weeks of Real Jobs to do with it. I will come up and install plates on weekends.
0 -
the plates have 8 holes, look like #8 would fit.
I have the simpson Quick drive subfloor setup. Problem is the shortest screws of any type are 3/4".
With 23/32 subfloor, I'd rather use a 5/8" fastener.
For hand jobbing this little #6 x 5/8" has a sharp point on it. So many short ones are self drilling for sheet metal and you waste half the length in the wood.
0 -
A basic 3/4 Zip screw should work without poking through.
I know those special drive screws get $$.
I also found with the auto-drive screws it wasn't so easy to hit the hole.
 Bob "hot rod" Rohr
trainer for Caleffi NA
Living the hydronic dream1 -
A good, lightweight impact driver, and a tool belt.
3/4” Simpson stainless screws.
You can hit a rhythm that helps to pass the time. With some skill, the process really starts moving. Send a screw into each end of the plate to keep the plate in place. Send home the remaining screws after the plates in each bay are set in place.
Swinging hammers and fitting pipe…bringing the dream to life
1 -
Good points!
a compact 1/4" 12V Dewalt impact is fairly light. A magnetic wrist band keeps the screws close to the tip of the 1/4" magnetic driver, so very little wasted motion.
Less poked fingers from keeping zip screws in a tool bag on your belt :)
 Bob "hot rod" Rohr
trainer for Caleffi NA
Living the hydronic dream2 -
I'll test fit a plate. I think they won't take a 10. I saw some SQ drive 8's with pan heads. I got to thinking about the CSK screw in my link above. They tend to move things more.
0 -
Found this #8 x 5/8" zip-R with a sharp point and all threads and #2 Robertson. $19.28 per thousand. I like it.

 2
2 -
I wanted to follow up on the VEVOR staple up plates that I initially purchased. I got a caliper and measured them after getting the impression they were not .016
How about .012? I was mad. This was a deliberate profit taking lie and I called them out on it.

I started a return and they went round and round, and came out and said that .012 -016 was in the normal situation, within the normal range of error and not to be concerned.
I did not waste time and got VISA involved.
Then they tried to offer me 10% 20% 50% to just keep and use them. Each time I said no, I was not using them. Eventually they gave me a full refund and did not send me shipping labels, so I have 1200 of these 2' plates that are only useful when trapped between some wood, as @hot_rod had stated in another thread.
I'll seal up the boxes and try to find a good home for them.
0 -
How well the channel grips the tube is also critical. That is where most of Thermo-Fin the knock-off are "value engineered"
Anywhere they can take aluminum out of the product saves them $$.
Any mention of the grade or temper of the aluminum? That is a critical part of the design also. I doubt you could talk with anyone that would answer those questions??
I watched some Thermo-Fin get manufacturered once. A giant hydraulic cylinder pushes a heated ingot of aluminum through a die. The dies do wear and need to be replaced when thickness varies like yours.
It comes out of the die like a soft noodle, then gets tempered and sheared to length. I got a trailer load of 20' pieces!
Hard to find out much about Vevor?
 Bob "hot rod" Rohr
trainer for Caleffi NA
Living the hydronic dream1 -
they are soft sheet metal. Will not grab anything ever.you could put them face up in channels and then lay the PEX in there, and sandwich the tubes in with wood above. That is all they are good for IMO. If somebody wants them for that purpose they can just pay shipping. Other than that, they are good for peeling all that blue plastic off and melting down for a good purpose.
0 -
stamped sheetmetal? They must have started with different gauges of metal.
Sheetmetal, steel or galvanized is usually sold by gauge size
 Bob "hot rod" Rohr
trainer for Caleffi NA
Living the hydronic dream0 -
gotta be 30 Ga then. It was a bridge too far.
Now I have extruded goodness from Montana.
1


Categories
- All Categories
- 87.3K THE MAIN WALL
- 3.2K A-C, Heat Pumps & Refrigeration
- 61 Biomass
- 427 Carbon Monoxide Awareness
- 119 Chimneys & Flues
- 2.1K Domestic Hot Water
- 5.8K Gas Heating
- 114 Geothermal
- 165 Indoor-Air Quality
- 3.7K Oil Heating
- 76 Pipe Deterioration
- 1K Plumbing
- 6.5K Radiant Heating
- 395 Solar
- 15.6K Strictly Steam
- 3.4K Thermostats and Controls
- 56 Water Quality
- 51 Industry Classes
- 50 Job Opportunities
- 18 Recall Announcements