Losing 10 gallons/month

My tentative plan is to replace the current steel pipe with copper and add a couple flush valves on each end. Not sure how I make the transition but I'd look to use 1.5” brass unions so corrosion doesn’t occur.


Comments
-
Did you flood the boiler to make sure there isn't a leak above the water line and it isn't going up the flue?0
-
If it loses water when you're not using it then it's your return.Contact John "JohnNY" Cataneo, NYC Master Plumber, Lic 1784
Consulting & Troubleshooting
Heating in NYC or NJ.
Classes

 3
3 -
Losing, not loosing


 4
4 -
A few more months at that rate of loss -- since it's been going on for a while -- won't likely do that much more damage. But the sooner the better...Br. Jamie, osb
Building superintendent/caretaker, 7200 sq. ft. historic house museum with dependencies in New England0 -
It's interesting. It looks like they repiped the above-ground part of your wet return at the same time they installed the boiler. And if they did that, it must have been because those pipes were rotting out. So I wonder why they didn't think to test or just replace the underground part. (I mean, the obvious answer is $)
Here's the crazy thing I would do. Go ahead and chisel out the mortar patch and purchase and size/cut your copper now during the cold season. On a warm weekend repipe the copper below the floor. Instead of mortar, cover it with pressure treated wood or composite deck material. Make the cover be upside down U shaped so it doesn't put force on the pipe. Plumb it with isolation valve(s) and garden hose bibs for easy flushing (I see one is already there). You don't have to bury the pipe in dirt, you can let it sit above the dirt and below the deck bridge you made for it.
It's so nice having the return below grade I think all this is worth it. You'd also be able to see if that really was where your leak was and then post pictures of the rotten pipe for fun. The best thing about working on your own system is you get to do fun things like this.NJ Steam Homeowner.
See my sight glass boiler videos: https://bit.ly/3sZW1el0 -
@impossible
Dig it up (it's been dug up before so the diggings easy) But I wouldn't dig it until I had the new material on hand...just in case. Just digging may finish the old pipe off.
Get your new material and do it as soon as the weather is warm. Dig the trench out big enough so you can put armaflex pipe insulation on it. This will keep the pipe away from the concrete and the dirt 4
4 -
That's a great tip. I'd even recommend insulating wet returns that aren't buried. When my wet return rotted out I noticed that most of the corrosion had happened on the outside of the pipe. Basements tend to be damp, and water condenses on the return piping when it's cold, and since there's plenty of oxygen available, it rusts. Insulation will make the pipe last a lot longer.EBEBRATT-Ed said:Dig the trench out big enough so you can put armaflex pipe insulation on it. This will keep the pipe away from the concrete and the dirt
Just another DIYer | King of Prussia, PA
1983(?) Peerless G-561-W-S | 3" drop header, CG400-1090, VXT-240 -
-
From the looks of those Mains, it looks like a counter flow system. I think I even see a drip on one of the mains. What do those wet returns go to? Do the mains change pitch and become a parallel flow somewhere along their path?0
-
It’s time to do the overfilling test, recommended above, because that amount of water loss is unnatural.
Fill it up, when only warm to the header, where you can feel the cold water, and let it rest, for an hour or so. Any boiler leaks will be seen in the firebox, or on the floor.
Don’t forget to drain the excess water out when turning it back on.
Do a survey of your radiators to find their EDR, so you can size the replacement, if it appears you have a boiler leak.—NBC0 -
Rather than bury the pipe again why not run it along the walls above ground. You can support the pipe with J hooks from the wall.
There may be a short run of pipe that may need to be buried you can bury the copper tubing below grade but cover it with clea sand. Where the copper pipe comes above ground use pipe sleeves to protect the tubing from the concrete,
JakeSteam: The Perfect Fluid for Heating and Some of the Problems
by Jacob (Jake) Myron0 -
Thank you all for all your suggestions and help. I am not sure I would be able to do this the right way without this forum.
I finally got around to digging up my basement floor. Not to my surprise, I found a 3/4 inch hole on the underside of the buried pipe. I could now use some suggestions on which materials I need in order to repair the problem. I did extensive googling and learned that I should replace the iron pipe with copper, add a flush valve on each end and use 1.5” brass unions so corrosion doesn’t occur between the two metals.
There have been some great recommendations here but since this is a well traveled area in our basement, I've decided to bury the line again.
I am hoping you can answer the following questions…
1) What size copper pipe should I use? Match the current 1.5”?
2) I don’t know what a flush valve is. I googled it but all I come up with are toilet valves.
3) Should I use brass unions to connect the brass to the current piping?
4) Where would you cut the line? ABC? 123?
Thanks again for any tips you may have. I will continue to post pictures of this project for future reference.
Cheers


0 -
1.5 inch is fine. For your backfill, though, use clean sand -- no concrete. The pipe will last longer. You can place concrete over the top a few inches up for the floor, but make sure the sand is well compacted before you do.
By flush valves in this application (yeah, Google would come up with toilets...) I'd recommend full port ball valves, but with an arrangement at one end so that you can also hook up a hose and blast away.Br. Jamie, osb
Building superintendent/caretaker, 7200 sq. ft. historic house museum with dependencies in New England1 -
replace size in kind.
Be sure you have valves installed to isolate the line and hose valves to be able to flush out the wet return when needed,
Jake
Steam: The Perfect Fluid for Heating and Some of the Problems
by Jacob (Jake) Myron1 -
Isolation valves on each end. Then a Tee just below each valve that has a valve and hose fitting.
IIWM, the one at boiler would be such that you can flush all wet return lines, including the exposed above floor lines, from the other end without pushing all the junk into the boiler.
You can flush from either direction if needed.
I use washing machine hoses for my double female connections.1 -
Removed most of the sections, pics below...


0 -
I was able to remove most of the old work but cannot get the last portion off. It is my understanding that I can't simply cut the iron pipe and fit a new piece onto the cut end? I must unscrew leaving threads so I can screw a new piece back on? Well probably not a shocker but I'm having a hard time getting the old threads to break, at least with two 14" wrenches and a 2 foot "breaker" bar. I'm looking for any suggestions on how to unscrew the old pipe. Should I try heating with a torch? I'll keep hitting it with PB blaster in the meantime

0 -
Try unscrewing any of those 3 and replace from there. If you can unscrew that ell from the horizontal pipe you can cut the close nipple between the 2 fittings to unscrew it. Might just need longer pipes on the handle of the wrenches. Make sure the back of the wrench is seated on the pipe so it is less likely that you crush it. Heat could help too.
Could also cut the outside of that ell at the horizontal pipe with a hacksaw or grinder to just before you get to the threads and split ti with a cold chisel. Those fittings may also be the right kind of iron to shatter of you back it up with one short handle sledge and hit the opposite side with another one.0 -
Thank you mattmia2! The sawzall/chisel method worked great!
Going to take these old pieces to the plumbing supply center tomorrow so I can get my new parts....
2 -
Nice job! I used like a 5 foot "helper" pipe to break my 2" steam pipes. They really hold on.
NJ Steam Homeowner.
See my sight glass boiler videos: https://bit.ly/3sZW1el1 -
How'd I do?


Lucky I started this project, woke up this am here in NJ and it was 52 degrees. After I confirm my work is water tight, I will patch the floor and fire the boiler up. Is that all there is to it?
Thanks again for all the tips. The guys at the plumbing supply house loved the idea of wrapping the underground copper with Insulation.1 -
Looking good, although I would insulate the piping completely as it comes up though the floor (mitering the elbows).2
-
Bring the insulation out of the floor at the end and cut it so it butts together around the ell underground. The idea is to provide a barrier between the corrosive soils or concrete and the copper. Leave it sticking above the floor a couple inches.
 4
4 -
Thanks all. Back in business here.
Hope this thread helps someone in the future.
Cheers0 -
I don't see an isolation valve on the end where you cut the old iron 90.
If you connect house pressure to either hose bib then water/sludge could/will back up into your steam main/returns if your under floor pipe was slightly restricted.
If you do not have a valve on that side somewhere, I would cut one into the copper riser and then a hose bib below it for flushing.0 -
I for one would not use gravel or stones as the fill before re-cementing the floor.
fill the hole with sand (pre washed no salt in sand) then re-cement the floor. The cement is cheap enough. You can buy redi-mix at home depot or lowes centers. You do not need to add the gravel for a stronger Concrete mix as the basement floor is not a load bearing floor.
By the way the job you are doing is about as professional as it can get.
Nice work
JakeSteam: The Perfect Fluid for Heating and Some of the Problems
by Jacob (Jake) Myron0 -
Thanks everyone. I turned the boiler on and it filled up with 5 gallons of water. After four weeks it has not leaked so I feel good about patching up the floor. However, I have another issue that must be related as I have never experienced this before I repaired the pipe.
The boiler kick on over the weekend for the first time and has been making a loud banging noise. I confirmed the radiators are pitched properly and the valves are working. It seems like the noise is only coming from the two closest radiators to the system but I did only let it run for 10 minutes before I turned it off. The radiators throughout the house did get warm. I've read that the noise is due to water trapped in the pipes. Is there a valve I need to open to release the water? Any other suggestions welcomed.
Thanks
0 -
A banging noise -- if it's really water hammer -- is from water trapped in the pipes -- but it's not usually a valve. And it doesn't take that much water. Check the pipes leading to those two radiators to make sure that they are pitched so that the water can drain properly.Br. Jamie, osb
Building superintendent/caretaker, 7200 sq. ft. historic house museum with dependencies in New England0 -
Does the water line in the boiler surge? Did you get rid of the oils from that new pipe?0
-
Are those radiators on the main that this return was attached to? Is the hammer on the main that you worked on? When you installed that section of copper that is above the floor, did you raise the main to fit the pipe or make that vertical pipe a little taller than it was, changing the pitch of the main?0
-
I believe this could be the problem? The vertical copper piece may be too long. The water pitches back to the iron, not down to the new underground copper section. I will just undo the fitting, sawzall 1" off and resolder.Fred said:When you installed that section of copper that is above the floor, did you raise the main to fit the pipe or make that vertical pipe a little taller than it was, changing the pitch of the main?
1 -
But isn't everything in these pictures under the waterline?
NJ Steam Homeowner.
See my sight glass boiler videos: https://bit.ly/3sZW1el0 -
Is the boiler water oily from the work?
Single pipe 392sqft system with an EG-40 rated for 325sqft and it's silent and balanced at all times.
0 -
I'm not even sure if this matters but the old iron pipe pitches to the left. (A)ethicalpaul said:But isn't everything in these pictures under the waterline?

From the place shown in above photo, pipe runs horizontally about 15 feet, then turns up 90 degrees and runs vertically up to this area...
So quite simply, does the water need to pitch down to the underground return? My limited knowledge tells me that no steam travels through this piece so it shouldn't matter.
0 -
If the part where the pitch might have changed is under the water line, you are right, it doesn't matter.
If the change led a horizontal "dry" part with steam in it to change pitch, then that could matter.
You don't want any of the "dry" parts to be able to collect water.NJ Steam Homeowner.
See my sight glass boiler videos: https://bit.ly/3sZW1el1 -
If by waterline you mean the line in sight glass, then yes. The sight glass water line is about 24" off the ground and this run is about 9" off the ground.
I just ordered a couple new Hoffman valves to eliminate this possibility as the problem0 -
Yep, that's what I mean. When the boiler isn't firing, that water line is consistent everywhere in your system. If you have a laser level, you can mark it on all your vertical returns.
NJ Steam Homeowner.
See my sight glass boiler videos: https://bit.ly/3sZW1el0 -
I opened the new valve I just installed and I drained about 4 gallons of dirty water. Didn't notice it was oily.ChrisJ said:Is the boiler water oily from the work?
0 -
Two other tidbits of information I forgot to disclose...
Once I heard the water hammer, I removed one of the furnace air vents and waited about 30 seconds as air blew out. Later that day I noticed about 3-4 cups of water discharged from the water release valve shown in the picture above.
Today I opened the new water valve I installed near the floor and 4 gallons of water drained out thinking I was going to cut the pipe and lower it. Once I realized it didn't need to pitch, I filled the boiler to the point the sight glass was about 3/4 full. I turned up the thermostat and within 5-10 minutes the hammering came back and water started coming out the release valve. Any idea why water is pushing up that high? Sight glass is still at 3/4 full.
Here a small video clip: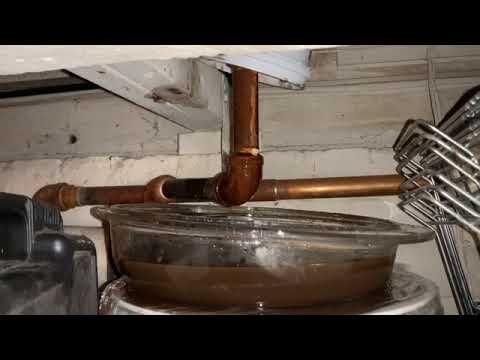 https://youtu.be/iz5et2-ZQHM
0 -
You need to skim water / oil off the top of the water, not drain from the bottom.
Single pipe 392sqft system with an EG-40 rated for 325sqft and it's silent and balanced at all times.
2


Categories
- All Categories
- 87.7K THE MAIN WALL
- 3.3K A-C, Heat Pumps & Refrigeration
- 59 Biomass
- 430 Carbon Monoxide Awareness
- 128 Chimneys & Flues
- 2.2K Domestic Hot Water
- 5.9K Gas Heating
- 121 Geothermal
- 170 Indoor-Air Quality
- 3.8K Oil Heating
- 79 Pipe Deterioration
- 1.1K Plumbing
- 6.6K Radiant Heating
- 396 Solar
- 16K Strictly Steam
- 3.5K Thermostats and Controls
- 56 Water Quality
- 51 Industry Classes
- 51 Job Opportunities
- 17 Recall Announcements