Welcome! Here are the website rules, as well as some tips for using this forum.
Need to contact us? Visit https://heatinghelp.com/contact-us/.
Click here to Find a Contractor in your area.
If our community has helped you, please consider making a contribution to support this website. Thanks!
Boiler short cycling and problematic radiator
Options

Nurb
Member Posts: 26
Hello everyone, I just purchased my first home (c1945) and have been trying to get the steam heat working as well as possible. I have no experience with plumbing, although I am mechanically inclined and good with automotive and electronics repair. The boiler is a Dunkirk model from the mid-80s and there are 5 (2 large, 3 small) radiators on the ground floor and 3 (small) upstairs. My investigation into the system began when the largest radiator on the ground level began spewing water out of the adjustable air vent. Apart from having a reddish brown tint the water seems to be relatively clean. I replaced that vent with a Gorton #5 but it still had the same issue. I noticed the pressure on the boiler's internal pressure gauge was reaching 7-8PSI and ended up replacing the (non-functioning) Pressuretrol from 1999 with a Vaporstat. With the pressure on the Vaporstat set to 1PSI this problematic radiator does not spew water but it also takes forever to heat (all the other radiators are fine). If I set the Vaporstat to 1.25psi or higher the radiator will begin shooting water out the vent again. Another thing to mention is that after running for a minute initially the boiler continually cycles on and off for about 20 second intervals. Any suggestions what I should do? Is the boiler over-sized for the home? Despite all this the system does still heat the house reasonably.


0
Comments
-
Do keep the vapourstat at 1 psi.
Are there any main vents on the steam pipes in the basement? You would find them near the end(s) of the steam main(s), after the last radiator takeoff. if so, what are they? If not.. there's more than half your problem with the cycling on and off.
The piping right in the area of the boiler ("near-boiler piping") isn't what it should be in several respects -- as I'm sure others will notice -- but I think we can let that go with a nervous laugh for the moment.
That is one big radiator. I suspect -- and will wait for your comment on main vents -- that the real problem, though, is that the other radiators may have slightly bigger vents than are really needed, starving that one of steam until they are all closed. However, without main vents -- or with inadequate ones -- there's no point in working on that. In the meantime, make sure that that one problem radiator is pitched slightly to the inlet end, and that the valve is fully open, and that the pipe in the basement feeding it has a good slope back to the main.Br. Jamie, osb
Building superintendent/caretaker, 7200 sq. ft. historic house museum with dependencies in New England1 -
You could find the instruction manual for that boiler, and see if the piping follows the factory instructions, for number of risers, pipe diameter, and height of the equalizer above the water level.
Side outlet boilers are very sensitive to the piping, and generally need both risers installed.
The water looks a bit dirty in the sight glass, and so a good drain and refill could remove any chemicals which may have been put in to clean the boiler, as a substitute for skimming. Skimming is best if you can find a suitable outlet.
A low pressure gauge, (0-3 psi), Tee’d off the Vaporstat, would enable you to be sure the vaporstat is properly calibrated.
Check the main vents on the dry returns to see if they are adequate. Generally, a Gorton #2 is good for 20 feet of 2 inch pipe. The radiator vents need to be more restrictive, like Hoffman 40’s—NBC
1 -
First thing is to locate your steam main vents.
You should have 1 on each main leaving the boiler,
perhaps at the ends.
You have some piping issues in the basement, but start with the steam main air vents.1 -
Thank you everyone, I did not see any steam main vents in the basement but will take a look again this afternoon... sounds like that is at least part of my problem. Should I replace the #5 vent on the large radiator with the spare Gorton#4 I have? I think the adjustable vents on the rest of the (smaller) radiators may be set too large, most are on full open or very close to it. Maybe I should purchase some #5/6 for the rest of the radiators?
I will look in to adding a low pressure gauge next to the Vaporstat and draining the water in the radiator.0 -
Your steam to the left side of the chimney might be a counter flow main with out a dry return. (the low point of the main is at the boiler so returning condensate is counter flowing to the steam.)
The one to the right looks like a parallel with a dry return.
(The steam and condensate water are flowing in the same direction and all the condensate returns thru the smaller pipe sloped back to the boiler)
Is this the case for the steam mains?
The main air vents should be at the end of the mains or where the return drops down to the boiler.
Which main has the offending rad connected?1 -
What kind and size vents are on the other radiators? In general the vents should set according to the size of the radiator, the length and size of the pipe from the steam main to that radiator. The vent rate is generally set by the volume of air in a radiator and the pipe that foods it - more air takes more venting.
So tell us what the other vents are and check for main vents and any possible place main vent might have been in the past.
BobSmith G8-3 with EZ Gas @ 90,000 BTU, Single pipe steam
Vaporstat with a 12oz cut-out and 4oz cut-in
3PSI gauge1 -
I'm going to take a close look later and will be back with pictures of everything.0
-
i'm having a hard time seeing a water level in that sight glass,
either that glass is dirty, all the way,
or the water level is up past the top, too high, and neds to be drained to 2/3s glass, or that line on the boiler.
what do you see at the boiler?known to beat dead horses1 -
In the original pictures the water is a little high. I drained the boiler this evening and the refilled... Still a little high here but the water looks cleaner. I'm assuming it will never look completely clear running through iron? I'm going to take pictures of the whole system tomorrow, ran out of time today.0
-
Do you have an automatic fill on that boiler?
or are you filling manually?
I see the water line now,
and I see the fill level marked on the boiler jacket,
no need to be above that line, nor desirable,
above that line is so close to the steam riser outlets that you're boiling is carrying water out with the steam,
the dirty water is contributing to the carry out also,
drain the boiler again, WHILE IT"S COOLED,
and refill again, WHILE IT"S COOLED, only to that marked water line,
Take advantage of that drain by the make up water line, where it meets the condensate return, you'll get ugly water from both the boiler, and the return line there.
and yes, you can see clean water, when you get there,
I think the boiler is just loaded up a bit, and can stand for a couple drains and fills,
and or a skimming also, do you see a skim port, I don't.
Does the water line bounce much in the sight glass when the boiler is firing?
more than an inch , or violence, is too much,
again, dirty water, and skimming as a solution.
you don't want high pressure, under 1 is good,
no need for 1-1/4, 1-1/2, or higher,
low = good, lower = better,
post a picture of your pressure control showing its settings,
finally, that rad, does that vent, vent ?
is it working?
might just need a faster vent there.known to beat dead horses1 -
I'll drain the boiler again one everything cools. I'm not sure what skimming is, but I've been draining from the blue valve. There is no automatic water filler but it does have a safety device that turns the boiler off if the water is too low. The water level does bob around a couple inches and sometimes completely fills up the sight glass, and sometimes looks turbulent (but the water level was too high to start). The boiler is running at 1PSI, I also took a look around and didn't see any steam main vents. The problematic radiator has a Gorton #4 (also tried #5). Thanks for your time and suggestions, I'll be back later with more info/pics.


0 -
ok, blue valve was the one I referred to for draining.
however, the active sight glass begs for skimming,
dirt and oils on the boiler water surface make the little steam bubbles angry,
skimming removes that surface layer,
you can search here for other threads on skimming, or,
that high brass hose bib valve on the back is as close as you're going to get,
ideally that reducing bushing would be a full size nipple, capped or valved, for better cross sectional water flow as you skim there, but that will work, just take longer.
You can't really skim thru that valve,
ideally, remove that valve, and add a short nipple, (and cap),
the valve restricts flow pattern, and makes it darn hard to be sure of the water line*, as that valve is constructed to turn down,
A nipple is easier to look into, and determine that precise fill setting, and flow rate, to optimize your skimming,
the cap closes the nipple when you're done.
*If the water level gets above the height of the nipple (valve) then the oils floating on top can't get out, so water level here is critical.
So, with the boiler off, remove that valve, add your nipple, and let it drain to your bucket,
the nipple (valve) is above your normal water line,
so you will open, ever so slightly open, the water feed, so you only allow a slow trickle out of the nipple, (high valve), the oils and scum on the top of the water will flow out this way,
this will take a while, hours, of painfully slow and precise filling, you want the water flowing out thru only half the cross section of the nipple (small valve),
You can also manually fire the boiler while skimming to warm / heat the water.
You're turning the service switch on, and off, you don't want to get to boiling, just hot, not steaming.
When you feel you're done, set the water level back down to that line on the boiler jacket, no higher.
Skimming can be a multiple session activity, you'll know your good when the sight glass stays calm,
or as a cool trick science project,
take some of that first skim water, and go boil it in your wife's least favorite pot, it will be all frothy.
then as you're a hour or 2 into it, boil another pot, less frothy.
Same thing is happening in the boiler.
and yeah, I don't see any main vents there either,
that problem radiator, is it close or far from the boiler?
the safety valve above the skim valve,
it should be mounted with the valve stem vertical,
less chance for crap to jamb or get stuck under the valve disc and seat if it was to open,
I think I see that you could reuse the fittings and parts there to get to proper orientation.
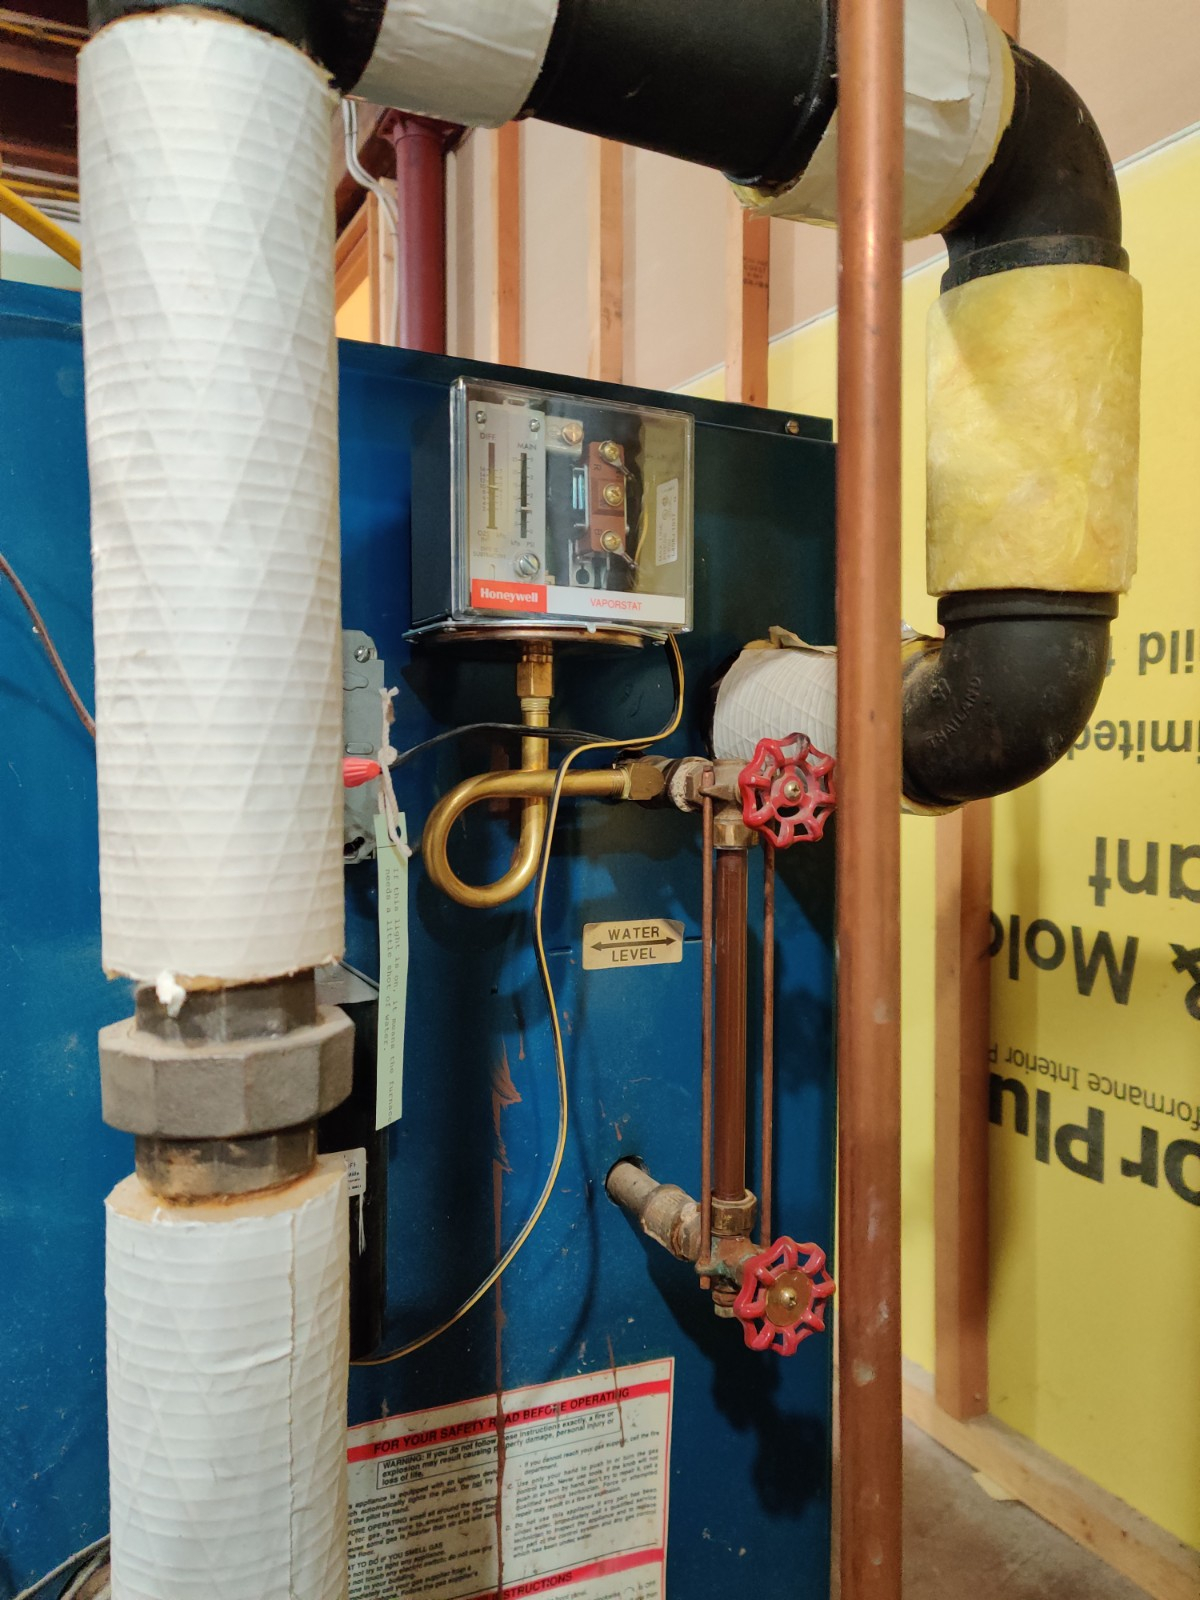
Vaporstat settings look,
the pigtail under it needs to be checked for clean and clear
(yearly) but the boiler isn't getting over your settings so you're good there for now.
known to beat dead horses1 -
Really appreciate the help, as mentioned I am new to all this and knew nothing about boilers/radiators a week ago. First off, I drained and filled the boiler 4 or 5 times and have the water looking a lot cleaner. It seems like the water is "dancing" only 1/4 inch when the boiler is running now. It seems like the pressure on the (inaccurate) syphon gauge is a notch lower now and the boiler will run maybe 40 seconds instead of 20 on it's short cycles. The slight glass is discolored and should probably be replaced because it makes it look a little worse than it really is. When installing the Vaporstat I replaced the pigtail (had to cut the old one to remove Pressuretrol) and build out with a couple brass elbows.
As far as your suggestion to add the nipple, could you show me on one of the pictures where exactly you mean? My current understanding is that I should remove the red valve on top of the sight glass?
Regarding the safety valve, this is what you are saying should be vertical?
The large, problematic radiator is probably the closet or second closet to the boiler. I think this pipe runs directly to it? The radiator is on the front wall of the house on the ground level, boiler is roughly in the middle of the house.
0 -
Looking at the left side of your boiler.
The garden hose bib up high on the left side of the boiler would be your skim port.
You need to remove the hose bib, if any reducer bushings come out with it so much the better.
Put about a 4" pipe nipple in that port, add a 90 to point down and another 4" nipple to direct water to the floor. Get a cap for that pipe size for when you are done. The hose bib will not flow water correctly for skimming.
Follow the instructions for skimming as above.
You are trying to float oil off the top of the boiler water, this has to be done slowly so as not to mix the oil and water.
Draining your boiler from the bottom might seem to clean it, but the oils will cling to the internal walls inside of the boiler and when you fill it again the oil is washed back to the top.
The pressure relief safety valve is on the top left rear corner of the boiler. That device should be such that the lever with the pin is on the top of the fittings. You want to keep the bottom of it down so as not to get junk under the sealing seat.
Then the discharge would point towards the rear wall, you need a nipple to clear the boiler jacket and use the 90 to point down.
It should then be piped to with in 6" of the floor.
If you read the tag/label on it, it should indicate 15# of pressure.
If it opens it will pass steam at that pressure and you need to direct it down to the floor. That looks like a plastic drop pipe on it now. Should be black pipe or copper. No threads on the lower end.
Leave the right side of the boiler alone for now.1 -
Ah, I think I understand now.

I think we may be making progress here because there is a definite improvement after just draining the boiler, and skimming sounds like it will only help matters.
While the safety relief valve should be corrected, am I safe in assuming it's not contributing to my problems at the moment? The tag on the back does indeed say 15psi.0 -
The relief valve is not adding to your problems.
Easy fix....2 pipe wrenches needed....minimum of 14" long.
Economy ones will work OK until they don't.
Unscrew the drop pipe, unscrew the relief valve from the horizontal nipple, unscrew the 90 from the boiler nipple.
Do not loosen the boiler nipple.....the reason for 2 wrenches.
Make sure the boiler nipple is clear, install the relief valve so it is pointing to the wall. The nipple in the 90 might be long enough to go into the valve with the drop pipe pointing down. Replace the drop pipe if it is plastic with black pipe length you buy at a big box store. Threaded on one end only, reamed on both ends.
Is your troublesome rad the last connection on the left main??0 -
Got it, my dad has very good (old) pipe wrenches and probably the pieces I need in his spare parts. He doesn't know any more about steam heat than myself though.
I believe the rad in question is the last on the left main. Looking at the piping it almost seems like it could be the only radiator on that main. It does seem to be working somewhat better after the multiple drains I did, but is definitely slow to heat up still.0 -
I have to wonder.... if the problem child is served by that rather long runout, have you checked that there is really truly enough pitch on that runout, and that it is really truly straight for that whole length? No sags? Doesn't take much. It might not even be nice to you and hammer -- but still pool enough water to really slow things down.Br. Jamie, osb
Building superintendent/caretaker, 7200 sq. ft. historic house museum with dependencies in New England0 -
I don't see any obvious sags, but I'll have to take a look tomorrow when I have a better flashlight... still haven't moved everything over here yet. Should the radiator be lifted more on the far end... I don't really see any pitch honestly and the radiator is 3.5ft long.

0 -
put a level on top of that rad,
it doesn't need much,
but it should pitch back to the supply valve.
Does that vent get hot, and close to steam ?
and do you hear air releasing prior?known to beat dead horses0 -
When the system was at too high of a pressure previously it used to vent like crazy and shoot water, but also heat up quicker.
I'll pay attention tomorrow when I run it again but haven't heard much venting with the system at 1psi and a Gorton 4/5 on it. It does eventually heat up but it's very noticeable that the right side is heating up first and slowly. I'll check how level it is tomorrow as well. Interestingly it seems to be the only one in the house that isn't propped up on the far end, and it's also the only radiator of that style.. the rest are silver color.
Once I get the boiler properly cleaned I'll revisit the vents on all the rads. Are rads only affected by incorrect vents from others on the same main?0 -
I think we have all lost track of where @JUGHNE and @Jamie Hall were originally going with this thread. There is no main venting.
What diameter and how long are your mains? The main venting before any radiator issues should be addressed.
 1
1 -
That was going to be the next comment....maybe tomorrow.0
-
Haven't forgot about that but it seemed like cleaning the boiler was probably a good idea regardless. Is there any reason why someone would build the system without main vents? Will be back tomorrow with more information.0
-
Thanks @JUGHNE . I agree that the lack of a safety relief valve is a huge issue for safety and should be addressed immediacy.
Sorry I also forgot to mention @nicholas bonham-carter and @BobC were also going down the main venting track as well.
@Nurb that radiator is not suffering from lack of pitch or sag. If you don't vent your mains steam can't reach your radiators evenly. Main vents should be placed 18" back from where your dry returns drop to wets or after your last run out leaves the main and be on a nipple at least 10" high. I recommend Barnes and Jones Big Mouths, biggest bang for the buck and great quality.
Venting the mains should also reduce you short cycling significantly. You should be able to set the vaporsat at 1psi or lower, my system runs at 12oz cut out 4oz cut in.
Depending on were your are located there should be a good contractor on here that can help you out, Check find a contractor.
0 -
Definitely focus on the items people have already mentioned, but regarding your problematic radiator--that looks refurbished to me. The clean black color and new radiator valve looks like Ecorad or someone redid it. The baseboard is also only partially painted behind it indicating something smaller might have been there in the past. Makes me wonder if that wasn't the original radiator in that location.
Can you post a photo of the side of that radiator? Also the height from the floor to the top. The valve looks like it says "1 1/4" on the side from the photo. Can you verify?
There's a chance that radiator is just too big for it's connection, which could be contributing to the problems it's having.Burnham IN5PVNI Boiler, Single Pipe with 290 EDR
18 Ounce per Square Inch Gauge
Time Delay Relay in Series with Thermostat
Operating Pressure 0.3-0.5 Ounce per Square Inch0 -
I'm going to fix the skim port and safety relief today or tomorrow (before I run the system again). I'm located near the capital of NY, but pretty certain I do whatever needs to be done with some guidance.
The problematic radiator is 19" tall, to me it looks like there was a repair previously on the top.
As far as installing main vents, do you just drill and tap holes in the mains?


0 -
This is a modern radiator with much less mass than the old ones. This is the color they come from the factory so it may have been a production repair. I wouldn’t worry about the radiator nor anything else until the main venting is sorted.
The header is so low, especially for a single-fed side supply, I expect a ton of water is getting into the mainNJ Steam Homeowner.
See my sight glass boiler videos: https://bit.ly/3sZW1el0 -
-
I agree focus on the other items first.
From the look of it that radiator doesn't appear to be the original with all the new plugs, etc. Do the other radiators in the house look similar in terms of design and dimensions? The connection is the right size, though. So that's not the problem.
Although, compact radiators like this tend to not work well with steam. They don't have much internal volume or wide internal spaces for the steam to move uniformly through. The steam generally races along the bottom over to the vent instead of heating along the top, or they heat up unevenly.Burnham IN5PVNI Boiler, Single Pipe with 290 EDR
18 Ounce per Square Inch Gauge
Time Delay Relay in Series with Thermostat
Operating Pressure 0.3-0.5 Ounce per Square Inch1 -
The rest of the radiators in the house look more period correct to me, apart from some small ones in an addition upstairs. I'll take pictures of all them later and the mains so we can maybe figure out where to put vents.0
-
I think we all agree main venting is important,
and should be thought about, and installed.
Was it ever decided that saddle clamps were steam compatible?
or does Nurb need to break into his mains?
Now take another look at the basement pictures,
it seems the main is relatively small(not that venting won't help)
and that there are rather long(ish) runouts to the rads,
The newer problem rad is boiler close,
either it isn't venting fast enough,
or is it venting too fast, and the steam is shooting across and closing that vent, too soon?
Nurb, Does that vent get steam hot?
and if it does, is it before, or after the rad finally heats?
As the boiler fires, how long before the other rads start to heat up
known to beat dead horses0 -
Just to clarify that there is a relief valve on the boiler, it is installed on the horizontal rather than vertical plane.
Why no main vents? in the days of slow steady coal fired boilers the air would get slowly pushed out of the rad vents and maybe stay out most of the season. The dead men who installed your system may have cut their teeth on coal boilers....or the entire system was repiped by someone who didn't know better.
IIWM, I would not use the BJ Big Mouth main vents; although the biggest and best, they may spit water in your system.
Your boiler piping is such that you probably are delivering wet steam. Especially on the left counter flow main that is not dripped anywhere.
Gorton #2's would be enough IMO.
1 on the left main and 2 on the right dry return at the end of steam main.
A 1/4" tapping for each would suffice for each vent.
The G2's have 1/2" threads. You will need reducing couplings.
Be sure to get a 1/4" NPT ....National Pipe Thread.....tap.
And the correct drill bit for that tapping. Drill on the top of the pipe. At least 6" from a fitting and 6" between multiple taps.
Use a minimal amount of cutting oil as this will have to be skimmed out of the water afterwards.
The vents must be as vertical as possible.
On the left main you may have to add swing fittings to get the vent vertical. You could try without, might not be a problem.
On the annoying rad, it looks to be a replacement.
They may have pushed the riser with the valve on it down to line up the rad valve spud. You could try raising the valve end up 1/2" and the vent end up 3/4", this might correct the sag under the floor that you cannot see. You could add 1/4" shims as needed.
If this eventually solves the problem you could come up with better looking wood risers.
You well may be beyond the pipe size and length minimums for that size of rads. I have a couple of them in a church and with the slowest air vent on them they keep under control.
0 -
Thanks for the continued help. I didn't have a chance to get in to fixing the safety or skim valve today (spent all day cleaning up leaves before potential snow). Once I get these corrected I'll look in to the main vents. To me it seems the system may have been repiped (possibly due to an addition), I find it hard to imagine that pipe from Thailand was being used in 1945 (although maybe WW2 was still affecting things). I'll try raising the radiator as you mentioned and see if it helps things.
Here are the rest of the radiators in the house, they all work well (although a couple have noisy vents)
[Downstairs]
Second largest radiator and closest to thermostat (problematic radiator is larger and a few more feet from the thermostat).

Needs a new valve cap

[Upstairs]
There is another of these thin radiators not pictured.


0 -
In 1945 Thailand barely had electricity, their infrastructure would have been about the level of China at that time.
Even today I have only seen brass goods made in Thailand, and they are surprisingly of fair quality about matching Taiwan materials....but better than Chinesiem materials.
But some of your steam piping in the basement, the main pipes and runouts....not just at the boiler....was from Thailand?0 -
Hmm, seems like it's mostly elbows and T pieces that are from Thailand. There's also some China and other markings I don't recognize Hard to tell with the long runs of pipe as it's covered with fiberglass mostly. The boiler is approximately 29 years old per the manufacturer, would outsourced piping have been common then?


0 -
My guess is that it has been redone within the last 10-20 years.
There may have been some main air vent taps that someone had just put plugs into and the next pipe fitter just left out those tees.
As Dan has said in his books......"plugs are a lot cheaper than vents"
Look above in the store for books.....We Got Steam Heat and The lost art of steam heating......well worth the money for you.0 -
NJ Steam Homeowner.
See my sight glass boiler videos: https://bit.ly/3sZW1el0 -
I was involved with the start-up of a small H B Smith steam boiler, approximately 3,500,000 BTU input at a U S Steel plant in the 1980's. Since U S Steel was an American company all fittings and piping, in fact every thing in the building had to be "MADE IN THE USA". All the fittings supplied by Smith were Foreign crap that they forgot to change. Once the inspectors from U S Steel saw this, every fitting was replaced with American fittings. All piping adjacent to the boiler was visually inspected by the Job Inspectors and any foreign stuff had to be replaced at the contractors or MFG expense. Back then foreign made stuff was junk and probably still is. One other observation, cast iron baseboard is never used in a 1 pipe steam system unless the contractor is not educated in his job and a good steam contractor will only use cast iron fittings not the black iron I see in some of the photos. On that very long new radiator you could try installing a vent in the top tapping and leave the normal vent installed. Some of the steam guys that monitor this site may want to castrate me for making that recommendation but it may help.0
-
Alright guys, I replaced the plumbing following the guidance you gave (using only US made pipe/fittings). Hopefully everything looks good...
I was also able to sort out the LWCO needing an artificially high level by cleaning up the probe. Now on to the skimming and main vents install.
[Removed picture] 1
1


Categories
- All Categories
- 87.7K THE MAIN WALL
- 3.3K A-C, Heat Pumps & Refrigeration
- 59 Biomass
- 430 Carbon Monoxide Awareness
- 127 Chimneys & Flues
- 2.2K Domestic Hot Water
- 5.9K Gas Heating
- 121 Geothermal
- 170 Indoor-Air Quality
- 3.8K Oil Heating
- 79 Pipe Deterioration
- 1K Plumbing
- 6.6K Radiant Heating
- 396 Solar
- 16K Strictly Steam
- 3.5K Thermostats and Controls
- 56 Water Quality
- 51 Industry Classes
- 51 Job Opportunities
- 17 Recall Announcements