Overhauling my steam system! Help me answer a few questions please?

My wife and I bought a house back in February. Built 1935, Queens NY beautiful detached Tudor style house..... with EVERYTHING falling apart, even the heating system. Having a million other things to do in the house, I procrastinated on the heating until the very last minute. The temperature dropped this week, reaching 62 inside the house. I have no choice but to bring this thing up to speed soon. I have a two year old, and a six week old that need to keep warm.
1. Fairly new oil boiler (~3-4 years old). Supposedly maintained by the BIGGEST oil service co. in Queens. I'm not surprised they let the whole system run to the ground. Burnham MST288 (or MST396? How can I tell) Both have 3 sections, 22 5/8" jacket length, as per nameplate.
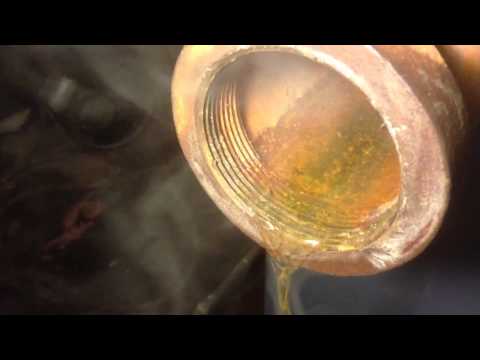
2. Service company let the broken main vent shoot steam and totally rust the reducer onto the elbow. I took a hacksaw blade to the reducer, and along with some kroil, cut it out over the course of a couple hours. Built my antler, and threw a gorton #2 on there. However, while testing yesterday, I noticed warm damp air coming from the gorton. Is this thing working properly? I need to do the same with the other main, as one side of the house heats up quickly, while the other side is still cold.
3. Had oil delivered last week. After filling the tank, suddenly the float gauge dropped all the way to the bottom of the sight glass and doesn't work. Is this typical? Can it be reset? Needs to be replaced?
4. Large portions of the mains, and near boiler piping is uninsulated. Seemed like fiberglass pipe wrap would be an easier way to install insulation, rather than the pre-formed fiberglass lengths. Which do you guys recommend?
5. Pressuretrol was set to the lowest setting, (.5 I believe, and 1 differential). Noticed boiler cut off before reaching temp, but cut back on after a minute or 2. During this time, 2-3 of the radiators were hissing. My guess is that they were letting go steam, and making the pressuretrol drop and kick the boiler back on. Ordered a couple varivalves to replace those hissing valves. I also ordered a low pressure gauge to install at the pressuretrol, so I can see what's going on there as well.
6. Lastly, there is a smell in the house when the heat comes on. At first I thought it was the heating oil, but I think it may be the kroil I used to loosen up the reducer for the main vent. System need skimming? I noticed when the water is boiling, the sight glass level is jumping up and down.
7. I had the system tuned up this past weekend - oil filter changed, general vacuuming and cleaning, nozzle changed. Thing is, whoever installed this boiler mounted the LWCO on a nipple that sits right overlapping the chamber door. The service guys couldn't get in the combustion area to do a proper cleaning! Hoping to move that LWCO so that I can get in there and vacuum up everything.
Not for nothing, but I see a conflict of interest where an oil supply company holds the service contract for an oil boiler. What incentive is there for them to do a proper tune up, and make the system the most efficient it can be?? If anything, they will sell more oil by doing the opposite!
For the record, the book is in the mail- It will be arriving Thursday
Comments
-
Does the #2 air vent close when the steam gets to it? (It will be burn your hand hot)
You may need more than 1 #2 per steam main......1 #2 Gorton per 20' of 2" steam main is the rule of thumb.
Did you get much Kroil into the piping as you removed the bushing?
Preformed fiberglas insulation 1" thick seems to be the easiest to install and is reusable if need be. All the roll/wrap I've seen turns into somewhat of a mess.
That LWCO nipple has been there since the boiler was installed? So that door has never been opened for cleaning from day one?
What book are you getting? Pictures are good for more advice from this site.0 -
Lots of little things... one or two bigger.
The hissing vents on the radiators are telling you that you need more main venting -- although they may hiss anyway. But you knew that. They shouldn't shoot steam out -- but you knew that, too!
Warm damp air from the Gorton is not a problem. Steam would be; it should close on steam.
At which point the pressure will rise, and your pressuretrol will kick the burner off until the system can get rid of some air and condense some steam -- that's also what it's supposed to do -- but it shouldn't do it until late in a longish cycle (at least 10 or 15 minutes after steam hits the first radiator). That it does it so soon is, again, telling you you need more main venting.
I much prefer the pre-formed fiberglass insulation. It's a lot easier to work with, and worth the cost.
Do get a good burner person in there to clean the boiler and set up the burner. They do exist.Br. Jamie, osb
Building superintendent/caretaker, 7200 sq. ft. historic house museum with dependencies in New England0 -
To your insulation question. Years ago when I bought my house I put on the wrap type fiberglass. Last year when I replaced my boiler I used the preformed. I can tell you from experience the preformed is MUCH easier than the wrap. It also looks better and offers better insulation. It might cost more, but for me it would be a bargain at twice the price. For comparison I remember spending several weeks carefully wrapping all those pipes with the wrap type insulation. When I used the preformed it took me a couple days to do the same pipes...actually more pipes due to the way I piped the new boiler. So my vote would be for preformed. As for the oil company comment, I personally think it depends on the region and the company. My parents have been dealing with the same oil company since the early 80's. They have always gotten a full cleaning and combustion analysis. They have a contract and the tech is usually there for several hours doing all the cleaning and tuning. Question for you, since they couldn't open the chamber to finish the work did they give you a discount or did you pay full price for half the job? Did they perform a combustion analysis and give you the printout from the analyzer? These are all things they should be doing. If they don't give the printout find a new company. These days it's easy to check on the tune up by posting the printout online and getting someone to break it down for you. Plenty of guys on this site can tell you if they did a good tune or a bad tune.0
-
Great comments already, thanks guys.
-They didn't give a discount, there was a small door in the back and they used that to clean, but I'm not confident they cleaned as best as they could have, if the door was accessible. I intend to move that LWCO, or at least make it so that I can open the door. I asked for the combustion analysis on the phone, and he said he does it. When they finished up and I asked for the printout, and he said he left his machine at home (sure) and ensured me that because the flames were orange, and not smoky, that it was running efficiently (lol). Won't be using them again, but I was glad to at least have the filter and nozzle changed, and flue cleaned.
-Mains are not more than 20', the house is smallish. Warm air is coming out of the gorton, but definitely not steam. I just expected it to vent only cold air and then close up. I've never seen one of these in operation before, so I didn't know what to expect.
-As for more venting, I have two mains. 4 radiators on one, and 3 on the other. One of the radiators on the "gorton" main was hissing, and being that the main is less than 20 ft, I'm not sure that more venting would solve the problem.
-I really hosed the bushing down with PB blaster before trying kroil, so I'm sure there's a good amount in the boiler water. I'm sure there's a good thread on skimming, I'll look for it on here soon.
The book is The Lost Art of Steam Heating.
I knew some pictures would help, I'll take some today when I get home.
A 10-15 minute cycle sounds great, before the boiler kicks on again, but mine was really more like 2-3 minutes. I'll try to insulate and see if that helps anything.
Thanks guys for all your comments.0 -
Venting the mains fast and the radiators slowly is the key to even steam heat in most cases. If you bought Heatimer varivents you may be asking for trouble. They vent very fast and it's hard to adjust them at the low end.
If a radiator doesn't heat, it's air vent might be plugged. Check the radiator with a level to make sure the radiator has a little slope towards in input pipe so water can find it's way back to the boiler. Check the pipe that feeds the radiator to make sure it has a little slope back to the boiler.
BobSmith G8-3 with EZ Gas @ 90,000 BTU, Single pipe steam
Vaporstat with a 12oz cut-out and 4oz cut-in
3PSI gauge0 -
BobC, I did buy those Heatimer Varivents. They are easily returnable - which vents do you recommend? Also, is there any difference whether they are placed on the first floor vs second floor? ie- do I need different models per floor? THanks.0
-
In general you COULD need different vents based on floor AND room. I have the smallest vent in my house on the second floor in a bedroom because the radiator is too big for the room. Balancing the system is a combination of geography and output. The general rule is the further from the boiler the faster the vent, but if it's a big radiator in a small room you may want to slow it down. There is a fantastic book in the store on balancing steam heating with venting. I highly recommend it, it's 10 bucks comes electronically and the money goes to charity. It's a short read too. As far as which vents to use we all have our preference, but I am a Gorton fan. They aren't adjustable, but with the sizing chart in the balancing steam book I actually found it quite easy to get mine right. Here is a link:
http://store.heatinghelp.com/Balancing-Steam-Systems-p/300.htm0 -
I agree with KC about that Balancing Steam offer, a lot of good information cheap.
The key to a balanced steam system is matching the vet to the amount of air in each radiator / feed pipe. When you get it right everything heats up at about the same time. If all the radiators and runouts were approximately the same you could just put Hoffman 40's on them and be done with it but that usually isn't the case.
I find the Maid O Mist vent kit with select-able orifices very handy when initially balancing a system. What kind of vents are on the radiators now?
http://www.amazon.com/Maid-Steam-Angle-Radiator-Valve/dp/B003DV3AGE/ref=sr_1_1?ie=UTF8&qid=1444063556&sr=8-1&keywords=maid+o+mist
BobSmith G8-3 with EZ Gas @ 90,000 BTU, Single pipe steam
Vaporstat with a 12oz cut-out and 4oz cut-in
3PSI gauge0 -
Just in case it wasn't mentioned already, you should be sure the pigtail under the pressure control is clean. Put your new gauge on the same pigtail so you can see what the control sees/feels.0
-
The Pressuretrol is set correctly. Don't increase the settings in an attempt to reduce the short cycling. Increasing the pressure will only add to your problems.
If the water in the sight glass has a lot of bounce to it, more than 1/2" to 3/4", you probably do need to skim the boiler. You may have to do it two or three times to get all the oils off of the surface of the water, in the boiler.
Those radiator vents should close when steam hits them. They are on the radiators to allow air to escape and close on temperature. The same is true with the Gorton #2's. They may vent a little warm air as the steam gets close to them but should close when the steam hits them.
I'm assuming this is a one pipe system since you say you have vents on the radiators. A few pics of the boiler and near boiler piping and a couple of the radiators will help everyone on this site advise you.
Make sure the radiator valves are either all the way open or all the way closed. There is no "in Between" on a one pipe steam system. Condensate has to be able to return to the boiler through the same pipe that feeds steam to the radiators.
Also, make sure all of your radiators have a slight pitch back towards the pipe side of the radiator so that condensate can run back into that pipe. You can use checkers or a couple quarters under the legs of the radiator, on the vent side to raise that side a little if they need to be re-pitched.0 -
There is a chance that your T-stat could be short cycling the burner. It can happen. You need something for steam, one cycle per hour. Most T-stat out of the box are set for forced air systems.0
-
I would like to point one thing out, I work for a large oil company. Each and every service I do, includes a full brush and vac. I pull the entire burner apart, I clean the chamber. I pull the smoke pipe and inspect the chimney. I flush the oil line. And yes, I use a digital analyzer to set up the system. I also go the extra step of testing the system prior to and after the tune up to show the customer the benefit of a proper service...why...Pride...(my average service is 2.5 hours)
 1
1 -
You're the exception.lchmb said:I would like to point one thing out, I work for a large oil company. Each and every service I do, includes a full brush and vac. I pull the entire burner apart, I clean the chamber. I pull the smoke pipe and inspect the chimney. I flush the oil line. And yes, I use a digital analyzer to set up the system. I also go the extra step of testing the system prior to and after the tune up to show the customer the benefit of a proper service...why...Pride...(my average service is 2.5 hours)
All Steamed Up, Inc.
Towson, MD, USA
Steam, Vapor & Hot-Water Heating Specialists
Oil & Gas Burner Service
Consulting 1
1 -
Thanks guys. It's not a thermostat problem, I can hear when the tstat clicks on and off and the boiler turned off from the pressuretrol without the tstat reaching temperature.
We turned on the heat for a quick warm up this evening after coming home and the smell in the system is something I really need to deal with first. Problem is, I don't know if there's a skim port on my boiler. There's a drain valve (under the oil burner) and a pressure relief valve. Please see the attached pics.0 -
It doesn't look like you have a skim port. You can, however, take that elbow off, that the Pressure Relief Vavle is mounted on and replace that with a 3/4" Tee. Remount the Pressure Relief Valve on the top opening of the Tee and use the end opening as your skim port. When skimming, the flow of water has to be very, very slow, just a trickle, so as to not create a lot of turbulance on the surface of the boiler water. Allow it to trickle for two or three hours. When done, install a 3/4" plug in the end of the Tee and you are set anytime you need to skim again. I have a Burnham also and that's the way I had to set mine up too.0
-
Fred - any chance you can post a pic of the setup your describing? Just want to make sure I do it exactly like you described.
On another note, I drained some water from the boiler drain valve (below the burner). The water at first was VERY brown (rust I guess). I did this a few times, and changed probably like 5 gallons, letting the auto fill come on and refill the boiler. I then kicked on the boiler to take out the excess oxygen. I noticed that after coming to steam, the water in the sight glass was VERY dirty brown. Do I need to keep draining water until this runs clean?0 -
I would recommend washing the boiler out using a wand like Gerry Gill does followed by a 3 or 4 gallon slow skim. I would also recommend 1 or 2 tablets of Rectorseal Steamaster after the boiler is really clean.mookie3333 said:Fred - any chance you can post a pic of the setup your describing? Just want to make sure I do it exactly like you described.
On another note, I drained some water from the boiler drain valve (below the burner). The water at first was VERY brown (rust I guess). I did this a few times, and changed probably like 5 gallons, letting the auto fill come on and refill the boiler. I then kicked on the boiler to take out the excess oxygen. I noticed that after coming to steam, the water in the sight glass was VERY dirty brown. Do I need to keep draining water until this runs clean?
Here's a video of Gerry Gill washing a boiler out. I use a similar wand, but go in via the skimmer port and drain through the boiler drain into a bucket. https://youtu.be/q1tw9rz-pUk
 Single pipe 392sqft system with an EG-40 rated for 325sqft and it's silent and balanced at all times.
0 -
Thanks, I'll check it out, although I would have to buy that wand. looks like this method gets alot of gunk out though.
Question regarding the pigtail/low pressure gauge. I've seen one pigtail with a tee, and gauge mounted horizontally, with pressuretrol on top. I've also seen a tee with 2 separate pigtails, pressuretrol on one, and gauge on the other. Which is better? I'm ordering new parts, I unscrewed my black pigtail yesterday and it was very corroded inside, so I'm going to replace it with brass.
The 0-30PSI gauge in my pictures - is that water pressure? What should it be reading?0 -
One other thing, that I really find amazing - Out of ~10 plumbing supply stores here in NYC, 9 do not carry, and have no plans to carry, a gorton #2. What are people using for their main vents around here???0
-
Do they carry any vents? Could it be there are so many people that have no idea how to work on steam that they don't even know about the vents? No demand=No supply0
-
Supplyhouse.com carries them. That's where I've bought all of my vents from and I believe they're right in Farmingdale.mookie3333 said:One other thing, that I really find amazing - Out of ~10 plumbing supply stores here in NYC, 9 do not carry, and have no plans to carry, a gorton #2. What are people using for their main vents around here???
Single pipe 392sqft system with an EG-40 rated for 325sqft and it's silent and balanced at all times.
0 -
ChrisJ said:
Supplyhouse.com carries them. That's where I've bought all of my vents from and I believe they're right in Farmingdale.mookie3333 said:One other thing, that I really find amazing - Out of ~10 plumbing supply stores here in NYC, 9 do not carry, and have no plans to carry, a gorton #2. What are people using for their main vents around here???
After I bought this new (old) house, I ripped out all of the corroded brass plumbing and corroded gas lines, and replaced everything with new copper and black pipe. I ordered ~$500 worth of stuff from Supplyhouse - SIGNIFICANTLY cheaper than supply stores and big box chains (sometimes 50-75% discount on fittings). I love Supplyhouse, and I just (literally ~4minutes ago) ordered a #2, new pigtail, 1/4" fittings, and the boiler cleaning tablets from them.0 -
I piped my boiler and house from them as well as a few other things. My total spent there since 2011 is several thousand now.mookie3333 said:ChrisJ said:
Supplyhouse.com carries them. That's where I've bought all of my vents from and I believe they're right in Farmingdale.mookie3333 said:One other thing, that I really find amazing - Out of ~10 plumbing supply stores here in NYC, 9 do not carry, and have no plans to carry, a gorton #2. What are people using for their main vents around here???
After I bought this new (old) house, I ripped out all of the corroded brass plumbing and corroded gas lines, and replaced everything with new copper and black pipe. I ordered ~$500 worth of stuff from Supplyhouse - SIGNIFICANTLY cheaper than supply stores and big box chains (sometimes 50-75% discount on fittings). I love Supplyhouse, and I just (literally ~4minutes ago) ordered a #2, new pigtail, 1/4" fittings, and the boiler cleaning tablets from them.Single pipe 392sqft system with an EG-40 rated for 325sqft and it's silent and balanced at all times.
0 -
That 0-30 gauge is code required. It is to show steam pressure, but if you read the book you get you realize 2# or less is the max PSI to run. So the factory gauge is worthless but required.
Do not put your new gauge in that location. The 0-30 has a built-in "snubber" to protect it from steam. I would leave it there for now.
It is nice to have a tee with plug (nipple & cap is better IMO) on the tap where your present pigtail is located. The new brass pigtail would then be mounted on the "bull" (side tap) of the tee that points straight up. This would require the use of a vertical pigtail, you now have a horizontal one. Go up to a brass tee, put the control on top and on the side bull tap, with necessary fittings, install a new gauge, perhaps a 0-3 PSI. Both of these items must be protected by the water seal in the pigtail. The lower plug lets you check for blockage where the tee connects to the boiler.
If you have or download the I&O (Installation, operating and service instructions)manual for your boiler model, it might be 70 pages or so, there might be a page showing section tappings.
The I&O I have is for the Independence model, (not yours).
They use the term "surface blow-off...factory plugged", it is in the side under the supply pipe. There may be a knock out in the jacket, (similar to a knock out in a steel electrical box). It is worth opening that KO if there. There might be a 1" or 1 1/4" plug hiding under that. It needs to be at or just above the water line of the boiler. If you find one, check back on how to remove the plug to install a skim port.0 -
I can't seem to post a pic for some reason. Anyway, it is a simple change. Take the Pressure relief valve off, Take the elbow off but leave the straight nipple that comes out of the boiler. Buy a 3/4" black Tee, screw one end onto the stratight nipple, turn it so that there is an opening facing up and remount your Pressure Refief valve into that top opening so that it is vertical. That leaves you only the end opening on the Tee. You can either put a 3/4" plug in that opening or, if you have room, add a 3" or 4" nipple on that end and put a cap on it.mookie3333 said:Fred - any chance you can post a pic of the setup your describing? Just want to make sure I do it exactly like you described.
On another note, I drained some water from the boiler drain valve (below the burner). The water at first was VERY brown (rust I guess). I did this a few times, and changed probably like 5 gallons, letting the auto fill come on and refill the boiler. I then kicked on the boiler to take out the excess oxygen. I noticed that after coming to steam, the water in the sight glass was VERY dirty brown. Do I need to keep draining water until this runs clean?
Obviously, if you can find a tapping in the boiler block, as Jughne suggests, that would be better but getting those plugs out after 3 or 4 years is next to impossible.0 -
Your skim port is next to the pressure relief valve, remove the plug and attach a long nipple, allow hot water (not steamming) to flow as thick as a pencil, non-stop flow is key, for at least one hour, repeat as many times as needed
 http://youtu.be/oLl_9o_knFo 0
 -
A.F Supply in Bklyn will have all vents you require or else you can find what you need online which I am starting to see a lot of guys doing.0
-
jonny88 said:
@Chris I love the wand but what do you do if there is no floor drain.I see a lot of water and you know the first words from people today,MOLD.
I use a 4 gallon bucket under the boiler drain and insert the wand through the skimmer. I have a partial dirt floor and the first words from my mouth would be "mud".
Two videos I took while washing out the boiler earlier this year.
This is what I get out of the rear section / return of my boiler when I use the wand. It's the rust from the radiators / piping as the rest of the boiler stays practically rust free from the water treatment. This is the nasty stuff you won't get out just draining the boiler or skimming.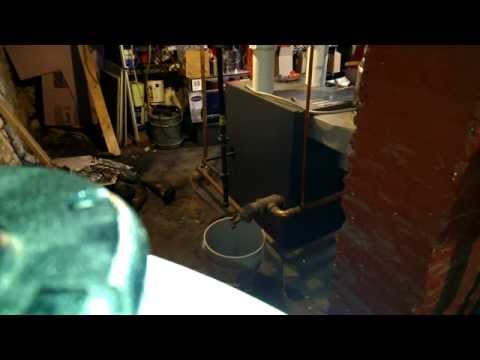 https://youtu.be/kTpThruLvn4
This is a fast skim I do after using the wand.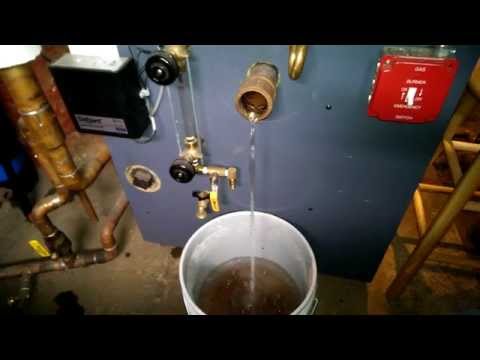 https://youtu.be/nPKTSn-depc
Here's a video I did a few years back of a normal hot skim. https://youtu.be/EkoY9xrdpcY
 Single pipe 392sqft system with an EG-40 rated for 325sqft and it's silent and balanced at all times.
 1
1 -
Gotcha very nice.We did a blowdown under 10psi we have king valves installed etc,after all these years it was nice working with someone who showed the right way of doing things.My eyes have been opened a lot after going out on my own.When you are taught wrong thats as good as you get,its a pleasure working with people passionate about getting a system running perfectly.We are nearly there and will share info when the boss is happy.Thanks for sharing Chris.1
-
+1 on the bucket. I used the wand and bucket on the same connection on mine. Just had to cut a small notch in the bucket for clearance. I was able to sit on another bucket to use the wand, worked like a charm.

0 -
Nice wand! Now I can make my own out of spare pipe/fittings rather than wasting cash to find one. What's on the tip though?
About my 0-30 gauge - I noticed when the boiler is off, it's at 22 PSI. After steam rises, it's at 25. Broken gauge? There's no way the steam pressure is this high? I'm expecting my pigtail today so I'll have an idea what's going on after I get my new gauge installed.
On another note - I bought a 0-5PSI gauge, not 0-3. Is this ok? I figured I could still see the fractions of a psi on a 0-5.
Thanks for all the tips, you guys have been great so far.0 -
Not sure what KC used, but mine goes from 1/2" to 1/4" and then has a 1/4" elbow on the end that goes into a 1/4" cap which I drilled a small hole in that acts as a nozzle.mookie3333 said:Nice wand! Now I can make my own out of spare pipe/fittings rather than wasting cash to find one. What's on the tip though?
About my 0-30 gauge - I noticed when the boiler is off, it's at 22 PSI. After steam rises, it's at 25. Broken gauge? There's no way the steam pressure is this high? I'm expecting my pigtail today so I'll have an idea what's going on after I get my new gauge installed.
On another note - I bought a 0-5PSI gauge, not 0-3. Is this ok? I figured I could still see the fractions of a psi on a 0-5.
Thanks for all the tips, you guys have been great so far.
The gauge range depends on what your system runs at. A 0 - 3 PSI gauge never moved on my system and a 0 - 0.5 PSI gauge barely moved. The gauge I have installed now maxes out at 0.07 PSI.
If you run at 1 to 2 PSI a 5 PSI gauge should work fine.Single pipe 392sqft system with an EG-40 rated for 325sqft and it's silent and balanced at all times.
0 -
Mine is essentially the same, but mine is 1/2" the whole way. The 1/4" would help with clearance getting into the boiler. Mine just makes it and that is a 2" connection.0
-
Since it's "show and tell" time I thought I'd do the same. MIne is similar...but just showing some close-ups. This was a present so no comments on the soldering job
") ... it's been cleaned up since. Not shown is a 360deg rotating connector between the hose and wand that's a must as far as I'm concerned. I've found the handle really useful. Colleen Two-pipe Trane vaporvacuum system; 1466 edr
... it's been cleaned up since. Not shown is a 360deg rotating connector between the hose and wand that's a must as far as I'm concerned. I've found the handle really useful. Colleen Two-pipe Trane vaporvacuum system; 1466 edr
Twinned, staged Slantfin TR50s piped into 4" header with Riello G400 burners; 240K lead, 200K lag Btus. Controlled by Taco Relay and Honeywell RTH6580WF1 -
So you have the coolest wand I still have this.vaporvac said:Since it's "show and tell" time I thought I'd do the same. MIne is similar...but just showing some close-ups. This was a present so no comments on the soldering job
... it's been cleaned up since. Not shown is a 360deg rotating connector between the hose and wand that's a must as far as I'm concerned. I've found the handle really useful. Colleen") Couldn't resist.
Couldn't resist.
 2
2 -
There is definitely something wrong with us!
(Just now noticing I can only click "LOL", "like" or "awesome", but not all. I don't remember that... is that new?)Two-pipe Trane vaporvacuum system; 1466 edr
Twinned, staged Slantfin TR50s piped into 4" header with Riello G400 burners; 240K lead, 200K lag Btus. Controlled by Taco Relay and Honeywell RTH6580WF0 -
Single pipe 392sqft system with an EG-40 rated for 325sqft and it's silent and balanced at all times.
 1
1 -
Passion is not a problem in my book.vaporvac said:There is definitely something wrong with us!
0 -
Now that's what Doctors call OCD, LOL..ChrisJ said:I still say the coolest component for a steamboiler is a Magnehelic.

 https://youtu.be/gxlQvjOhGAE
 2
2


Categories
- All Categories
- 87.3K THE MAIN WALL
- 3.2K A-C, Heat Pumps & Refrigeration
- 61 Biomass
- 429 Carbon Monoxide Awareness
- 120 Chimneys & Flues
- 2.1K Domestic Hot Water
- 5.8K Gas Heating
- 114 Geothermal
- 166 Indoor-Air Quality
- 3.7K Oil Heating
- 77 Pipe Deterioration
- 1K Plumbing
- 6.5K Radiant Heating
- 395 Solar
- 15.7K Strictly Steam
- 3.4K Thermostats and Controls
- 56 Water Quality
- 51 Industry Classes
- 50 Job Opportunities
- 18 Recall Announcements