need help on boiler cleaning

I was following the user manual to give the steam boiler a cleaning, then got some questions. I'll list my questions here and the full cleaning steps in the next post.
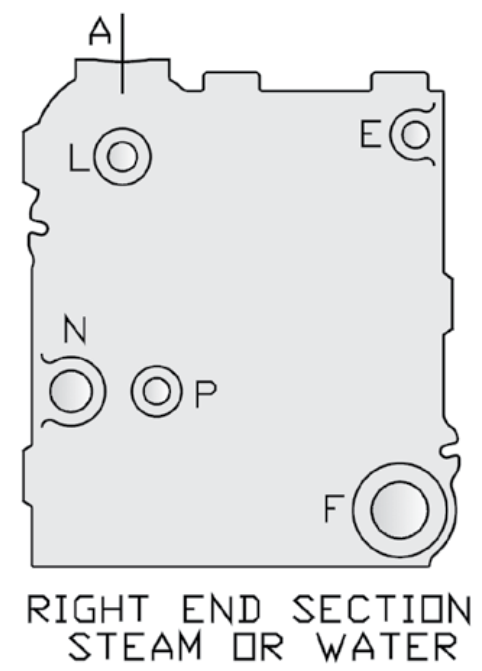
- step2: what boil-out compound should be used?
- step2: could you recommend a high pressure spray machine for this cleaning?
- step3: the boiler does not have tapping L, how to do surface blow off?
- step4: what boiler water treatment should be used?
- step5: how to proceed when the supply main does not have air valves (one pipe system)
Comments
-
1. Oil from new piping connections and sediment in existing piping must be removed from system to
prevent unsteady water line and carry-over of entrained water into supply main.
a. Fill boiler to normal waterline
b. Follow Lighting or Operating Instructions to place boiler in operation
c. Operate boiler with steam in entire system for several days to bring system oil and dirt back to boiler
d. Drain condensate from drain valve in wet return. Operate boiler until condensate runs clean
2. Boil-out boiler.
a. Follow instructions TO TURN OFF GAS TO APPLIANCE
b. Fill boiler to normal water line
c. Remove safety valve
d. Pour recommended boil-out compound into boiler through safety valve opening
e. Reinstall safety valve in Tapping "E" with spindle in vertical position
f. Follow Lighting or Operating Instructions to place boiler in operation. Boil water for at least 5 hours
g. Follow instructions TO TURN OFF GAS TO APPLIANCE. Drain boiler and system piping
h. Remove drain valve. Thoroughly wash boiler water passages with high pressure spray through drain valve tapping
i. Reinstall drain valve in Tapping "F"
3. Second Boil-out for Stubborn Cases. If all oil and grease is not removed a second boil-out using surface blow-off is necessary.
a. Run 1 NPT pipe from Surface Blow-Off Tapping "L" to open drain. Do not install shut-off valve or other restriction
b. Fill boiler to top of gauge glass
c. Remove safety valve
d. Pour recommended boil-out compound into boiler through safety valve opening
e. Reinstall safety valve in Tapping "E" with spindle in vertical position
f. Follow Lighting or Operating Instructions to place boiler in operation. Boil water for approximately 5 hours without producing steam
g. Open boiler fill shut-off valve to produce steady trickle of water from surface blow-off pipe. Continue boil-out for several hours until surface blow-off water runs clear
h. Follow instructions TO TURN OFF GAS TO APPLIANCE. Drain boiler and system piping
i. Remove drain valve. Thoroughly wash boiler water passages with high pressure spray through drain valve tapping
j. Fill boiler to normal waterline. If water in gauge glass is not clear, repeat procedure starting at step b
k. Remove surface blow-off piping. Install 1 NPT plug in Tapping "L"
4. Add Boiler Water Treatment.
a. Remove safety valve
b. Pour recommended compound into boiler through safety valve opening
c. Reinstall safety valve in Tapping "E" with spindle in vertical position
d. Follow Lighting or Operating Instructions to place boiler in operation
e. Boil water or heat water to 180°F
f. Measure boiler water alkalinity. pH should be between 7 and 11. Add recommended water treatment chemicals, if necessary, to bring the pH within the specified range
5. If unsteady water line, foaming or priming persist:
a. Follow Lighting or Operating Instructions to place boiler in operation
b. Install gate valve (shut-off valve) in Hartford Loop. Install drain valves in return main and at boiler
c. Connect hoses from drain valves to floor drain. Close gate valve in Hartford Loop. Open drain valve in return main
d. Fill boiler to normal water line. Follow Lighting or Operating Instructions to place boiler in operation
e. Operate boiler for at least 30 minutes after condensate begins to run hot. Follow instructions TO TURN OFF GAS TO APPLIANCE
f. Close all radiator valves. Remove all supply main air valves. Plug openings in supply main
g. Drain approximately 5 gallons of boiler water into container. Mix in recommended boil-out compound
h. Remove safety valve. Pour recommended compound into boiler through safety valve opening. Reinstall safety valve in Tapping "E" with spindle in vertical position
i. Follow Lighting or Operating Instructions to place boiler in operation. Slowly feed water to boiler. Water will rise slowly into supply main and back through return main. Adjust flow to maintain approximately 180°F water from return main hose. Continue until water runs clear from hose for at least 30 minutes
j. Turn off water to boiler. Continue to operate until excess water is removed from boiler and system (by steaming) and boiler water reaches normal waterline
k. Follow instructions TO TURN OFF GAS TO APPLIANCE. Open all radiator valves. Reinstall all supply main air valves. Open gate valve in Hartford Loop
l. Allow boiler to cool until crown sheet is no longer too hot to touch. Close drain valves at boiler and in return main. Fill boiler slowly to normal waterline
m. Follow Lighting or Operating Instructions to place boiler in operation. Allow boiler to steam for 10 minutes. Drain one quart of water from lower Gauge Glass fittingn. Drain second quart sample from lower Gauge Glass fitting. If sample is not clear, repeat cycle of draining boiler and return main and refilling boiler until sample is clear
o. If after normal operation boiler water becomes dirty from additional system piping sediment returning to boiler
i. Complete steps 5a through 5n
ii. Complete steps 3a through 3k
6. Make pH or Alkalinity Test.
a. After boiler and system have been cleaned and refilled as previously described, test the pH of the water in the system. This can easily be done by drawing a small sample of boiler water and testing with Hydrion paper which is used in the same manner as litmus paper, except it gives specifc readings. A color chart on the side of the small Hydrion dispenser gives the reading in pH. Hydrion paper is inexpensive and obtainable from any chemical supply house or through your local druggist. The pH should be higher than 7 but lower than 11. Add recommended water treatment chemicals, if necessary, to bring the pH within the specified range. With this lower level of protection, care must be exercised to eliminate all of the free oxygen in the system
b. Boiler is now ready to be put into service
 0
0 -
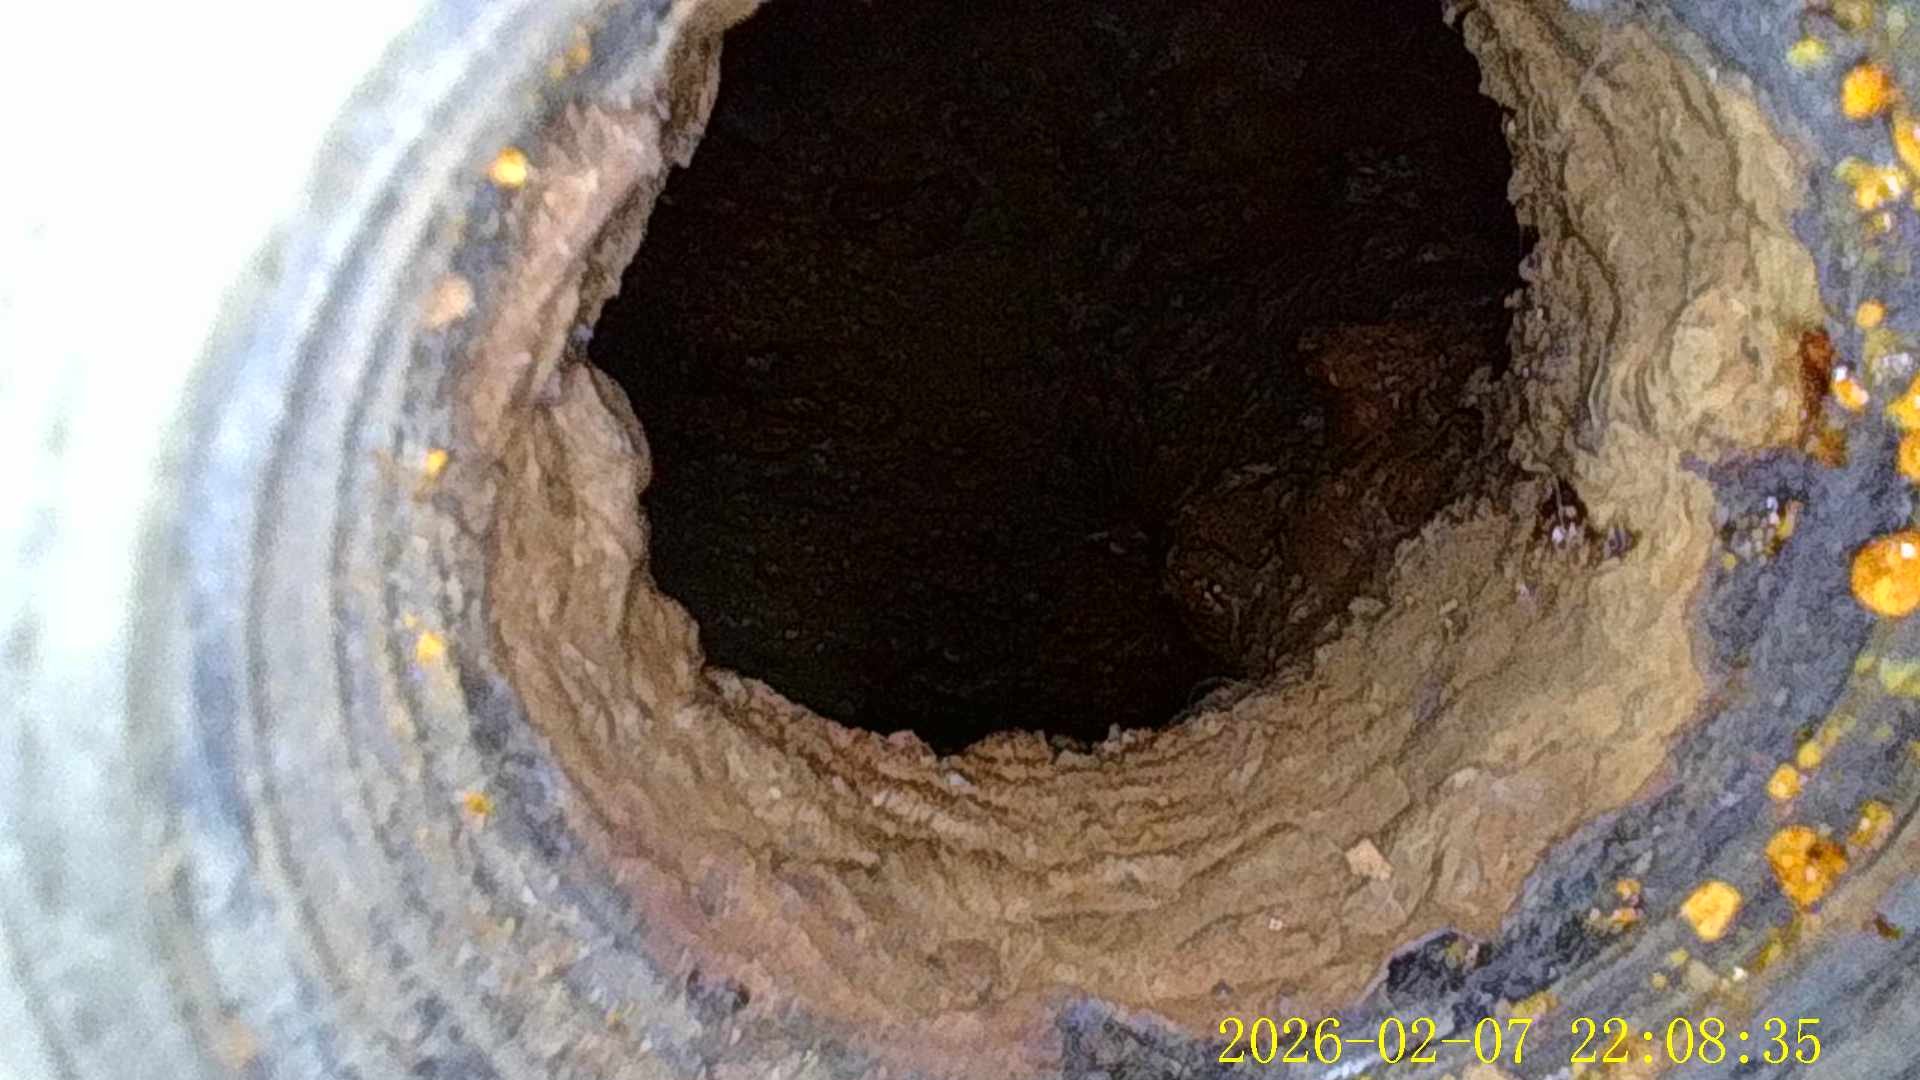

The inside of the boiler is already coated with sediment. It rubbed on the finger like bright brownish pigment. It really needs a cleaning.
0 -
Year/Make/Model of boiler? Some pictures help too, a couple feet away from the boiler showing the controls, piping, etc. How does the water look in the site glass while its running?
0 -
probably making a wand with copper tubing that you can screw on a hose with the end closed off and a couple holes drilled in the sides it your best bet to flush that stuff out.
0 -
are you saying a pipe cleaning probe? ..
like this one or the Karcher pc20 cleaning kit?
the pressure washer is bulky and expensive. I don't want to buy this much just to clean the boiler
0 -
i was thinking more a piece of 3/8" tubing and a hose thread adapter.
0 -
Yup….this is a DIY project. Get some small copper tubing, cap one end and drill some small holes in a straight line and sweat a garden hose thread adapter on the other end. Stick the tube in wherever you can and move it around so that the small jets of water can hopefully dislodge some gunk. Rinse and repeat.
There are some safe boiler cleaning chemicals that may also help….but with that buildup it would be a good idea to get rid of the chunks first.
 1
1 -
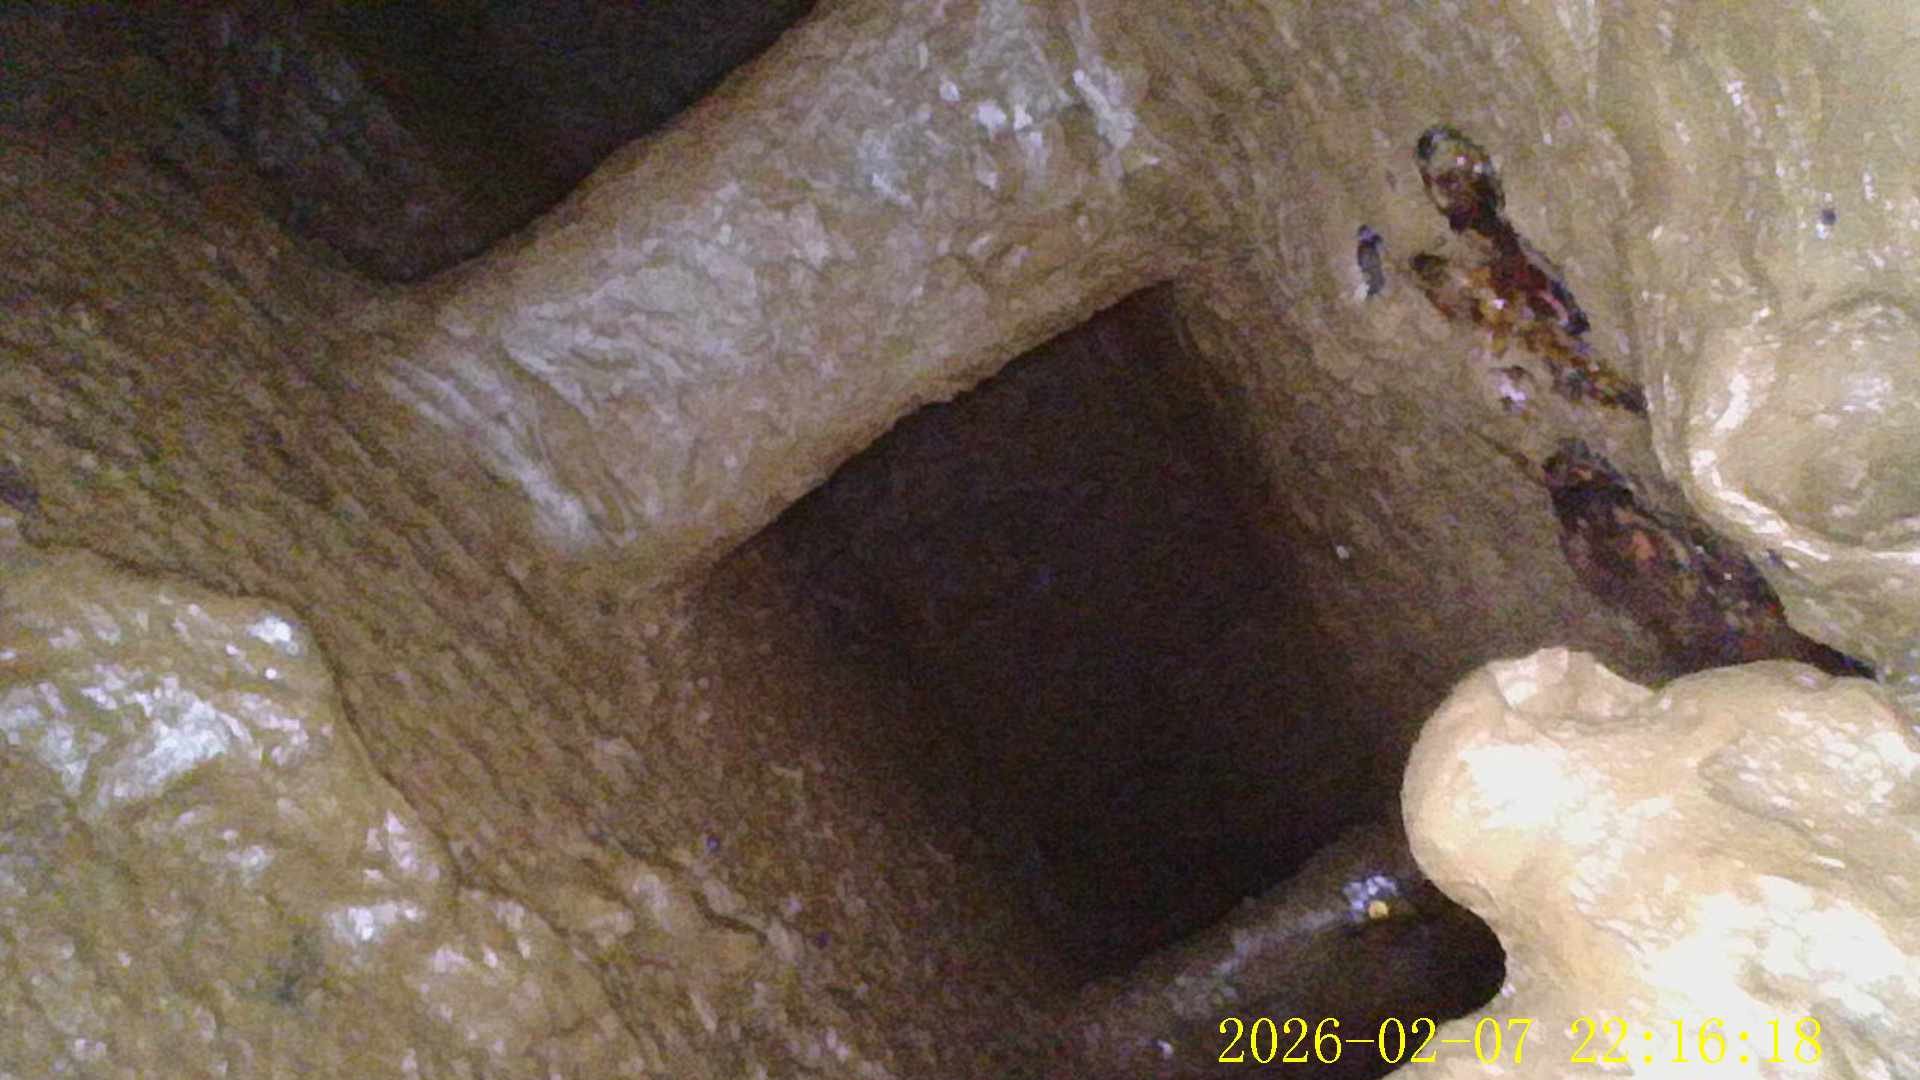
It can only touch the sections on the two ends. There are 3 sections in the middle it cannot access
0 -
What if you make several with different curvatures to the left and right?
0 -
You can get to each section thru the connecting opening at the top and the bottom of the boiler.
Your home made sprayer just needs to be long enough
Edward Young Retired
After you make that expensive repair and you still have the same problem, What will you check next?
0 -
This is not covered in the operation manual I have. Is this the service manual? Could you provide a link? Remove the jacket right panel to get at the connecting opening?
0 -
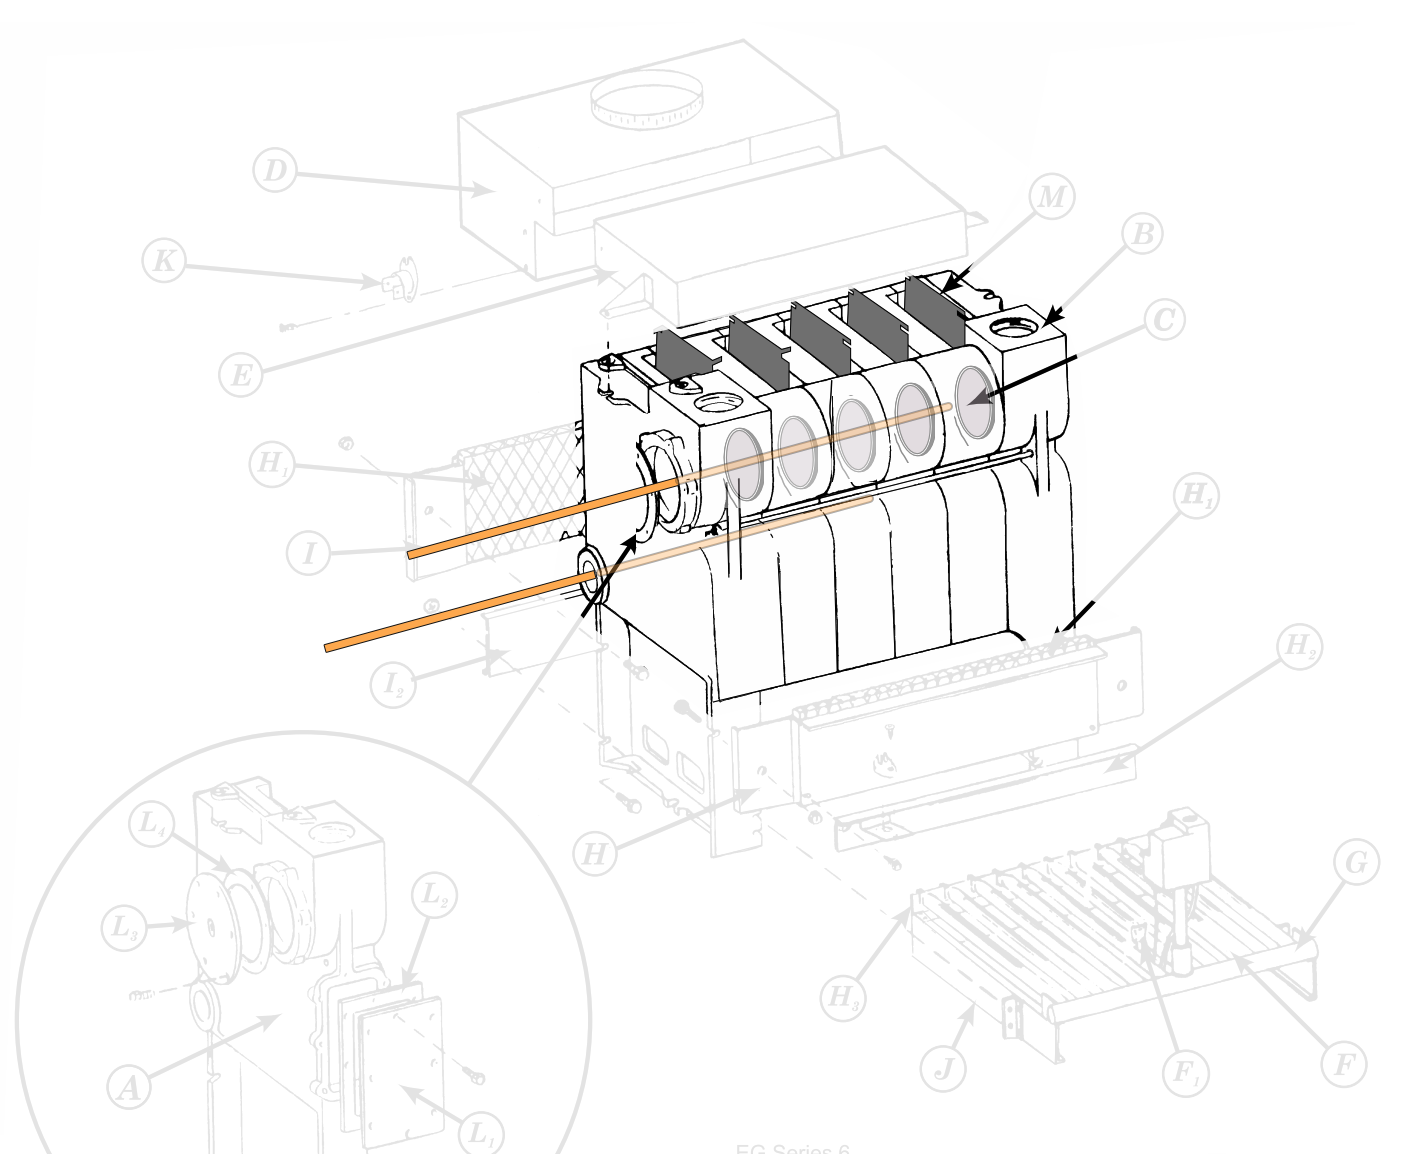
That illustration is from a Weil McLain EG manual. I adjusted some of the drawing to illustrate the internal openings between each section
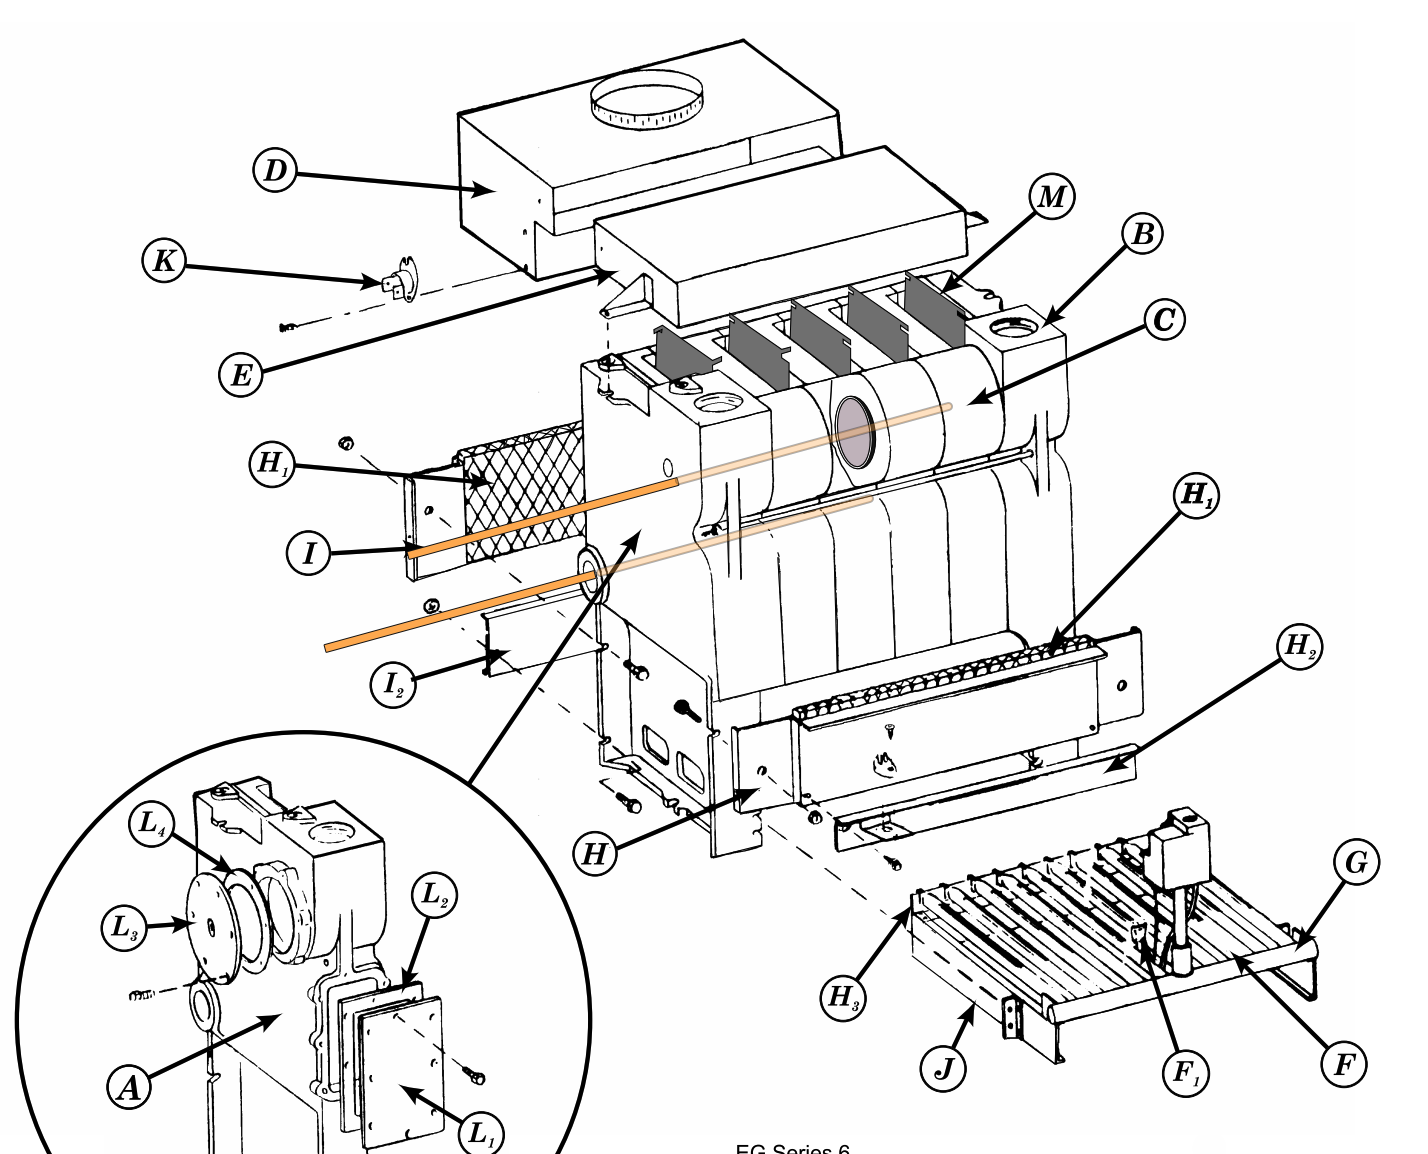
each intermediate section has a large opening at the top and a small opening at the bottom that connects the sections together.
Edward Young Retired
After you make that expensive repair and you still have the same problem, What will you check next?
 1
1 -
Here is a commercial boiler that is being assembled in the boiler room. I have this one intermediate section highlighted with the DIY 90° spray nozzle inserted in the opening and soraying inside the intermediate section.
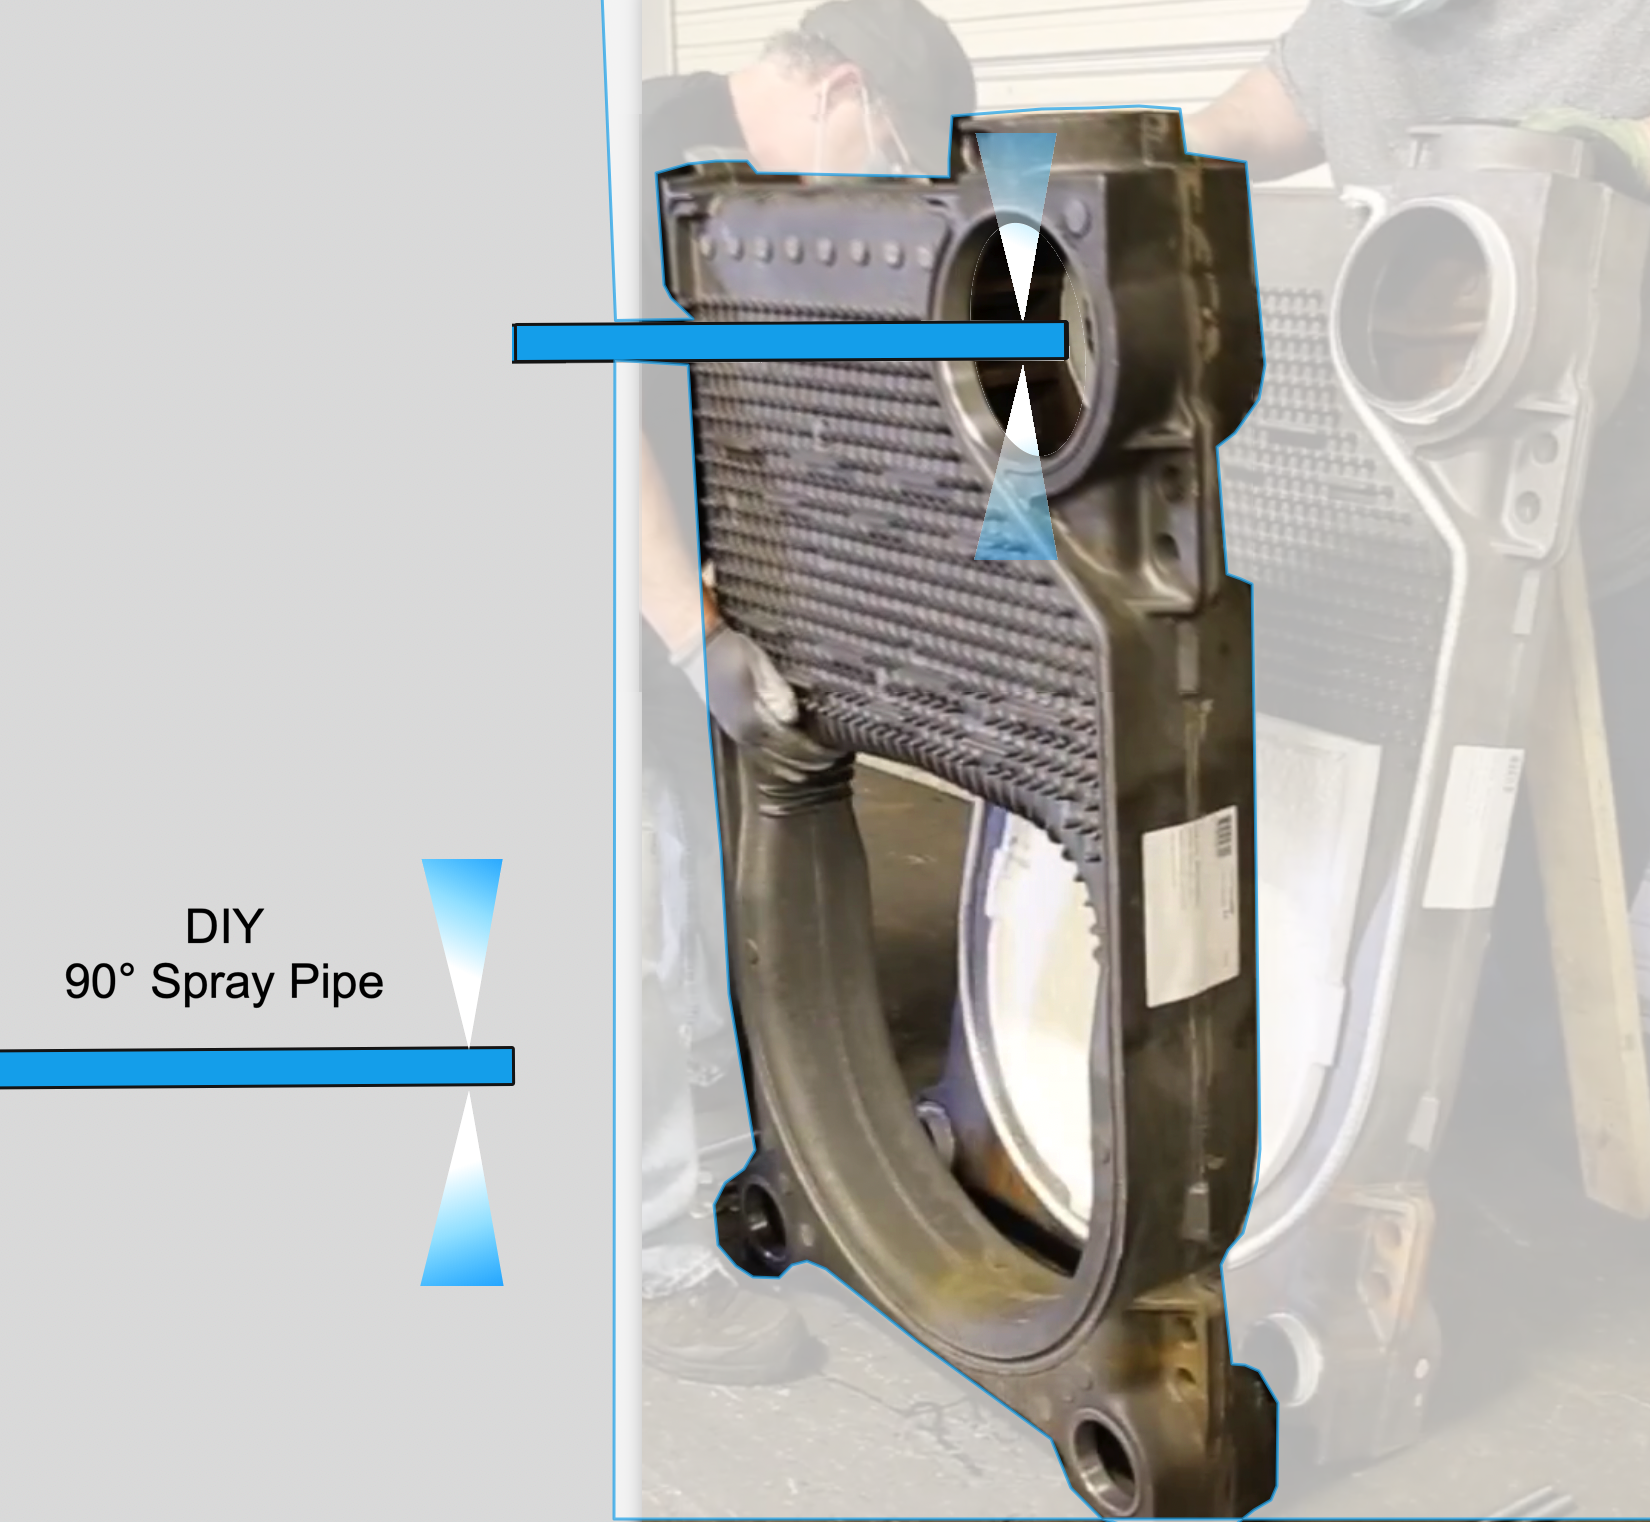
as you can see the DIY 90° spray nozzle pipe is long enough to reach the first and last section form one end of the boiler. You will need to be able to twist and insert and withdraw in order to get the spray to knock off the sludge so it falls to the bottom.

Edward Young Retired
After you make that expensive repair and you still have the same problem, What will you check next?
1 -
Thanks for the illustration
your drawing is super
0 -
What does one do if their boiler only has side entry ports………….I don't believe my Peerless has an entry port through the front.
Get in through the side and try to clean it best you can?
0 -
At this point, given the risk of disassembling things….I'd rather throw a boiler cleaning liquid in there and let it dissolve things slowly (or maybe quick?)
Hercules Scout Steam Boiler Cleaner (Powder) and Hercules Boiler and Heating System Cleaner (Liquid) are available at my local Lowe's and Home Depot. I've used them on my own boiler but mine wasn't as bad as yours….well I think, I didn't see the insides of mine.
Fill the water line as high up as you dare and let it steam for as long as you can, days if possible. Keep an ear out for surging/water hammer since your water is going to get nasty. Drain, refill and repeat until the inside is clean.
Once clean enough…use RectorSeal 8-way to the tune of 1oz per gallon of water. It's main feature is to increase and stabilize the pH to prevent further corrosion and gunk from forming but it does do some cleaning as well.
0 -
I came across this electric pressure washer , Westinghouse EPX3500, its rated for 2,000 psi and has a rated flow rate of 1.2 gpm
does this washer fit for boiler cleaning?
0 -
I would say YES, however there are no 90° dispensing fittings that might be useful in cleaning the intermediate sections. I am not sure how you might connect a DIY home made 90° discharge pipe to something safely with that high of a pressure rating Technically you would need to test your home made wand with 3000 pressure in order for it to be deemed safe for that 2000 PSI machine.
Edward Young Retired
After you make that expensive repair and you still have the same problem, What will you check next?
0 -
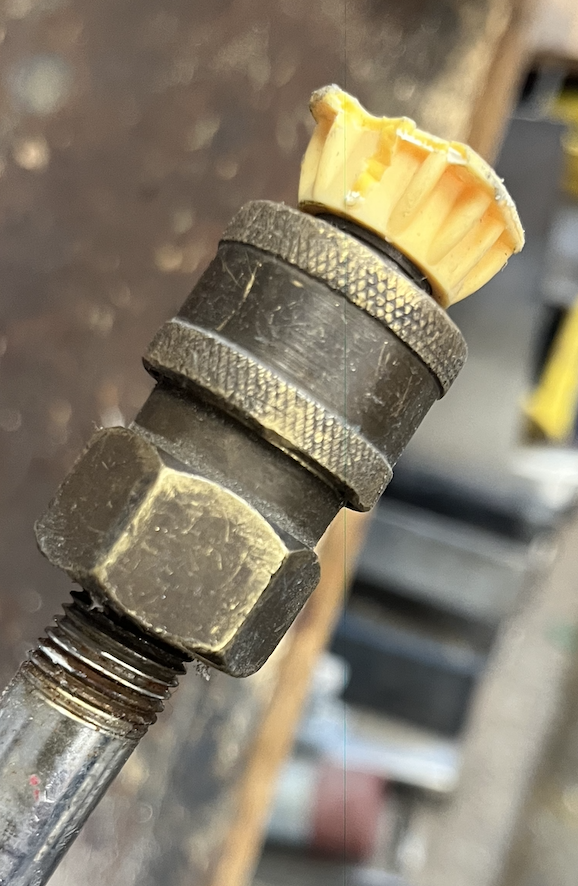
the connection is doable using adapters.
copper wand > garden hose: flare to barb adapter
garden hose > spray gun: adapter
0 -
I did a little theater work in my younger days. the engineer that was in charge of the facility with all kinds of lighting, sound, props and backdrops taught me that anything that goes on his stage MUST pass the rule of three. That meant if a light fixture weighed 50 pounds, the support for that fixture needed to be aboe to hole 150 pounds of weight. all the safety cords and fastening devices have to have a tested rating of three times the load that it was supposed to support.
When I look at some boiler assembly instructions that tell the installer that the boiler must be pressure tested to 1-1/2 times the operating pressure, that kind of strikes me as "barely enough"
With the list of parts that include a garden hose and a barb fitting adaptor that you just provided, I'm not convinced that your DIY 90° spray port will withstand 2000 PSI from that pressure washer. I would be very careful with that pressure rating and what you connect to it.
Edward Young Retired
After you make that expensive repair and you still have the same problem, What will you check next?
 1
1 -
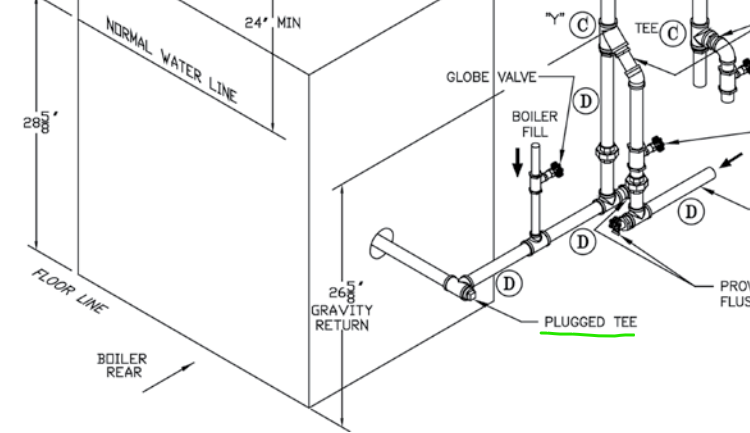
called the customer service, a factory rep told me to look for the lower "push nipple". not sure if the "nipple" here is what they call that connected opening space. In my model, if the piping were plumbed right, removing the plug from the TEE at the end of the wet return gives access to a 2.5" opening for cleaning
 1
1 -
you are correct. hose barb with clamp is not rated for that high pressure.
I need to make some calls to find out the proper fitting to use.
0 -
To answer a previous query:
A push nipple is a short section of pipe, typically about 1 to 3 inches long depending on the diameter. It is usually made of cast iron or steel and is precision-machined to fit the accurately machined openings between cast iron boiler or radiator sections.
The machining involves a slight taper, allowing the nipple to seat tightly when the sections are drawn together with tie rods. This metal-to-metal compression creates a secure, pressure-tight joint that prevents water or air leakage at the connection between the two mating sections.
Edward Young Retired
After you make that expensive repair and you still have the same problem, What will you check next?
1 -
Was that a hemp house your were working in, @EdTheHeaterMan ? That's what the stagehands' union required in the theatres I worked in for hemp. A safety factor of 2 for steel cable. Something falling from the files can ruin your whole day…
Safety factors show up all over the place. I've never been really happy with anything much less than 2…
Br. Jamie, osb
Building superintendent/caretaker, 7200 sq. ft. historic house museum with dependencies in New England0 -
Hemp house … that's funny @Jamie Hall. My kids went to a high school with a stage that hosted the annual school play, and I was voluntold to help out thanks to my community theater background. Long story short, my wife’s boss had been the volunteer director for years. So when my son and daughter attended that school… let’s just say I didn’t exactly get to sit in the audience.
This stage was delightfully prehistoric. Hemp rope rigging. Sandbag counterweights. No fancy automated fly system — just gravity, friction, and teenage optimism.
The canvas backdrops were flown in and out the old-fashioned way. You pulled rope. You tied off rope. You trusted rope.
When we ran out of sandbag counterweights, we occasionally reassigned a freshman to the rail.
“Stand here. Hold this. If the castle starts descending rapidly, lean back and think heavy thoughts.”
It was a very immersive educational experience. Physics, teamwork, and upper-body strength — all in one after-school activity.
To their credit, the freshmen were highly effective counterweights. Low cost. Renewable resource. Slightly dramatic when startled.
Nothing builds character like being part of a live-action pulley system.
Edward Young Retired
After you make that expensive repair and you still have the same problem, What will you check next?
0 -
Maybe put an elbow at the end of the pressure washer wand.
Probably fid a screw on nozzle, instead of this quick connect, o to shorten the length
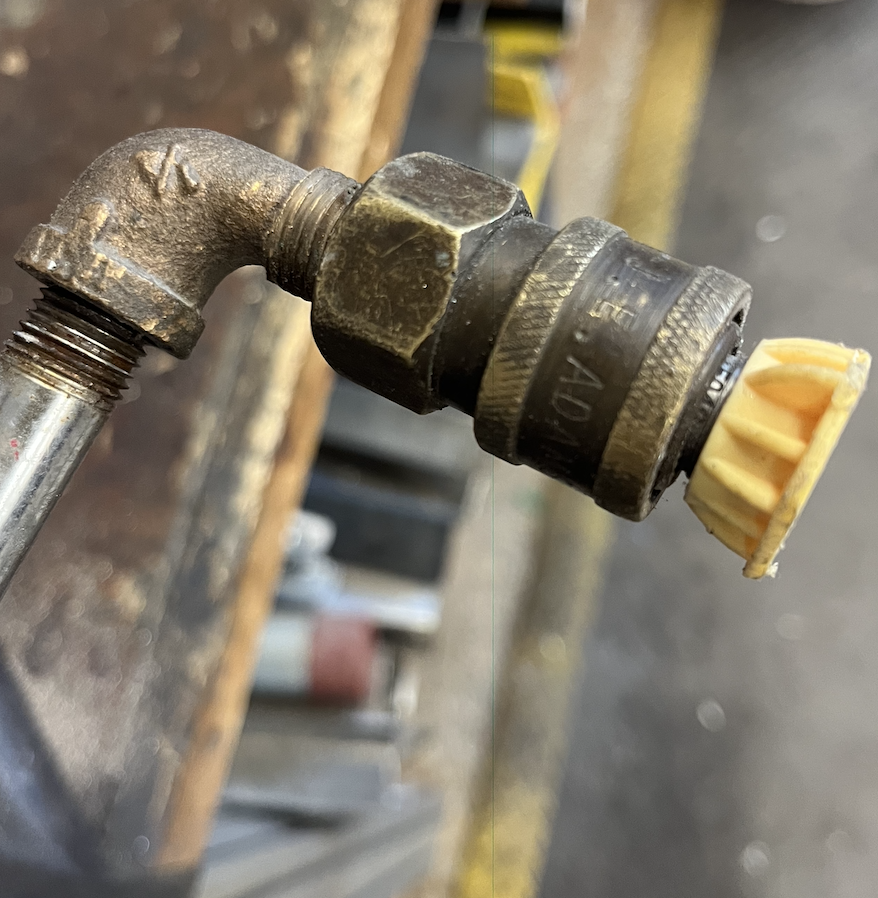
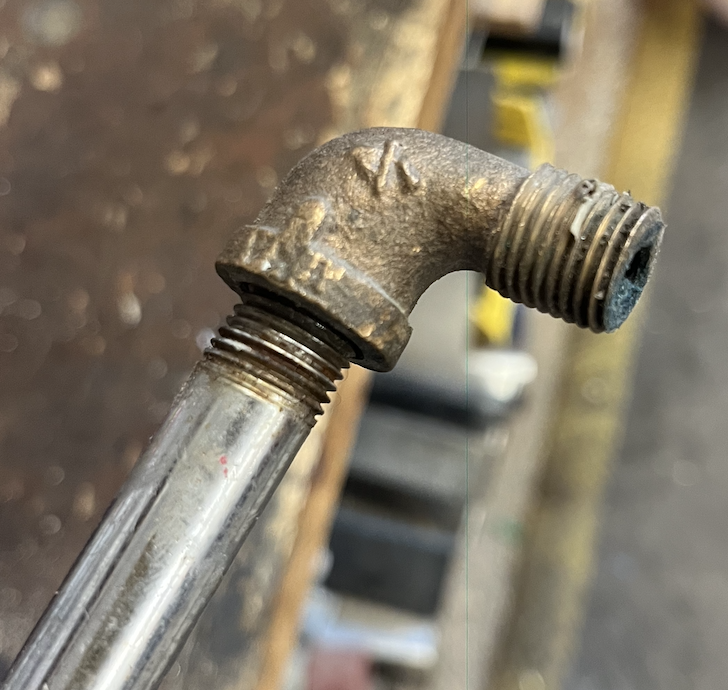 Bob "hot rod" Rohr
trainer for Caleffi NA
Living the hydronic dream3 -
Great Idea with the street 90°. Then Of Course you will need the camera on a probe to see if you have all the build up removed. I think my Gastro-Intestinal doctor has an extra one if you need it.
Edward Young Retired
After you make that expensive repair and you still have the same problem, What will you check next?
2


Categories
- All Categories
- 87.6K THE MAIN WALL
- 3.3K A-C, Heat Pumps & Refrigeration
- 59 Biomass
- 429 Carbon Monoxide Awareness
- 124 Chimneys & Flues
- 2.2K Domestic Hot Water
- 5.9K Gas Heating
- 119 Geothermal
- 168 Indoor-Air Quality
- 3.8K Oil Heating
- 78 Pipe Deterioration
- 1K Plumbing
- 6.6K Radiant Heating
- 394 Solar
- 16K Strictly Steam
- 3.5K Thermostats and Controls
- 56 Water Quality
- 51 Industry Classes
- 50 Job Opportunities
- 18 Recall Announcements