Drain boiler to repair some leaking pipes & pressure testing

I have a new simple one zone residential boiler. (newly installed). Can I just turn off the power switch at the boiler, hook up a hose to the drain and open it up into the floor drain? This is what I always did with the old 1950s Janitrol boiler, but I just want to make sure that's the correct procedure.
The plan is to replace a few nipples at radiator valves that have rusted out. and also add some packing material (teflon or graphite) to all the valve nuts to reduce the dripping that probably is the cause of the rusted nipples. Once I do this, I'm wondering is there is a professional way to pressure test the system to see if it will leak anywhere? It seems like there must be a better way to test for leaks without refilling the whole system and looking for leaks. Most of the pipes and valves are 1912 so obviously there may be other leaks than what I can see.
Comments
-
Your procedure sound like the best way to proceed.
Refilling is probably the only practical way to test.
1 -
Refilling with water and pressure testing — to no more than twice the relief valve pressure — not only is the most practical way to test — it's the safest. Pressure testing with air is really remarkably dangerous.
Br. Jamie, osb
Building superintendent/caretaker, 7200 sq. ft. historic house museum with dependencies in New England1 -
Is there a way to disable the pressure relief valve to test it at a higher pressure? Is it safe to put this much pressure in the system? I'm more concerned about the new boiler being able to handle that than I am the old pipes and radiators from 1912 since I know those are sturdy, but I have no idea if the internals of a new boiler are this heavy duty.
0 -
Just run the pressure up to 25#. That will be high enough, if you mess with the relief valve you may need to replace it.
 2
2 -
if you go much above the operating pressure you may find leaks you otherwise would not have had
 2
2 -
Sounds good, I'll bring it up to 25psi and look for leaks. I think the relief valve is set for 30psi. Thanks for the advice.
0 -
I'm finally getting around to replacing some rusted nipples and repacking valve nuts. I got the first one done and the nipple was not as nearly as corroded and rusted as I had thought from the leaking. It did seem to have damaged threads and maybe that's why it was leaking. Or it was just the packing nut that was leaking. The house was build in 1912 and I've never added more packing to the nuts in the 30+ years I've lived here. (actually just learned that was something I could/should do from this forum)
I forgot to ask if it was best to remove the existing packing material in the nut and start with fresh graphite or teflon packing. That's what I did on the first one.
Here is what an internet search suggested the old packing material is:
"100-year-old radiator valves is typically made of traditional packing materials like tow, hemp, or grease-soaked sealing cord"
I can post a picture, it is an oakum or hemp-like material that is stringy and soaked in something. It seemed to me that removing it was the best bet so that's what I did. Since I had the valve removed I was able to add some water to it upside down and water did not leak out of the valve stem, so I "think" the graphite packing rope worked. Obviously this is not a legit pressure test.
Opinions? Should I just add more packing or clean the original packing material from the nut and start with fresh packing? I'm planning to go around and do all the old valves.
0 -
sometimes some or all of the fiber in old packing material is asbestos. it is more important that the stem is smooth than if you remove the pacing and replace all of it or just add more. packing with various types of natural fiber and teflon packing is available now. usually the natural type had graphite mixed in it for lubrication.
sometimes you can tighten the nut and stop the leak too. don't crank down on it too hard or you can crack the nut.
1 -
I suppose if the results are the same, I can just add a 2-4 wraps of teflon or graphite rope to the existing packing material so I don't disturb the existing packing. My local university will check it for asbestos for free so I may take the material I removed to them and have it tested. I still have a month or so before needing heat.
0 -
In this video he just adds graphite packing after saying much of the existing stuff is worn away. He's not attempting to remove old material. So maybe I'm overthinking it.
https://youtu.be/y0VQOZqiw7U?t=94
0 -
Don't worry about removing old packing. Just add to what is there.
Edward Young Retired
After you make that expensive repair and you still have the same problem, What will you check next?
1 -
Sounds good, The results from the University came back that it was asbestos so I'm going to just add more as needed and leave the rest of the valves undisturbed. Also it's good to know that I can probably do this while the system is filled by just turning the valve off and putting a towel around the valve and working fast. I was worried that water would be shooting out around the stem but if it's just a little leakage that's not an issue.
0 -
I ended up going around all the 9 radiators and added some amount of graphite packing rope to each of the valves. The ones that had signs of leakage (green patina on brass parts or staining on floor) I added about 4-7 wraps and the others I added 3-4 wraps. The next step is to refill the boiler but that brings up my next question:
When I refill the system with water, do I need to do anything to make sure no water gets in the expansion tank? The installer of the new boiler told me that the one valve (which looks to me like it's just in front of the expansion tank) needs to remain in a partially open state. I don't really understand why it needs to be like this and I don't understand the finer details of the expansion tank. I assume, though, it needs to remain empty so there is space for overflow. Is my assumption correct? Do I need to shut that valve to the expansion tank when refilling the system? I'm familiar with the correct range of PSI and bleeding radiators, but I need advice about how to correctly fill the system with water and what to do with the expansion tank. Do I need to drain the expansion tank? Thanks in advance for advice. I can send pics if needed. It's a simple one zone single family system.
0 -
Nice work checking all the valve packing.
The expansion tank should have emptied when you drained the boilerThe valve to expansion tank needs to kept open. As you fill up the boiler the water will flow into the tank until the air pressure inside tank reaches equilibrium with the boiler water up to limit set by fill pressure regulator.
As boiler heats up the water pressure will increase a few PSi and expand into the tanks.
Without the expansion tank the pressure would rise until the pressure relief valve release.1 -
So, are you saying I should just fill the system with water to 12-15PSI or so and not concern myself with closing the valve to the expansion tank during the filling stage? I would have assumed the tank is supposed to be empty so there is room for overflow into the expansion tank when pressure gets too high, but I'll admit, I don't know anything about how they work.
0 -
I guess you can fill it either way. I used to fill the system to 12-15 psi with the tank shut off and when the system is filled and vented open the expansion tank valve
I am sure the way @PC7060 says will work as well.
1 -
Advantage of leaving open is the tank will drain out water pontentially resolving any waterlogged condition.
Only advantage to closing while filling then opening is the valve get exercised. 😊Once opened the water will fill the tanks until pressure is equalized.
1 -
I'll post a picture of the valve and expansion tank. The installer insisted that the valve remain in a half open/closed position. I wasn't there when he explained this to my wife so I don't really understand why he said it must remain half open/closed.
I just watched some youtube videos on expansion tanks and think I understand better how they work now. I assumed it was supposed to be empty (only air), but it actually has a water side and an air side with a diaphragm in-between. So, I assume that when I fill the system to 12-15psi, the water half of the expansion tank is also then at that same pressure. Is that true? Do I need to check the pressure on the air side and adjust it to match that water pressure? I have a digital air pressure meter and a mechanical bicycle pump, but don't own an air compressor.
 0
0 -
You should only check the air pressure in the expansion tank when it is EMPTY of water. Pressurize it w/ air then, to the system's recommended operating pressure of 12-15 psi. Then fill the entire system (incl. tank) to that water pressure w cold water.
1 -
Okay, thanks, that sounds like an important first step before refilling the boiler that I didn't know about. Will my bicycle pump do the job well enough?
Also, I'm still confused about what to do with that partially open valve (see picture). Do I leave it how it is when refilling or do I open it all the way for refilling and then return it to the position it's in now. I'm uncomfortable with changing that valve setting since the installer said it should remain in that position.
0 -
yes, bike pump will work. You don’t want to use a high pressure air compressor for these tanks. Although the small battery powered ones with built in gauge work well.
From you original description I was imaging a old school tank hanging from ceiling.
Can you post a picture from a bit further back so we can see the entire boiler and near piping?
1 -
That valve is there to prevent all of the cool returning water from cooling off the boiler causing the flue gasses for condense. This will shorten the life of the flue pipe and the boiler. That valve is allowing an amount of warm/ hot water to mix with the returning cold water from the system. Does that make sense?
Miss Hall's School service mechanic, greenhouse teacher, dog walker and designated driver
 2
2 -
Yes and no, It makes intuitive sense that you wouldn't want hot and cold things suddenly mixing together, I can see why that could cause damage. I guess I'll just leave that valve in its current position and not worry about it if that's how it should remain during filling and regular operation
0 -
-
wow, bet those MegaPress adapters were pricey. I’d have removed those sections and threaded into the old fittings. Guess they left the large pipe wrenchs at home. 😊
Works well either way.
0 -
Any issues with air removal?
Pumping at the expansion tank, pump on the return, and the large pipes with very low flow velocity can make air removal tough.
Good to have that microbubble separator.
Is the boiler LP with that copper gas line?
Nice piping work.
Bob "hot rod" Rohr
trainer for Caleffi NA
Living the hydronic dream0 -
Being a homeowner with a coal stoker boiler I was very surprised with this piping arrangement, I would not have approved of this based on my past experience with viega press fittings blowing apart.
How are your radiators plumbed?
With your pressure relief valve piping plumbed as it is how do you expect to drain the boiler if needed?
Your picture image appears to show the drain valve handle crossing the dump pipe for the pressure relief valve. The pipe nipple they used is too short.
I am going to assume your old system was a hand fed coal fired gravity system using the radiators as the point of no pressure change originally.
Am I correct in thinking the circulator is pumping into the boiler? Does the circulator have a check valve in it?
I do not see a Low Water Cut Off switch, pressure regulator or back flow preventer in your boiler plumbing, they are required by plumbing code.
Is the triple aquastat inside the front cover of the boiler?
The bladder tank should be pressurized when empty. The manufactures provide you with a chart showing what the pressure in the tank should be based on how many stories your home is.
The boiler fill valve should be closed after the system is filled and checked for leaks and never left open.
Is the chimney cleanout still accessible? Is there a cap on the chimney? If I remember plumbing code correctly your gas water heater should not be sharing the same chimney with the hot water boiler and should be using a power venter.
I would have created a common header pipe for the return to boiler sump piping from the cool water returns.
I have lived through issues with bad boiler plumbing and that is why I am asking these questions.
0 -
Many of these questions are beyond my ability to answer, but I will try. The contractor pulled permits and did inspections so I can only assume the install is acceptable in my area. There is a back-flow preventer that's higher up between joists. The water heater venting out the same flue liner as the furnace has been like this for the 30+ years I've lived here and I have carbon monoxide testers everywhere and there is no problem. The installer said the existing flue was fine for this type of cast iron boiler but if I went with a high efficiency I may need something else. I wasn't really happy with how they installed those couplers to the existing pipes, but they insisted it was too difficult to break those pipe joints and reuse the threads. He said this is how they do all of them on old houses. The old boiler sat squarely on the concrete pad and I was annoyed that they put the new boiler so it sat the other direction, but he said it needed to be this orientation for servicing so I accepted it in the end.
There may have been a coal furnace at one point since the house was built in 1912, but for all the years I've been here it was a natural gas Janitrol boiler built in the 1950s.
If by air removal you mean bleeding the radiators, I've not had problem getting the air out of all the radiators and reaching the 12-15psi at the boiler gauge. It does take going back and forth with adding water, bleeding and repeating but it seems to work fine. I did this every year for 30 years with the old boiler and I've had no problem with the new boiler, but this is the first time I've drained it so I'm not sure if I will run into problems when refilling. This is why I'm here asking questions to make sure I have the correct procedure for refilling.
The expansion tank measures 13.1 PSI on my digital meter so that seems fine to leave as-is.
0 -
Your system static fill [pressure required is determined by the highest point in the system, maybe the topof the tallest radiator.
If it is a two or 3 story system. Measure of guesstimate the highest point above the boiler.
Consider a multi story home, the top of the highest tallest radiator is 22 feet.
22 X .433= 9.5 psi. Add 5 psi to that to assure positive pressure at that highest point so 14.5 psi would be a good fill pressure.
For common single story, 10- 12 psi is a good number. When the system is cold, tank pressurized to the fill pressure. There is no water in the tank until it begins to get warmed, expands and pushes into the tank.
I would keep an eye on the boiler pressure as it heats up to 180 or the boiler temperature. With all that large pipe and water content, it may require a larger expansion tank, or two of those #30.
The boiler from cold to 180 should not increase pressure above maybe 25 psi. You want to stay under the pressure relief valve 30 psi setting.
Bob "hot rod" Rohr
trainer for Caleffi NA
Living the hydronic dream0 -
It's a 1.5 story house, so the attic is the second floor and there are 4 radiators up and 6 down. None in the basement. The system worked fine last winter and it's quite cold in MN, so I'm going to assume the company that installed it knew what they were doing. If something needs to be changed they'll have to come back and do it, adding expansion tanks is more than I'm capable of. I'd like to be able to do basic DIY maintenance of the existing equipment to keep it in good shape so it keeps working and lasts as long as possible, but beyond that I'll probably need to call someone.
I'm hoping to refill the system this weekend and check for leaks at all the radiator valves. Since I messed with the packing nuts I'm just going to assume some of them will leak when I refill the system and I'll have to go around and tighten some of them to stop leaks. I'll post about how it goes then.
This kinda brings up my next question. Assuming filling and bleeding radiators goes well, do you think it's wise to purchase a yearly service plan and have a pro come out and tune it up before each winter? I've always done this work myself with the Janitrol, but that was a much simpler system. I would take out all the burners, clean them with a wire brush and poke all the burner holes to make sure they are all open, and vacuum out the boiler. But this system was just a gravity unit and not as complicated. Thoughts?
0 -
there may be some “how to service” videos at the manufacturer website. That should not be a complicated boiler to service.
Bob "hot rod" Rohr
trainer for Caleffi NA
Living the hydronic dream1 -
Consider a multi story home, the top of the highest tallest radiator is 22 feet.
22 X .433= 9.5 psi. Add 5 psi to that to assure positive pressure at that highest point so 14.5 psi would be a good fill pressure.
For common single story, 10- 12 psi is a good number.
For a single story home what is the benefit of 10-12 psi vs 14.5psi?
0 -
what would be the reason to run 14 psi, if 10 or 12 gets the job done?
Many fill valves, and expansion tanks are factory set at 12 psi although it is wise to confirm that.
Bob "hot rod" Rohr
trainer for Caleffi NA
Living the hydronic dream1 -
Refilling to 15 PSI was a partial success. 3 of the 9 packing nuts were leaking a bit and tightening seemed to fix the problem, so that's good news and I can check that off my list. Unfortunately, the one valve that was leaking the worst, the one where I replaced the vertical nipple just below the valve is still dripping as before. When I took the valve off, I noticed the threads on the valve seemed a bit damaged. But I thought I'd just use a lot of pipe dope and some extra teflon tape to make sure it seals, but that didn't work, and I think I'll need to drain again and replace that valve.
Replacing the valve is not a problem, what is difficult for me is getting the spud out. I haven't had any luck doing that on these 120 year old radiators. I bought one of those long universal spud wrenches, but I can't understand how to keep it tight on the spud to get a wrench on it. It just falls out. I've seen on youtube someone had a spud wrench that was just specific for the one size but I can't find it online. Also, I saw one video where he hacksaws the spud and chisels it out. That seems like it would work if the spud is soft brass, but then I'm worried I can damage the threads on the radiator — that would be a disaster. Advice? The dripping is very little, but I can't see leaving it, it will bother me and the nipple will rust again.
0 -
Slide the spud tool and put a wrench on it they tend to stay in place.
If spud lugs strips out, I cut the nut off with oscillating saw and remove spud using pipe wrench. Every spud I’ve every seen is brass and unthread easily once you get pipe wrench on em without damaging radiator.
The brass is also why the lugs can strip.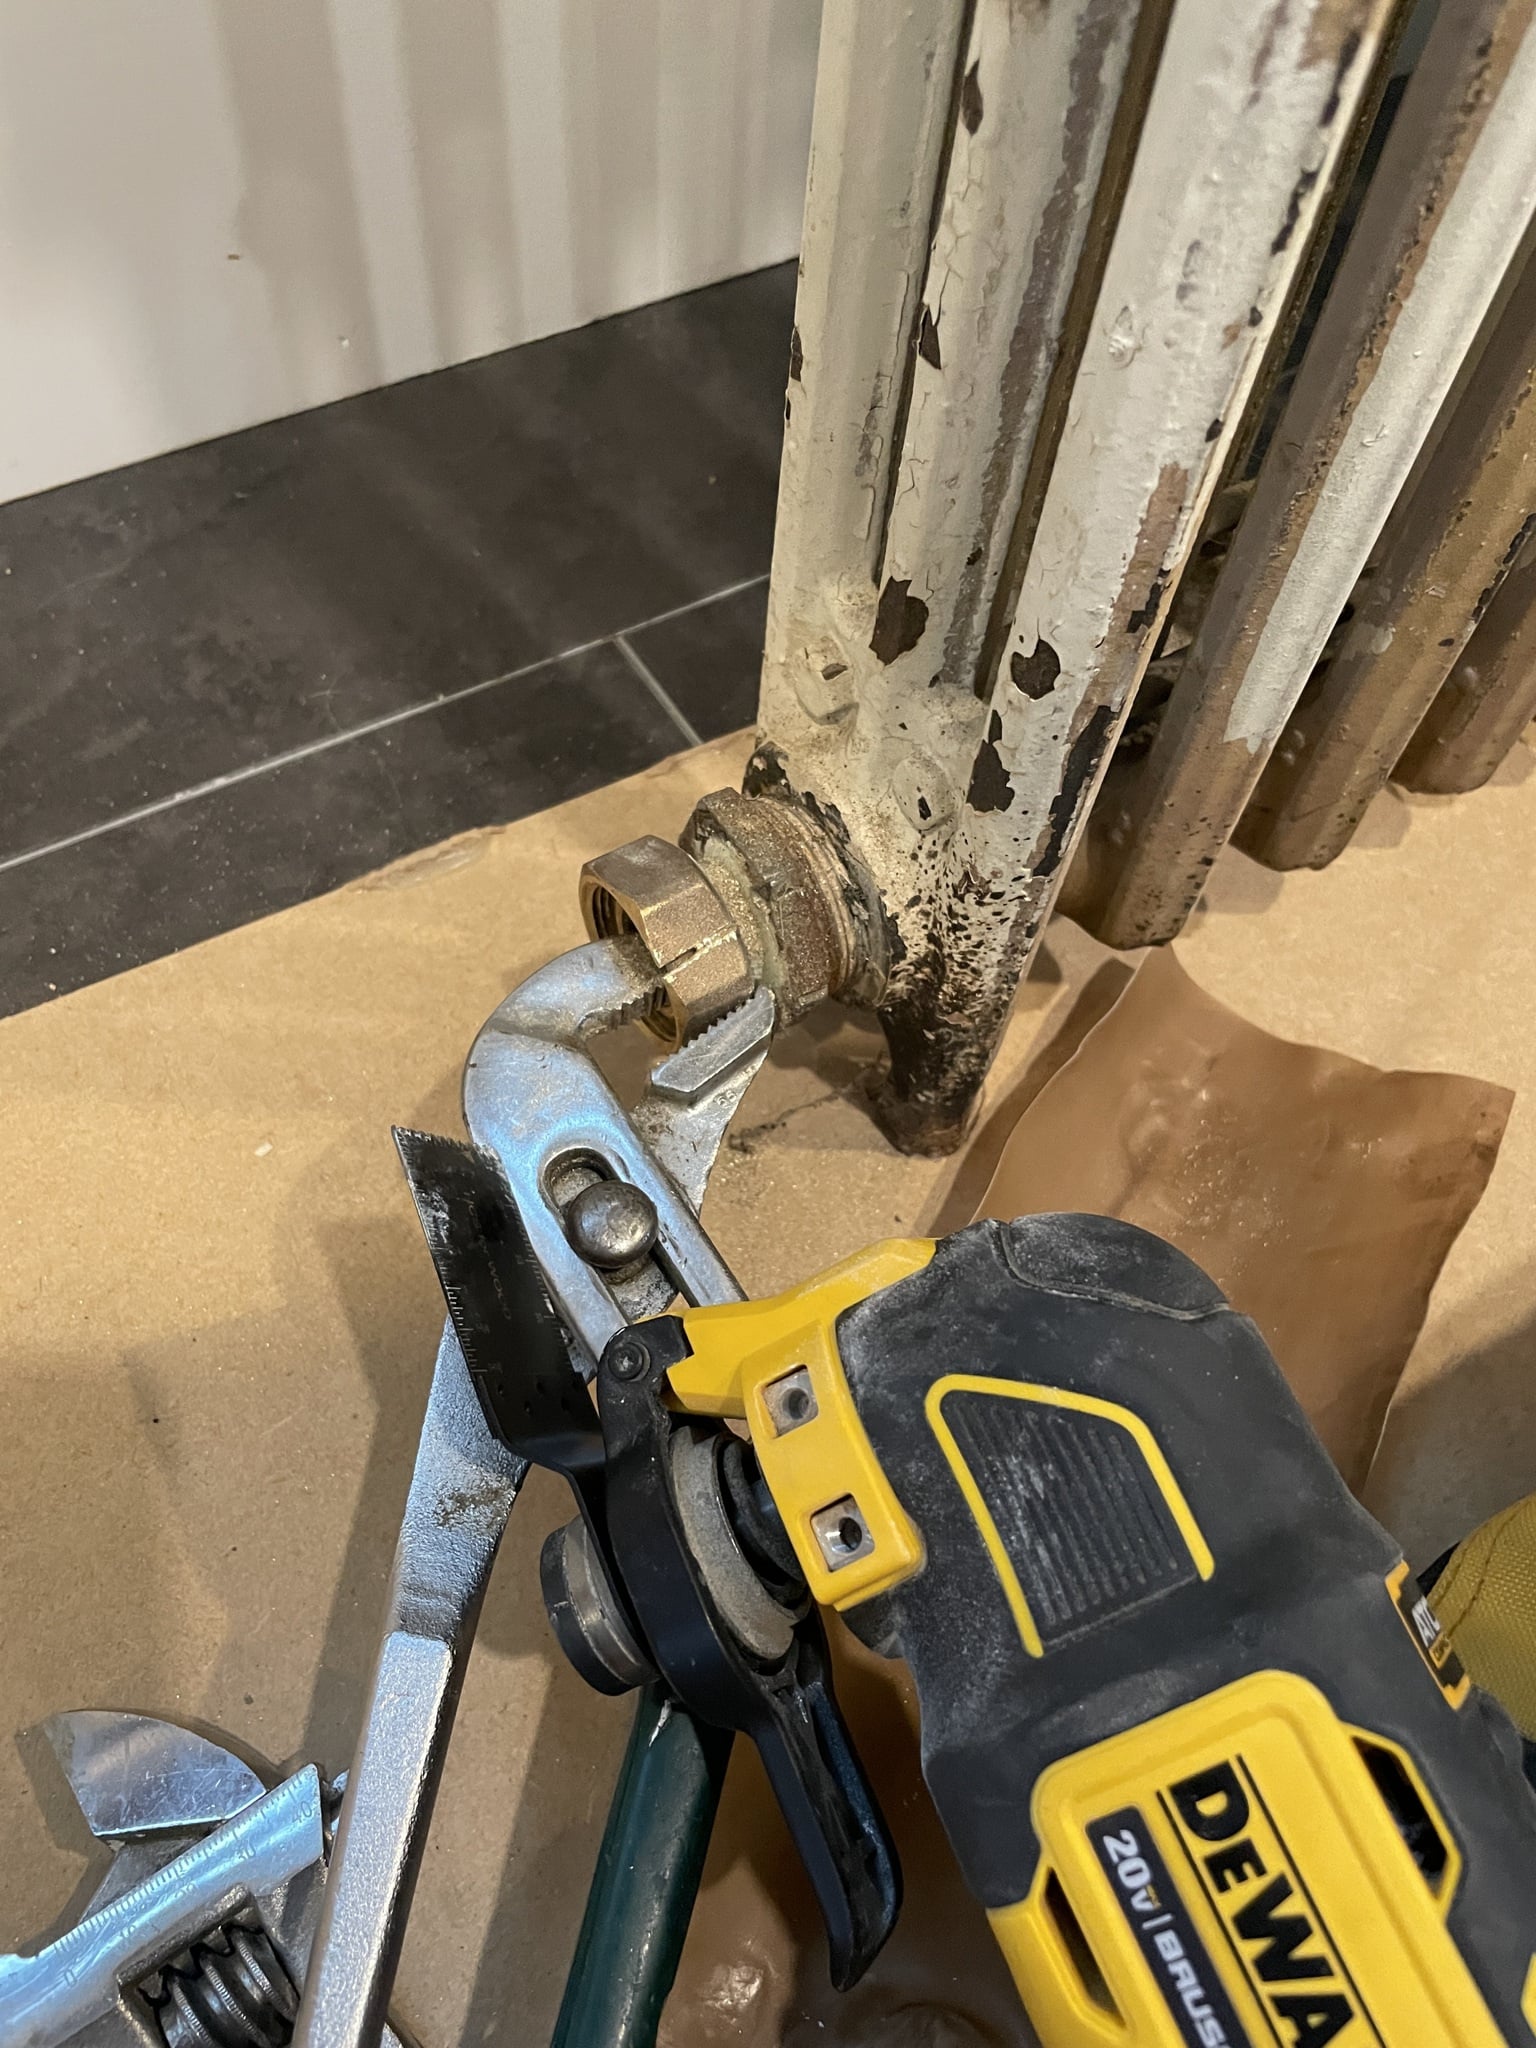 1
1 -
That's great, if I can't get it out with the spud wrench, I can still just cut off the nut and have enough room to grip it with a pipe wrench. That's the solution I needed, thanks! I was worried about messing up the threads on the radiator by cutting inside the spud.
1 -
The nubs or spuds or whatever they are called were too worn to use the spud wrench. I ended up cutting off the nut. I put the spud wrench inside so the walls of the brass spud would collapse against something rigid. I didn't think that would work at first and I'd have to saw the inside of the spud (not my first choice) but eventually it moved with a big pipe wrench and an extension piece of PVC. It needed to wear off the lip on the spud before the pipe wrench gripped well enough to move it.
1 -
Good job getting it out. I start with a 18” pipe wrench and add a 36” cheater one for stubborn ones. 😊
1 -
Thanks. My radiators pipes range from 1"-1 1/2" and this was one of the big ones and stubborn. I really had to mangle the pipe until an 18" wrench with a long extension would get it to move. But in the end it came out and now I know how to do it. Filled the system to 20PSI to pressure test it and after a tightening a few packing nuts, it's not leaking anywhere I can find anymore. I imagine that once I turn on the boiler the heat may cause some slight leaks and I'll have to go around and tighten nuts and bleed again, but I feel confident it's ready for winter now. Thanks everyone for the help.
I'm curious about pressure and the expansion tank. I measured the air pressure in my expansion tank at 13.1PSI with an empty system,. I'm wondering is the air pressure in the expansion tank rising when the water pressure rises, so that that as more water enters the expansion tank the volume of the air side is decreasing and the air pressure is rising? If this is the case, does this affect the accuracy of the PSI reading on the gauge? Should I go for a 13 PSI reading on the gauge so they are equal? The gauge on my boiler is so small I can't really tell very accurately to more than about +/- 5 PSI
1 -
The pressure in the tank should match fill valve pressure but id say 13PSI is pretty close. You will need to isolate the expansion tank and drain boiler side to adjust.
Does not affect accuracy of pressure gauge. Water will fill the tank until the air pressure on tank equals the boiler pressure. With a cold boiler that will be pressure set on the incoming water pressure reducing valve. When the boiler is at temp you may see slight increase but not much if expansion tank is doing its job.
your gauge look pretty typical, you can install one with larger face but probably not worth the bother as you would need to drain down the boiler.
1







Categories
- All Categories
- 87.8K THE MAIN WALL
- 3.3K A-C, Heat Pumps & Refrigeration
- 60 Biomass
- 430 Carbon Monoxide Awareness
- 133 Chimneys & Flues
- 2.2K Domestic Hot Water
- 6K Gas Heating
- 124 Geothermal
- 170 Indoor-Air Quality
- 3.9K Oil Heating
- 79 Pipe Deterioration
- 1.1K Plumbing
- 6.7K Radiant Heating
- 397 Solar
- 16.1K Strictly Steam
- 3.5K Thermostats and Controls
- 56 Water Quality
- 51 Industry Classes
- 51 Job Opportunities
- 18 Recall Announcements