Replacing Electrodes on Beckett AFG Oil Burner

Greetings!
While performing the yearly maintenance on my oil furnace, I've come to notice that the electrodes are looking a bit rough. Being a DIY guy, I have a feeling I should replace them. I did find this set as a replacement (consulted the manual/part number) at my local Home Depot but the insulators are not long like the ones currently installed. However, this part appears to also have the longer insulator.
Do I need the kit with the longer insulator?
Lastly, I also have this filter installed on my tank but for some reason, this exact match is a bit hard to find. Do I have an option for an alternative that is more readily available?
Comments
-
There’s no **** way you should buy that filter at that price, unless it’s for a box of 50.
It’s a standard spin on. Sid Harvey has them for maybe 10 bucks (still working off last years case)When you’re there, bring your old electrodes and match them up to new ones.
Most important is that they are properly set, proper x dimension, and you do a full combustion analysis (including draft and smoke). Amongst some other things.0 -
Sid's isn't open to the public. And I commend them for it.
 1
1 -
@HydronicMike I think it's for a box but thank you for the suggestion as where to find it. I will also do as you suggested with the electrodes. Thank you.
0 -
Can you post a photo of your suspect electrodes? I was wondering how you are going to adjust the burner for proper combustion. Do you own a smoke tester and a combustion analyzer? Of course of you might save 100 or more on doing all the maintenance steps yourself, but will the fuel usage increase resulting form improper adjustment be worth it? A guess it might be a wash.
Do you know how to test all the safety features in order to make sure the system is safe to operate? My 28 point tune up of an oil burner included testing 5 different safety items and if one of the items did not pass the test, then the burner was not safe to operate. But you can save on that part too by ignoring those items and just hope that those safety features are working as they are supposed to.
Edward Young Retired
After you make that expensive repair and you still have the same problem, What will you check next?
0 -
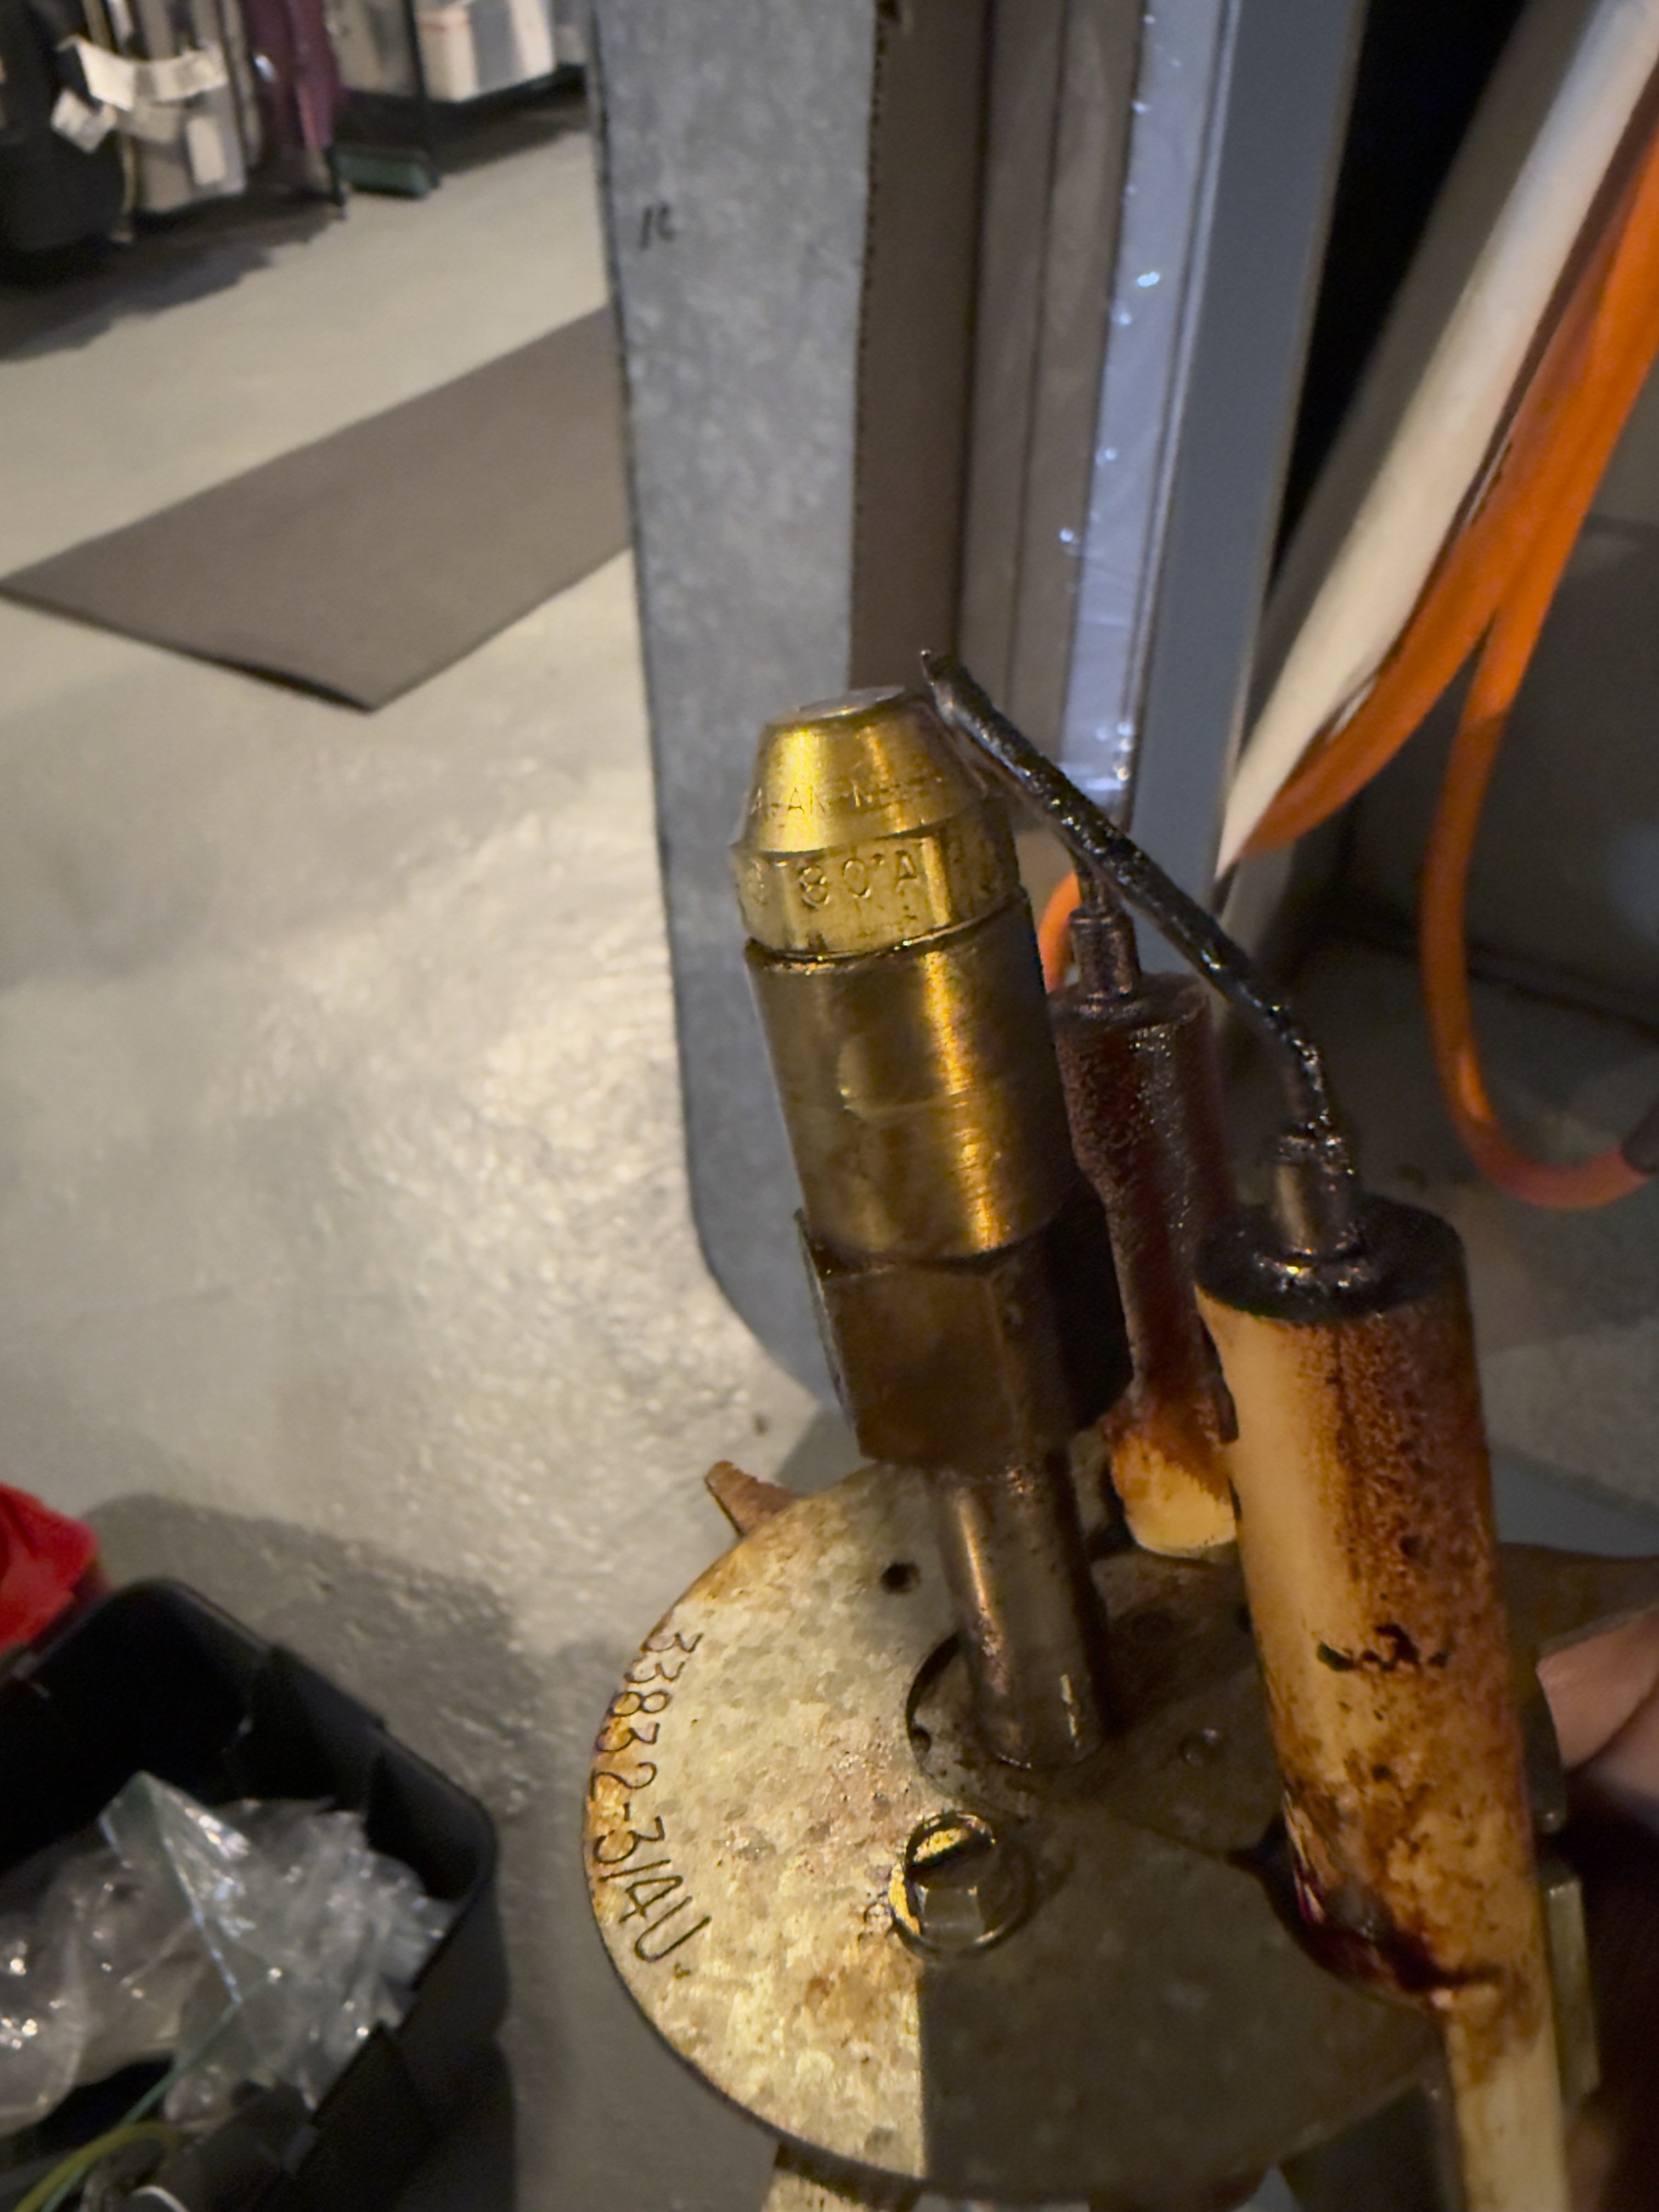
@EdTheHeaterMan See attached.
I don't own any of those tools but I read the manual a few times and the steps listed doesn't sound very difficult to follow. I understand the risks but my goal is to hire a tech every other year for an overall assessment. I came to this conclusion after realizing that the time he was spending during the yearly maintenance was becoming less and less. Hardly any parts were being changed etc. The icing on the cake was one year where a tech misconfigured something and the furnace started to short cycle. I had to call another company for them to fix it since the original kept coming back and not finding the issue.
And on the plus side, I have learned so much about how it works. I assume it's never a bad thing in case of an emergency. 😉
 0
0 -
Looking at the assembly, maybe have a tech check it this year.
0 -
They say they aren’t but the three in my area will. So will RE MICHEL. But at least RE charges more to H/O than account holders.
I still recommend a competent professional for anything combustion related.0 -
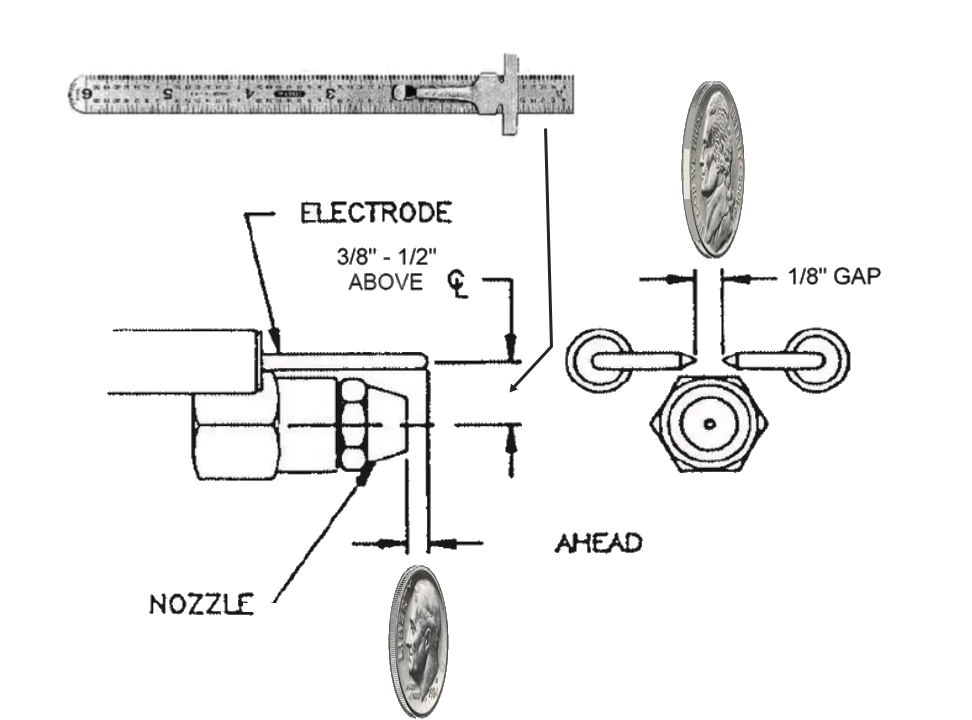
Looking at that assembly, I don't see anything wrong with the electrodes that require replacement. A wire brush and some degreaser should make them operable. Do you have a small ruler that has measurements in the 1/32" increments? you will want ot set the gap and the hight above the nozzle centerline with one of these:
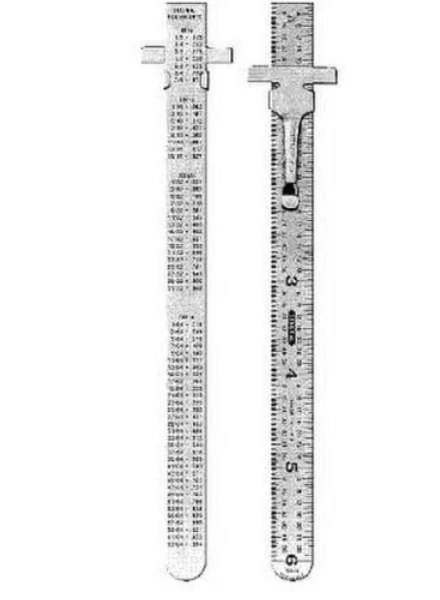
That is all I used when learning how to set electrodes in the 1970s. You could use a nickel as a feeler gauge to set the gap. A dime for the measurement ahead (foreword) of the nozzle, but you still need something to measure the hight above the nozzle centerline.
Edward Young Retired
After you make that expensive repair and you still have the same problem, What will you check next?
0 -
so much could go wrong. I did the same thing you are doing last year (I have experience, just not the right experience, and the tools) and so much went wrong… I was off on electrode position, I thought I was vigilant with measurements, had a delayed ignition and smoked the basement. Be careful.
0 -
I would suggest buying oil from a full-service oil company that has a competent service department.
Will you pay more for oil YES.
But you will have someone you can call who has an interest in keeping your boiler running properly.
0 -
@EBEBRATT-Ed I tell customers all the time when their fuel delivery company doesn't provide service and they call us for service that its "the high cost of low priced fuel"
1 -
@EdTheHeaterMan Thank you for the instructions. I really appreciate you taking the time to write this up. I purchased a "Beckett z2000u Gauge Kit "Z" based on some research. I was planning on using that and double checking it with the small gauge that came inside the electrode kit (I found all the parts I needed at my local F.W. Webb).
0 -
@HydronicMike I did end up calling them and they asked me right away if I was a pro. No go unfortunately. My local F.W. Webb had no issues selling the parts I Needed 😂. I purchased a new electrode kit, new nozzle and a filter. Total of $65.
By the way, they didn’t have the filter I had (linked above) in stock, but they suggested I use a similar one. The only difference is that the new one has a maximum pressure rating of 40 psi instead of 60 psi. I trust their recommendation, but where can I double-check that this is acceptable to use? Is it in the burner manual?
0 -
The filter is fine. There is little to no pressure on it
1 -
The maximum pressure allowable on a fuel line where that filter is located is less than 3 PSI. Anything higher and you risk the possibility of the fuel pump's shaft seal leaking. Chances are, your fuel line may operate in a vacuum at times. In other words a filter rated at 40 PSI is way higher than necessary, an therefore safe to use
Edward Young Retired
After you make that expensive repair and you still have the same problem, What will you check next?
1 -
@EdTheHeaterMan & @EBEBRATT-Ed, Thanks for the confirmation on the filters.
I just finished putting everything together and she fired right away. No smoke or anything odd that I could tell.
A couple more questions if you don't mind: In the image below - I assume the small circles above the burner are the clean outs? I pulled them off and stuck a vacuum in there but before that, I inspected them with a flashlight and they appeared clean. Is there anywhere else to check? Chimney clean out is also good.
Lastly, some light reading the other day also led me to a "pump strainer". This is the pump on the burner:
I can't find the manual on this so I am wondering if I need to replace or inspect the "strainer"during maintenance or if it even applies to my unit. A closer look makes it seem like it won't simply pop off as there is a bolt/connection on the right side that won't allow the cover to come off. I could be wrong, of course.
0 -
If it is a Suntec pump it has a strainer. A Webster pump doesn't.
You can buy a replacement strainer it should come with the gasket or clean the existing strainer. You shut the oil off at the burner and unbolt the pump cover and pull it off gently with the oil line attached. Probably need to tap it for it to break free. Don't pry it off you could damage the pump
1 -
Those are the cleanout ports for the heat exchanger (HX). The proper cleaning tool is a 1-1/2 diameter horse hair brush with a 36" to 42" handle in order to wrap around the curve of the HX then you vacuum what falls to the bottom with a flexible 1.12" soot snorkel. Cleanout Brush.
As far as the fuel pump is concerned you will need a replacement gasket on hand to service the strainer, or you can just purchase a replacement strainer that comes with a gasket. Suntec 3779901 cover gasket or Suntec strainer S160-14
Or you can get the same parts with the RW Beckett name on them for more money. Beckett S160-14
Edward Young Retired
After you make that expensive repair and you still have the same problem, What will you check next?
1 -
The fuel pump cover bolts takes a 5/32 Allen head. And no smoke or anything odd that you could tell? Awesome. Looks like you got it handled.
1 -
@EBEBRATT-Ed Thank you for the detailed information!
@EdTheHeaterMan I appreciate the info and links provided! I will order those parts right away. For being my first time servicing the pump, I think I will wait until the season is over in case something goes wrong. I also suspect things in there to be okay for now since I've been having this unit serviced yearly since I purchased the home.
When you say after using the brush on the heat exchanger, the dirt will fall to the bottom: where exactly? I assume I insert the brush in each of the three clean outs and after, insert the vacuum in the same places?
@HVACNUT Thank you for the info! And no smoke or anything odd. But then again, the unit has always been serviced. For now, I simply replaced the filter at the tank, the spray nozzle and electrodes using a Z gauge to dial it in which made it foolproof. I may wait on the pump strainer until the season is over in case I screw it up.
Double checked all CO detectors in the home specially the one near the basement stairs just in case.
Can't thank you folks enough for all the info!
0 -
When you say after using the brush on the heat exchanger, the dirt will fall to the bottom: where exactly?
The bottom of the outer radiator.
I assume I insert the brush in each of the three clean outs
There are only 2 cleanout ports. The center is an inspection port to the inner section of the heat exchanger. that inspection port is for viewing the flame. it penetrates the inner HX just below the outer radiator. (not shown)
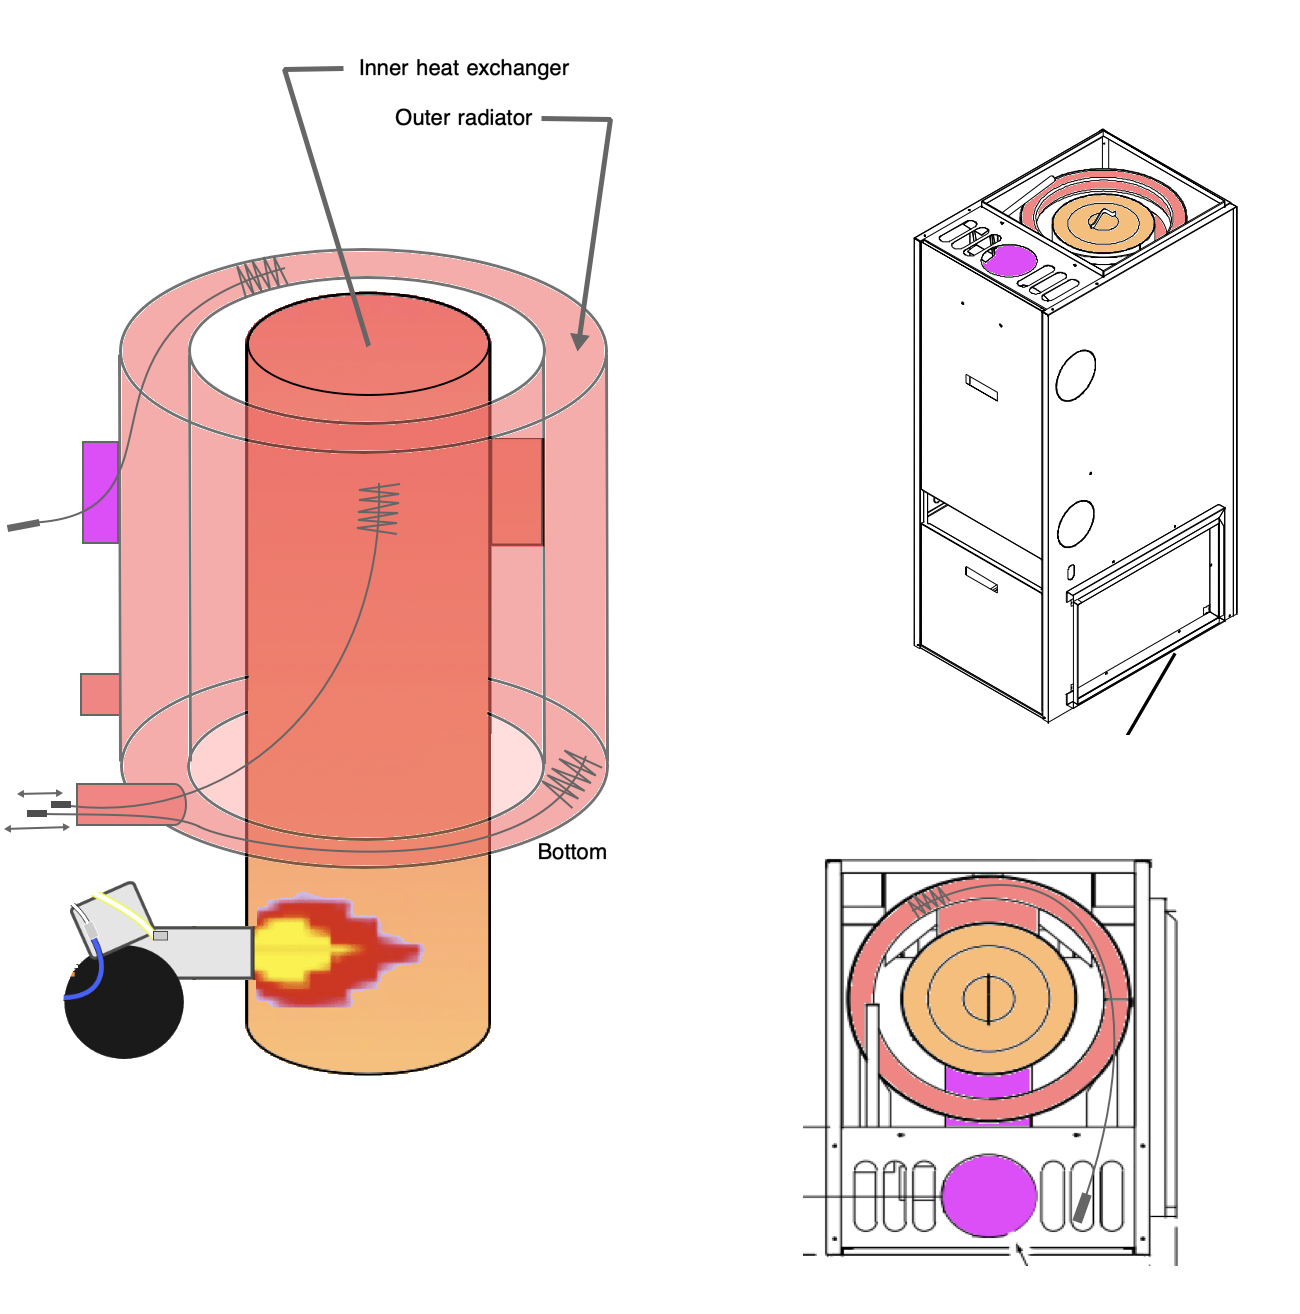
If you look at the left illustration there are 3 brushes. two are using the bottom clean out port on the right side of the outer radiator section of the HX, one of the brushes is entering the outer radiator of the HX thru the vent pipe location. On the bottom right is a brush entering the bottom right cleanout port and reaching past the center rear section of the outer radiator. That will always be the hardest place to reach with the vacuum and you will never actually see if it is clean. You just have to "feel" that it is clean.
I hope my illustration is clear
EDIT:
This is not your furnace but I like the detailed cleaning instructions they provide on page 52. Velocity Boiler Works Oil Furnace. They have an octagon outer radiator that is supposed to be more efficient compared to your round outer radiator, but the cleaning instructions are the same.
Edward Young Retired
After you make that expensive repair and you still have the same problem, What will you check next?
1 -
Can't thank you enough for this. I really appreciate the attached illustrations! You just made it idiot proof 😂.
Again, thank you!
0 -
Please don't put words in my mouth!!! I never called you an Idiot!!! 🤭 I was thinking it, but I never said it out loud! L🤣L
EDIT:
But seriously, I'm glad I can help you to understand what's happening inside that heater of yours
Edward Young Retired
After you make that expensive repair and you still have the same problem, What will you check next?
1


Categories
- All Categories
- 87.6K THE MAIN WALL
- 3.3K A-C, Heat Pumps & Refrigeration
- 59 Biomass
- 429 Carbon Monoxide Awareness
- 124 Chimneys & Flues
- 2.2K Domestic Hot Water
- 5.9K Gas Heating
- 119 Geothermal
- 168 Indoor-Air Quality
- 3.8K Oil Heating
- 78 Pipe Deterioration
- 1K Plumbing
- 6.6K Radiant Heating
- 394 Solar
- 16K Strictly Steam
- 3.5K Thermostats and Controls
- 56 Water Quality
- 51 Industry Classes
- 50 Job Opportunities
- 18 Recall Announcements