Unrecognized return vent

Hi,
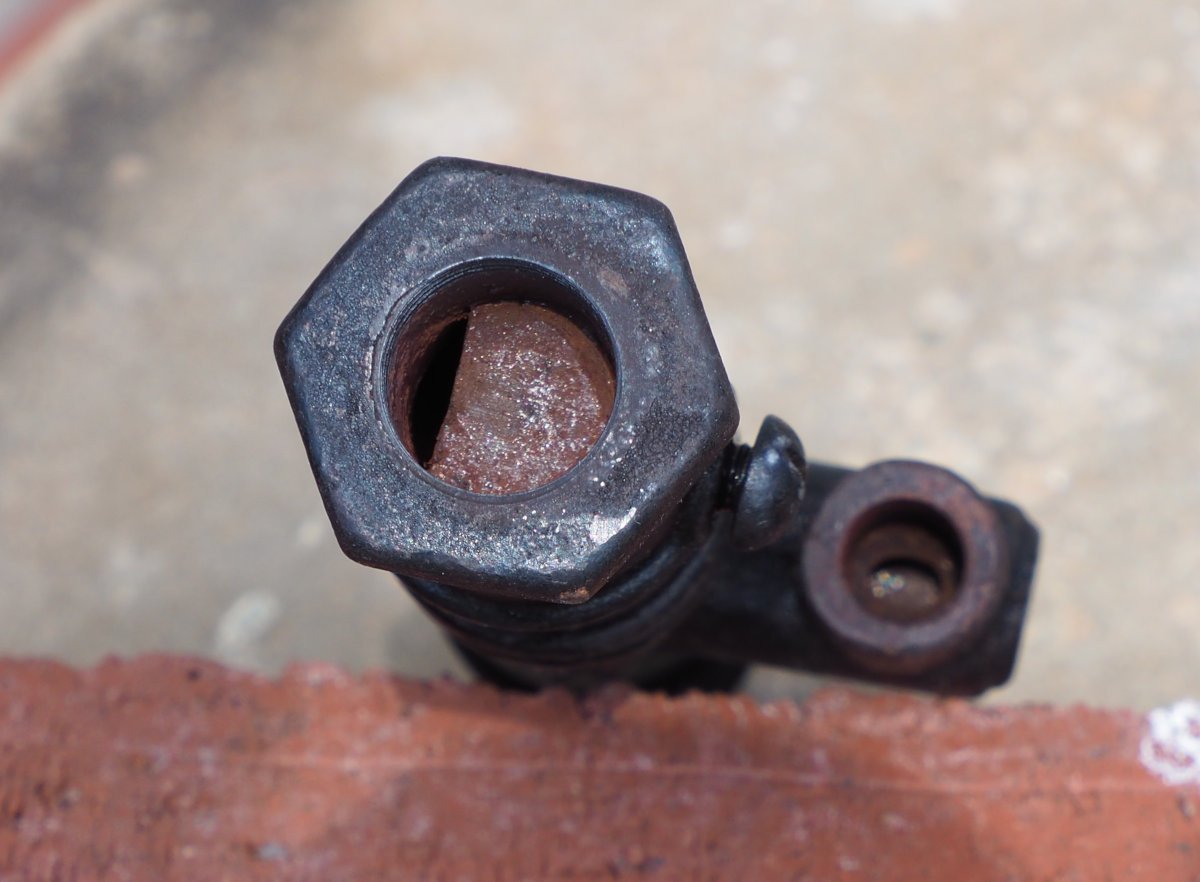
I would like to identify the vent found on my radiator returns. See pics below.
Note: in the first pic, the second bump is actually the L of a second vent behind the first.
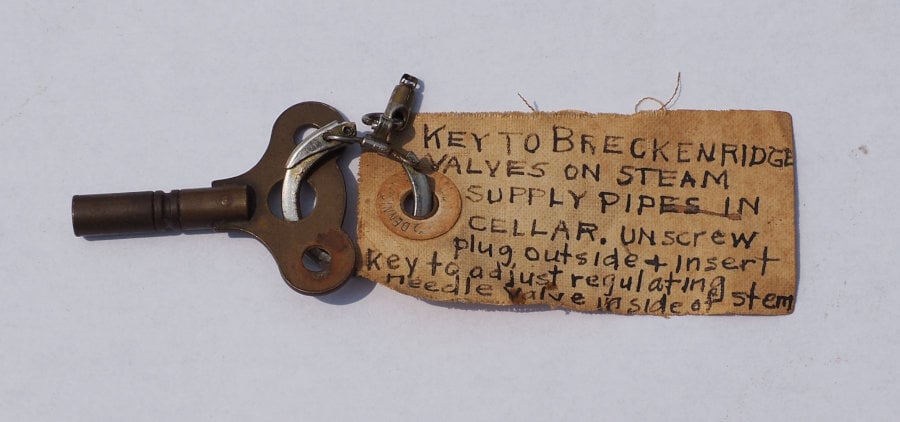
EDIT: Found adjustment key
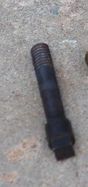
The vent has no identifying marks of any kind. It is 6" long. The bottom threaded hole is slightly more than a 1/4 NPT. The opening on the L is threaded. The L hole communicates with the bottom. However, on heating the vent, it did not close off air (perhaps broken). There is a rod and brass cap of the L; the rod has a threaded section, but sits loose in the inner hole. The the screw on the body is removed, the hole communicates with both the bottom and the L; when tightened, it is airtight. I hoped the body screw would loosen the inner parts; but it did not. It appears as if nothing more can be disassembled (but maybe there is a trick).
Some background on my system. It is an apparently uncommon 2-pipe system; each radiator has a separate runout from the main; each radiator has a separate return to the a common wet return near the floor of the basement; so, the returns do not communicate with each other; the radiators have generic supply valves (not indexable; no orifices); there are no traps at the radiator; there are vents at each radiator return, in the basement near the ceiling; all but two of the returns were updated with Hoffman 1A in the 1970s; the two remaining are as in the pics; there are no other vents or mechanical contraptions or special pipe arrangements, just the boiler.
The house was built in the 1910s; originally with a Pierce coal-fired boiler and radiators; a Kel-Mac vapor system is named in the blueprints. Circa 1924, the Pierce was replaced with a Bryant gas boiler. In 1997, it was replaced with a commodity Carrier (Dunkirk) gas boiler; existing near piping was unchanged.
System works well except for 2 of 20 radiators; one (furthest) rarely heats; the other (much closer to boiler), the supply pipe bangs a bit and radiator rarely heats. Neither have the old vent attached. Oddly, the two radiators with the old vent heat nicely.
I would also like to find more info on the Kel-Mac system. LAOSH only has a 1/2 page mention.
Thanks.
EDIT: Additional details
- The vent is "Breck" (Moses P. Breckenridge), may be his 1868 design (unconfirmed);
- Is thought to have a bi-metal component to actuate the valve.
- The bottom thread fits 3/8" NPT;
- The adjust screw in the "L" does screw into the inner hole (found original key for this);
- The "L" outlet thread fits 1/8" NPT (not confirmed if actually tapered hole);
- Heating the vent with a flame did not cause it to close (perhaps broken or rusted;
- Placed in acetic acid (5%) for 3 days; de-rusted very well;
- Re-tried heating test to cause valve to close; did not close;
- Still unable to disassemble;

Comments
-
early vents used a carbon rod that would expand in the steam, you might have some form of that.
1 -
that 3/4 partition piece probably comes out or once came out when the screw in the side was removed. i don't see how you'd machine that in place. there might be something else that unscrews through the side ell port first.
0 -
If each radiators return is piped individually to a wet return then you need no traps. You should have an air vent large enough to vent the air from the supply run out through the radiator and the return line and the air vent should be located at the top of the riser where the return drops into the wet return
1 -
they have another thread with this system. that is what they have.
1 -
Since all the radiator condensate returns have their own vent and then drop down to a wet return, if there is not, a main vent at the far end of the steam main from the boiler may help. Also with the poor heating radiators and banging check the pipe pitch, there may be trapped condensate there.
" Oddly, the two radiators with the old vent heat nicely. " If it ain't broke don't fix it ???
National - U.S. Gas Boiler 45+ Years Old
Steam 300 SQ. FT. - EDR 347
One Pipe System0 -
@pacoit said- "The opening on the L is threaded"
My educated guess is this went to an air line that led to an ejector which pulled air from the system, similar to the Paul system. Or, it might have led to the chimney and used the draft to pull the air out, as in the Broomell and other systems.
Obviously, and regrettably, whatever was connected to this is long gone.
All Steamed Up, Inc.
Towson, MD, USA
Steam, Vapor & Hot-Water Heating Specialists
Oil & Gas Burner Service
Consulting 2
2 -
i think the system diagram has an air vent line. see the other thread.
0 -
@Steamhead said, "My educated guess is this went to an air line that led to an ejector"
That is my guess as well. The threaded L hole seems perfect for an air line fitting. As @mattmia2 mentioned, the blue prints detail one indirect radiator under the living room floor; the outlet tees off (may not have been literal) with condensate return on one side and a "KelMac retarder" with "air-line" on other side. The KelMac retarder (probably adjustable) might well be the vent above.
Does anyone have a pic of a KelMac retarder? Or other info on KelMac system?
0 -
Looks like this post has 3 pictures of a Kelmac Jr. retarder. Looks like a steam trap, where is the valve assembly guts ?
https://forum.heatinghelp.com/discussion/150293/steam-trap-kelmac-jr-retarder
National - U.S. Gas Boiler 45+ Years Old
Steam 300 SQ. FT. - EDR 347
One Pipe System0 -
If I had to guess this screw is a calibration adjustment. When steam gets to it, it or what it screwed into expands to stops the steam from exiting the system, minimizing water consumption. It would not surprise me if it screwed into a bi-metal leaf spring.
The other slotted screw may have held the baffle assembly or the whole guts in place. The guts may be rusted in place now.
National - U.S. Gas Boiler 45+ Years Old
Steam 300 SQ. FT. - EDR 347
One Pipe System0 -
that kel mac appears to be a different system with metering radiator valves and radiator traps.
0 -
I agree it does, but the OP requested " Does anyone have a pic of a KelMac retarder? ". Maybe the KelMac retarder and the Kelmac Jr. retarder are different too.
National - U.S. Gas Boiler 45+ Years Old
Steam 300 SQ. FT. - EDR 347
One Pipe System0 -
I believe I may have mentioned this previously.
I worked on a system that had "Kelmac Jr. Retarder" steam traps.
IIRC, the "Retarder" was 3/4" size and the "Jr." was 1/2" size.
The Kelmac valves left in the system were worn out and did not have any special designs for metering. Just a globe valve.
The guts had been removed from all traps.
Most valves changed and supply orifices added.
No return traps or drums left in basement.
System would run on ounces when done with changes.
 1
1 -
Thanks for the info!
I haven't been able to disassemble the vent beyond what is shown in the pics. What looks like an adjustment screw now fits loosely in the inner hole that it probably once screwed into, but is now rusted away a bit. As to the body screw, nothing inside came out when I removed it. So far, I have hesitated to bang on it (other than some tapping) until I (hopefully) find some more information.
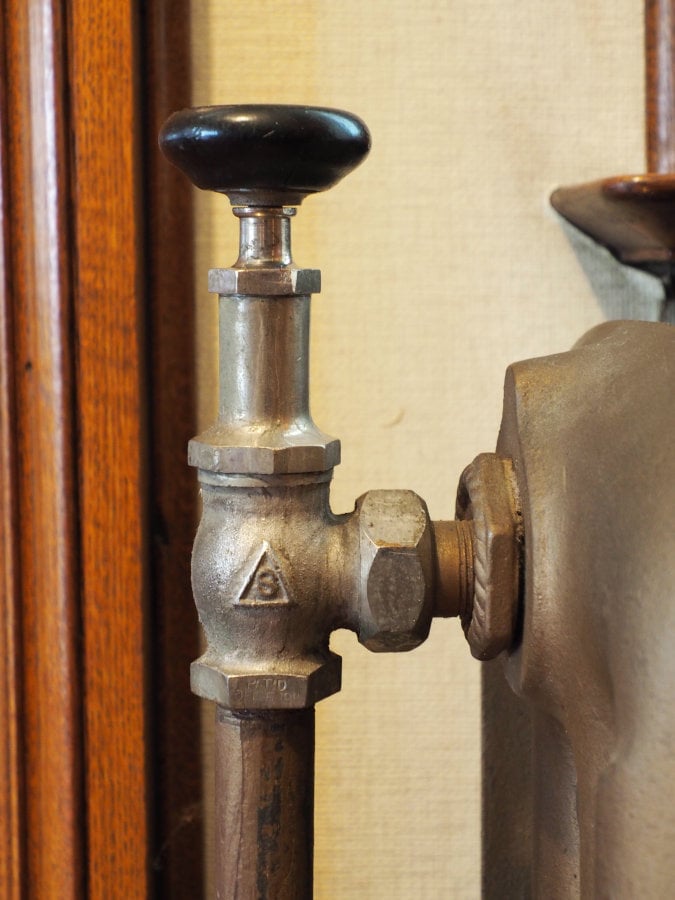
I thought my old vent may have been the KelMac retarder. Apparently, it is a different component. My system has no trace of radiator traps; the return elbows look as old as the radiators. There is also no trace of KelMac radiator supply valves. Mine are apparently generic globe type; they have a big spring inside; and they are identified with an "S" inside of a triangle. The simple round, smooth, hard rubber handles look old (possibly going back to the 1924 switch to a Bryant gas boiler—-gas had just arrived to the city).
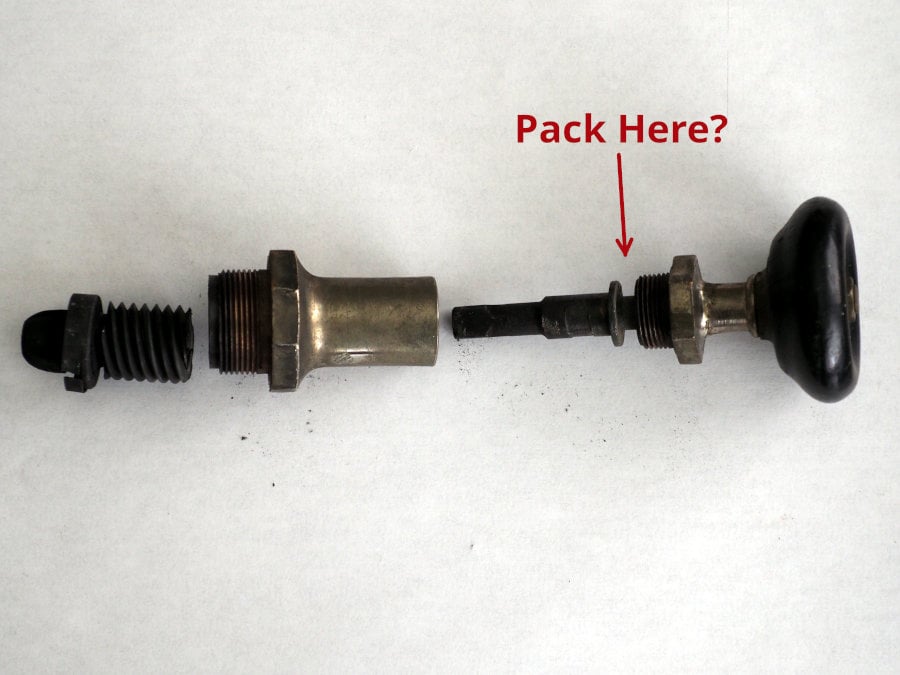
By the way, what is the proper way to repack these valves?
0 -
might be sylphon.
how to repack depends on the type of valve. some use a bonnet with a packing gland in it, more premium valves used a bellows or some other "packless" arrangement.
0 -
Since you have it detached from the system and the threads on that bolt or what it screws into may be defective. If it were me, and it would be more for curiosity sake than repair, I would soak the old vent in a good rust remover and see if I could disassemble it some more. In the mean time I would just install another Hoffman 1A (or the like) in its place.
Those 2 old vents may have a vent rate much greater than a Hoffman 1A so to keep things balanced and venting as fast as practical a main vent may be a good idea if it does not already exist.
National - U.S. Gas Boiler 45+ Years Old
Steam 300 SQ. FT. - EDR 347
One Pipe System0 -
do you see packing in the bottom of the bonnet above that disc on the upper half of the stem?
it will probably be a lot easier to see what is going on if you take the handle off and take the bonnet off and it will be easier to replace the packing without the stem through it.
packing material frequently contained asbestos, frequently graphite coated, though it could be other fibers too.
It looks like it is a non-rising stem globe valve with conventional packing but it could be something else.
0 -
That's a "spring-packed" valve. ISTR the washer on the stem compresses the spring against the packing which is located underneath the spring. Replacement packing would look like a washer with a hole in it the size of the stem.
Also, the stem is non-rising and has no threads on it. It engages with the threaded portion at the left, which runs in threads inside the bonnet (or sometimes in the valve body) to open and close the valve. This puts less wear on the packing, and is one reason these valves last as long as they do.
Not sure what the S stands for though.
All Steamed Up, Inc.
Towson, MD, USA
Steam, Vapor & Hot-Water Heating Specialists
Oil & Gas Burner Service
Consulting 2
2 -
You could probably use string packing if you can't find a suitable packing washer although you might need to initially press it together with your hand and the stem on a table or some socket or pieces of pipe and a vise to pack the new packing together.
0 -
The radiator has an offset bushing in it. Not important for the supply but helps the radiator drain better on the return.
1 -
@mattmia2 , Yes, there was some tiny residue of packing on the top side of the disk (at arrow). I previously removed the handle; the screw cap slides out and there is nothing else.
@Steamhead , I didn't quite follow your description as to the washer position. You are correct that the stem is non-rising.
It appears to me that the packing/washer should fill the space at the arrow; the screw cap presses down from the top; and the spring in the "barrel" presses up against the the bottom of the disk. Is that correct?
0 -
@pacoit , it looks like there is a washer below and slightly left of the arrow that says "pack here?". It also might be part of a sleeve. That should be what compresses the spring. Is there any evidence of packing material below the spring?
All Steamed Up, Inc.
Towson, MD, USA
Steam, Vapor & Hot-Water Heating Specialists
Oil & Gas Burner Service
Consulting0 -
@Steamhead , Ah, the "disk" just left of the arrow is a solid part of the stem; the spring presses up against it; cap screw and packing press down. The bottom of the (very stiff) spring is fixed in the "barrel". I see no evidence of, and no place for, packing below the spring.
My guess is that the spring provides a little flexibility so that the amount of packing doesn't have to be exact and still allow the screw cap to be screwed all the way in.
I found a small amount of thin string in one valve (at arrow location). I tried twisting 3 strands of that thicker blue thread tape to form a ~1/8" string. It worked on several valves, but one valve has failed twice despite heavy packing (I'm running roughly 0.5 psi air in the system to find leaks.).
0 -
the spring does come out, might have to twist it in the direction that makes it smaller to get it to move but you don't have to remove it. try some small string packing and try using a vise with some blocks of wood or a c clamp and wood, one with a hole in it to use that shoulder on the stem to pack the string packing together. i'd probably use teflon, once you get it in there it will last forever. if the stem is rough where the packing rides on it, polish it with fine scotchbrite. mcmaster carr sells spools of all sorts of string packing.
0 -
@mattmia2, Yes, the spring comes out; the bottom rests on a ledge in the "barrel".
Some valves I repacked apparently successfully; a few I packed and repacked harder but still leak. Interestingly, the existing good valves (not repacked) have a springy up/down motion when I press on the handle; the repacked one do not.
It's probably far-fetched, but I wonder if some springs have weakened, don't provide the push back/compression once the packing and screw cap are in place? Something seems amiss.
0 -
@mattmia2, I repacked several valves, today, following your suggestion, and used smooth parallel pliers to pack the thick teflon tape (formed into strings). The extra packing made the difference! All the valves appear to seal (tested with ~1 psi piping pressure, and then with digital audio recorder).
I also found a couple valves still packed (at the arrow in the pic of my earlier post). The packing was essentially dust. Anyway, it confirmed for me how to pack the valve.
The purpose is to prepare for conversion to a vacuum system. Positive pressure was useful for revealing leaks. But next I'll test for actual vacuum. If the results are good, I'll proceed with the project.
0 -
string packing will be easier to deal with than dozens of feet of teflon tape. you may need to put some in, pack it down, then add some more and repeat a couple times to get enough in there and get it packed tight enough.
0 -
I believe it’s a Breck:
Retired and loving it.
 3
3 -
@DanHolohan, Thanks for the info!
I also found a third vent in a drawer. The adjustment screw in the "L" is still screwed into its hole (hole not rusted out). The screw has a small square head; it's in a small space, and there must have been a special key to access it. Still have to try to de-rust and disassemble one of the vents.
0 -
Oh, my! Look what I found rummaging through an old drawer in the basement:

It's the key to the—-now verified—-Breckenridge vent regulation screw!!!
Folks, It may be the only one left in the world! Has impeccable provenance! Found with original identifying tag, and in the building where it was used! Last used by the current owner of 55 years! Step right up closer, folks. This item is now available for purchase for the first time in over 110 years! Now accepting bids of above… $1 million.
2 -
@pacoit , I think you just made HeatingHelp history- this may be the first time we've seen Breckenridge vents still in service.
All Steamed Up, Inc.
Towson, MD, USA
Steam, Vapor & Hot-Water Heating Specialists
Oil & Gas Burner Service
Consulting1 -
With the unit that has the messed up threads, if it can be nondestructive dissembled I wonder if the threads can be repaired with a Heli-Coil.
As far as with " The purpose is to prepare for conversion to a vacuum system. Positive pressure was useful for revealing leaks. But next I'll test for actual vacuum. If the results are good, I'll proceed with the project. "
I'd like to know how this works out.
National - U.S. Gas Boiler 45+ Years Old
Steam 300 SQ. FT. - EDR 347
One Pipe System0 -
If it is that old it may not be a standard thread. If those are indeed bimetal steam air vents you are better off replacing them modern vents and keeping these vents as collectables. It may be designed to vent everything through these vents, they might be much larger capacity than modern radiator vents so the main can vent through the radiators. If that is the case your best bet is to add main vents. you could get a higher capacity by using a radiator steam trap but this system probably balanced better with coal than with a cycling gas or oil burner with the original vents.
0 -
Yeah, sadly the 'New Stuff ' does not play nicely with the vacuum agenda. If you have not, you may want to review how @PMJ runs his system, your returns may have to be modified or adapted.
" there are vents at each radiator return, in the basement near the ceiling; " This may work to your advantage, so the tapping are already there for a common venting and equalization system (since all returns drop down to a wet return).
Too bad you don't have all the original Breckenridge vents with the threaded vent ports.
BTW I have not seen a key ring like that in quite some time.
National - U.S. Gas Boiler 45+ Years Old
Steam 300 SQ. FT. - EDR 347
One Pipe System0 -
if you use radiator traps they will be threaded on the outlet. you would have to do your balancing on the inlet of the radiator.
0 -
FYI, the adjustment screw on the Breck is 4mm diameter with 32tpi threads.
@109A_5, The Brecks and the basement tappings suggest to me the system was in fact originally a vacuum system, probably actively controlled. I'd like to reproduce that—-if the piping proves tight enough.
@mattmia2, If I can't proceed with the vacuum project, I will keep the Hoffman 1As and add main vents. If vacuum project moves forward, I'll most likely add rad valve orifices to limit steam flow. System has no traps, and I would remove the Hoffmans.
Ha! I could modify the Hoffmans: remove adjustment cap; thread the barrel section; and machine a fitting for standard pipe/hose connection! Yupper! That's a duezy!
0 -
If with the vacuum enhancement the Hoffmans are needed for the variable orifice functionality and/or to block steam from entering into the venting interconnect I would not modify them. I would use silicone tubing slid snugly over their outer diameter and then adapt the vacuum / vent system to the silicone tubing. That way it it does not work out you still have good Hoffman vents. Also if it does work out and a Hoffman vent fails no modification is needed to replace it.
National - U.S. Gas Boiler 45+ Years Old
Steam 300 SQ. FT. - EDR 347
One Pipe System1 -
Ah, a far more sage solution.
In fact, although I was joking before, your idea seems quite workable. Using the Hoffmans would save the need for orifices. And it fits nicely in my planned step-by-step approach to modification where each step is a working (explorable) end point, or is a step to the next level. Thanks!
0 -
Also @pacoit , if you do go with vacuum you can use standard thermostatic steam traps as main vents. Hook them to the vac pump and the mains will vent quickly.
All Steamed Up, Inc.
Towson, MD, USA
Steam, Vapor & Hot-Water Heating Specialists
Oil & Gas Burner Service
Consulting1


Categories
- All Categories
- 87.5K THE MAIN WALL
- 3.3K A-C, Heat Pumps & Refrigeration
- 59 Biomass
- 429 Carbon Monoxide Awareness
- 124 Chimneys & Flues
- 2.2K Domestic Hot Water
- 5.9K Gas Heating
- 119 Geothermal
- 168 Indoor-Air Quality
- 3.8K Oil Heating
- 78 Pipe Deterioration
- 1K Plumbing
- 6.6K Radiant Heating
- 394 Solar
- 15.9K Strictly Steam
- 3.5K Thermostats and Controls
- 56 Water Quality
- 50 Industry Classes
- 50 Job Opportunities
- 18 Recall Announcements