new concrete slab with radiant heat that will be polished for finished flooring

I posted here previously and received so much guidance and support (thank you all), and now getting back on track. Because of damage to joists and foundation, we ended up having to do some structural work (joists, foundation). I have searched around this forum for answers and advice. I found some pieces I’ve incorporated in this post.
I have a radiant installer that I am ready to sign a contract with. He has provided layout of pex runs, heat loss, etc. Installation is in joist with heat transfer plates for 2nd floor, and in slab for 1st floor. Pex is specified as 1/2".
Now I’m getting prepared for the next phase: new slab preparation. I am actively speaking with concrete contractors to prepare, pour and finish the slab (class B, level 2 semi gloss finish). I know that the concrete mix design is very important for specialized applications like a polished slab with radiant heat. One source I have been getting info from is delgrossodesign website, and the owner has provided me additional info via email. The owner is outside our area and price range, so ultimately we will need to hire someone else for the finishing of the slab.
Initial plan for slab was 4” slab with #4 rebar 12” OC doweled into foundation at 24” OC. I will be going back to my engineer to confirm the direction we want to head. He has not been great, and signed off on things during inspections that later caused problems. However, we didn’t want to start fresh with a new engineer (due to cost and need to resubmitting plans) so we decided to keep him to complete the project.
I’m looking for practical recommendations, informed by what folks have seen work best in the field for our situation. While our Engineer of Record (EOR) will, of course, need to review and approve the final agreed-upon mix design for compliance, I value folks first-hand experience in this site.
One concrete contractor I received a quote from recommended the following in his estimate:
- 5” slab with the slab unattached from the foundation and using expansion joints between the slab and interior foundation walls (to better minimize slab cracking).
- 6” of compacted gravel, vapor barrier, insulation, 5” slab
- 1” insulation of slab (will specify 25 psi insulation, likely XPS Dow or foamular 250); could go thicker.
- Pour 7 sack 4000 psi with ⅜ pea gravel; admixtures would be specified by working with the concrete supplier company (he mentioned: liquid fibers, water reducer as admixtures to consider)
- He said he would only create tooled control joints. My research on control joints:
- saw-cut control joints are generally preferred over tooled control joints for heated polished slabs (due to their deeper cuts, more visually appealing on finished surface b/c less wide/collect less dirt and debris)
- He mentioned that I should mist the slab post pour a couple times a day to help minimize cracking during curing
The questions I am looking for advice on (or anything else folks care to offer):
- dowel the slab into the foundation or leave it unattached with expansion joints?
- pex running through expansion joints?
- we have some interior foundation grade beams that the pex might need to run above for the ideal boiler and manifold location
- control joints: tooled vs saw cut?
- My research: saw-cut control joints are generally preferred over tooled control joints for heated polished slabs (due to their deeper cuts, more visually appealing on finished surface b/c less wide/collect less dirt and debris)
- Are there other options I should be considering (such as “zip strips”)?
- pex running under control joints?
- take preventative measures: using conduit or pipe wraps where pex runs under control joints
- concrete mix advice - does a mix with the following components seem reasonable? Am I missing or misunderstanding anything?
- 3/8" pea gravel
- If we follow the rule for 3 times the aggregate size above the tube [ref post], and with awareness that smaller aggregate does end up being a bit weaker mix;
- does a 7 sack mix, and/or other admixtures (liquid fibers) compensate adequately for this?
- Liquid fibers
- Assume this refers to cellulose-based microfibers that are designed to disperse extremely well in concrete mixes and are often invisible in the finished product, even after polishing. Liquid fibers (specifically cellulose microfibers like UltraFiber 500 by Solomon Colors, or similar products from other manufacturers) are highly recommended for polished concrete. Unlike traditional polypropylene fibers, which can sometimes "fuzz" or become visible on the surface, these liquid fibers are engineered to be non-obtrusive.
- Water reducer (assume this is the same as “plasticizer”)
- Fly ash
- I've read that fly ash can cause issues when grinding and honing, so it’s better to avoid it.
- Integral color (to achieve a consistent darker grey color in finished product)
- Opinions I have heard: add it for consistency; not worth the cost; add a small amount of black to achieve a grey and minimizing cost
- 3/8" pea gravel
- Insulation strategy
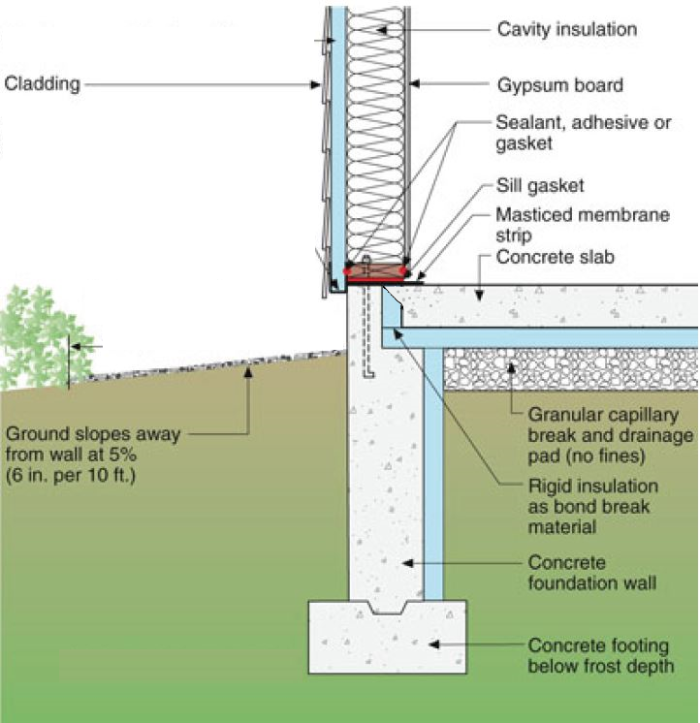
- I was thinking we should taper the top of the edge insulation
- similar to this diagram, though our sill is flush with the stem walls, and don’t think we would put insulation on edge below the bottom of slab (I am in climate 3)
- I was thinking we should taper the top of the edge insulation
Comments
-
A couple of thoughts. One, unless there is a structural reason why the slab needs to be doweled to the foundation, don't. Let it move (preferably a real expansion joint). Second, if you are creating either tooled or saw cut joints for cracking — which, with fibre, you may not actually need — your reinforcement mesh must be continuous across the joints. I am not familiar with "liquid fiber", although I have used and specified both microfiber and macrofiber reinforcement with a a number of different fibre materials quite happily.
Br. Jamie, osb
Building superintendent/caretaker, 7200 sq. ft. historic house museum with dependencies in New England0 -
- dowel the slab into the foundation or leave it unattached with expansion joints?
—No, I wouldn’t - pex running through expansion joints?
—I would loop it under. - we have some interior foundation grade beams that the pex might need to run above for the ideal boiler and manifold location
- control joints: tooled vs saw cut?
—Tooled. You’re going to gets some cracking no matter what you do. And you’re relying on someone to be perfect with layout and execution of saw cutting.
- My research: saw-cut control joints are generally preferred over tooled control joints for heated polished slabs (due to their deeper cuts, more visually appealing on finished surface b/c less wide/collect less dirt and debris)
- Are there other options I should be considering (such as “zip strips”)?
- pex running under control joints? —-I think this would be best—-
- take preventative measures: using conduit or pipe wraps where pex runs under control joints
- concrete mix advice - does a mix with the following components seem reasonable? Am I missing or misunderstanding anything?
- 3/8" pea gravel
- If we follow the rule for 3 times the aggregate size above the tube [ref post], and with awareness that smaller aggregate does end up being a bit weaker mix;
- does a 7 sack mix, and/or other admixtures (liquid fibers) compensate adequately for this?
- Liquid fibers
- Assume this refers to cellulose-based microfibers that are designed to disperse extremely well in concrete mixes and are often invisible in the finished product, even after polishing. Liquid fibers (specifically cellulose microfibers like UltraFiber 500 by Solomon Colors, or similar products from other manufacturers) are highly recommended for polished concrete. Unlike traditional polypropylene fibers, which can sometimes "fuzz" or become visible on the surface, these liquid fibers are engineered to be non-obtrusive.
- Water reducer (assume this is the same as “plasticizer”).
- Fly ash
- I've read that fly ash can cause issues when grinding and honing, so it’s better to avoid it.
- Integral color (to achieve a consistent darker grey color in finished product)
- Opinions I have heard: add it for consistency; not worth the cost; add a small amount of black to achieve a grey and minimizing cost. I personally would do smallest aggregate. Hot Rod would be the expert on this.
- 3/8" pea gravel
- Insulation strategy
- I was thinking we should taper the top of the edge insulation
- similar to this diagram, though our sill is flush with the stem walls, and don’t think we would put insulation on edge below the bottom of slab (I am in climate 3) Standard detail, looks good to me.
- I was thinking we should taper the top of the edge insulation
0 - dowel the slab into the foundation or leave it unattached with expansion joints?
-
Just my opinion: concrete is a horrible residential floor. It's hard and it's loud, it tires the joints and anything dropped on it breaks. While concrete is hard, it's not that tough, and it's easy to scratch and there's no real way to repair it.
While it's often used as an emitter in floor heating systems, it isn't particularly good at that because it has too much heat capacity and responds slowly to changes in the heating load. I think you'd be miles ahead to do one of:
- Frame out a floor on top of a slab, and insulate the framing;
- Raise the floor a couple of feet and have a crawl space
- A concrete-free slab floor like this: https://www.greenbuildingadvisor.com/article/concrete-free-slab
In any case, insulate up to the bottom of the subfloor, and then put high-responsiveness heating panels between the subfloor and the finish floor.
0 -
we had a concrete expert at an RPA convention yeas ago talking specifically about radiant and slabs. His suggestions
When you pour a slab within 4 concrete walls you can get external restraint cracking. Always have a bit of an expansion strip around it. They have a dense rubber foam strip at the concrete suppliers for this1/2 wide 4” deep.
The larger the aggregate the stronger the concrete mix, go with 3/4 or larger.
The mix leaves the plant properly mixed. Every gallon of water added to a yard of concrete reduces the psi by about 100 lbs. use a plasticized if you need it to flow better. If they add5- 10 gallons when the truck arrives to make it easier to “pull” your odds of a crack increase.
Rebar, heavy remesh, nothing guarantees a slab will not crack. The steel keeps the slab from shifting where a crack goes through a slab. A crack is a free control joint :)
The subgrade below the slab has a lot to do with the integrity. On commercial work they do compaction tests. I have seen a few jobs fail that test and the subgrade had to be reworked,
I would use a base rock at least 4” and compact it.
I had a finished, colored slab in two of my office/ shops, color was mixed in the batch at the job, and no, they do not like doing that and may charge extra! Actually the color sort of wore through where we walked the time all you would start to see some aggregate.
How large is the slab? Control joints are on a 10x10’ grid. I have poured jobs without any control joints for custom basement colored slabs.
Know that when you saw cut a colored slab you will see white stripes as the aggregate is not colored! Usually you caulk those saw cuts with a colored silicone.
Ideally a control joint is 1/3 the slab thickness, which is not doable with tube. Best you could gamble would be a 1” deep cut if you have tube 2” below the top. But a crack will travel across a 1” cut. I’m not convinced any type of control joint is 100% able to prevent or stop a crack. It the tiny little cracks, called road mapping, that drive me crazy in finished slabs. Prepare your self for those.
A troweled in joint will not look good at all. It would be a wide joint to caulk nicely?
While the mesh is great for tying tube it does little to reinforce the slab, especially if it is not lifted.
Yes the fibers look like dog hair on the finished slab, but if they power trowel it melts them off and they are not noticeable.
The recommendations from the speaker were to increase the fibers to 3 lbs per yard, do not water the mix, add agents if it is extremely hot, as a fast dry day can be an issue. On hot summer pours they would spray a coating on them as soon as the finished troweling, supposed to slow the water from leaving the top.
The slabs that looked the best to me over the years were stamped or stenciled ones, they hide cracks well. I did one job where it was stamped to look like wood planks! It was a little rough on the feet however.
Hoping to get a perfect, long lasting crack free polished slab is risky business. I doubt any plant or concrete finisher would guarantee that. It is a hard unforgiving surface, in kitchens especially. But tile is also should you drop anything on it.
I would tube it 6” oc to operate at the lowest SWT, minimize expansion/ contraction. 3/8 is easiest to work, but 200- 225’ loops. You get a tad more concrete coverage.
Pros and cons to high mass vs low mass radiant. Slabs need to be set and left circulating imo. They do not ramp up or down quickly.
I will say in a shop in a cold climate, nothing beats a warm slab. Concrete is a tricky medium to work with, and it is pretty final. Concrete is the most consumed product in the world. Looking at some of the structures and roadways the build in China, they must be the largest consumer?
Bob "hot rod" Rohr
trainer for Caleffi NA
Living the hydronic dream
 2
2 -
if you have a delta t of ~100f the edge insulation on the slab will be very important.
0 -
Just to emphasize a couple of @hot_rod 's excellent summary. He's right. Fibers won't be a problem if you power trowel. You won't notice them. And use enough. Also, his comment on don't add water. Just don't. As he says, if for some reason you need it to flow better, specify adding plasticizer — and let the ready mix company do it.
Last tidbit. Keep the concrete moist or at least damp for at least 72 hours. That is really truly critical, and a lot of the problem surface cracking one sees is from not doing this. Perhaps I can explain why. Cement is the binder in concrete — it's what sticks to the aggregate and holds it all together. Cement does NOT dry. It cures by reacting with water to form a crystalline solid. This takes time — and enough water. If there isn't adequate water, not all the cement can react and the cement won't cure. This is particularly true at the surface of, for instance, a slab. Too much water is almost as bad. Concrete mixes are very carefully designed!
Br. Jamie, osb
Building superintendent/caretaker, 7200 sq. ft. historic house museum with dependencies in New England 1
1 -
over time, like decades for it to happen something close to fully, the hydrate formed with the water is changed in to a carbonate with carbon dioxide from the air.
0 -
you can also cover the slab in tarps or plastic once it sets enough that the tarps won't mark it to help keep it wet so it cures properly.
you would definitely want to run outdoor reset to mix the slab heating temp with the combination of the high mass and your range of about 90 degrees of outdoor temp where you need heating. the better you insulate the less your heating load will vary with outdoor temp.
0 -
wait, disregard some of that, i think i'm confusing this with another post where they have an outdoor temp of -40…
0 -
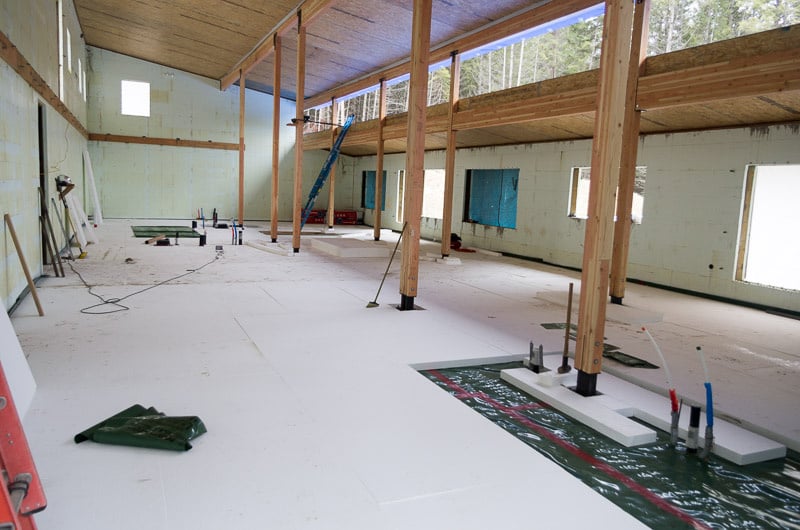
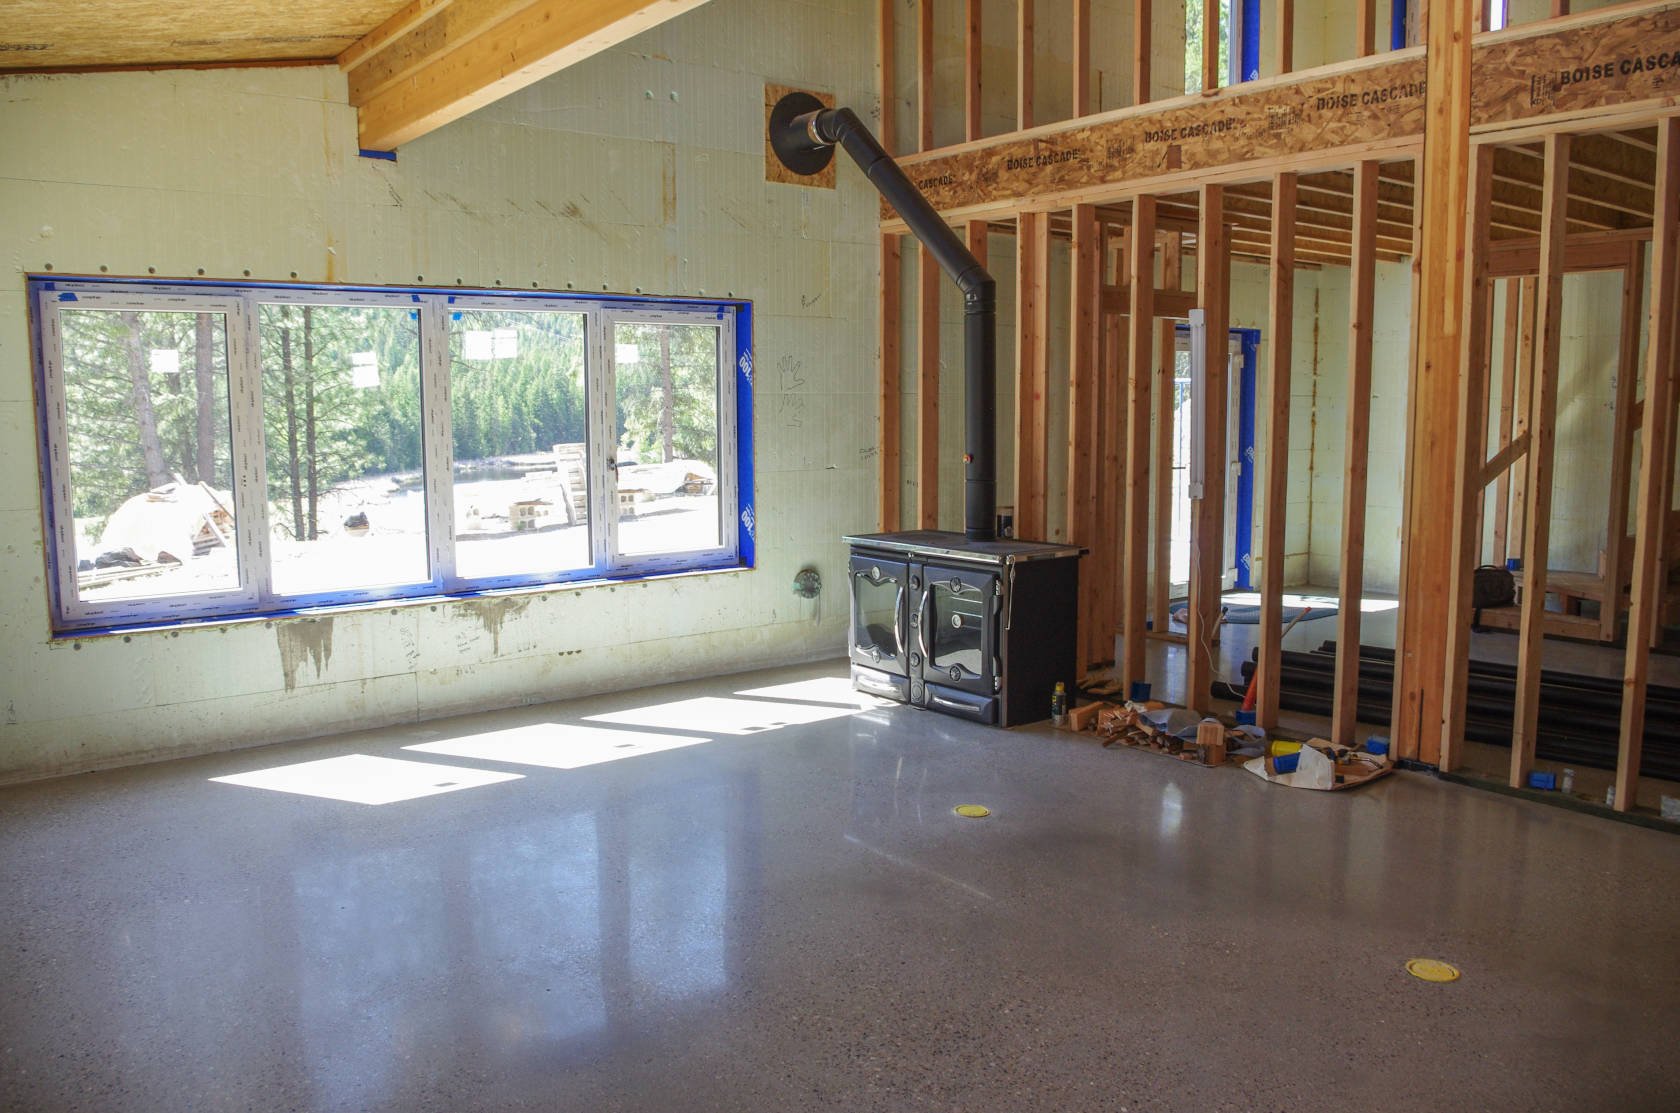
Our new home has a polished concrete floor with radiant tubing. The walls are ICF so the foam provides a thermal break and expansion joint at the perimeter. The slab was poured on 3" of 25psi EPS foam for a thermal break to the ground below since we are in a northern climate. There is a 10 or 15 mil vapor barrier under the foam that was glued to the ICF perimeter wall and taped around all penetrations.
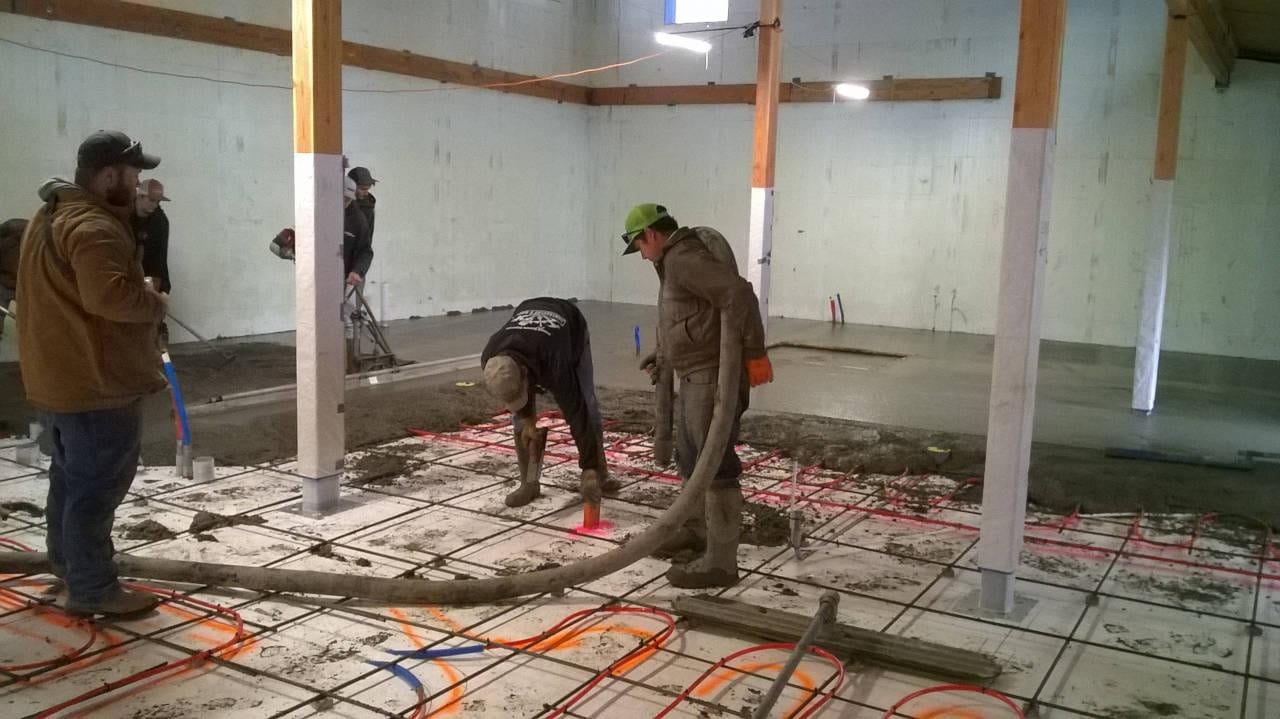
We debated placing saw-cut control joints and placed the PEX as low as possible to allow this option. The tooled control joints filled with polyurethane at our local WalMart look pretty bad so we took a chance and didn't cut any control joints. The floor is about 80' x 35' with 9 embedded column bases. It was in the late fall so we poured concrete mixed with hot water, I think it was 3500psi, no fiber mesh. I can't remember if they added any plasticizer. It stayed warm and very humid inside as the concrete cured. We had some minor cracking but only where the slab was restrained. For example, at the doors there was rebar from the footings folded back into the slab along with rebar out to the thermally broken threshold so when the concrete shrank we got some small cracks at the corner of a couple of the doors. There are also two doors where the concrete continues into the garage and into a mechanical room. We have some cracks there where the slab was continuous. It would have been better to place a control joint in those doorways that would have been covered by the door threshold. Around the perimeter there are gaps up to 1/4" or more in some places due to concrete shrinkage but these will be covered by drywall and baseboards.
Our initial plan was to use a mix with a larger black aggregate. This stone was crushed so they wanted a pump truck with a 3" hose. At the last minute we had to work with a smaller pump and they were afraid the larger crushed stone would jam it so we went with standard washed round stone, probably 3/4" if I recall. There is also a fair amount of smaller stone in the mix.
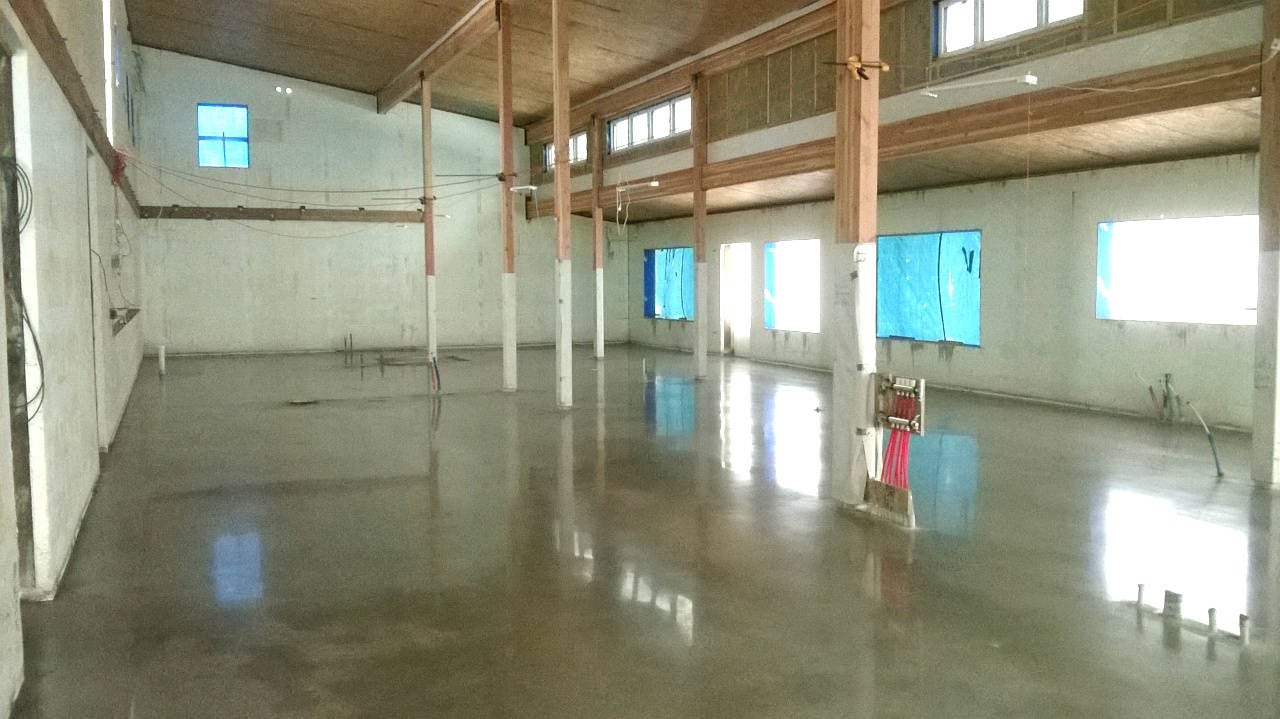
They hand floated pads at the screed depth and then used a vibrating power screed. We had hoped so see more of the large rock exposed after polishing but the vibra screed pushed the rock too far down. It would have required a lot more polishing to expose it. As a result, there are areas with good rock exposure and other areas that are more of a uniform grey. We also have some 'interesting' bonus features caused by small twigs and other items that were blown into the sand and rock used to mix the concrete.
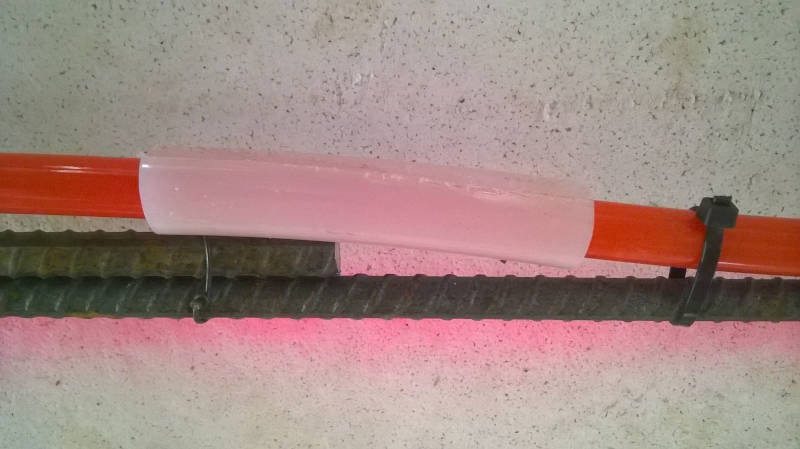
The PEX was tied to a 2' grid of rebar. The rebar was placed on custom made 1" dobies to set it as low on the EPS foam as possible. The PEX was buried in the under slab foam from the manifold to the desired room in some cases. A 2" deep groove was cut with a hot knife, PEX inserted, the removed foam glued back in the groove above the PEX with spray foam and then trimmed flush. This same method was used to run 3/4" PEX to a central manifold. A piece of 3/4" PEX was slit and snapped over the 1/2" PEX in areas subject to damage. Buried PEX was brought up out of the foam in a piece of blue flexible conduit (smurf tubing). The entire system was pressurized to around 60psi before and during the concrete pour to make sure any damage was found and fixed.
Overall we are pleased with the floor even though it is not perfect.
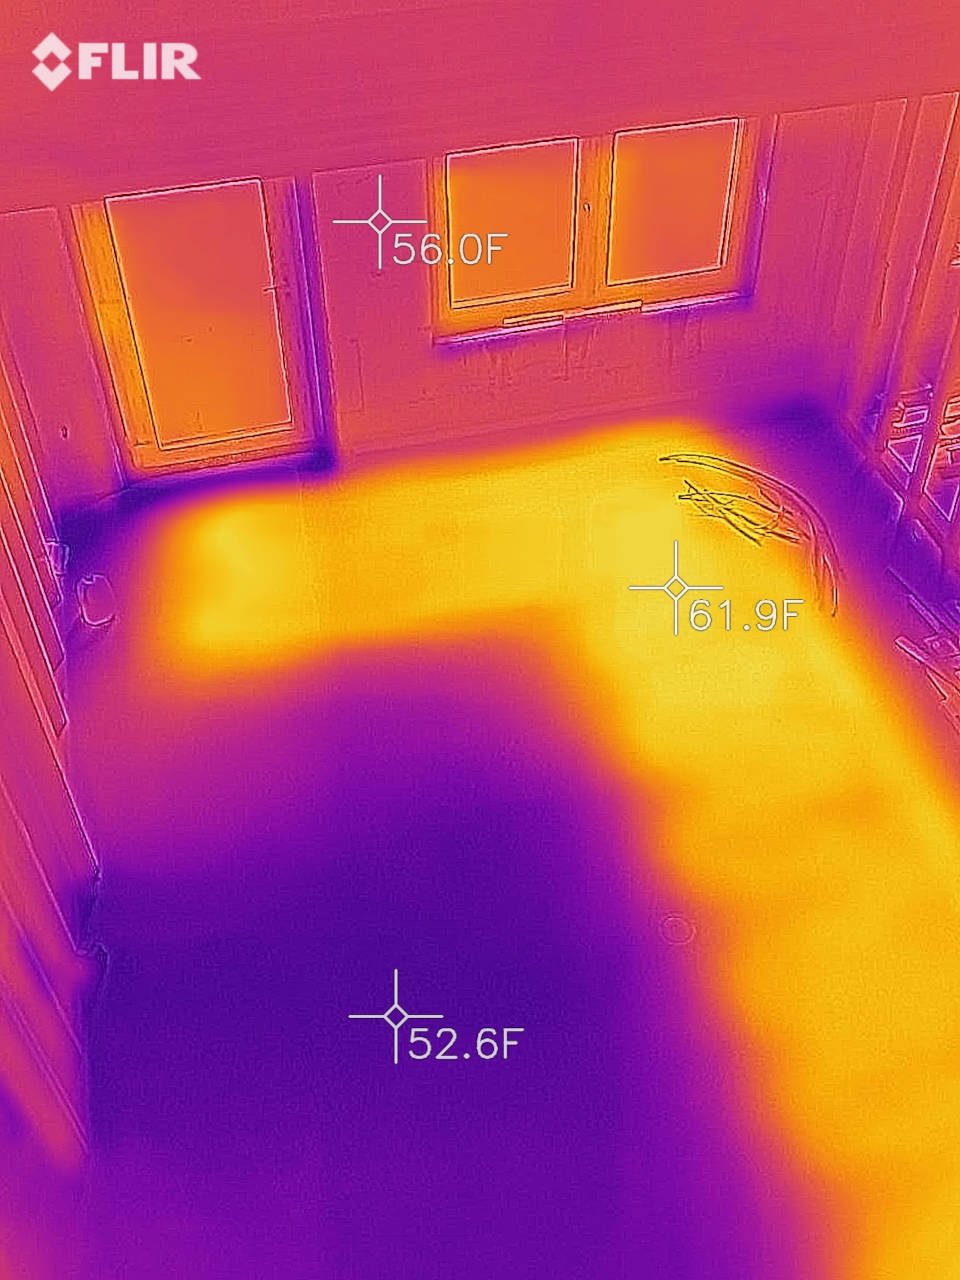
Since the house is very thermally efficient it will not need much heat. The water to the floor will only need to be about 95F on our coldest design day of around 5F. The water temp is set by an LK outdoor reset on a mixing valve which seems to be working very well. In order to increase perceived comfort, the PEX was not placed on a continuous grid in most rooms. Instead, less PEX was placed in locations where people would most likely stand or be seated. This allows a higher water temperature in those localized areas so the concrete will hopefully be warm enough to feel the heat. I found a couple of articles online describing this approach. Here's a FLIR image taken as the system was initially warming up.
We polished the floor before any of the interior framing was built. This lowered the cost of the polishing but requires extra care during the rest of the build. The densified concrete seems quite durable but as @DCContrarian pointed out, you can damage it and any repairs will be difficult and filled in cracks will show.
1 -
Ah… the floor is already done.
Nice looking job, @OffGridICF . The main thing I would have done differently is to use fibre reinforced concrete and done control joints around known restraint locations — but what's done is done. The cracking you have will not improve, and you will need to live with it…
Do you plan any additional floor covering? Just area rugs? No additional? ??
Br. Jamie, osb
Building superintendent/caretaker, 7200 sq. ft. historic house museum with dependencies in New England 1
1 -
I'm not sure what happened with the original post from @RenovationWontEnd. It would be interesting to hear how his project turned out, both the heated slab and his upstairs with stapled up PEX between the joists.
Thanks @Jamie Hall, we will use area rugs where needed. I expect we'll have a few thicker cushioning mats in the kitchen. No additional floor covering is planned unless we end up hating the polished concrete.
The floor is not perfect but the minimal cracking we have is acceptable. We talked about control joints and placed the PEX low enough to saw cut them. After getting a quote to cut and fill the 4' x 4' decorative grid we wanted we decided to take a chance and omit them. Most of the resulting cracks are too small to easily fill and not very noticeable. There are no cracks in the open floor areas, they are all off the corner of doors where the concrete was not able to shrink without cracking. Some will be covered by door mats while the worst are in the garage and mechanical room where it's not a big deal if they are visible. We skipped the fiber mesh to avoid possible issues when polishing the concrete. The biggest negative came from twigs and softer material in the concrete which caused flaws in the polished surface but even that isn't a big problem for us. I'm not sure how that could have been avoided with our local batch plant.
The interior slab shrank up to 1/4" away from the ICF wall on two edges and that movement probably prevented cracking in the middle of the floor around the columns. The thermally broken thresholds for exterior doors seem to be effective when combined with adjacent PEX loops but the rebar across the break probably contributed to the cracking there.
The upstairs areas will be heated with Jaga low-temp panel radiators on a separate ODR circuit. This seemed like a much simpler approach than PEX in between the floor joists and TRVs offer independent control in each room with a single water temperature. The total heat load averages about 5 BTU/sq-ft at the design temp of 8F so the combination of radiant slab and radiators should work with relatively low water temperatures. So far there is no drywall or interior insulation and the entire space stays at 65F with about 85-90F water holding the slab around 70-72F. Keeping 800 gallons of heat storage charged to run the floor only requires one firing per day of the Froling boiler. This should improve once the ERV is operating to reduce infiltration losses. So far I'm very pleased with how well the system is working and especially the power consumption since we're off grid with minimal winter sun for power.
 1
1 -
I poured a shop slab this summer, still haven't turned on the radiant. It was a full 3 months before cracks started appearing. There is no rhyme or reason to how or when concrete cracks, from my years pouring concrete.
The office in my last shop had colored concrete. We did saw control joints, but the tiny "road map" cracks traveled right through the control joints. It had remesh and fiber mesh added to the pour, foam expansion around the entire slab.
Also all the saw cuts were grey as you cut through the aggregate that is not colored all the way thru. So we grouted the control joints with a soft acrylic caulk.
The slab may expand as it is heated and close some of the edge gaps. But maybe you will never see that if sheetrock and base trim covers it.
It lloks great from here :)
Bob "hot rod" Rohr
trainer for Caleffi NA
Living the hydronic dream0 -
The concrete should be mostly finished shrinking and moving around. The interior slab was poured in October of 2020 before all the windows and doors were installed. It was all dried in and locked up in February 2021 with only a wood stove for enough heat to work inside. The radiant floor was turned on in March of 2025. That said, this has been a mild winter for us so the slab hasn't gotten as hot as it will in the future.
The sheetrock and base will easily cover the gap at the slab edge. In the meantime, it's been filled with spray foam to keep it from filling up with sawdust, etc.
I hadn't thought about filling the cracks with caulk until you mentioned it. I have some grey roofing sealant that might work well on the larger crack in the garage. The newer STPE caulk / sealant materials are pretty amazing, stuff like Quad Max. Something like that might be more easily removed adjacent to the crack with a razor blade while epoxy and other fillers tend to darken the surrounding area in a way that cannot be removed.
I fully expected more cracks so I'm happy with the results. Currently there are no places for cat hair, dirt and crumbs to hide from a commercial size dust mop :-)
0 -
Two or three years ago I used Sikadur Crack Fix epoxy to fill cracks in my garage and shop. Some were in 40+ year-old concrete, no radiant, some was ten year-old concrete in a radiant floor. It's a low viscosity product that tends to wick into cracks. It has held up well and appears as veining in the floor. It might be worth looking at for small cracks instead of caulk.
1 -
Thanks @AlaskaDick , I used some of that in the garage as a test and it does work well. The challenge is getting it into a narrow crack without getting it onto the adjacent concrete. It darkens the concrete making the crack appear much wider. I want to try covering the crack with clear tape, cutting along the crack, placing the epoxy and then removing the tape with any overspill.
A grey polyurethane filler would match better but the stuff I've seen is much thicker than the Sikadur epoxy.
0


Categories
- All Categories
- 87.6K THE MAIN WALL
- 3.3K A-C, Heat Pumps & Refrigeration
- 59 Biomass
- 429 Carbon Monoxide Awareness
- 124 Chimneys & Flues
- 2.2K Domestic Hot Water
- 5.9K Gas Heating
- 119 Geothermal
- 168 Indoor-Air Quality
- 3.8K Oil Heating
- 78 Pipe Deterioration
- 1K Plumbing
- 6.6K Radiant Heating
- 394 Solar
- 16K Strictly Steam
- 3.5K Thermostats and Controls
- 56 Water Quality
- 51 Industry Classes
- 50 Job Opportunities
- 18 Recall Announcements