Replacing cracked Peerless steam boiler, repiping near boiler

I was told by my oil company that my 12 year old peerless ECT-03 steam boiler has cracked. No reason why, but it’s cracked. After quotes nearing $10k for its replacement, I’ve decided to mostly DIY the replacement. I’ve found a plumber willing to come in and make sure I’ve done it right for a reasonable fee, but he’s slow to respond and I don’t want to press his goodwill too far, so I’m hoping to ask the collective wisdom here.
I will be replacing the Peerless with a Burnham Megasteam MST396. I found a 2 year old unit with accessories for $500, and have read the reviews and it seems to be a no brainer. I have purchased the near boiler piping kit in hopes of simplifying the installation, but I can return it if need be. I’m comfortable with the water and electrical hookups, but steam is new to me.
My questions are about connecting the assembled near boiler piping to the existing steam piping. There is currently a single pipe leaving the boiler which connects with a union to an older steam main pipe which then has two branches in separate directions as well as an equalizer pipe which joins back to the wet return with a tee before returning to the boiler. I am attaching pictures that show the piping as best as I could get from my friend who is living there (I am out of state right now):
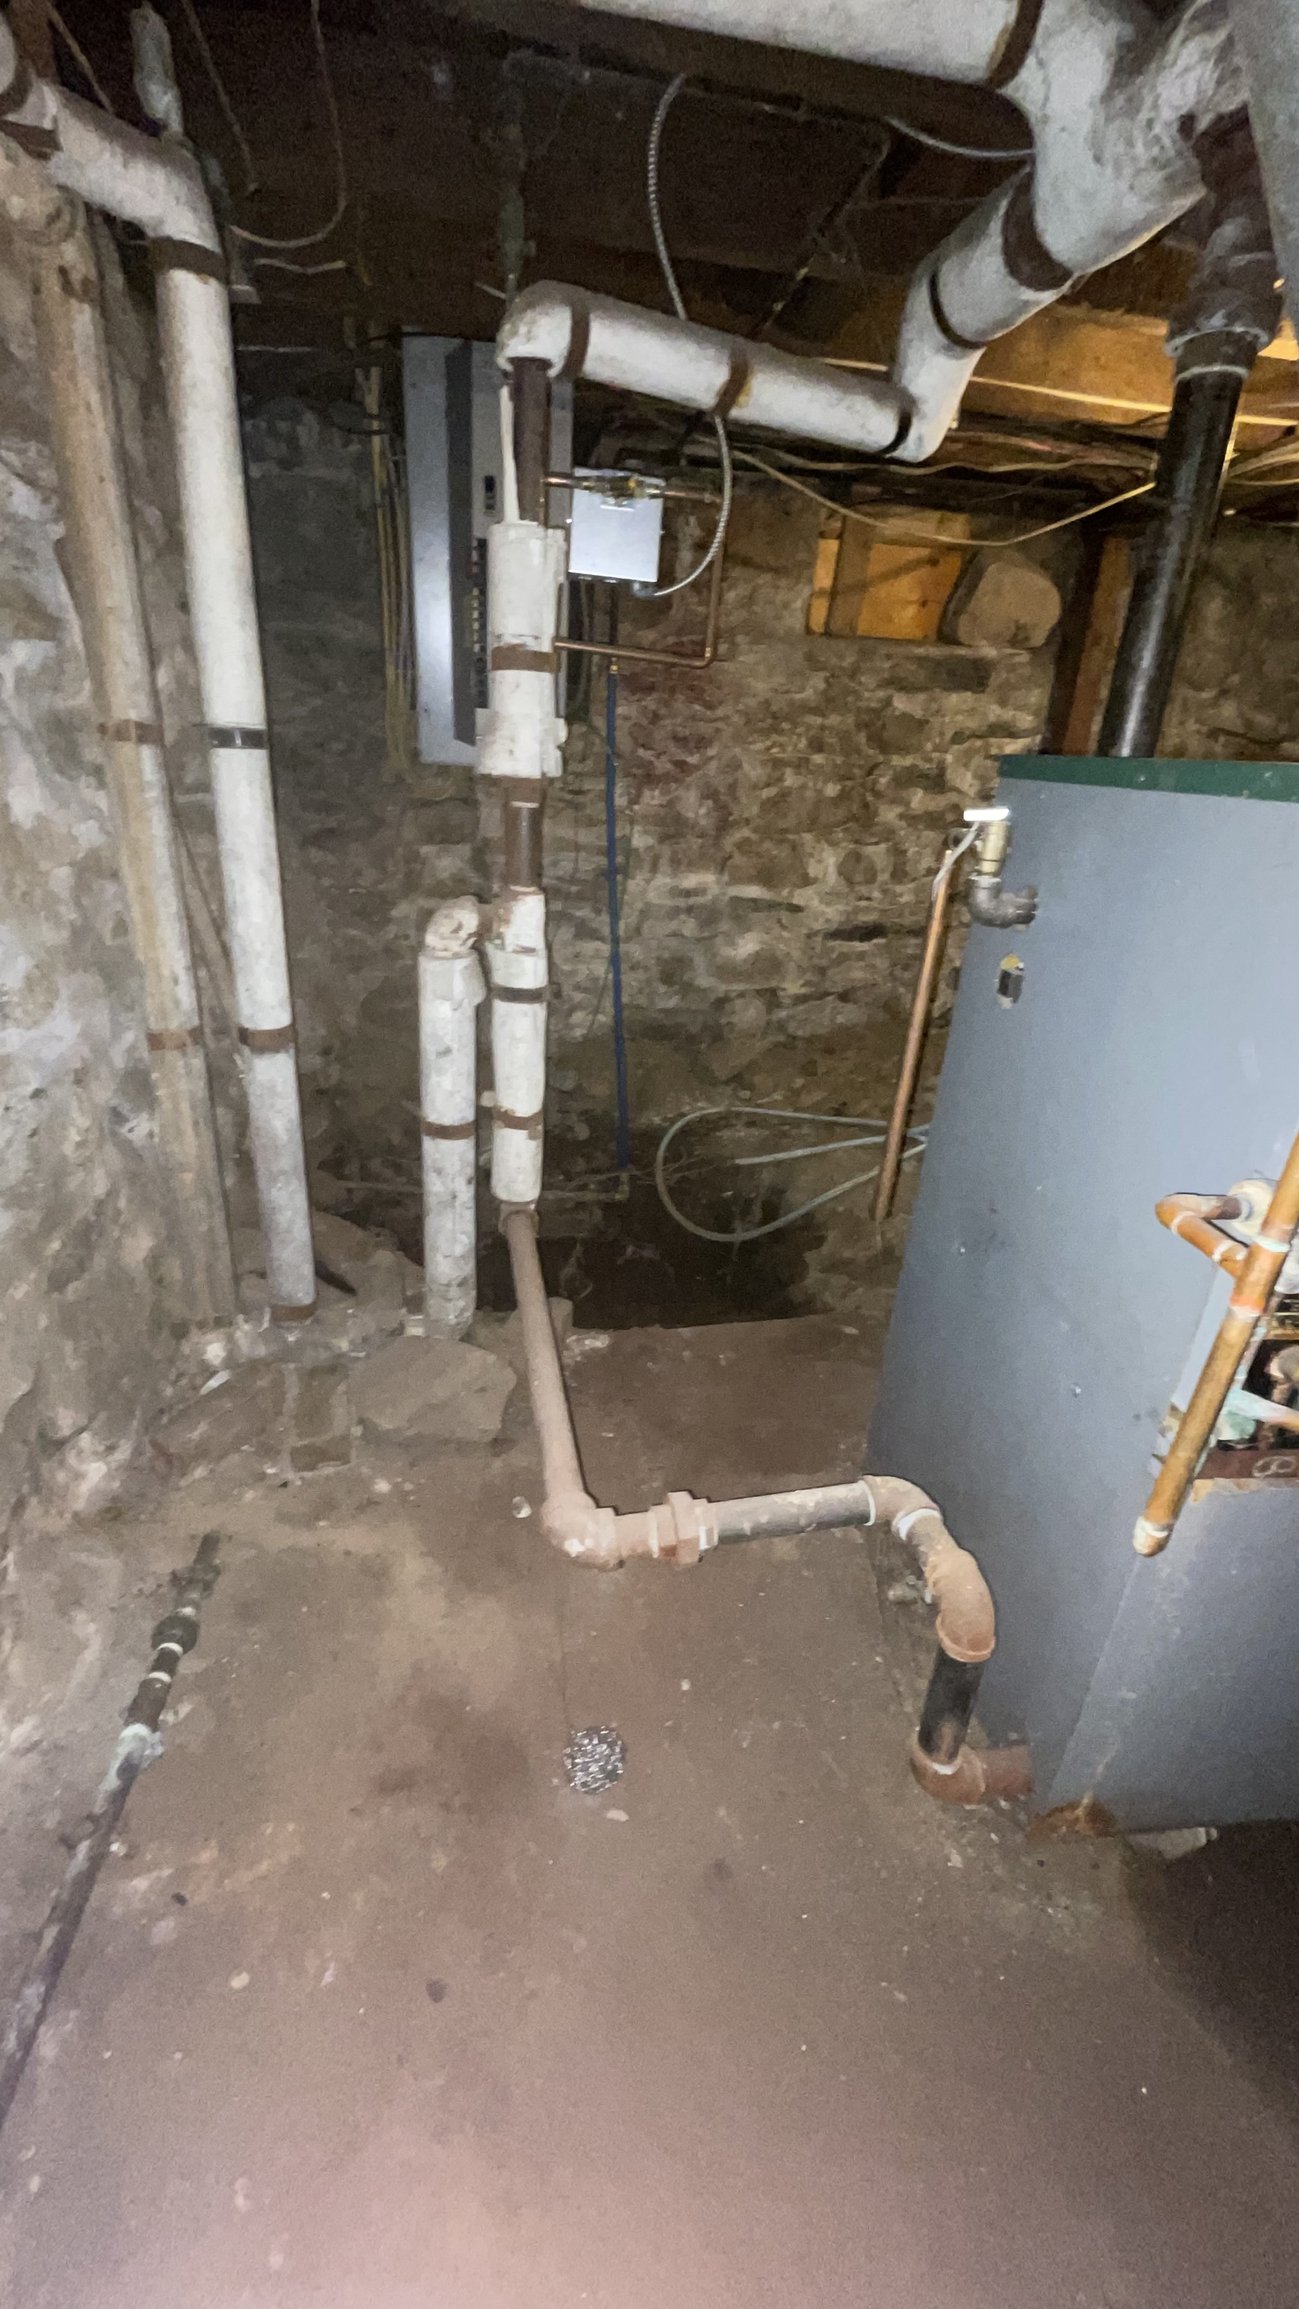


To me, it appears that this piping kit would be connected to the existing steam main (where the union is made with the current vertical pipe exiting the boiler). It then appears that the existing wet return would be connected to the wye in the piping kit.
My questions are:
1) Do the connections described above sound correct?
and
2) If so, does the piping kit replace the existing equalizer pipe? If so, do I just cut and cap the existing equalizer?
If anyone has advice, questions, comments, or concerns, I would greatly appreciate it. Also, if anyone knows a good steam contractor willing to service NE CT who might be willing to work with me, I’d be happy for a recommendation.
Neal

Comments
-
What size pipe is coming up from the Peerless?
Baltimore, MD, USA
Steam, Vapor & Hot-Water Heating Specialists
Oil & Gas Burner Service
Consulting0 -
I believe it is 2”, can confirm when I get back this weekend. I am not sure if the pipe diameter increases beyond the union where it connects to the older steam main, but I am nearly positive it’s a 2” pipe coming from the peerless.0
-
I think I would build out the near boiler piping as pictured above. I would leave the old header and equalizer, for a few reasons. Connect the outlet of the new drop header to the place where the old boiler connects to the existing header. I would retain the old equalizer pipe and consider it a Drip and connect it to the wet return side of the new Hartford loop. You will probably get super dry steam this way and minimize dealing with the white stuff.
National - U.S. Gas Boiler 45+ Years Old
Steam 300 SQ. FT. - EDR 347
One Pipe System0 -
Are you sure that your existing boiler is leaking?
 1
1 -
@STEAM DOCTOR has an excellent point, I would verify the crack before I spent any money. One method (no significant disassembly) Raise the boiler's water level to over the top of the boiler's housing, does water leak out ?STEAM DOCTOR said:Are you sure that your existing boiler is leaking?
National - U.S. Gas Boiler 45+ Years Old
Steam 300 SQ. FT. - EDR 347
One Pipe System0 -
Make sure to look inside the combustion chamber as well. Not all leaks will end up on the floor. Small leaks could be in the combustion chamber and you wouldn't necessarily notice it if you didn't know to look.0
-
I marked up the two pictures to show you how it should be hooked up. Red is the main, blue is the return, the black is what goes away with the new boilers piping kit.


0 -
This sounds like a great suggestion...would the simplest way to accomplish this be to place a tee at the junction of the existing wet return and equalizer and then connect the third leg of the T to the new wet return?109A_5 said:I think I would build out the near boiler piping as pictured above. I would leave the old header and equalizer, for a few reasons. Connect the outlet of the new drop header to the place where the old boiler connects to the existing header. I would retain the old equalizer pipe and consider it a Drip and connect it to the wet return side of the new Hartford loop. You will probably get super dry steam this way and minimize dealing with the white stuff.
Something like this:
Existing Equalizer Pipe
I
Existing Wet Return ----- New Wet Return0 -
Ok that text failed…like this drawing?

0 -
I will verify that the boiler is leaking before I wrestle the new one down the stairs. Thanks for pointing out an obvious step I skipped.STEAM DOCTOR said:Are you sure that your existing boiler is leaking?
0 -
Thanks, but there is another feed from the steam main that heads off 180 degrees opposite the red line running to the right, so I need to make sure I feed both branches. I was thinking the most convenient connection would be right at the existing unionKC_Jones said:I marked up the two pictures to show you how it should be hooked up. Red is the main, blue is the return, the black is what goes away with the new boilers piping kit.
0 -
Hello @Nsherman2006,
I was thinking something more like this. It looks like there is two dry returns that drop down to a short wet return. This way the old equalizer pipe would connect into the wet return way below the water line.
Yes reusing the old header and equalizer pipe is odd and atypical but I think it may have some advantages in this case since it is already there. Otherwise you should separate mains and bring them down to the new drop header individually and have two Tees at the drop header.
National - U.S. Gas Boiler 45+ Years Old
Steam 300 SQ. FT. - EDR 347
One Pipe System0 -
Does your plumber really know steam, or just thinks he knows steam?
NJ Steam Homeowner.
See my sight glass boiler videos: https://bit.ly/3sZW1el
 2
2 -
Also verify Who is removing all that asbestos!Nsherman2006 said:
I will verify that the boiler is leaking before I wrestle the new one down the stairs. Thanks for pointing out an obvious step I skipped.STEAM DOCTOR said:Are you sure that your existing boiler is leaking?
0 -
The discussion isn't about convenience it's about doing the piping correctly, the reason I thought you came here.Nsherman2006 said:
Thanks, but there is another feed from the steam main that heads off 180 degrees opposite the red line running to the right, so I need to make sure I feed both branches. I was thinking the most convenient connection would be right at the existing unionKC_Jones said:I marked up the two pictures to show you how it should be hooked up. Red is the main, blue is the return, the black is what goes away with the new boilers piping kit.
That kit shows one main connection, if you have more than one main you need to add another tee to the header and connect the other main there. The existence of 2 mains does not change how this works, just changes how many tees you put into the header on the new boiler.
I'm all for saving money with doing things DIY, it's why I installed my own boiler as well, but it still needs to be done correctly. 1
1 -
Alright all...I was able to get to the house this weekend. I verified the old boiler was leaking (pretty bad once I raised the water level...it's been fine for domestic hot water but there's no way the existing boiler was going to hold steam), installed a heat pump water heater for domestic hot water, and picked up the Burnham and wrestled it down the stairs. The near boiler piping kit came in as well so I have 30 days to decide if I need to return it.
I've read through the comments (and greatly appreciate them), and am trying to figure out the best way to proceed. I'm going to post a few pictures that can hopefully be helpful.
First, the piping situation, as best I could photograph it:
Next, with the steam mains highlighted in red, the equalizer in green, and the wet return in blue (I hope I've identified these correctly):
Now, to determine my approach. I'm assuming that the way that the current boiler is set up is less than ideal (only a single riser), but if that would make sense to replicate, it seems to be the most straightforward,
I believe @109A_5 is proposing a revision like this, where I use the near boiler piping kit but keep most of the existing components, with a small amount of piping changes (in purple):
This revision seems pretty doable, I'd have to buy a pipe threader but that's easily in the budget. It also appears that the amount of asbestos that would need to be removed is well within what I can do as a homeowner (with the appropriate precautions)
I believe @KC_Jones is proposing a revision like this, where I use the near boiler piping kit but add an additional tee to feed the mains separately:
This revision seems like it disturbs a large amount of existing pipe, but if it's the best way to do it, then that's what I'll do. I would probably need to hire professional assistance if I go this route.
So the 3 options I'm currently evaluating are:
-Piping identical to what is currently in place (using only a single riser)
-109A_5's revision (which I feel confident in DIYing)
-KC_Jones' revision (which I would likely need to hire help for)
If y'all can help me with identifying which of these approaches seems best, I would be greatly appreciative. The help I've gotten so far has been tremendous, thank you so much!
0 -
Hello @Nsherman2006,
Obviously, I would do the job my way, since it makes it simpler and less costly. You illustrated it well except for the shape of the Hartford loop. Although utilizing the drop header (I would), another layer of Water / Steam separation is probably not necessarily, but since the pipes are already there, what is the down side as far as system performance ? As I see it, re-using some of the the existing piping is a benefit, in a few ways.
Its not like you are adding 100' of un-insulated pipe. What actually is the down side ? I'd love to know.
I think it could be done without the purchase of a pipe threader. I guess that depends on your local resources or supplyhouse.com is fast too.
National - U.S. Gas Boiler 45+ Years Old
Steam 300 SQ. FT. - EDR 347
One Pipe System0 -
Thanks for the reply! I would prefer to do it this way for convenience if leaving the existing equalizer is a bad idea.109A_5 said:Hello @Nsherman2006, Obviously, I would do the job my way, since it makes it simpler and less costly. You illustrated it well except for the shape of the Hartford loop. Although utilizing the drop header (I would), another layer of Water / Steam separation is probably not necessarily, but since the pipes are already there, what is the down side as far as system performance ? As I see it, re-using some of the the existing piping is a benefit, in a few ways. Its not like you are adding 100' of un-insulated pipe. What actually is the down side ? I'd love to know. I think it could be done without the purchase of a pipe threader. I guess that depends on your local resources or supplyhouse.com is fast too.
However, if you could point out where I went wrong in the shape of the loop that would be helpful.As far as the pipe threader, unless I am able to disassemble the tee where the current equalizer and wet return meet, I’ll need to cut and thread that pipe, no?
Thanks again for all your help!0 -
Hello @Nsherman2006,
With the Wye fitting that comes with the OEM near boiler kit, that is the wet return's connection point that makes the Hartford loop, I would have as short a nipple as possible into the Wye then a 45° fitting then drop straight down (vertical or plumb) like the old one did to connect to the existing wet return that goes to the dry returns. Like in the picture I edited before. In other words don't go horizontal until you are almost at the floor at the same level as the old wet return.
National - U.S. Gas Boiler 45+ Years Old
Steam 300 SQ. FT. - EDR 347
One Pipe System0 -
Ah, got it. My drawing skills clearly did not demonstrate that I was planning on doing that. I suppose art school is out for future plans!
Thanks again for all your help. I managed to purchase way more pipe threader than I need (I got a whole Ridgid power setup with the dies I need off Facebook marketplace, I’ll sell it when I’m done), so I think I’m prepared to start this project next weekend. I’ll start by trying to remove the couplings by unscrewing them, but I’m not optimistic that they will come apart easily, so I’m prepared to cut and add new pipe if needed.
1 -
Hello @Nsherman2006,
I’d be interested in updates on your project going forward, as my situation is parallel: NE CT, leaking boiler I’m replacing myself with the Megasteam, similar piping to the mains. Good luck!0 -
Well here are a couple of progress pictures…I got the boiler in place and assembled the black pipe. I still need to hook up water/electrical/flue, but I’m pretty happy with how it’s going so far (hoping that there are no leaks).
The power threader was certainly worth the investment, and I was a bit surprised that the near boiler piping kit required a couple of minor cuts to get everything to line up.Does anything look concerning in what I’ve done so far?
 0
0 -
0
-
Hello @Nsherman2006,
I like it. However I would have used a close nipple between the Wye and the 45°. Since there is a Wye it may not be as critical. Also I would have orientated the Hartford loop to put in the wet return drains and valves like in the manual. One pipe systems make mud so it is good to keep them flushed out.
National - U.S. Gas Boiler 45+ Years Old
Steam 300 SQ. FT. - EDR 347
One Pipe System0 -
Thanks! I ended up using a 3” nipple because I originally intended to put the drain at the bottom of that 90 where there’s a plug, but I realized later that there was another tapped 90 (right before it enters the boiler, not visible in the picture), so I put the drain there for convenience but did not feel like redoing the rest of the piping to shorten the nipple.There are 2 drains, one in between the two old returns and the old equalizer, and one just before the wet return enters the boiler. Where would a valve go in this arrangement? I just followed the instructions on the near boiler piping kit.
thanks again for all your help!0 -
I think I would not be comfortable doing something so invasive that close to that asbestos without removing it or at least gluing it together.0
-
mattmia2 said:
I think I would not be comfortable doing something so invasive that close to that asbestos without removing it or at least gluing it together.
I constantly wonder the same thing about fiberglass.
Single pipe 392sqft system with an EG-40 rated for 325sqft and it's silent and balanced at all times.
0 -
@mattmia2
The asbestos that was on the pipes I touched was removed prior to cutting them out. Once the new boiler is tested and verified to be working properly, I will wrap the asbestos with some sort of encapsulating product and insulate the new pipe with something better than air!0 -
Hello @Nsherman2006,
As long as you believe there is adequate means to flush out the wet return and the boiler.
https://s3-us-west-2.amazonaws.com/catsy.782/MegaSteam+IO+Manual.pdf
National - U.S. Gas Boiler 45+ Years Old
Steam 300 SQ. FT. - EDR 347
One Pipe System0 -
Hello @ChrisJ,
Many years ago I heard Russia considered fiberglass just as bad as asbestos. I do not know if there is any research to support that claim.ChrisJ said:I constantly wonder the same thing about fiberglass.
National - U.S. Gas Boiler 45+ Years Old
Steam 300 SQ. FT. - EDR 347
One Pipe System0 -
@109A_5
Well now that I see that I don’t know how I missed it before. There is a drain on both sides but I’m missing the gate valve circled. What is the purpose of that valve? Should I cut one in? It doesn’t seem like it would be hard to add with the union shown.0 -
Hello @Nsherman2006,
Many systems don't have that valve. They probably all should have it. Many systems don't have adequate drain valves either. And then folks don't use them even if they are there.
Depending where the makeup water feed is that valve can be closed to provide a path to flush or back flush the system. It provides isolation. Also you can fire the boiler and close that valve and let the condensate only drain out the wet return drain. Within reason the more drain valves the better, The better the facilities you have to keep the system clean the better it is. With garden hose(s) and a female to female hose adapter or a washing machine hose you can flush out different segments of the system. Mud restricts condensate flow and plugs up the boiler. Keeping it all as clean as possible maintains best performance.
To me the better the isolation of a section the better the flush. The drains should be at the be beginning or the ends of a given run for best flushing of that section.
National - U.S. Gas Boiler 45+ Years Old
Steam 300 SQ. FT. - EDR 347
One Pipe System0 -
Well, I suppose I should make an update, even though I forgot to take pics. The boiler installation was completed this weekend, and this morning my heating company came to service the newly installed boiler and said all looks good. It seems to work fine, and I left the settings on the low water cutoff, pressuretrol, and burner all the same (I don’t know if the tech adjusted them today, as I wasn’t there). Is there anything else I should consider doing to make this a reliable runner, such as skimming it after it’s been run for a little while?
Thanks all for the help…I’m happy with how this DIY project turned out0


Categories
- All Categories
- 87.7K THE MAIN WALL
- 3.3K A-C, Heat Pumps & Refrigeration
- 59 Biomass
- 430 Carbon Monoxide Awareness
- 128 Chimneys & Flues
- 2.2K Domestic Hot Water
- 5.9K Gas Heating
- 121 Geothermal
- 170 Indoor-Air Quality
- 3.8K Oil Heating
- 79 Pipe Deterioration
- 1.1K Plumbing
- 6.6K Radiant Heating
- 396 Solar
- 16K Strictly Steam
- 3.5K Thermostats and Controls
- 56 Water Quality
- 51 Industry Classes
- 51 Job Opportunities
- 17 Recall Announcements