Another incorrectly installed steam boiler- HELP!
The install instructions clearly state a required 3" header and a 1-1/2" equalizer. Also the Hartford loop is not correct, the instructions state a close nipple or wye.
I reconfigured the piping at the end of the counterflow main and added a Big Mouth air vent.
I then fired the system and noticed now the main heating much quicker but as the steam started to get to the Big Mouth also about 3-4 oz of water came out before the Big Mouth snapped shut. Ran the system for a little while noticed while the far radiator from the boilers are getting some heat that its still not right (radiator vents are new). Went back to the boiler noticed short cycling and bouncing and rapidly dropping water level and LWCO tripping after about 1 min 30 sec. Let boiler rest about 20-30 min then refired. It was impressive as my Big Mouth vent has now turned into a faucet spraying water like a geyser before it got hot enough to close again.
I took a video of the sight glass while the boiler was firing https://youtu.be/61rG-pyWgr0
It seems obvious that I need to repipe the boiler per manufacturers instructions. one of my many questions is my header height. Instructions say min 24" above the water line. I have read on here that taller is better, is there such a thing as too tall? Mcmaster carr has 3" pipe in 24", 30", 36" lengths. the 30" and the 36" are essentially the same price so if I went with the 36" I would end up at 40" above the waterline. I'm going to go with a dropped header, I will be able to have plenty of room to connect to my existing piping, I plan on installing a King valve, is this a special valve due to the temperature or can I use any gate or ball valve?
I also realize that I need to skim this boiler and also flush it by what I am seeing on the sight glass. But I'm thinking that I have bigger problems right now with the piping. I have watched the video with the Weil- Mclain glass boiler piping and I believe I just have too much velocity coming out of the boiler which is forcing water into my system.
I would appreciate any comments or suggestions as its getting cold!


Comments
-
I would say there is no such thing as too tall for the distance from the waterline to the header, especially if you are doing a drop header.
I would skim first. A new boiler takes multiple skim sessions, usually over a few weeks. They run absolutely wild without a skim session or two. I don't see a skim port, so it probably wasn't done.Burnham IN5PVNI Boiler, Single Pipe with 290 EDR
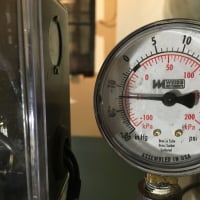
18 Ounce per Square Inch Gauge
Time Delay Relay in Series with Thermostat
Operating Pressure 0.3-0.5 Ounce per Square Inch 1
1 -
What's the boiler input rating?Burnham IN5PVNI Boiler, Single Pipe with 290 EDR
18 Ounce per Square Inch Gauge
Time Delay Relay in Series with Thermostat
Operating Pressure 0.3-0.5 Ounce per Square Inch0 -
Where s your fuel barometric damper without which your wasting energy n raising your stack temp. Also remove the plug in the front n put a full sized nipple w a reducer n ball valve drain hose to flush the bottom of the boiler . Looks like it’s a counter flow system would have been better off tying into the main w a tee and turned the run out into a drip it would seem that your first tee n take off off your main is backpitched into your boiler riser.at least from what I can see .counter flow system need dry steam and well insulated piping with out which it can be difficult get running properly w the least issues . Peace and good luck clammy
R.A. Calmbacher L.L.C. HVAC
NJ Master HVAC Lic.
Mahwah, NJ
Specializing in steam and hydronic heating0 -
Boy that oil line is an ugly tripping hazzard, and on the wrong side to swing the door open for cleaning. I guess when you change the pump strainer you can leave it floppin in the breeze and swing open the door.
Better would be mounted on the right side and transition to flex line going into the bottom supply to the fuel pump.
Luckily there are 2 unions there to make taking it apart pretty easy.
Where are you located? I'd say a pretty easy fix to one of the steam guru's on this site-if they're available.
And they can check your venting, and give you proper instruction for skimming & continued maintenance.There was an error rendering this rich post.
0 -
Don't bother skimming until you fix the piping. Your on the right track. The boiler mfg. piping requirements are the minimum standard to follow.0
-
This is the tag off the boiler

0 -
I also believe u need a oil filter unless it remotely mounted .do some reading on counter flow system before u attempt to re pipe it would be wise advice and if you hire some one make sure they are familiar w counter flow systems if not find some one who is .peace and good luck clammy
R.A. Calmbacher L.L.C. HVAC
NJ Master HVAC Lic.
Mahwah, NJ
Specializing in steam and hydronic heating0 -
Counterflow piping diagrams are on page 22 of this informative publication from Peerless Boiler.—NBC
https://www.peerlessboilers.com/wp-content/uploads/2018/01/OnePipeSteam.pdf 1
1 -
From your video it looks like the boiler is priming and you're having lots of carryover because the water level drops significantly midway through. That could be from the pipe diameter, dirty oily boiler water, or a combination of both.
I'm not saying repiping isn't worthwhile, but if you re-pipe, it sounds like you have a few days before you even have the parts. Might as well try skimming now. You'll need to do it anyways at some point.Burnham IN5PVNI Boiler, Single Pipe with 290 EDR
18 Ounce per Square Inch Gauge
Time Delay Relay in Series with Thermostat
Operating Pressure 0.3-0.5 Ounce per Square Inch0 -
Clammy, your comment about using a tee to tie into the main and turning the run out into a drip got me googling and I came up with the diagram that Nicholas referred me to. Its starting to come together in my head now what I'm supposed to be doing. If I use the tee in place of the elbow where the riser enters the beginning of the main and have the branch of the tee face up at 12'o clock, the condensate flowing back will not be able to run back into the riser. so use the runout of that tee to make my drip back to the loop. now that I have created a proper drip should I eliminate the one pictured that is about 18" to the left of the elbow entering the main that I'm going to replace with the tee?
0 -
I just figured out that my EDR is 167.26 how does this translate to the ratings on the boiler, just wondering if I am oversized0
-
If I'm looking at the right boiler manual, looks like your boiler is rated for 370 SQ FT for steam. That's with a typical 30% pickup/piping factor. So more than double your radiator load.
167 EDR seems pretty low for an older home. Are there rooms that have missing radiators?Burnham IN5PVNI Boiler, Single Pipe with 290 EDR
18 Ounce per Square Inch Gauge
Time Delay Relay in Series with Thermostat
Operating Pressure 0.3-0.5 Ounce per Square Inch0 -
My dilemma grows, my EDR is 167.26 (triple checked this) x 240 (240 BTUH per EDR rule) = 40,142.4 BTUH which converts to 40.14 MBH. My boiler is rated at 89 AHRI Net Steam (MBH) per manufacturers website. I'm thinking there may be a misprint on the boiler label because it has the 89 next to water instead of steam.
So it appears that my boiler is oversized by more than double 89,000 BTUH boiler vs 40,142 BTUH needed. Wondering how that factors in to my problems?
0 -
ac wagner, correct 370 is what their literature says. Ive got six rooms with six radiators, 904 sq ft total with 8 ft ceilings. the house is two stories with two separate boilers with separate systems for each floor. I am dealing with the downstairs unit. The second floor unit does function acceptably (identical boiler with the exception of having a hot water coil), the piping is also incorrect but correcting that mess is going to be a whole other issue. I just measured the second floor radiators and I came up with 184 EDR. Why does it seem to me that I could run this entire house (both floors) on only one of these boilers? I'm almost tempted to pipe them together and see.
This is what I used to calculate the EDR
0 -
This is the boiler for the second floor, its amazing it works. I think what saves it is the 2 inch header splits at the tee cutting the velocity in half so I'm not getting all the carryover of the other system, this second floor system splits two ways which the shorter main is counterflow, but the longer main goes downhill out of the boiler then back uphill at about the midway point, there is a return at the end of the main. it appears as possibly this branch was supposed to be a parallel flow with no venting. but the pitching is far from correct. The counter flow side drips directly back into the header riser while the poorly pitched parallel flow side drips back into the Hartford loop.

0 -
Your instinct is right--one of those boilers could heat both floors, based on the numbers you've provided. Not sure if it could also handle the indirect water heater with it. Depends on it's rating.
Is the house still being used as two separate units? Does it look like it used to be a single system that was split at one time?Burnham IN5PVNI Boiler, Single Pipe with 290 EDR
18 Ounce per Square Inch Gauge
Time Delay Relay in Series with Thermostat
Operating Pressure 0.3-0.5 Ounce per Square Inch0 -
It was always set up with two boilers, and it is still set up as two units.
I've gone back to reading Dan's book "the lost art , revisited" and I am concerned that no matter what I do I may have an issue because this boiler is oversized by this drastic amount. Being set up with the 2 inch counterflow main I fear I may have problems with condensate returning against the steam climbing the pipe. The chart on page 141 states 2" pipe is good for a maximum capacity of 92,640 BTUH for one pipe parallel flow and to increase one pipe size for Counter flow. which puts me needing to upsize my main. the more I look into this the more daunting the task becomes.
0 -
It seems overwhelming--many of us have been there too.
I still recommend skimming and changing out the water. Even with proper near boiler piping and appropriately sized, my new boiler was basically unusable for the first few days until most of the oils had worked their way out.
Since whoever installed this to begin with didn't have the knowledge to size or install the boilers, they probably didn't skim either. When they first ran it, the water was clean and it probably ran OK so they considered the job complete.
I'm not promising the moon, but you'd be surprised how much poor water quality can effect the performance. You have little to lose by trying.Burnham IN5PVNI Boiler, Single Pipe with 290 EDR
18 Ounce per Square Inch Gauge
Time Delay Relay in Series with Thermostat
Operating Pressure 0.3-0.5 Ounce per Square Inch0 -
There is a lot of crud in that water and I'll bet a lot of oil with the crud and I don't see any provision for boiler skimming. I agree draining and skimming is the first order of business, check the manual to see where the boiler skim tapping is and install piping so you can skim the boiler.
Skimming take a good amount of time and installers, especially low cost installers are loathe to put the time in to do it right. It may take several skimming sessions to get that water clean and each skimming will take 2-3 hours.
BobSmith G8-3 with EZ Gas @ 90,000 BTU, Single pipe steam
Vaporstat with a 12oz cut-out and 4oz cut-in
3PSI gauge0 -
Update, I was able to get the original installer out and I got the expected answers I knew I was going get out of him when I presented him with the Manufacturers piping diagram "I have done a bunch of these without a problem this way", "it is only a suggestion to use 3" pipe", and so fourth. I tried to present him with all the knowledge I have learned and it didn't make a dent. He skimmed the boiler and had to come back the next day and skim again. I still do have the occasional LWCO triggered and this is with a inch over the normal water line. Gonna have to deal with this for a while as it is now cold. My plan is to assemble the correct fittings and go at it once I get a break in the weather. The list of issues discovered to date are an oversized boiler, the 2" header and 1/1-4" equalizer where the manufacturer specifies 3" and 1-1/2".. There is a 3 inch nipple on the Hartford loop instead of the close nipple or wye fitting that is specified. I have one branch that goes two radiators and is piped closer to the header than the drip so all the condensate drains directly back into the header. Now that I have been enlightened the sins are impossible to ignore.
Thanks to all that have replied I appreciate the help and advice.0 -
No problem for him-that is!
It would be interesting to see other jobs he did “without a problem”.
Did he give you some sort of written proposal for this work?—NBC 1
1 -
Is that what it says in the manual? My IOM says, "Do not reduce the size or number of steam supply risers below the minimum shown in Table 4.1. Insufficient or undersized risers can cause damage to the boiler." That doesn't sound like a suggestion to me. Can you find anything similar in your manual?Scorpius_240 said:"it is only a suggestion to use 3" pipe"
Just another DIYer | King of Prussia, PA
1983(?) Peerless G-561-W-S | 3" drop header, CG400-1090, VXT-240 -
@Scorpius_240 you'll likely need to skim it several more times. It takes several sessions after a new boiler install.
Immediately after you skim, do you see an improvement in some of your problems?Burnham IN5PVNI Boiler, Single Pipe with 290 EDR
18 Ounce per Square Inch Gauge
Time Delay Relay in Series with Thermostat
Operating Pressure 0.3-0.5 Ounce per Square Inch0 -
I hope you told him “well now you’ve done one with a problem”
NJ Steam Homeowner.
Free NJ and remote steam advice: https://heatinghelp.com/find-a-contractor/detail/new-jersey-steam-help/
See my sight glass boiler videos: https://bit.ly/3sZW1el 1
1 -
He will just say, "Hey it's steam-what do you expect?"--NBC1
-
Where is this Without a Problem Located?Scorpius_240 said:Update, I was able to get the original installer out and I got the expected answers I knew I was going get out of him when I presented him with the Manufacturers piping diagram "I have done a bunch of these without a problem this way", "it is only a suggestion to use 3" pipe", and so fourth. I tried to present him with all the knowledge I have learned and it didn't make a dent. He skimmed the boiler and had to come back the next day and skim again. I still do have the occasional LWCO triggered and this is with a inch over the normal water line. Gonna have to deal with this for a while as it is now cold. My plan is to assemble the correct fittings and go at it once I get a break in the weather. The list of issues discovered to date are an oversized boiler, the 2" header and 1/1-4" equalizer where the manufacturer specifies 3" and 1-1/2".. There is a 3 inch nipple on the Hartford loop instead of the close nipple or wye fitting that is specified. I have one branch that goes two radiators and is piped closer to the header than the drip so all the condensate drains directly back into the header. Now that I have been enlightened the sins are impossible to ignore.
Thanks to all that have replied I appreciate the help and advice.0 -
NBC, there were no estimates on future work but he did come out and skim twice without charging.
Hap, the manual didn't exactly say not to reduce, nor did it say suggested size. It was "3 inch pipe on the riser and header"clearly written on the installation diagram.
AC, I did see an improvement after skimming.
Pecmsg, this installed in RI.
Update, after skimming a few more times and dealing with the LWCO tripping. I drained the boiler, fabricated a cleaning wand and flushed the boiler. Luckily for me the basement floor hadn't been washed in 65 years so I got a two for. The amount of black silty goodness that exited the boiler was impressive. After the flush and doing a few periodic skims I have a useable system. Although the noises it makes does wake me up some nights. For some reason fate or poor plumbing decided to make the radiator in the bedroom the one and only that clatters. It really sounds like the shutoff valve is broken off inside and the stopper is rattling around. But after two different occasions of disconnecting the radiator ( I just had to be sure) and verifying the shutoff was still in one piece, I am chalking it up water and steam colliding in the valve. Oh did I mention that I can hear the water sloshing around in the pipes. Yes, this is a steam system. This radiator happens to be fed by one of the two branches that are dripped directly back into the header. Due to the weather looks like I have no choice but to deal with this in the spring.
Thanks again to all that shared their wisdom.
0 -
Try raising that noisy radiator up about half an inch on the supply side and slightly higher on the vent side.0
-
All great advice here. Steam can be forgiving or be damning. That's why the installer said he never had problems. You wouldn't believe how messed up an installation can be yet still provide heating. It's only when the customer learns how a properly serviced system is capable of working does he realize that things are very wrong.
But economics usually prevails and fixing the problems cost money. Have you priced 3" steam fittings? Too often a shabby installer is never made to pay for his mistakes and the bad job goes on heating poorly and wasting fuel for fifty years.
Skim and flush; get that water clean and free of cutting oil. Lower the pressure as much as that cheap control permits and lift those sloshing radiators a bit to add pitch to the pipes. You may be very surprised at the difference these simple corrections can make.
0 -
Insulating the basement pipes will help you out too..
 1
1


Categories
- All Categories
- 87.5K THE MAIN WALL
- 3.3K A-C, Heat Pumps & Refrigeration
- 61 Biomass
- 430 Carbon Monoxide Awareness
- 122 Chimneys & Flues
- 2.1K Domestic Hot Water
- 5.9K Gas Heating
- 118 Geothermal
- 170 Indoor-Air Quality
- 3.8K Oil Heating
- 78 Pipe Deterioration
- 1K Plumbing
- 6.6K Radiant Heating
- 395 Solar
- 15.9K Strictly Steam
- 3.5K Thermostats and Controls
- 57 Water Quality
- 51 Industry Classes
- 51 Job Opportunities
- 18 Recall Announcements