Welcome! Here are the website rules, as well as some tips for using this forum.
Click here to Find a Contractor in your area.
If our community has helped you, please consider making a contribution to support this website. Thanks!
Air in Oil - Can the pump be bad?
Comments
-
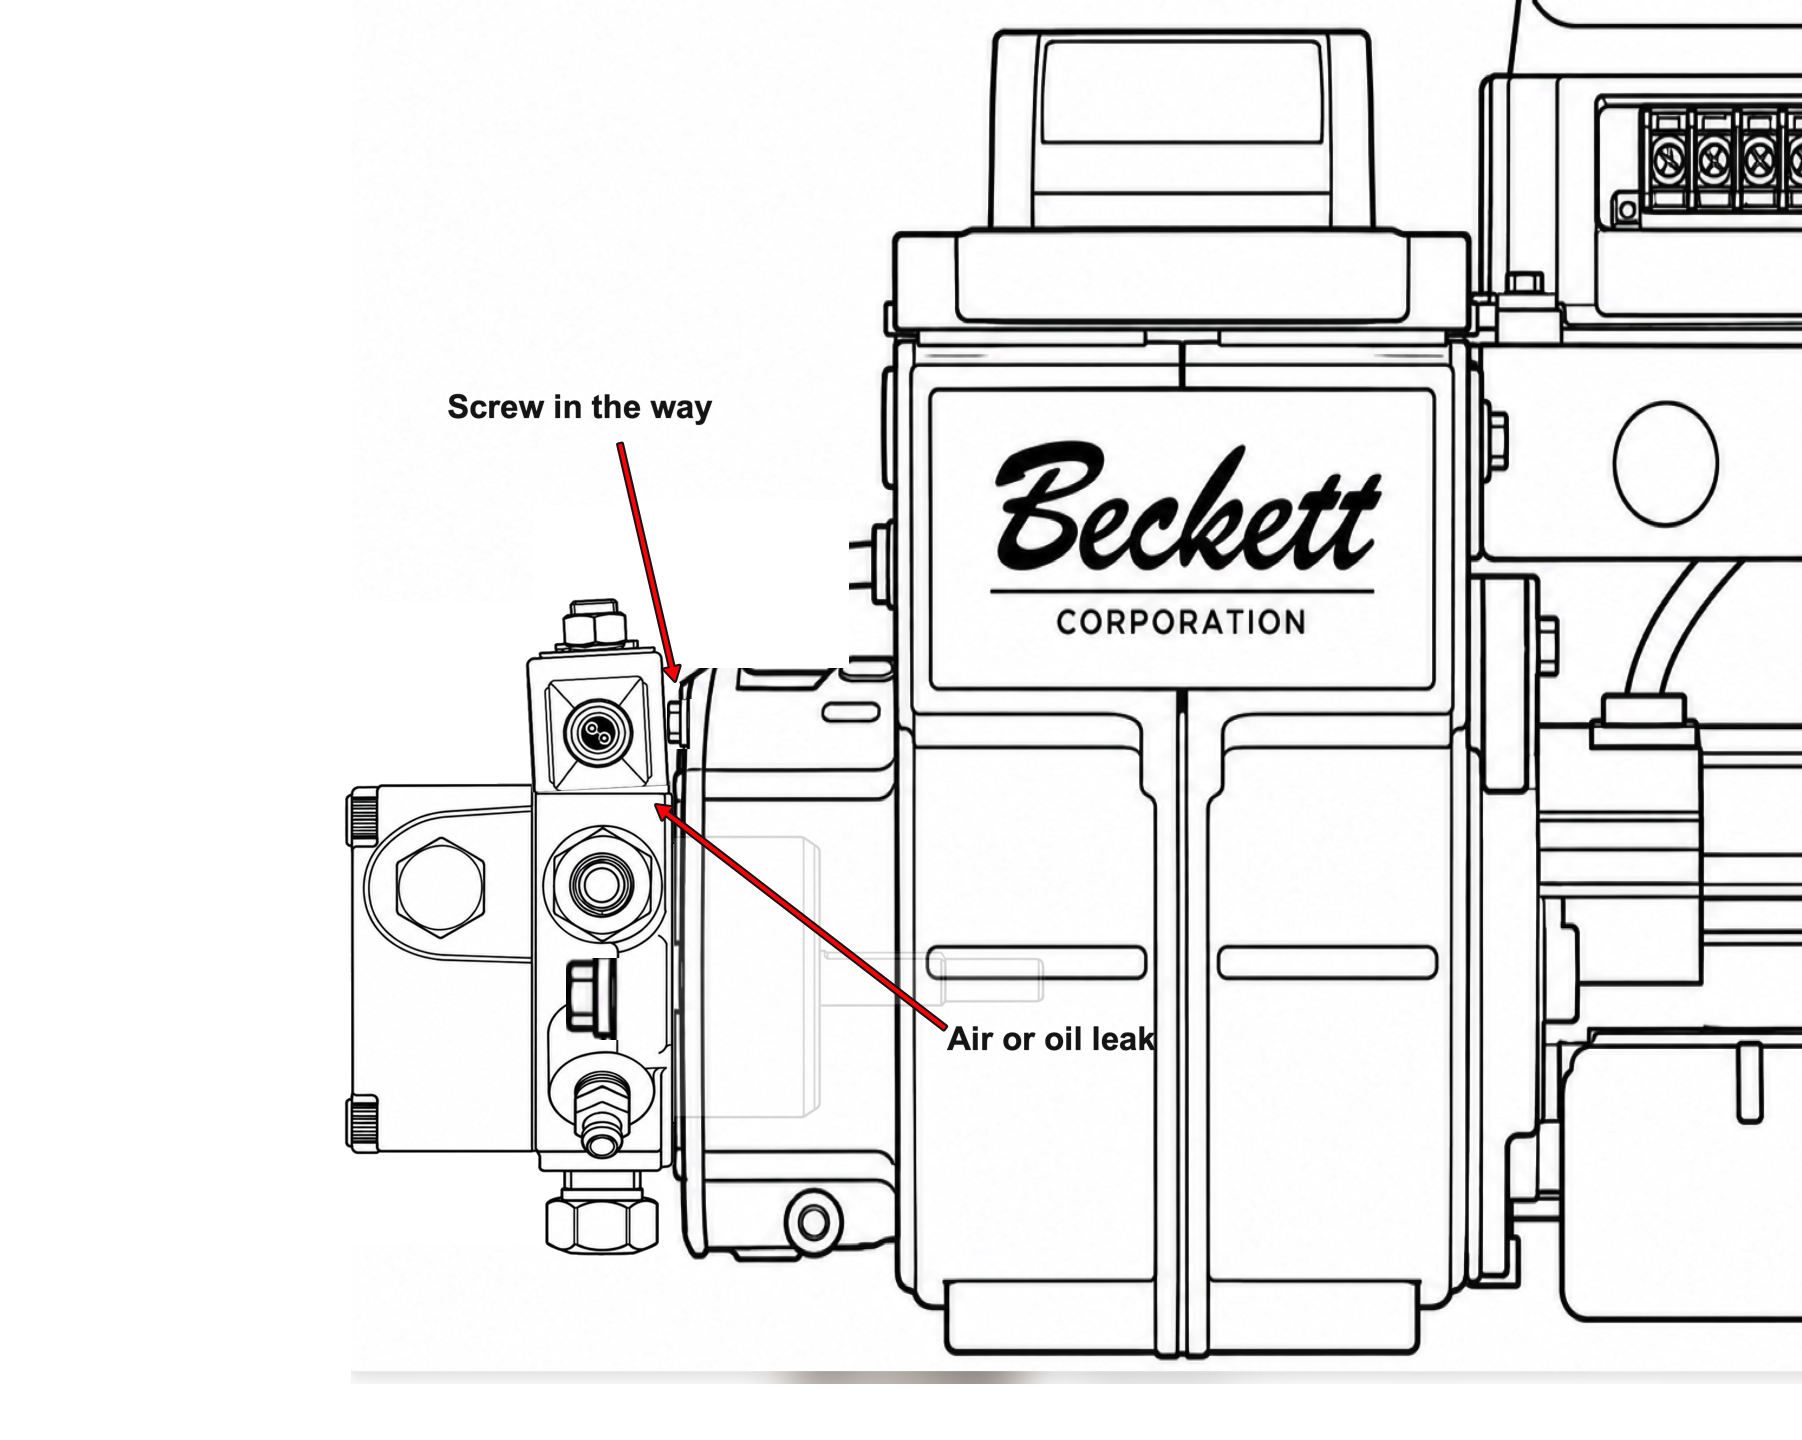
As far as the solenoid causing a problem?!? I remember installing a Clean Cut Pump on an older burner housing. If you look at the burner chassis that comes with a Clean Cut Pump and compare it to an older chassis there is a small machine screw with 5/16" hex head that is designed to hold the air adjustment in place. On the older burner it is centered over the top of the fuel pump. that screw is in the way of the solenoid magnet. if you tighten the pump on to the housing (as you should) the 5/16" hex head screw is in the way and causes the valve stem on the top of the pump to bend and cause a leak in the pump housing.
When you replace the pump and don't remove the screw, you end up with 2 damaged pumps. The one you removed and the one you just tightened on the that screw that acts like a fulcrum to bend the top valve shaft. Now both pumps match.
See illustration below showing the new chassis on the top and the old chassis on the bottom.
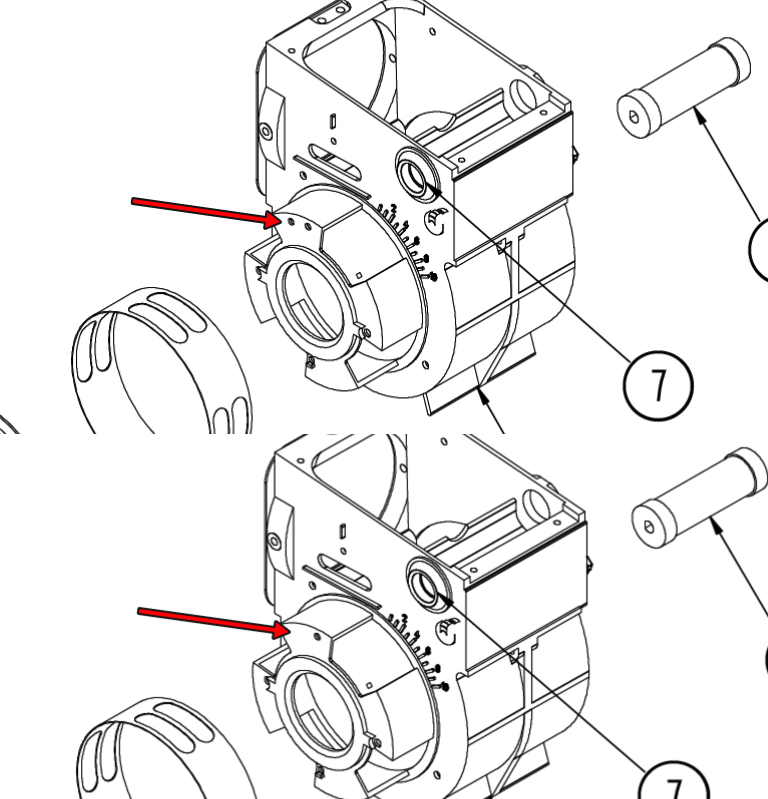
If you have the newer chassis then that is not a problem. Just telling you how that might be the source of a leak.
Edward Young Retired
After you make that expensive repair and you still have the same problem, What will you check next?

 2
-
@HVACNUT "Install a permanent vacuum gauge."
Going to do that tomorrow.
"I know, stupid question, but I'm running out of logical reasons. The arrow "out" of the TL is going to the inlet on the fuel pump, and the return line from the fuel pump goes to the arrow "in" on the TL?
If we ever meet in person you can punch me for asking."
Yes, lines are correct. (It was the first thing the tech looked at when he came)
I hain't punched anyone in over 50 years! 😄 Not about to start again, especially someone who is trying to help me!
0 -
Maybe AI can teach the oil how to behave?
Thanks!

 2
-
@EdTheHeaterMan "If you have the newer chassis then that is not a problem"
Yes, newer chassis, the shutter screw is off to the side.
0 -
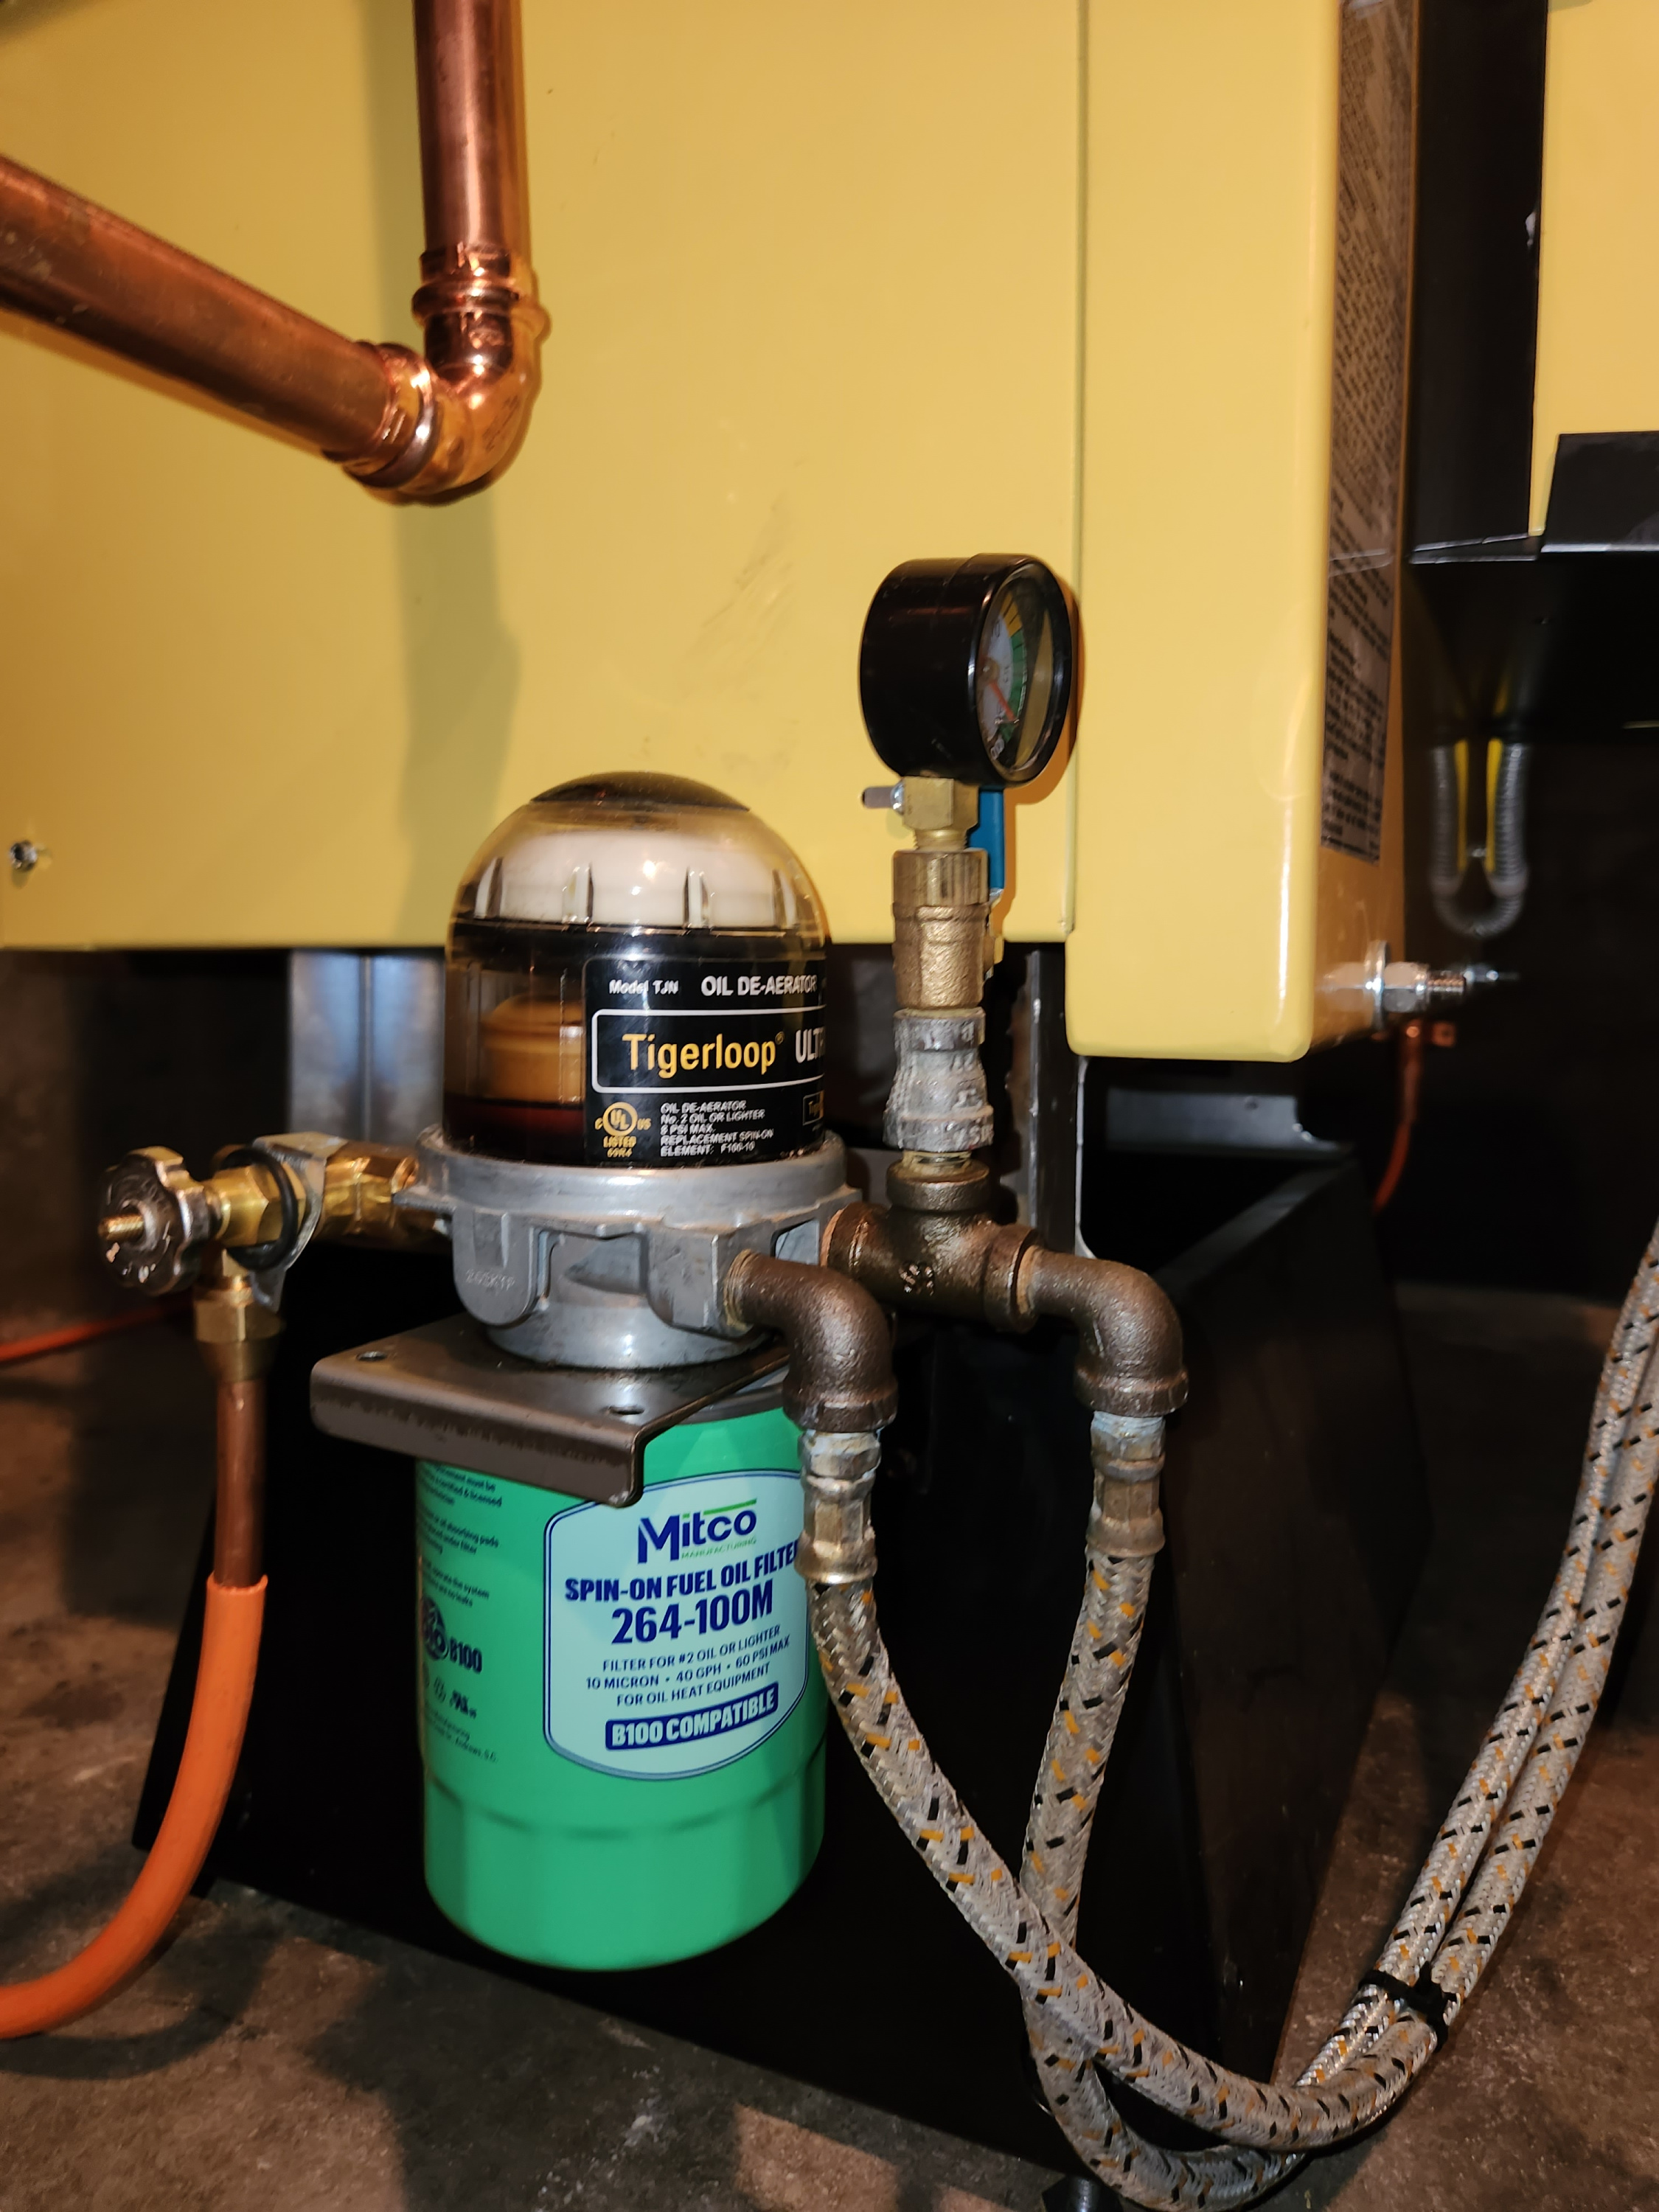
That permanent vacuum gauge location is good for the test between the pump and the TL
Edward Young Retired
After you make that expensive repair and you still have the same problem, What will you check next?
 1
-
The vacuum held overnight, it never dropped below the initial inch that occurred in the first hour so I'm confident that the lines from the tank, and the filters, etc, are all OK.
I got a call from the service manager this morning. He told me that the tech was "annoyed" at me because I questioned his wanting to replace the brand new TL and flex lines since the OLD one did the EXACT same thing.
Sure… it's POSSIBLE that brand new parts are defective out of the box… but how LIKELY is it?
During my career I learned to "TEST, DON'T GUESS", and to avoid "Firing the parts cannon".
Was I guilty of firing the cannon? Yes… I was, with the pump. I don't consider replacing a 12 year old TL and flex lines to be the cannon though, because it was time for that to be done as routine maintenance anyway.
Getting back to TEST, DON'T GUESS… I would have had much more confidence in the tech if he had not first shown up without a CA, and had done the vacuum tests that Ed suggested to me. EASY tests!
The manager told me this morning that they do not charge for the parts if it doesn't fix the problem. (the tech did not tell me this!) That's a step in the right direction, but I didn't ask him about the labor. I bet I'm gonna get a huge labor charge for their guessing game.
A different tech is coming back this afternoon to change the TL and flex lines. We'll see how good their parts cannon aim is.
I could rant on, but I won't.
0 -
@EdTheHeaterMan "That permanent vacuum gauge location is good for the test between the pump and the TL"
Installing the gauge in the unused pump port would serve the same purpose though?
0 -
Agree with Test don't Guess! With the second Vacuum test you will know if the TL and pump is the problem
Edward Young Retired
After you make that expensive repair and you still have the same problem, What will you check next?
1 -
yes…
Is that where you always had the vacuum gauge?
Edward Young Retired
After you make that expensive repair and you still have the same problem, What will you check next?
0 -
No… the gauge is on the spin on filter mount. I've not had a gauge on the TL side yet.
0 -
I'm 'hopeful' that the problem is rectified. Praying actually.
Yesterday after I installed the valve at the top loop at the tank, I ran the burner for a long time, and bled a bunch of air that was obviously introduced when I installed that valve.
I then closed that valve and ran the burner up to the 10" Hg that @EdTheHeaterMan suggested. It only dropped an inch overnight, if that… so say 12 hours or so.
When I quickly opened that valve I got a 'sploosh' of air I could hear move in the upper pipe loop.
I ran it again briefly and it ran like crap, but I shut it off and left it that way so the tech could hear it. And hear it he did, but still, NO BUBBLES in the TL dome!
Tech didn't think it was air, because no bubbles, and changed the nozzle AGAIN (3rd new nozzle), after this the burner fired up with some issues… he looked at the flame, fiddled with the air settings, ran his CA and got 10.75% CO2 which he was happy with. Burner was running fine all the way to high limit.
I went out a little while ago and it seemed fine, no pulsing/huffing/puffing/skipping, etc.
Then I closed that valve at the top of the tank again, up to 10" Hg several times, and opened the valve. After a few minutes I started seeing bubbles in the TL dome, but the burner kept right on doing it's thing.
I'm letting it cool overnight, will try it again tomorrow morning to build my confidence. Late tomorrow I'm also going to install the vacuum gauge on the pump port for some further peace of mind.
I still think this was an air issue, and I have theories about why this air was so hard to purge out, but it's getting late and I have a very early appointment tomorrow. No 2 AM for me today! If anyone wants to hear my theories, let me know and we can discuss.
Praying this is fixed! Thank you, thank you, thank you, everyone who has posted, especially @EdTheHeaterMan for his excellent graphics and testing procedures, and @HVACNUT and ALL OF YOU FINE GENTLEMEN who offered assistance, suggestions, and moral support!
0 -
Sounds like with the small nozzle the flow in the suction line is not enough to evacuate the air trapped in the loop on top of the tank.
If the air is truly all out and the suction line is tight you should be ok. When you opened and closed the valve a few times you slugged the air through the system into the TL or out through the nozzle.
you only flowing .65 gallons per hour through that line That's only .0108 gallons/ min.
That is one reason I dislike tiger loops, With an inside tank and overhead lines I would have used a two pipe system with no TIGER LOOP.
In the old days we were taught "if you have lift use a two-pipe system" and you have lift if only to get the oil syphoning. Plus, you oil line has to be completely 100% oil tight to work overhead with a small flow (which all oil lines SHOULD be) Like I said in previous posts. Solve the air/foam problem and the burner will run.
0 -
We had a job once that we had problems with. Brand new job we didn't install. We had 2 Carlin burner one in a boiler and one in a water heater. Underground tank. Each burner had a 3/4" suction line and a common 3/4" return. The larger burner in the boiler Carlin 201crd ran fine
The 100 CRD in the water heater kept getting air/foam. the pipefitter that piped the tank who I knew well told me he had pressure tested the oil line and had pressure on them for days and I beleived him.
We had Carlin out to take a look. He said "it will never run as is. The small oil pump on the water heater burner is not large enough to evacuate the air in the 3/4" pipe.
So we changed the suction line on that burner to 1/2" OD. The 3/4" was too large but the pipefitter had installed what the engineer drew on the print.
0 -
Wow… 3/4" is a HUGE oil line!
I've often wondered why in the USA we are not allowed to use 1/4" tubing for low flow situations. That would probably have not caused this issue in the first place.
I've been thinking about if it might be worthwhile to put a tee with a valve at that loop and from time to time hook up my brake bleeder to suck any collected air out. Ever seen such a crazy idea?
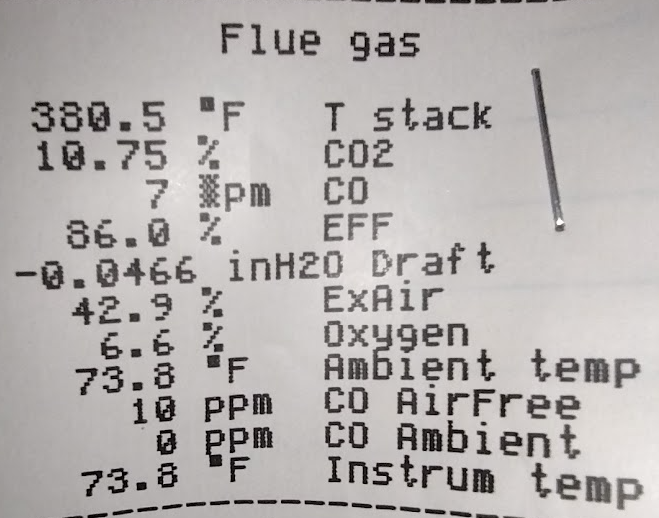
Here's the result of the Combustion test, how's it look to y'all?
 0
-
Too much air. When set to 1% CO2 below seeing smoke, mine is closer to 12% CO2. In addition to a combustion analyzer you will need a smoke pump to set it up correctly (draft and fuel pressure gauge also).
0 -
If anyone believes this is a combustion problem that can be diagnosed or repaired with a combustion analyzer or by simply replacing a nozzle, that person has limited experience with oil heat. You need someone with more experience than a nozzle changer to investigate this problem.
This comment is the most promising one so far:
“I went out a little while ago, and everything seemed fine. There was no pulsing, huffing, puffing, skipping, etc.
Then I closed that valve at the top of the tank again, pulled the vacuum up to 10" Hg several times, and reopened the valve. After a few minutes, I started seeing bubbles in the Tigerloop dome, but the burner kept right on doing its thing.”
This situation needs to be monitored closely to see if, and when, the flame starts acting up again.
You may want to install a permanent, properly rated pressure gauge on the high-pressure line between the pump and the nozzle, with a shutoff valve, so you can monitor the nozzle pressure and see what it reads if and when the problem occurs.
Edward Young Retired
After you make that expensive repair and you still have the same problem, What will you check next?
0 -
I have everything but the combustion analyzer. I do know that when my wet kit was still working I was able to easily get to 11.5%. I'm going to look into getting that back in action.
I do believe I will be switching to gas in the Spring, so perhaps it's a moot point.
I'm still wondering why the CAD cell is on the high side… further research needed there.
0 -
I was hoping to get a tech that impressed me with his know-how. Alas, what I got seems to be the norm in my area. I've tried many of them over the past 40 years. Around here most everyone has gas service and oil is only in a few smaller areas. I think that's why a good tech is hard to find. We only got a gas line up our road 2 years ago.
I started the burner again this morning and it started and ran fine, my confidence is building.
I have thought about installing a pressure gauge permanently. I had one on the old boiler 12 years ago, and it was helpful to know immediately what the pressure was. That pump had a fitting on it for a gauge, I don't know why newer pumps no longer have that. I may hook one up. I believe the easiest way would be to use two nozzle lines and a tee fitting for the gauge.
I'm also still considering raising the pump pressure to the newer spec of 180 PSI, with the understanding that it will raise the firing rate a few thousand BTU. I know it will need to be re-tuned afterward, but wonder if there is any real benefit to doing so. Maybe I should just leave it be in view of the fact that I'll probably switch to gas in the Spring. What's that they say about 'sleeping dogs'? 🐕️
0 -
@NJeffro leave the combustion as is. 10.75 Co2 is fine.
Like I said above. The problem was air trapped in the top of the loop. You but the valve in and then pulled a vacuum and opening and closing the supply valve slugged the air out through the burner or the tiger loop.
On a single pipe system, the only oil going through the line from the tank to the burner is what goes through the nozzle so like.60 gph or whatever it is.
That is simply not enough flow to move air.
If you had a supply and return two pipe system the oil pump would be moving the pump capacity which I don't remember what that is but probably 5 gpm instead of.6gpm and it would have flushed the air out.
Overhead lines on a one pipe system can be problimatic. Everything has to be 100% tight. And when you open the line to change a filter you get air in again. Thats why if it was mine it would be 2 pipe.
But leave it as is. Its working
1 -
I have had tigerloop hoses leak out the side, and tigerloops themselves that didn't work right, and fuse valves that had pinholes in the casting on the cast models. But since you replaced all that, then you would have definitely had to look somewhere else.
One of the things I noticed is your tigerloop is mounted below the burner, and if I remember right, it is supposed to be higher, which might mess with the floats somewhat if it isn't.
When I bled out systems that had a general filter, I used a method taught to me by an old timer. He said that since the filter is wool, that the oil has a tendency to not want to absorb in to it, so what he said to do was to close the valve before the filter, and then run the burner to get the highest vacuum you could, and then open the shutoff valve quickly. I have bled many burners before I tried this where I would bleed the pump with the valve open, and would have to repeat this a few times to fully bleed the system. After trying his system, I could bleed in one take. By doing what you did and closing the valve at the very start of the system, you effectively did the same thing. You might even have to do this twice in a row to get all air out though.
My bet is you will have no more problems with air.
Rick
2 -
Tiger Loops sometime cause more problems than they fix.
0 -
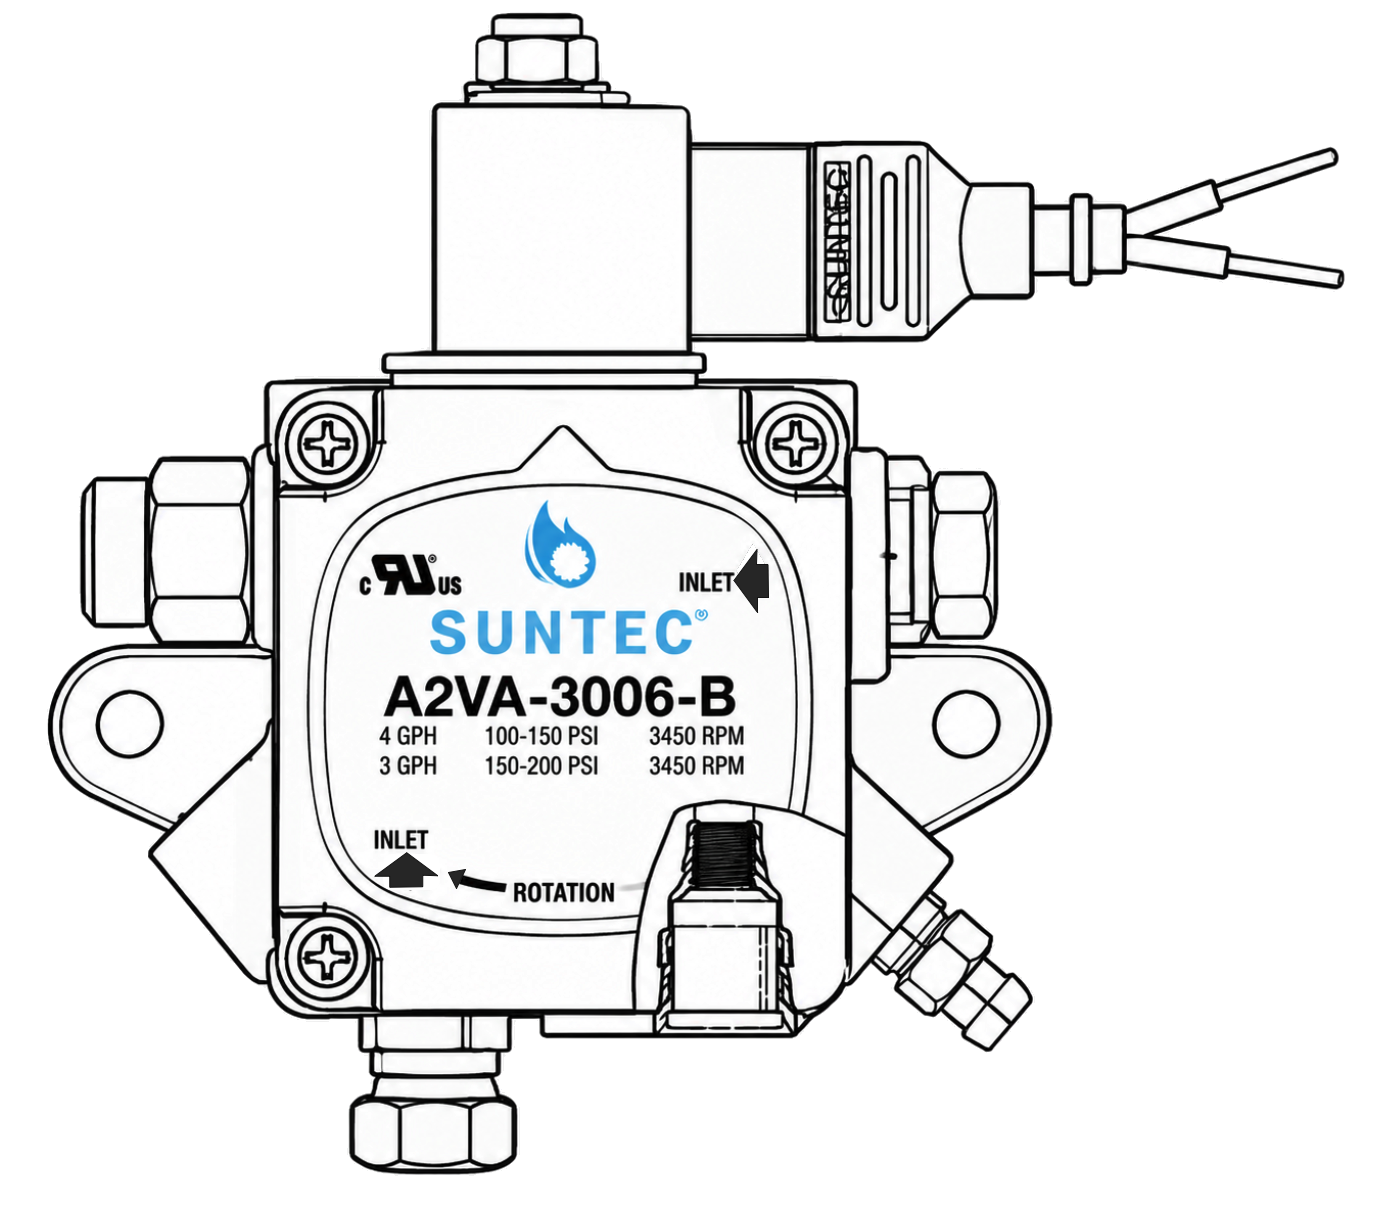
Do you have the PF20323 fuel pump or the Suntec A2VA 3006 version? Both have the Clean Cut solenoid valve feature.
If you happen to have the older version without the solenoid valve, there is a pressure port that will indicate the actual pressure being produced by the gear set, even when that pressure is below the setting required to open the nozzle port.
For example, if the pump pressure is set to 140 PSI but the gear set is producing only 120 PSI because of an inlet restriction, the gauge will show the actual pressure at that port.
When you install a gauge at the nozzle port, you must wait for the pressure to overcome the adjustment spring tension and open the high-pressure port to the nozzle before you get a reading.
It's a small difference, but it could be helpful in diagnosing problems like the one you're experiencing.
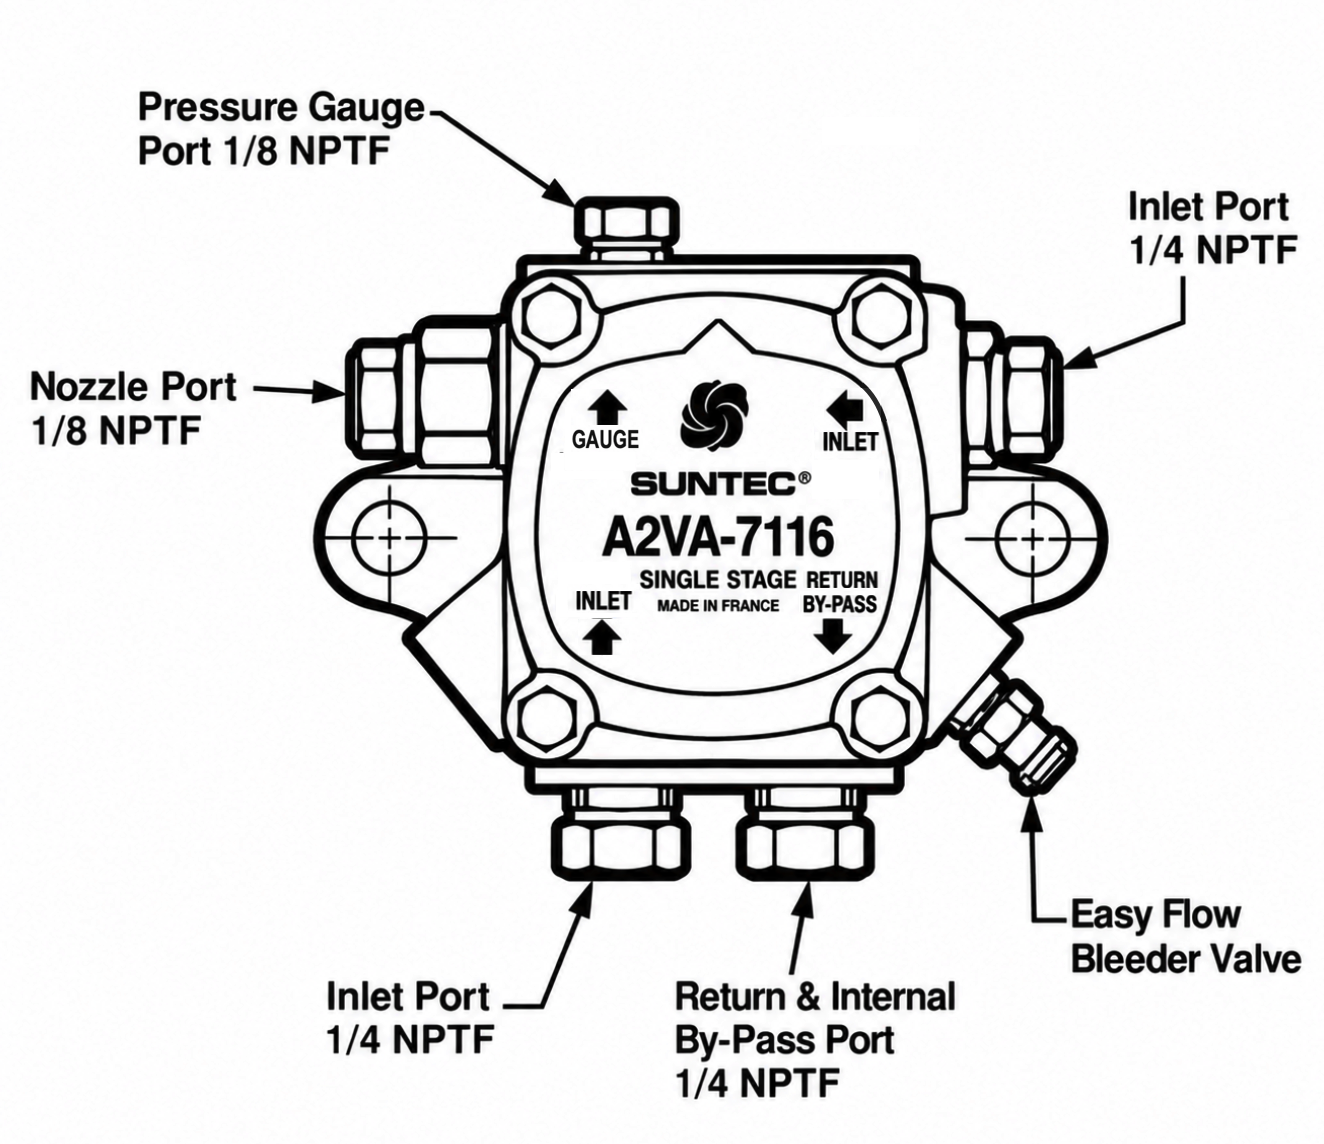
This is the older style pump without the solenoid valve. you can clearly see the 1/8" Gauge Port at the top.
In the same housing Suntec uses the top to insert the solenoid valve and therefor needed to eliminate the 1/8" gauge port as shown below
Edward Young Retired
After you make that expensive repair and you still have the same problem, What will you check next?
0 -
@rick in Alaska "My bet is you will have no more problems with air."
I sure hope not! Yeah, I think what I did amounts to the same trick, and it seems to have done it.
I've done it now quite a few times and then waited to see what showed up in the TL. The first time TONS! second time half a ton, third time a quarter… each time less and less, so I'm confident now that loop at the top of the tank had collected enough air to cause the problem.
I've run it numerous times now, with long off times in between, and I'm gaining a little confidence each time.
0 -
@EdTheHeaterMan "the PF20323 fuel pump"
I believe it's a PF20322. I believe the 3 may be a two stage model? The 2 is definitely a 1 stage. This is what came with the packaged boiler as new.
I had the A2VA-7116 on the previous boiler and that's the one I had the pressure gauge on back in the day.
I installed the gauge on the pump today.
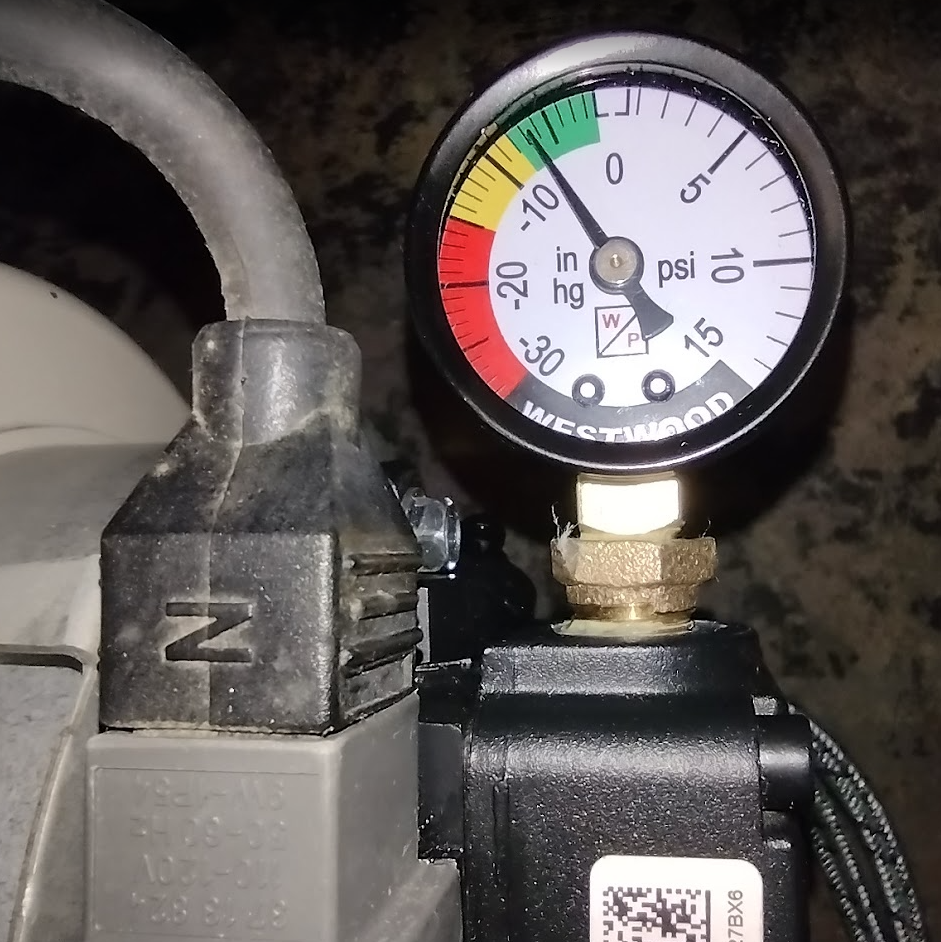
This is where it sits while the burner is running.
After it shuts down the vacuum goes down to appx what the vacuum on the gauge at the filter reads in a fairly short time.
When I follow your instructions, run it up to 15" with the Firomatic closed, and shut down the burner, this vacuum DOES bleed down somewhat rapidly. I haven't measured the time yet, but I would say that in 15 minutes the 15 drops to like 5". Shouldn't it be holding better than that?
0 -
I’ve enjoyed following this thread but am confused….. is the belief there was air in one of the flex hoses between the TL and the burner? Or in the line between the tank and the TL? Between the tank and TL the air should have been taken care of in the TL.
0 -
IDK what the others are thinking but my take is that with a small nozzle in the burner the flow between the tank and the burner is only .6 gallons/HOUR or .01 GPM. That is hardly any flow. If he has 3/8 tubing between the tank and the burner and air gets in the line (like from changing an oil filter) there isn't enough flow to drive the air to the TIGER LOOP. The air sits there and can't get out. Once in a while he gets some air to the burner and it causes a flame out.
0 -
-
Since I have never encountered this problem with a TigerLoop system, I have never actually had to perform a vacuum test on the piping between the Tigerloop and the fuel pump. Therefore, I don't know how the internal valves will react during a vacuum test.
There are three valves involved in the operation of a TigerLoop:
- The ball check valve at the inlet port.
- The air vent, which uses the float to close off the center chamber from the upper chamber.
- The oil-pressure-activated valve, which opens the passage between the center chamber and the lower chamber.
Because of these three valves, I can't be certain that the section of piping between the TigerLoop and the fuel pump is ever completely airtight and isolated from the atmosphere.
The fact that the system builds a vacuum of 15" Hg, then gradually drops until it reaches 5" Hg, leads me to believe that a conventional vacuum test may not be a reliable way to determine whether there is a leaking fitting.
An air-pressure test may also be inconclusive because the TigerLoop is designed to vent air from that portion of the fuel system.
Applying more than 10 PSI to a fuel pump's inlet can exceed the manufacturer's allowable pressure and potentially damage the shaft seal. Therefore, I would not exceed 10 PSI when using air pressure to test the fittings and tubing for leaks. You would also need to find a way to apply that pressure while ensuring that the TigerLoop's float closes the air vent.
That is not the easiest test to perform, in my opinion.
Edward Young Retired
After you make that expensive repair and you still have the same problem, What will you check next?
0 -
My belief is that there was a big slug of air in the piping loop coming out the top of the tank. I believe that this slug has been forming there for 12 years. It finally got large enough to impact performance. As soon as I heard the "Sploosh" of air moving through that valve when I opened it with 10" of vacuum on the line I knew… and surprise! The burner started behaving afterward.
The techs that were here disagreed. Something about not seeing the forest for the trees?
I think the hardest part of troubleshooting is not getting 'stuck' on something and keeping an open mind, and TEST, DON'T GUESS!
1 -
My take on it too Ed after everything I went through and hindsight is now 20/20.
I'm curious if anyone knows any of the reasoning about 1/4" tubing not being allowed ? It would EASILY handle the flow requirements of the smaller appliances.
I just had a chat with GPT-6 about it. It was interesting. I won't go into the details too long. I don't HATE AI, I'm just a little scared of it.
0 -
One would think that it 'should' but I believe the reality is that the TL is designed to remove SMALL amounts of air over time.
If my burner could have kept running long enough without losing flame and locking out, it MIGHT have worked.
I think that the amount of air it was trying to remove in my case was well beyond it's design capacity.
0 -
@EdTheHeaterMan " I don't know how the internal valves will react during a vacuum test."
Nor do I but I'm going to use one of your posted graphics to explain what I think may occur with excessive vacuum in the TL.
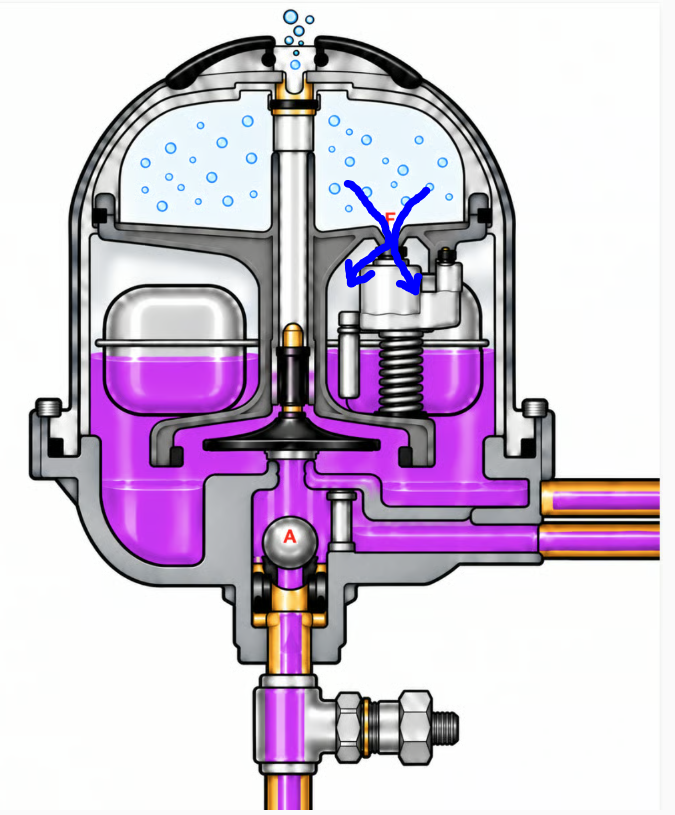
I believe that with the Firomatic closed at the bottom inlet, and the burner running, of course a vacuum will form while the burner is running. Enough of a vacuum to pull the float down and allow air to squeak past valve F (the blue lines)
I also think that this scenario may account for the differing oil levels that are seen in the dome under differning conditions. I've seen photos of them damn near full, and damn near empty, and we're told by Beckett and SPX that this is NORMAL.
At higher lifts (vacuum conditions) air can be drawn in through valve F resulting in a lower fuel level in the dome. Gravity feed with no vacuum, that dome should be pretty much full, high lift/vacuum will result in lower levels.
Plausible?
0 -
Why wasn't I seeing massive foam in the dome while running? (a poet am I?)
And yet, massive foam at the pump bleeder?
BLEEDER OPEN, VERY LITTLE RETURN FLOW
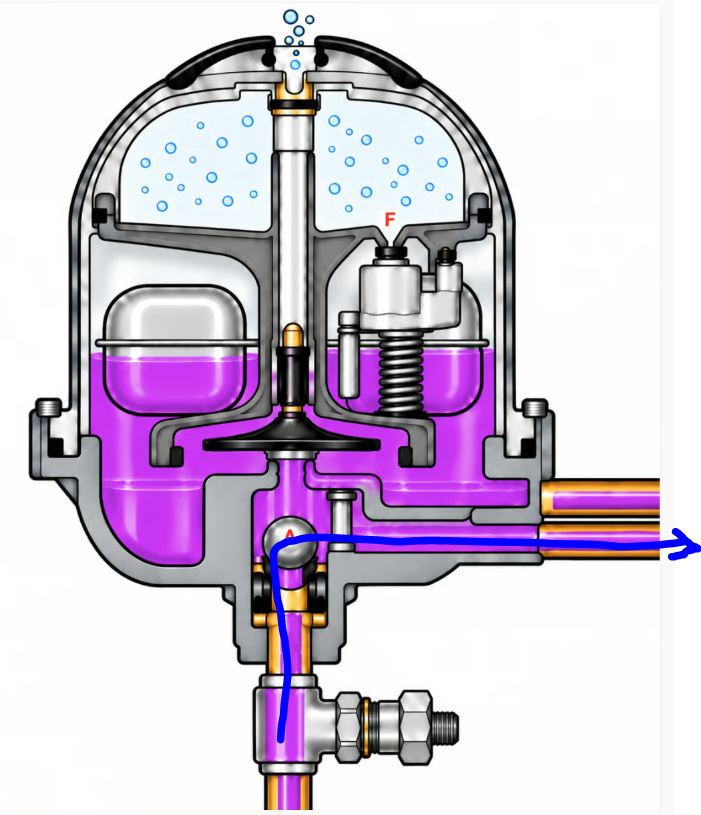
This condition was in fact bleeding the main line. I'm sure that if I kept bleeding and bleeding that eventually I would have gotten the air out. It would have taken forever and many many gallons of bleeding!
BLEEDER CLOSED, BURNER RUNNING
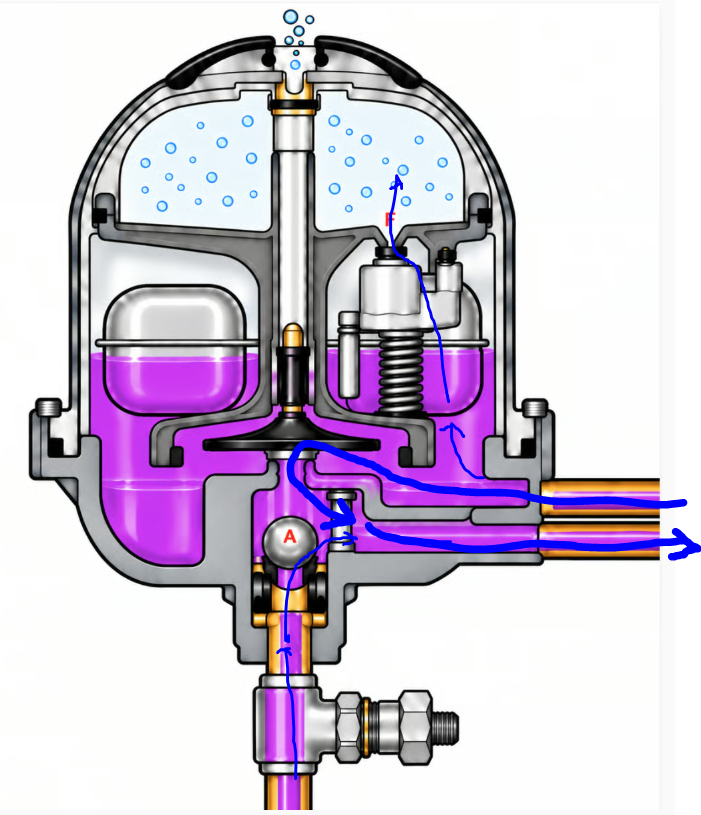
I believe that MOST of the air that got picked up by the pump was simply returning to the pump (the thick lines). And there had to be SOME air getting vented, but not enough to really SEE (the thin lines). Compounded by the fact that the manufacturer slaps a big ole label on obscuring most of the bowl from view.
In other words, again, more air in the fuel than the TL is designed to handle.
Plausible?
0 -
A few more comment regarding…
The TL I replaced was 12 years old and needed to be done anyway, along with the lines. TL Manufacturer recommends a 10 year replacement of the TL and I believe 5 years on the lines.
After I cleaned it this year it ran like crap. Thinking that maybe the aged TL and flex lines were at fault I replaced them. It didn't fix it.
My short-sightedness didn't let me (or the two techs I called in) reason it through that the real problem all along was that slug of air in the pipe loop.
0 -
My take is if the burner is firing .6 gph or there abouts that is the only flow you will get through the oil line from the tank to the Tiger Loop. With that small flow there is not enough velocity through the 3/8 tubing to create enough velocity to move the air trapped in the upper loop near the tank.
If the air can't get to the TL how can it vent the air? It can't.
Opening the bleed port on the burner to get more flow does not help purge the air as it just pulls more oil out of the TL.
Think about an old HW system or any HW system with oversized piping compare to the flow rate. Air in the system get trapped in the upper parts of the system. Not enough water velocity to carry the oil back to the air separator.
Ok so I am Nuts.
Does anyone have a better explanation?
1 -
The pump gear set moves about 17 gallons per hour. That is enough to entrain the air in a 3/8" fuel line. When the tiger loop has air in it and the float drops, all 17 GPH comes from the fuel tank because the valve between lower chamber and the center chamber closes and the ball check at the bottom opens. only tank oil goes to the pump in this configuration. Only after there is enough oil in the center chamber to lift the float to close the air vent will there be enough pressure to open the valve that. connects the center chamber to the bottom chamber and stops the fuel from the tank from opening the ball check at the bottom.
If there is any air left in the fuel line from the tank to the tiger loop, and that air does not find its way to the TL then that air will not get vented. that does not mean that oil wont migrate past that air and find its way to the fuel pump. All it means is that some of the air stays in the line and allows oil to flow past it while gravity allows the lighter air to migrate to the top of the fuel line's high points, and the oil to migrate past the air to the fuel pump.
As a result of this operation the fuel pump should never need to have the bleed port opened. The air vent at the top of the TL should, and in just about all the cases I have encountered, vent any air that reaches the fuel pump. If there is air that does not reach the fuel pump, then the fuel pump will work properly without needing the bleed port opened. @NJeffro's TL and fuel pump is the first time I have heard of a problem like this.
Edward Young Retired
After you make that expensive repair and you still have the same problem, What will you check next?
2 -
Ugh… I'm still not gaining confidence.
Ran the burner a short time ago and while not nearly as bad, I'm still getting an occasional 'hiccup' and puff during the first few minutes of running.
This is not good.
I'm lost here. I can't trust the nozzle changers to find this, and I sure don't know what to do.
0 -
Has Z dimension been discussed? I had one last winter drove me nuts. Brand new furnace by the installation department. Beckett with an L head. It took me two visits to find the factory set Z dimension was off. Similar situation as this. Flame started unstable, then smoothed out.
0 -
Check for foam/air. it is probably leaking air in during the off cycle while the suction is in a vacuum. Do yor trick about shutting the valve and pulling a high vac then opening the valve to slug the air out. if it runs after that you know your getting air in.
1 -
There is another trick. Go buy a 3/8" OD refrigeration flare sight glass and pipe it in between the tank and the tL
Amazon $19
1




Categories
- All Categories
- 87.9K THE MAIN WALL
- 3.3K A-C, Heat Pumps & Refrigeration
- 60 Biomass
- 430 Carbon Monoxide Awareness
- 134 Chimneys & Flues
- 2.2K Domestic Hot Water
- 6K Gas Heating
- 124 Geothermal
- 170 Indoor-Air Quality
- 3.9K Oil Heating
- 80 Pipe Deterioration
- 1.1K Plumbing
- 6.7K Radiant Heating
- 397 Solar
- 16.1K Strictly Steam
- 3.5K Thermostats and Controls
- 56 Water Quality
- 51 Industry Classes
- 52 Job Opportunities
- 18 Recall Announcements