Welcome! Here are the website rules, as well as some tips for using this forum.
Click here to Find a Contractor in your area.
If our community has helped you, please consider making a contribution to support this website. Thanks!
In Floor Loop Design

Hi,
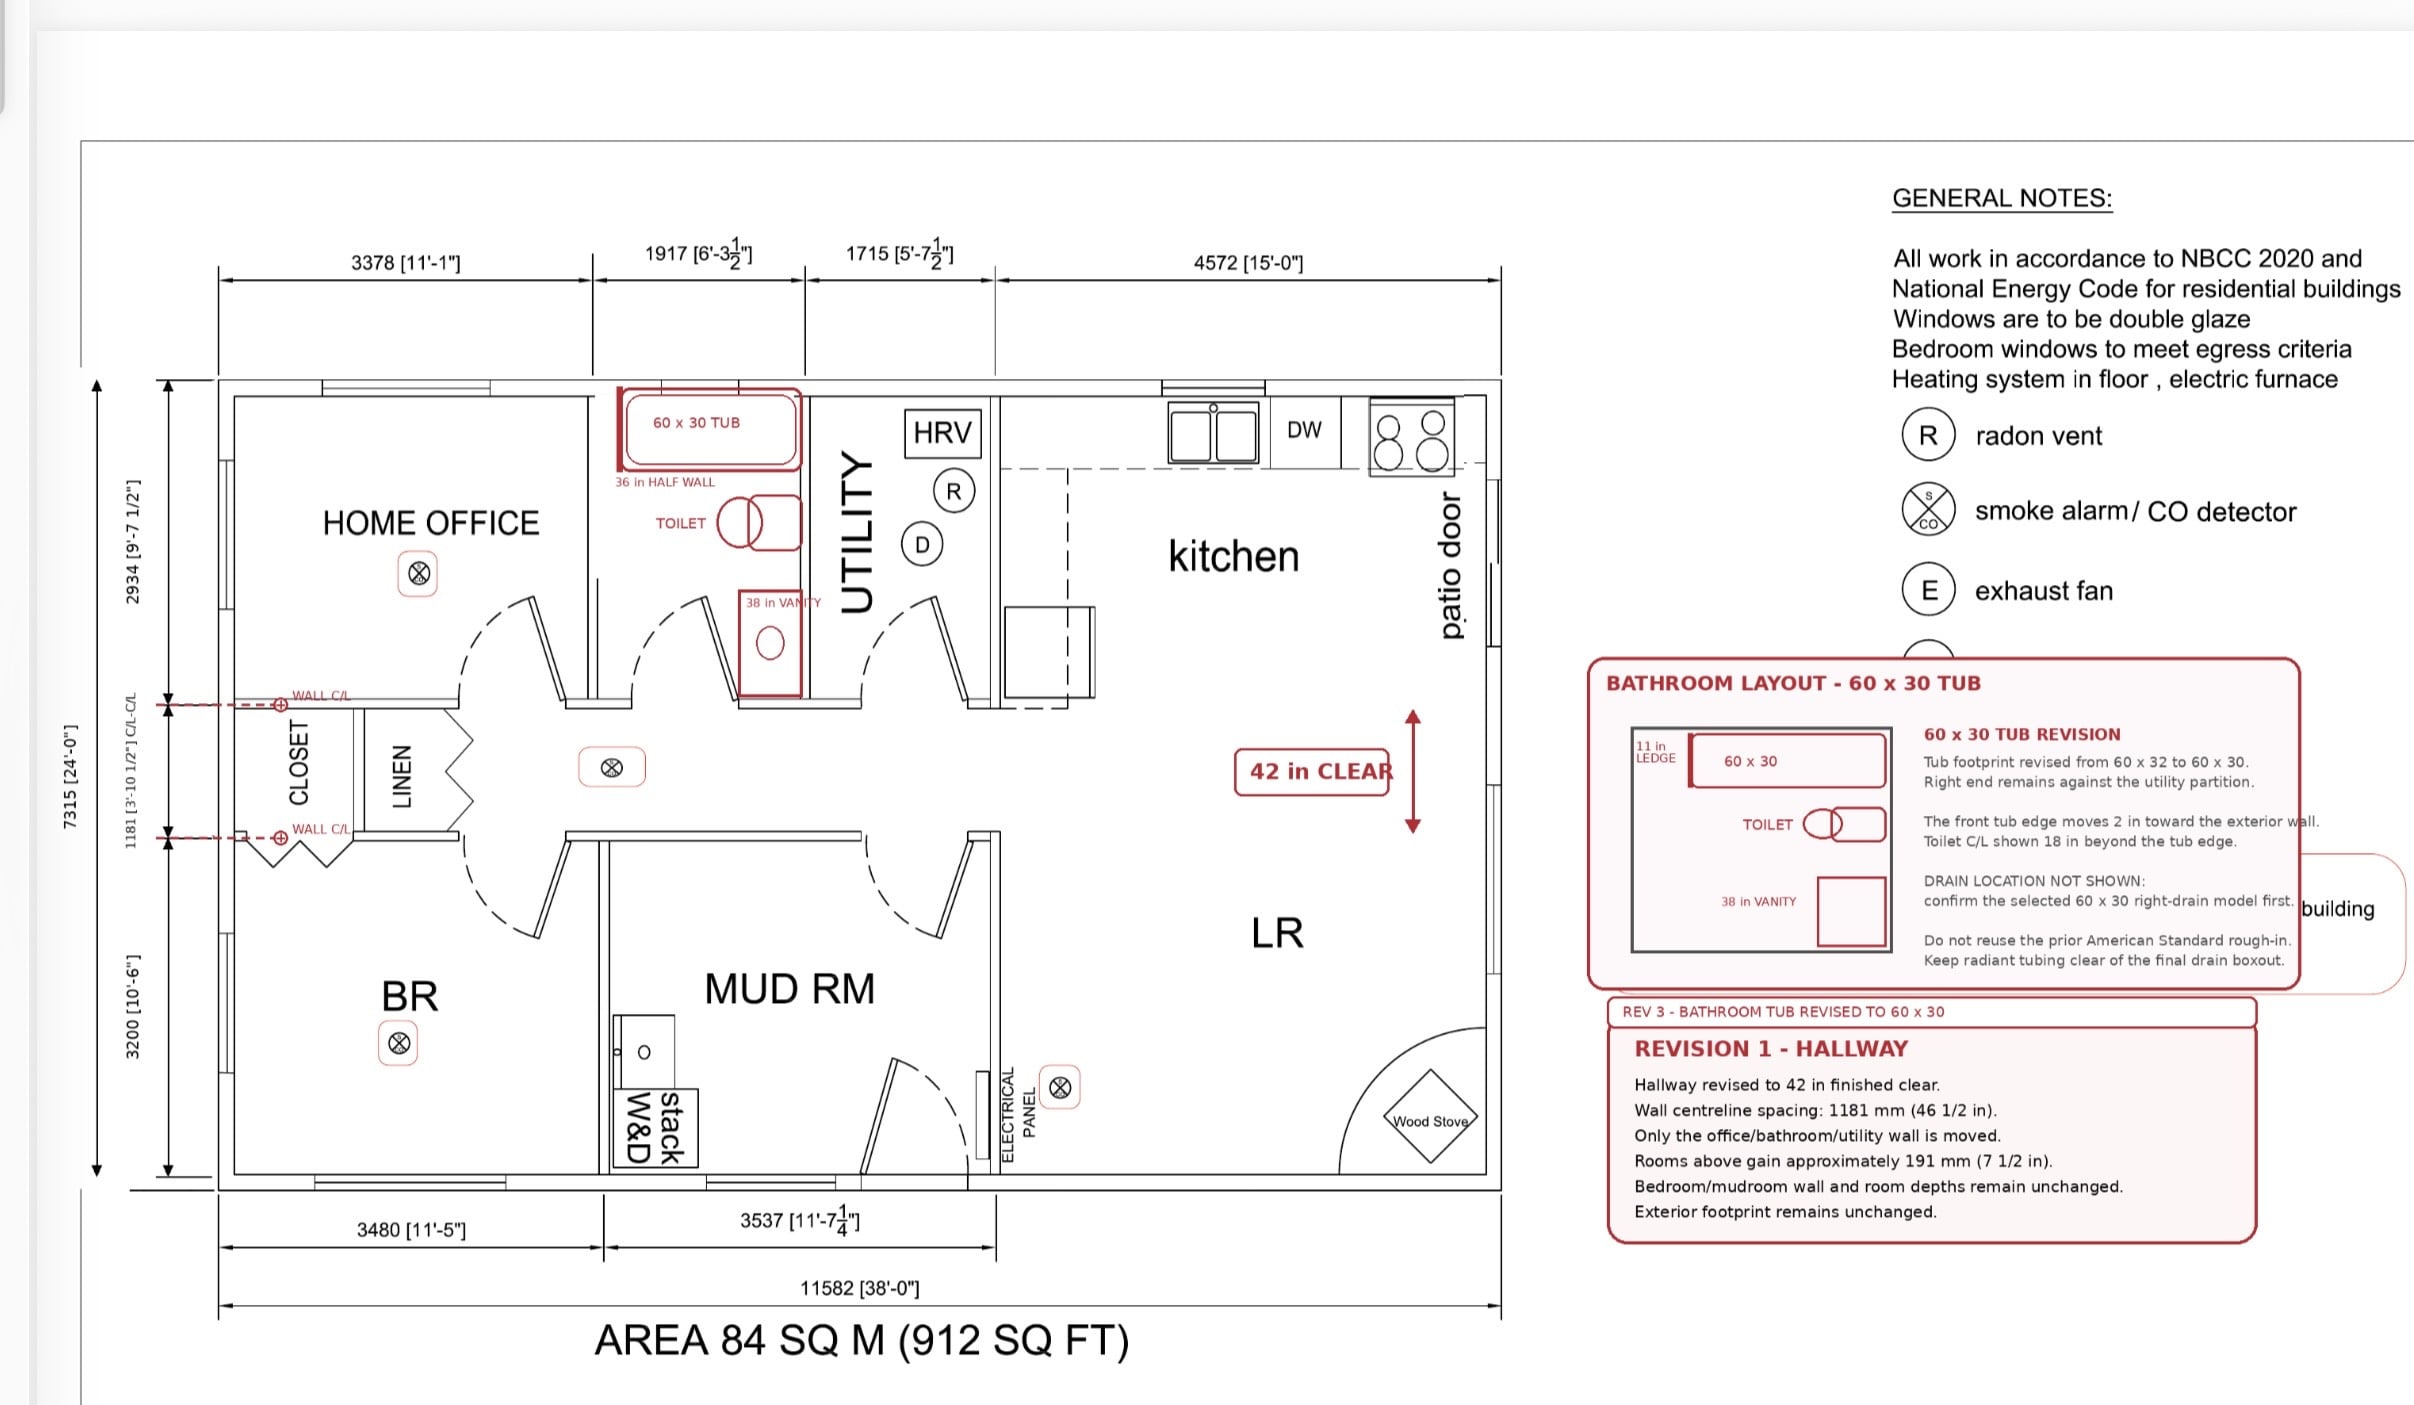
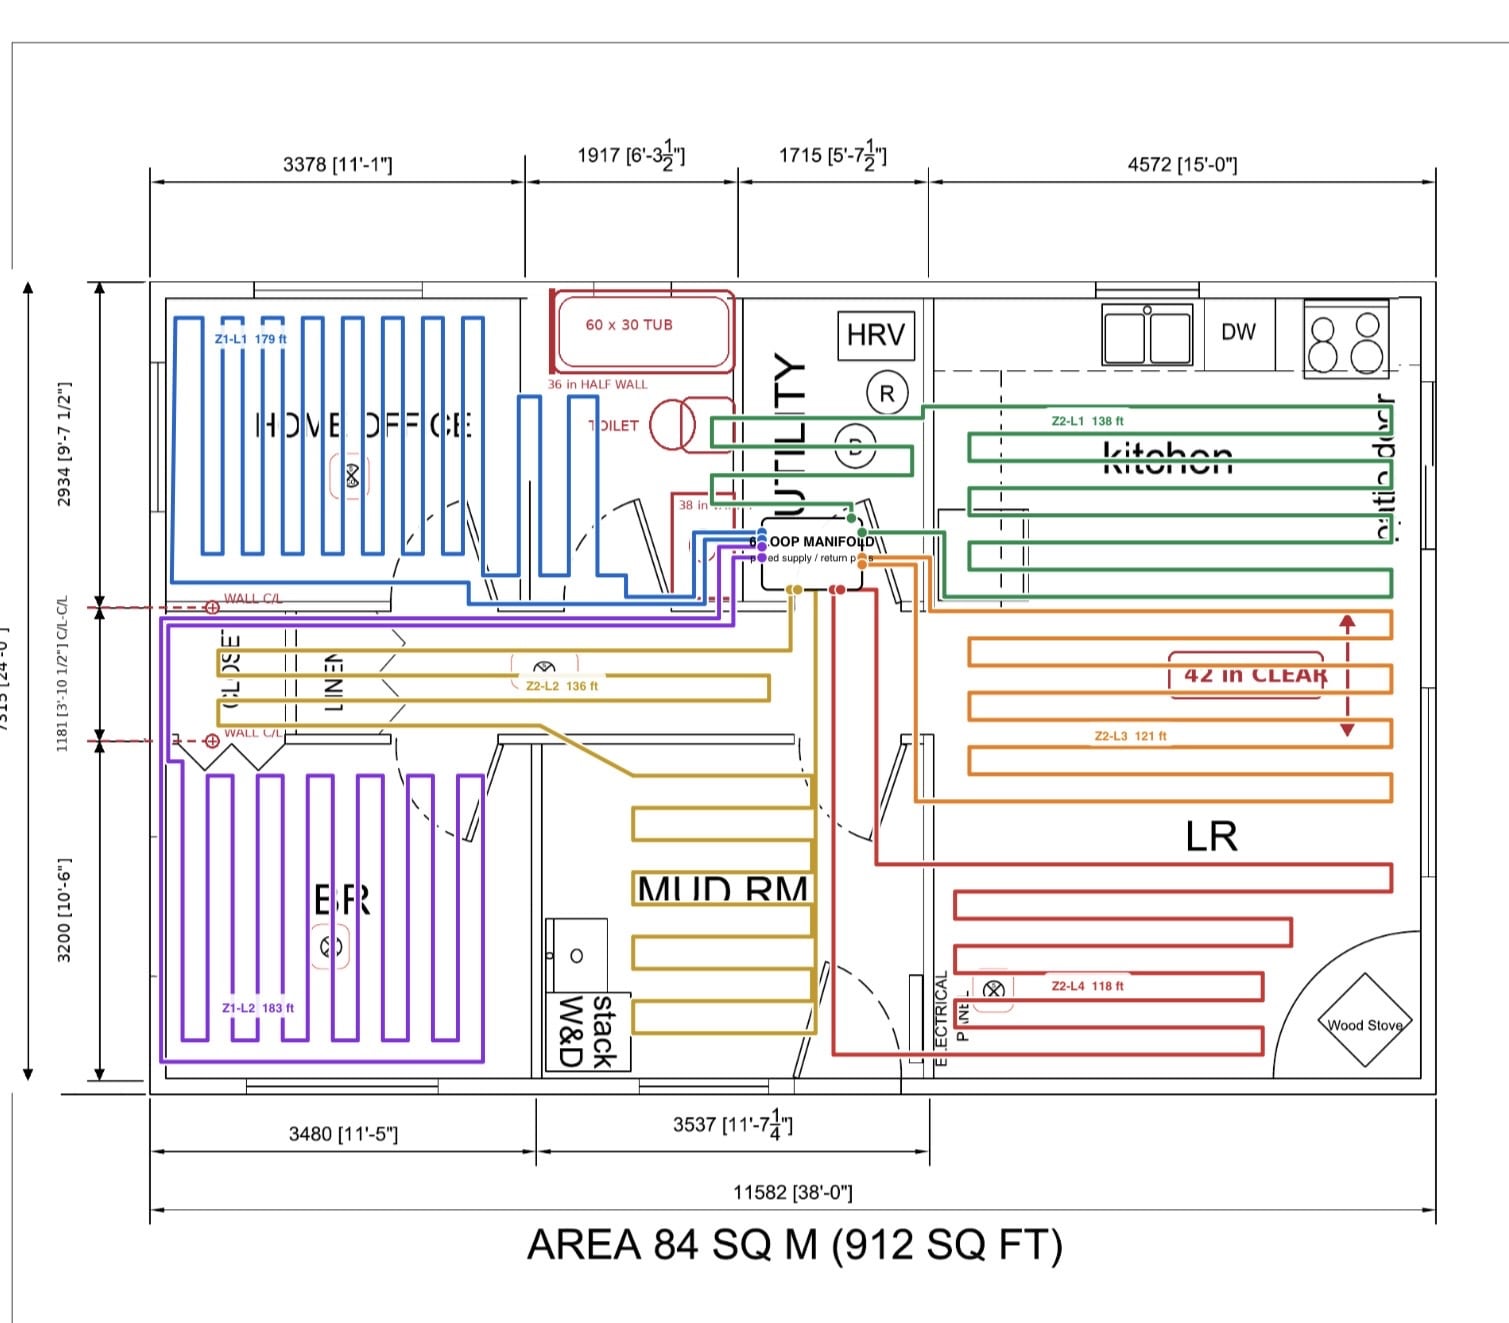
Just looking to see if my loop design is correct for a small home we are building.
Attached is a floor plan and the design I created. If anyone has experience with loop design and can provide some feedback it would be greatly appreciated.
Thanks
Bruce.
Comments
-
Where is the rest of design?
Heat loss?
Loop lengths, and flow rates?
Are these loops in a slab, a build up with warmboard or similar material, or staple up with plates?
What are the floor finishes in each room?
Etc.On first look the utility room and the bathroom are wrong and will most likely result in uneven heating. And it’s definitely not a good idea to run tubing under the toilet flange.
 1
1 -
Heating the closet?
0 -
The utility room and hall probably do not need much tube
The runs down and back to the bed room may be sufficient in the hall
Bob "hot rod" Rohr
trainer for Caleffi NA
Living the hydronic dream0 -
the heat loss is 9,102 btu/hr
runs
LoopArea
Plotted length
Z1-L1
Office and bathroom
179.0 ft
Z1-L2
Bedroom
182.6 ft
Z2-L1
Kitchen and utility
138.0 ft
Z2-L2
Hallway and mud room
136.2 ft
Z2-L3
Living A
121.1 ft
Z2-L4
Living B
117.7 ft
0 -
Ideally, you will want to come in and out of the rooms through doorways and not under walls. Nails through bottom plates can snag and penetrate the tubing.
And when you go through the doorways, crowd the tubing together in the middle of the opening to allow for threshold nailing at the ends.
8.33 lbs./gal. x 60 min./hr. x 20°ΔT = 10,000 BTU's/hour
Two btu per sq ft for degree difference for a slab0 -
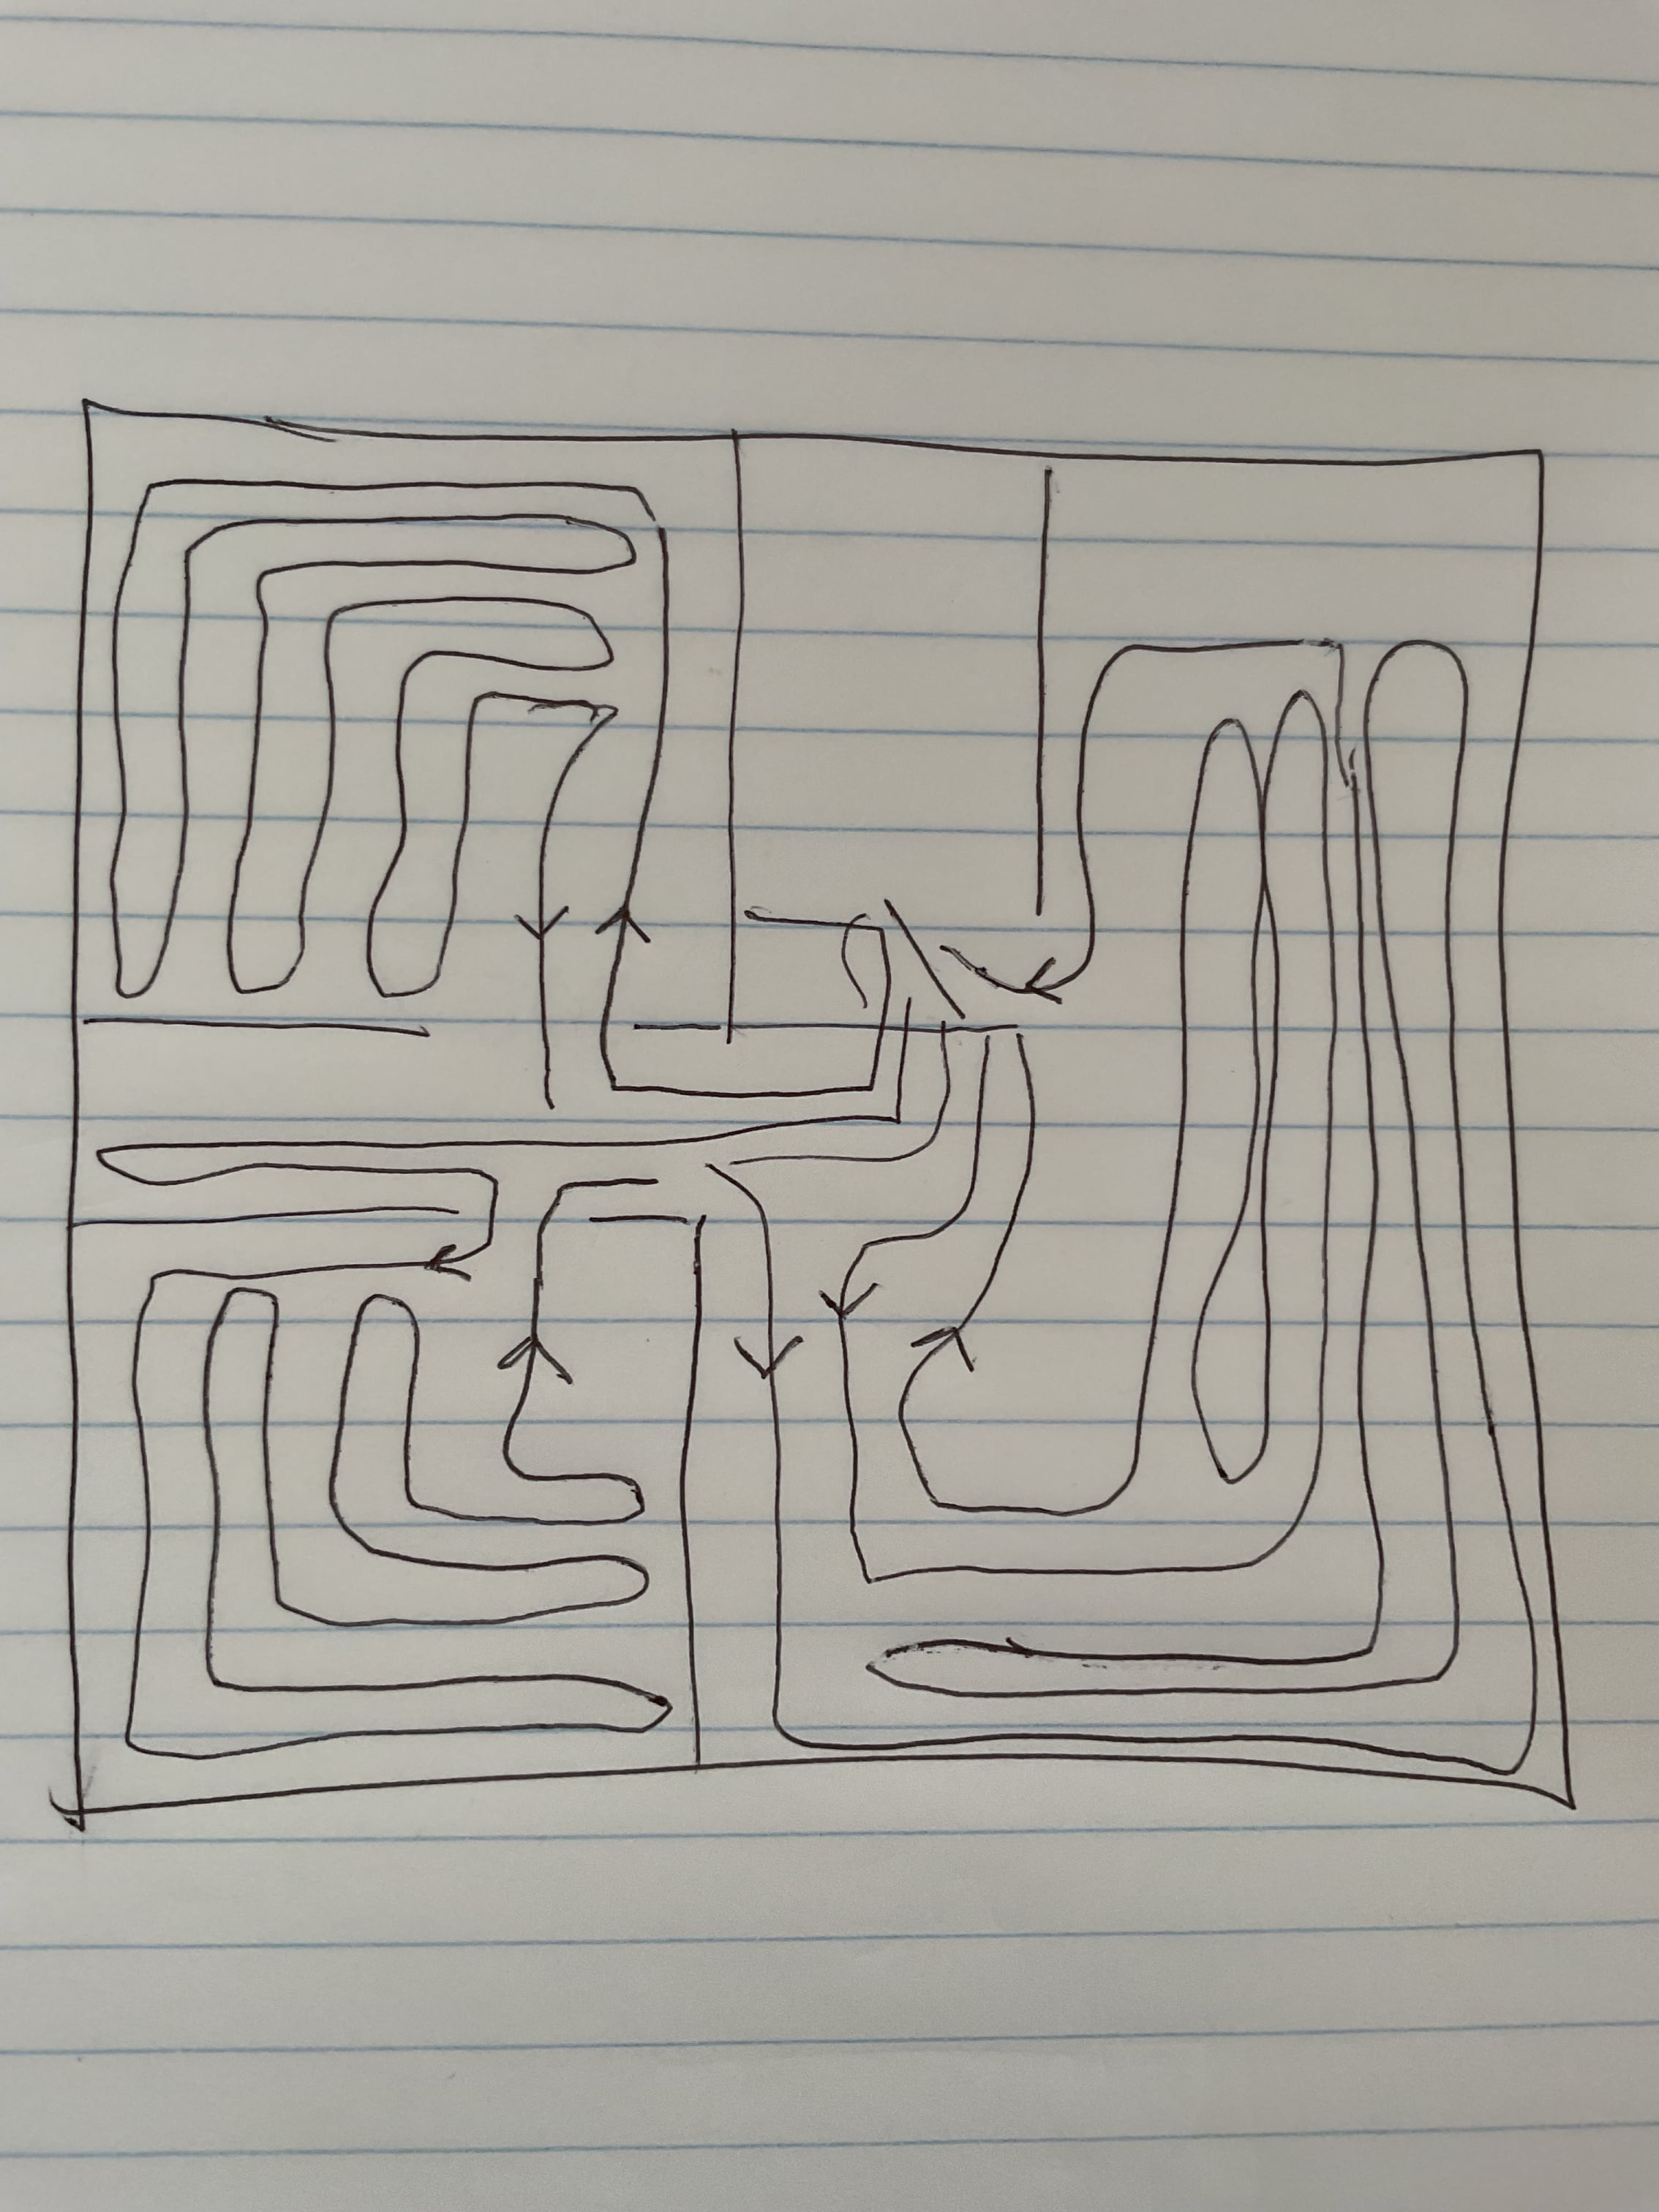
The less 180 turns , the easier to install. Especially on mesh for a slab pour
I typically do the outside walls first, an L shape loop. You could go through doorways also.
Basically I look at the loop lengths every room needs and adjust the loops as you go, getting all the tube required into the space
You will maybe get 6 different opinions, at days end they will all work
 Bob "hot rod" Rohr
trainer for Caleffi NA
Living the hydronic dream 2
2 -
Simplify. Buy a 1000' roll of pipe. Put in 4 loops. Don't zone. One temp for the whole slab.
 0
0 -
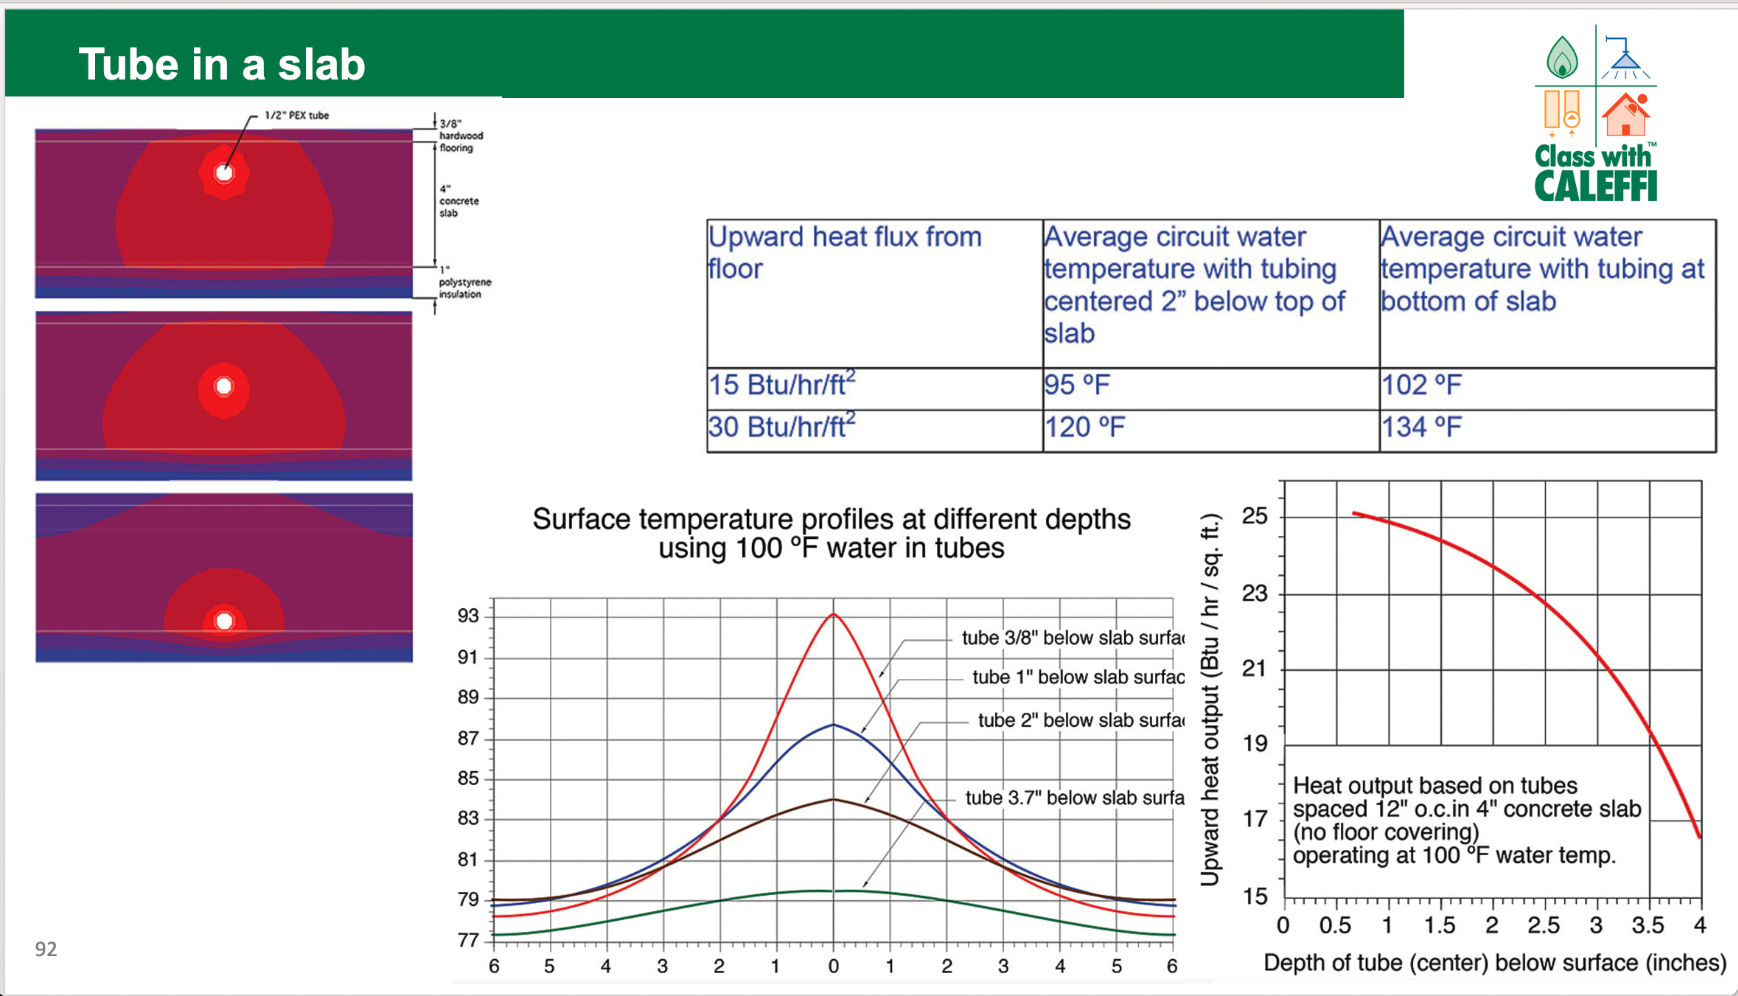
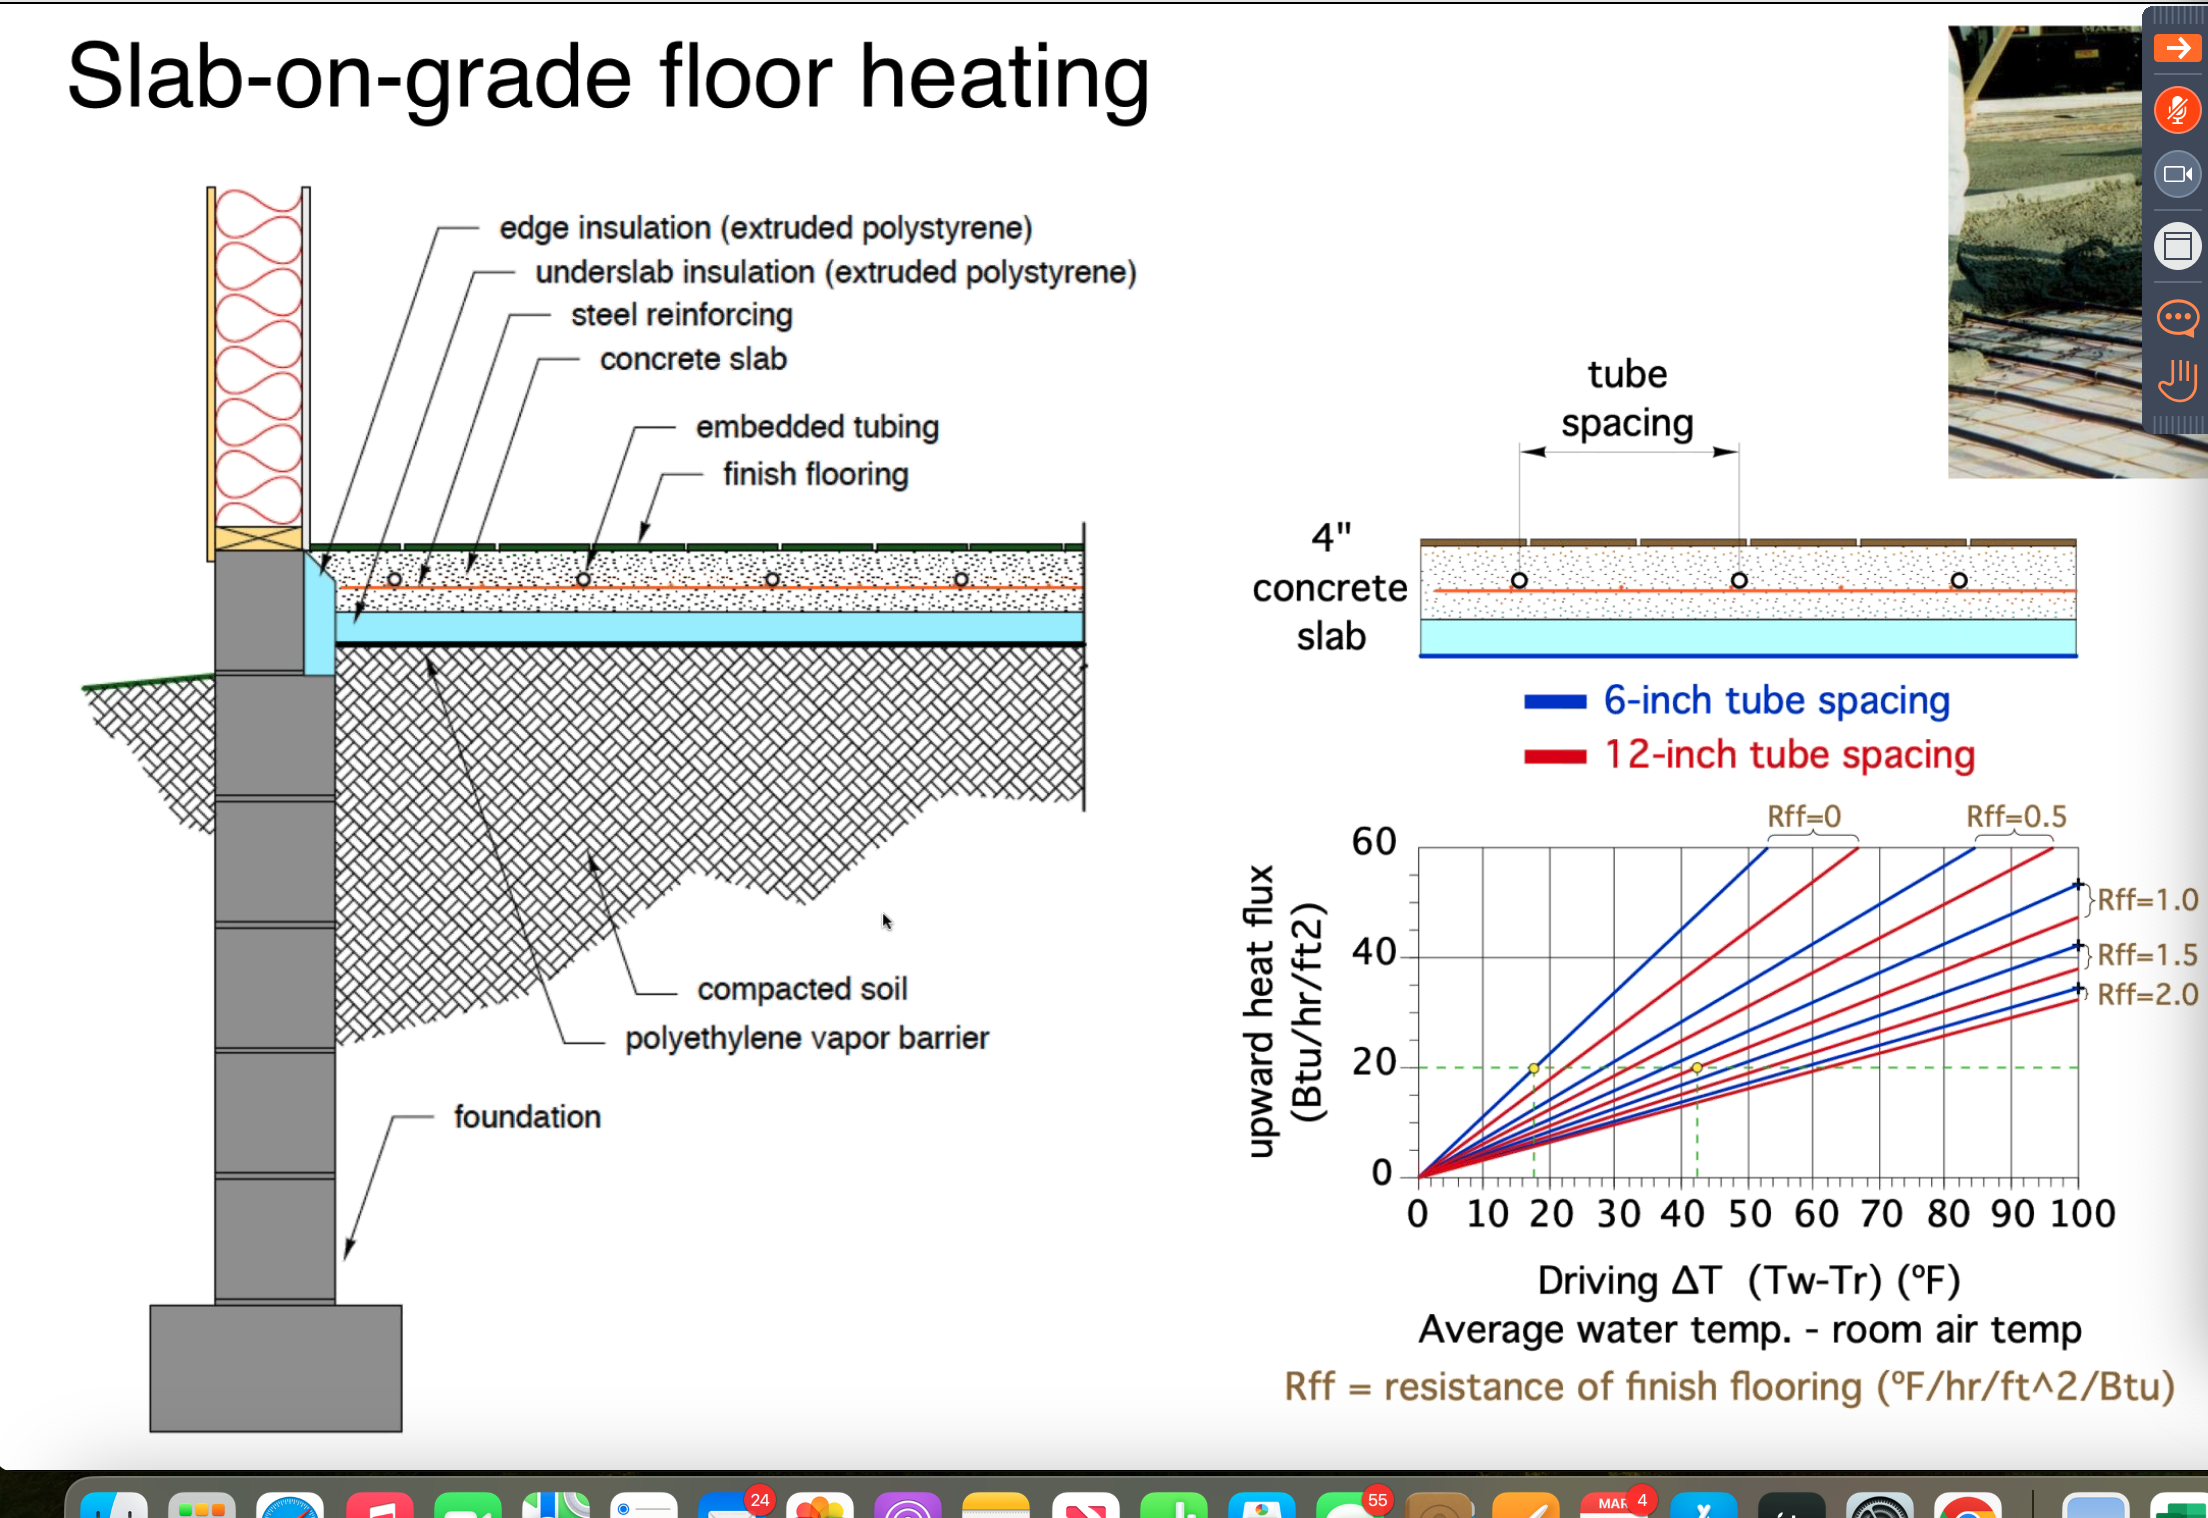
Tube spacing is important. Even when 12" spacing would satisfy the design, I would install at 9" to be able to lower the supply temperature to allow for greater boiler efficiency with a condensing boiler.
8.33 lbs./gal. x 60 min./hr. x 20°ΔT = 10,000 BTU's/hour
Two btu per sq ft for degree difference for a slab0 -
For a small job, short loops I would even go 6" on center. 3/8" tube is needed for the best 6" design.
If it is a slab, elevating the tube helps performace and efficiency, also.
 Bob "hot rod" Rohr
trainer for Caleffi NA
Living the hydronic dream0 -
I agree with earlier comments, specifically to not heat the closets, Utility room, under the refrigerator, enter and exit through doorways, etc. I would also consider instead of the Utility room piping the Bathroom as part of the Kitchen loop since the Home Office loop is already longer, and run it below the tub if possible, and cram as much pipe in both the Bathroom and Kitchen as feasible. Because of the cabinets you have much less floor area to volume than in other rooms so I have run into problems keeping a Kitchen warm — even worse in houses with an island, but with your open plan this will not be so much of an issue — and no one ever complains about the Bath being too warm so I usually wrestle its pipe spacing as tight as I can get it. By making the turns bulbous you can get tight spacing with 1/2" pipe. (Especially if using PE-RT pipe instead of PEX.)
Sol Brother0 -
This is such a goldmine of a response, I love it
@Sol_Brother said:
> I agree with earlier comments, specifically to not heat the closetsMy wife does not like a cold closet. Is there a reason not to heat the closet?
NJ Steam Homeowner.
See my sight glass boiler videos: https://bit.ly/3sZW1el0 -
Reach-in closets: Don't bother. Walk-in closets: Yes, for sure.
8.33 lbs./gal. x 60 min./hr. x 20°ΔT = 10,000 BTU's/hour
Two btu per sq ft for degree difference for a slab 1
1 -
unless the closet has outside walls, the really isn’t any place for it to lose much heat.
a slab on grade, a small downward loss, I suppose, a small amount upward.
Maybe your load calc sheet shows what each rooms heat loss is?
Interior walks are not often insulated , do heat moves from room to room.
Bob "hot rod" Rohr
trainer for Caleffi NA
Living the hydronic dream0 -
@ethicalpaul with regard to radiant heat in closets, it depends. In most cases, our customers prefers heated clothes closets, especially if they are the walk in type. If the closet is a pantry that might store potatoes near the floor, you might not want radiant heat (same idea for cabinets, especially in a kitchen). If the person happens to make wine or does a lot of canning, again radiant floors might not be the best choice.
Laundry closets can be a problem with radiant heat, especially if a few family members play a lot of sports. We learned this the hard way. Years ago we designed and installed a heating system with radiant floors for the entire first floor and the three bathrooms on the second floor. System worked great, each room held the temperature the homeowner wanted throughout the heating season. The laundry room was on the first floor, apparently when their son threw his sweaty football clothes in the laundry basket they gave off an unpleasant odor. When basketball season started the odors got worse. We "fixed' the problem by reducing the flow to this loop and dropping the temperature in this room a few degrees. After about ten years the family sold the house to a middle aged couple that does not have kids. This couple asked us to raise the temp of this loop weeks after they moved in.
1 -
If your heat load is 9k, why are you bothering with any of this? You are around 9 BTU/sqft, so on the coldest day of the year the floor will be 4.5F above room temp. Won't be cold, but nowhere near warm enough to be noticeable and that is on the coldest day. The rest of the time, the floor will be barely above room temp.
Your heat loss is low enough that you can even heat the whole place with resistance heat.
The in-between option for these low load homes is to put in resistance mat floor heat for areas you want extra toasty like the bath and kitchen. Heat the rest with an air to air heat pump. This about the 1/4 of the BOM cost of the hydronic option plus gives you cooling.

 2
2 -
In my little house, every closet is on an exterior wall, even a corner!
NJ Steam Homeowner.
See my sight glass boiler videos: https://bit.ly/3sZW1el0 -
in his example he has 3’ of exterior closet wall
I would just loop into that room, in and out 1 time. The heated spaces around it will keep it comfortable
Bob "hot rod" Rohr
trainer for Caleffi NA
Living the hydronic dream0 -
Thank you, I mistook your comment to be a general practice, not specific to his arrangement. My mistake!
NJ Steam Homeowner.
See my sight glass boiler videos: https://bit.ly/3sZW1el 1
1


Categories
- All Categories
- 87.8K THE MAIN WALL
- 3.3K A-C, Heat Pumps & Refrigeration
- 60 Biomass
- 430 Carbon Monoxide Awareness
- 133 Chimneys & Flues
- 2.2K Domestic Hot Water
- 6K Gas Heating
- 124 Geothermal
- 170 Indoor-Air Quality
- 3.9K Oil Heating
- 79 Pipe Deterioration
- 1.1K Plumbing
- 6.7K Radiant Heating
- 397 Solar
- 16.1K Strictly Steam
- 3.5K Thermostats and Controls
- 56 Water Quality
- 51 Industry Classes
- 51 Job Opportunities
- 18 Recall Announcements