Welcome! Here are the website rules, as well as some tips for using this forum.
Need to contact us? Visit https://heatinghelp.com/contact-us/.
Click here to Find a Contractor in your area.
If our community has helped you, please consider making a contribution to support this website. Thanks!
Removing old threaded pipes
Options
Leonc
Member Posts: 32
Have a few questions about removing these pipes that currently feed my hot water convectors, starting with what is the best strategy?
Plan is to reconnect 5 of the convectors (2nd level) directly from a manifold instead of the current reverse return. The other 4 convectors will be removed and installing radiant under floor (first level). If it helps, my house was built in 1940, located in the Philadelphia suburbs. I've only been here a handful of those years.
Is there a good place to start (at the smaller pipes feeding to the convectors vs starting at the boiler)?
Should I just cut everything off with a saw/grinder?
Ideally I can save the threads that go to the 5 upstairs convectors to reuse, or else find a different way solution to connect the piping from the manifold.
Secondary question: would scrapyards like to purchase this stuff? I would hate to just throw it away if someone can get use from it.
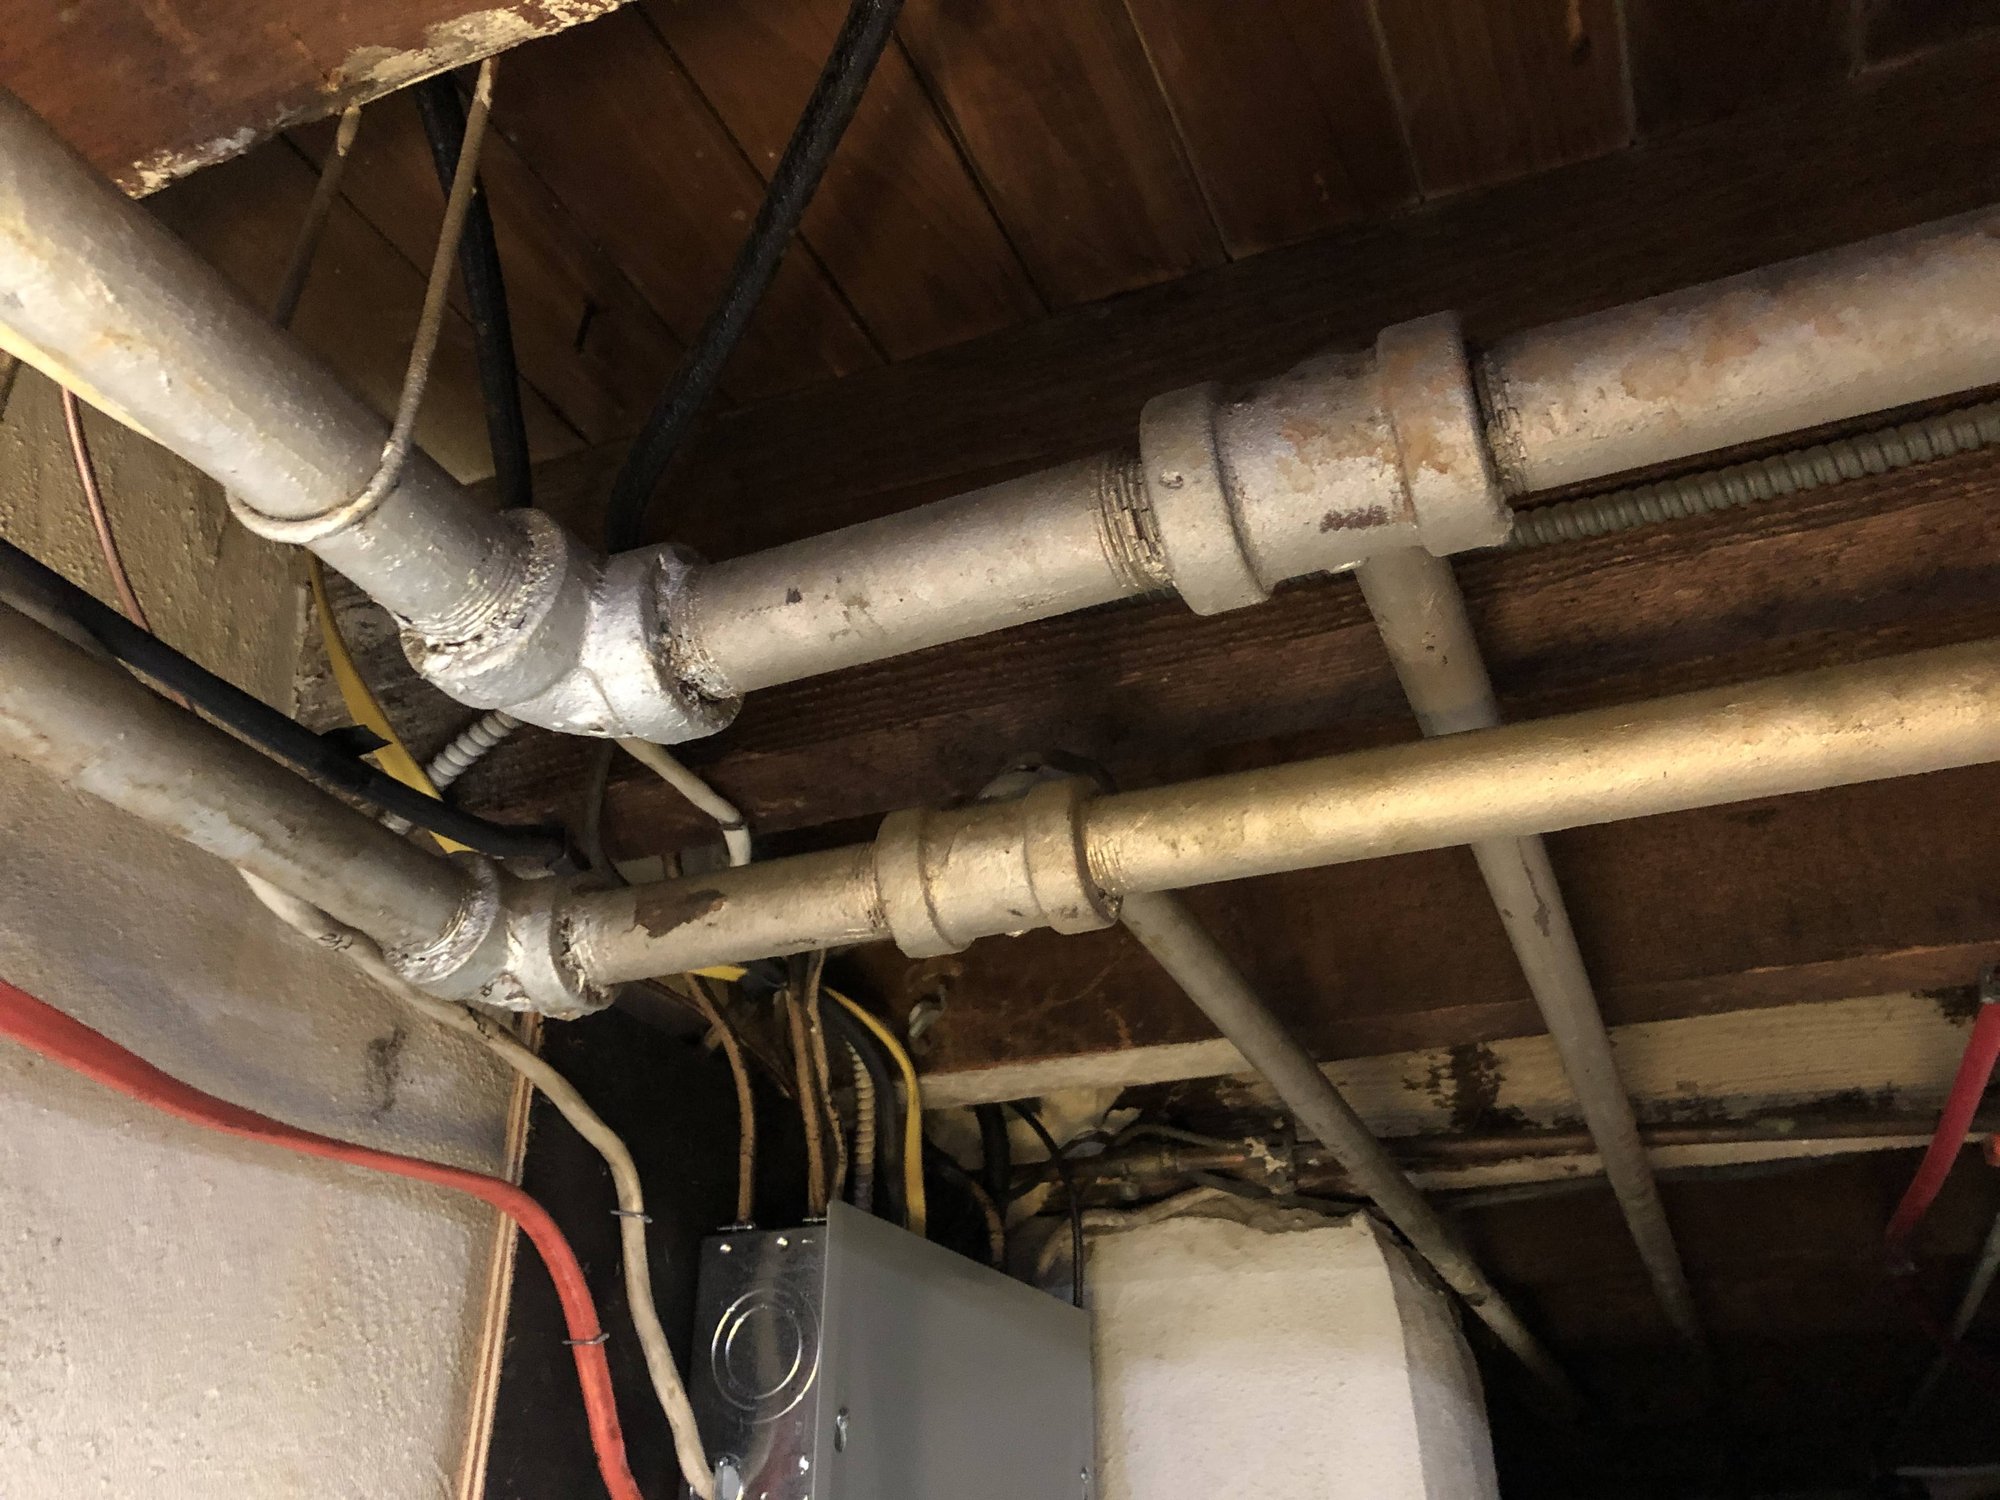
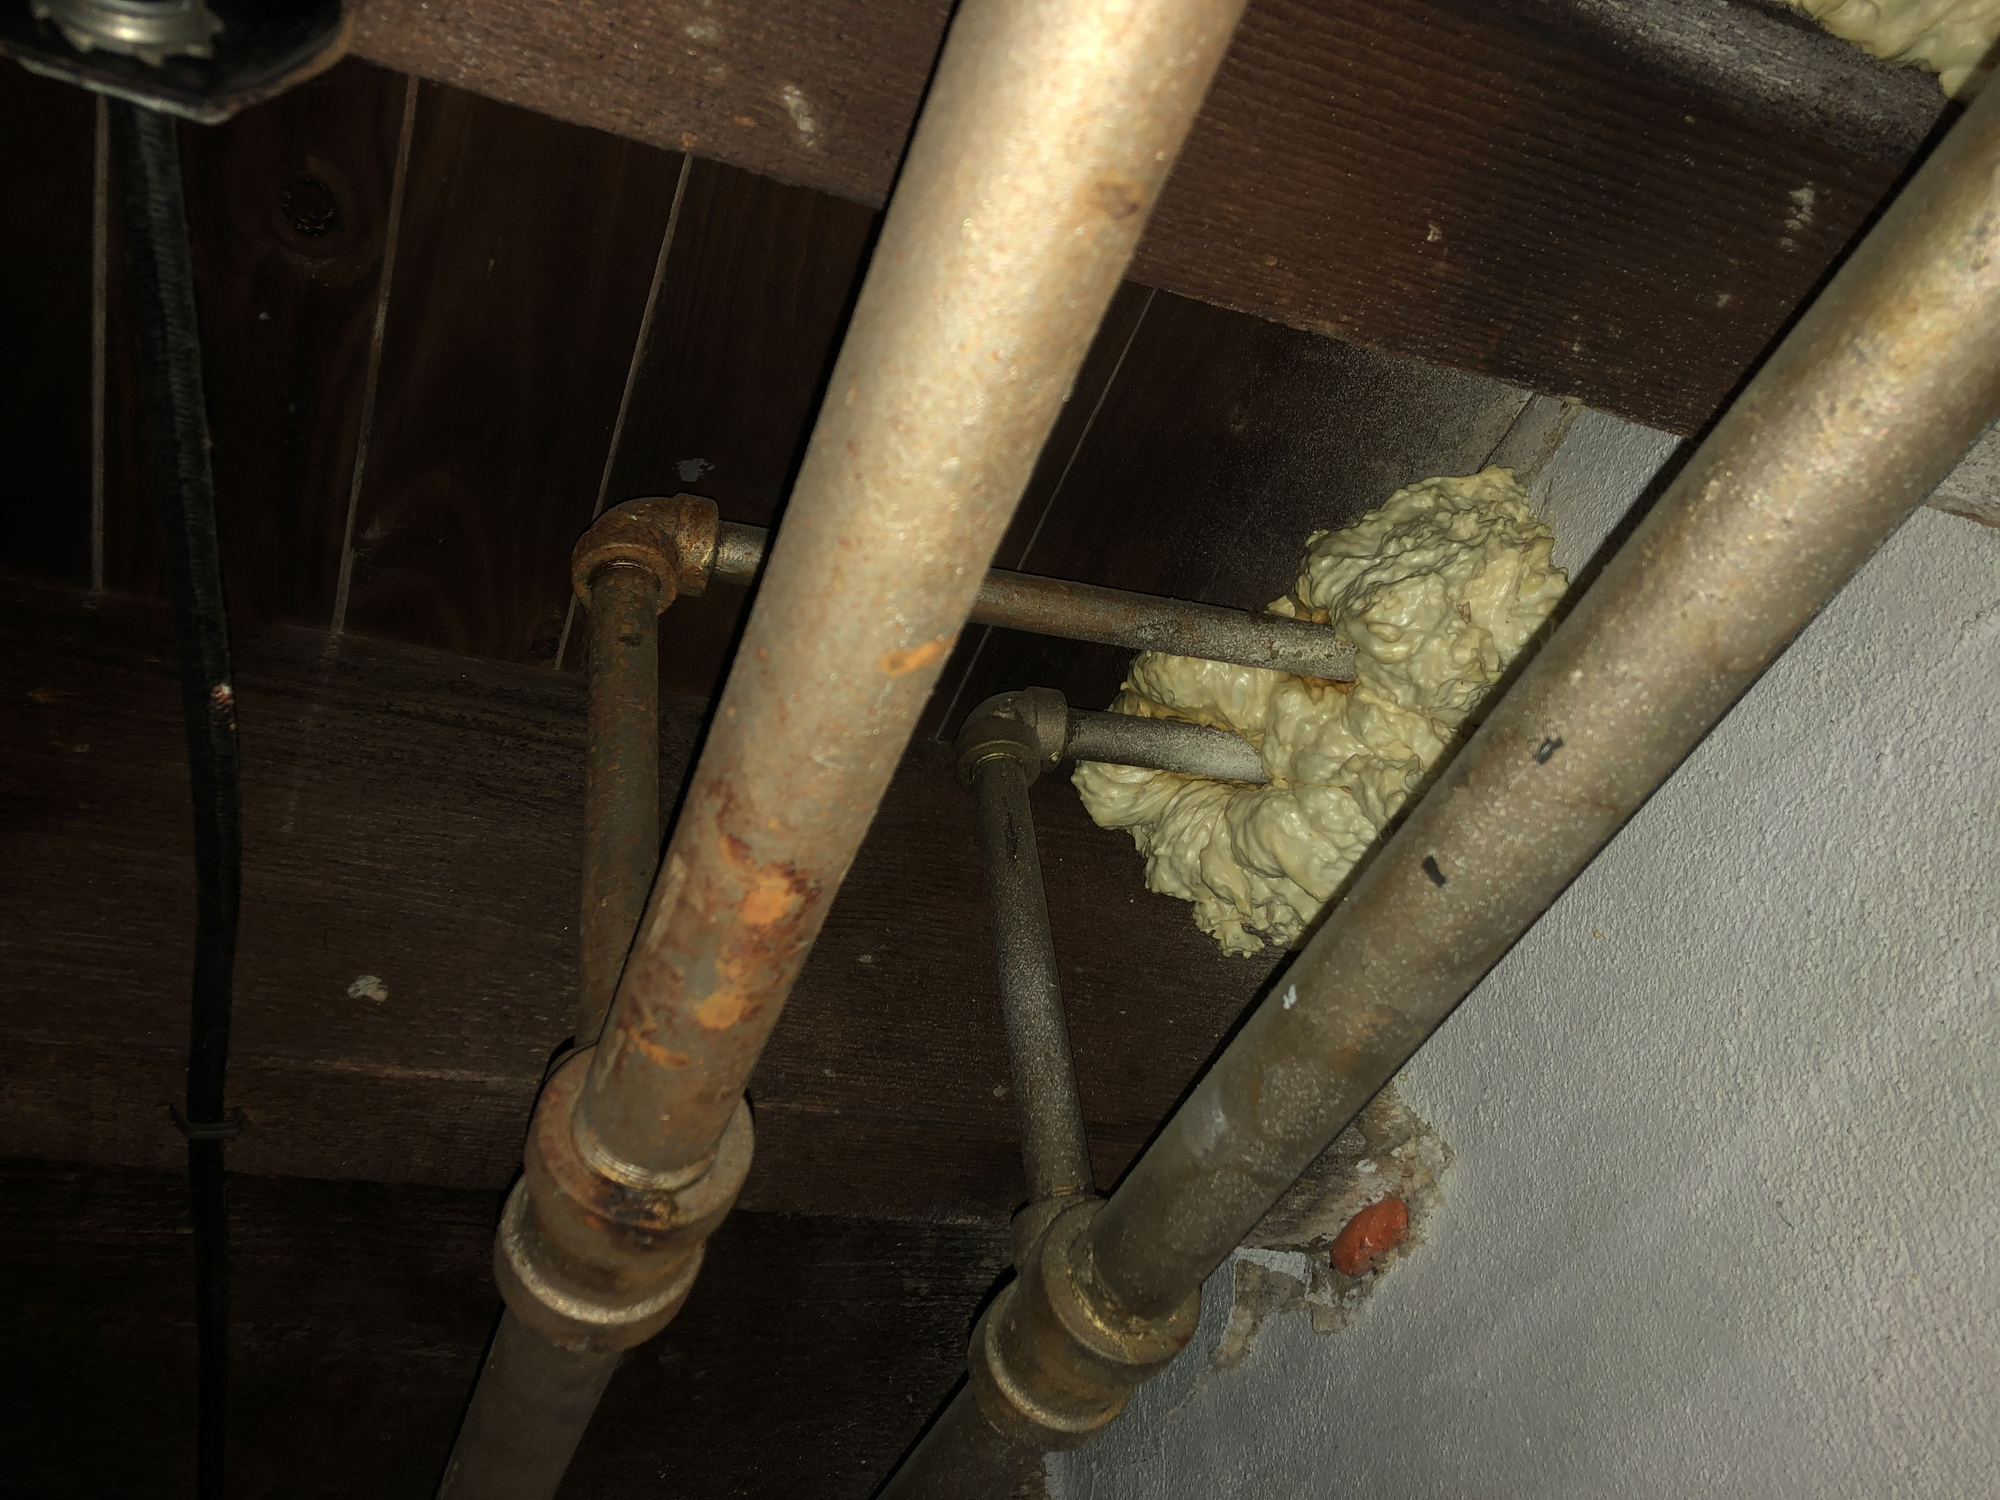
First picture is an example of where the main pipe feeds the rooms above the crawlspace. The second picture is the basement feed to a 2nd floor convector.
Thank you all for the suggestions!


0
Comments
-
-
On the assumption that there is a very good reason you want to scrap the reverse return and go to individual feeds on the second level... which I would think carefully about... I would try to save the threaded lines going from the basement up to the second level. That is, I would try very very hard to unthread the half or three quarter lines at accessible locations in the basement, and hook my lines from the manifold in there.
You may find that somewhere near the basement there are convenient unions. If so, I'd start there -- take them apart -- and then disassemble the pipe a length at a time from that location going along. If there are not convenient unions, or some of the fittings prove obstinate -- either is possible -- then I'd do much the same, only using a grinder or sawzall or whatever to get the pipes apart.
And stop where I got to the half or three quarter risers and do my darndest to unscrew those fittings so I could thread new adapters on. In both pictures, that would be at the elbows where the risers turn from horizontal to 45 down in the first picture, or horizontal to vertical down in the second.
Scrap value? There might be enough scrap value to pay for the drive to the scrapyard and back...Br. Jamie, osb
Building superintendent/caretaker, 7200 sq. ft. historic house museum with dependencies in New England1 -
That steel used to be a penny a pound. I'd call a hauler.
Personally, I would cut the branches off with a grinder or sawsall and use a Megapress (for water) fitting, then adapt to copper. You should be able to rent the Megapress tool from a local supplier.
https://info.viega.us/prozone/systems/megapress8.33 lbs./gal. x 60 min./hr. x 20°ΔT = 10,000 BTU's/hour
Two btu per sq ft for degree difference for a slab2 -
FIWM, I would "crack" the small fittings first.
You have cast iron fittings, they can be cracked open by holding an 8-10 sledge hammer on one side and wracking the other side with a 2-4 pound hammer.
........You need eye protection for this procedure.......
I would do those first, leaving the large pipe in place for stability of smaller pipes.
Support any long runs of smaller pipe before doing this as they may drop down and crack the fitting at the other end.
I assume you want to have connections up in the joist space where possible.
After freeing up all the small pipes you want then you can do the same on the large pipe. I would support it as it comes down, it is heavier than one imagines.
After all that then I would rent/borrow a hand threader for the sizes you have saved and "run the threads" of the saved ends. This would clean up the threads. Use a back wrench for this.
Cracking fittings is quieter and cleaner than a grinder, IMO.2 -
The old original installer thought ahead and used cast fittings . They used them for any future repairs . You need two hammers , I prefer lugs . One to hold against on the far side of the fitting to direct the force from the swinging hammer into the cast. You will hear the ring sound stop once cracked . Then spin the fitting off . Cast iron is brittle like glass .
There was an error rendering this rich post.
4 -
Big ED, what is a lug....not heard that term out here in the Midwest?
Other than the crack ability is there any reason to use CI fittings today?
I never see them available here.0 -
Thank you all for the suggestions! I'll try to crack the one that leads into my kitchen first (i won't want/need those threads). I'll post some pictures of how it goes when I get to it.
Another follow up thought, would a penetrating oil be helpful here?0 -
-
A lug hammer is a single hand held sledge hammer . Shorter handle and smaller head then a full size sledge ..
One of the reasons . to use cast iron fitting is the ease of repair in the future .. You can crack them loose . The other reason I feel they look better on boilers
There was an error rendering this rich post.
1 -
Supplyhouse seems to hide them away a bit, but they are all there: https://www.supplyhouse.com/Cast-Iron-Fittings-156000
NJ Steam Homeowner.
Free NJ and remote steam advice: https://heatinghelp.com/find-a-contractor/detail/new-jersey-steam-help/
See my sight glass boiler videos: https://bit.ly/3sZW1el0 -
Hi fellow Philly-burbian. I did a similar project on my house a few years ago:
https://forum.heatinghelp.com/discussion/154770/radiator-re-pipe-copper-or-pex/p1
I used a reciprocating saw with good quality metal cutting blades. Buy a few of them since they will wear out. Also prepare to have sore arms for a few hours after. It only takes a few minutes to cut through a 3/4" pipe.
It took me about 3 hours to demo all of the iron pipes in my basement, including cutting several 3 inch pieces. I kept the original iron riser pipes that feed the radiators on the ground and top floor of my house. I found that once I cut the last section of pipe prior to a riser it was fairly easy to unscrew the old fitting connected to the riser.
I also looked into getting some scrap value for the old pipe. It's not generally worth much, so I just called a local "picker" I know and he took it.1 -
 Hello All.
This is a 2.5 inch 100 year old plus steam line fitting I removed from one of the buildings where I am the in-house HVAC guy.
Using a hand grinder you cut a V in the fitting. I use a small thermostat screwdriver to gauge how deep my cut is so I don't nick the threads.
Then you can pry the V you have cut out with a larger screwdriver and a hammer.
After V removed I used a punch to push and break loose the fitting and then a pipe wrench to remove it.
I personally prefer this technique over breaking it with hammer but both have there place.
I would practice on a scrap piece first.
WORKS GREAT. NO ****
 !
!
3 -
-
Thanks again to everyone for the responses! I was finally able to get some time this weekend to go after these fittings. A reciprocating saw was the best tool for cutting the pipes, and as mentioned, some of the fittings were easy to screw off. Others needed some more persuasion. For those I used the reciprocating saw to cut grooves similar to what @Dodgedart described. A few hits with a chisel loosened it up, and in some cases even needed some more penetrating oil. So far I have demoed about half of the pipes, and have the fittings removed for 3 of the 5 convectors I need to save. Hopefully I can finish it out next weekend.2
-
Wanted to post another update here!
Just installed the Pex-Al-Pex into the pipes for the second floor convectors and it is night and day for my kid's room. Before, the heat would kick on, and that room would lag behind about 20-30 minutes before the return pipe even got close to being warm to the touch, and nothing could be felt in the convector. Today, with a direct pipe from the manifold, it is less than a minute before I see the return water temp at something higher than 100 deg F.
3
Categories
- All Categories
- 87.4K THE MAIN WALL
- 3.3K A-C, Heat Pumps & Refrigeration
- 61 Biomass
- 430 Carbon Monoxide Awareness
- 120 Chimneys & Flues
- 2.1K Domestic Hot Water
- 5.8K Gas Heating
- 115 Geothermal
- 168 Indoor-Air Quality
- 3.7K Oil Heating
- 77 Pipe Deterioration
- 1K Plumbing
- 6.5K Radiant Heating
- 395 Solar
- 15.7K Strictly Steam
- 3.4K Thermostats and Controls
- 56 Water Quality
- 51 Industry Classes
- 50 Job Opportunities
- 18 Recall Announcements


