New First time homeowner, looking for some advice.

The system seems to work good, none of the severe water hammer, spitting vents etc that I've seen others have to deal with. I've read through Dan's "The lost art..." book and one of the big takeways was don't start messing with stuff you don't understand or else there is a high likelihood you will throw the whole system out of whack. Because of this I've taken a month of so and tried to study my own system, as well as do as much research as I can.
My system consists of an old American Standard natural gas fed boiler model 6b j5 which I believe is referenced here
It has a newer looking Unimatch automatic water feed. There is one long main that circles the basement on 3 sides as well as a shorter one that services a portion of the fourth wall.
A few issues that I have noticed that may or may not need correcting.
There is only 1 main vent on the end of the long main, and I'm not sure if it is working properly. I'll fire the boiler and go stand by the vent and not hear anything. I've considered getting 1 or possibly more Gorten #2's to put on the main. I have about 67' of 3'' OD (not sure if people refer to OD or ID when quoting pipe size? If someone could let me know that would be great) pipe on the long main. I was going to get the sizing calculator that I've seen mentioned is in the store, but I need to see if you plug in ID or OD numbers.
The water level seems to be low. I've read that normally it is about halfway up the sightglass. Mine is normally only around a 1/4 or 1/3. I haven't experienced issues I guess, but then again I am so green I wouldn't really know an issue unless is was very obvious. I do have plenty of room between water level (or a slightly raised one) and my mains (Dan's beloved "A" value). Right now I have 26" from top of the boiler to a 90, which then travels horizontally a bit before going vertical another 17" and teeing off to the mains. In total I have 38" between current water level and the first horizontal pipe.
The pressuretrol is an original American Standard NO 450 Series b62 model baj type # 460552. It operates with mechanical dials and springs. When I first checked it the range was set for 2.5 and the differential was 3. From my understanding this would correspond to a cut in of 2.5 and a cut out of 5.5? I might be misunderstanding it though. I've since lowered the range to ~1 and differential to ~1. I am assuming that it is an additive control, because with the original settings, it doesn't make sense if it were subtractive. I'll have to wait to see how this works. I wonder if the main vent and the elevated pressure setting go hand in hand.
There is a unit that attaches to the sight glass and has the Y strainer for blowing down attached to it. I think this might be the low level cutoff? Regardless of it's function, when I blow down the unit the water comes out very slow. Is this normal? Or does this hint towards the pipes being gummed up? Also the 0-160psi (****?) gauge on the unit doesn't move at all. It could be that it is just operating at low pressures, but with the original pressuretrol settings it shouldn't be. I think one of the first purchases I should make is a low pressure oz/in2 gauge to install so I can see what is actually going on in regards to pressure. Right now I am blind.
I have a mix of the original asbestos insulation and some newer fiberglass and duct tape. I might switch the half cocked sections to modern stuff to help insulate the main.
It does seem like I have both a wet and dry return. The wet return being at the end of the long main and the dry return being only about 20' from the boiler. It is then piped back at a pitch to connect up with the wet return/hartford loop/water feed piping setup. Does this setup make sense?
I need to install the gauge I mentioned, and am thinking about looking into a vaporstat.
If anyone would be so kind to take a look at what I've written, point out anything that seems goofy, ask any questions that come to mind, and point me in the right direction I'd be very appreciative. It is my goal to build a firm foundation to understanding the system, so I can maintain/upgrade and have a healthy heating system for years to come.
Comments
-
We really need to see some better pictures with a bit more light. Need pictures of the piping around the top of the boiler. From your description it doesn't sound like there is a header there but I may misunderstand.
It looks like you have the Pressuretrol set about right. You really should take the Pressuretrol off, take that Pigtail off (the looped pipe under the pressuretrol and clean it out really god. They accumulate gunk in them and the Pressuretrol will not function properly.
The normal water level should be at least half way up the sight glass, some boilers a little higher but I'd start out with keeping it half way up.
The Low Water Cut-off with the blow down valve is a McDonnell Miller #67. It is suppose to be taken apart and cleaned annually. That entails replacing some gaskets that cam be ordered from one of their Distributors or even on ebay. You really need to test the LWCO with the boiler running. If it is working, it should shut the boiler down in a few seconds after you open the blow down valve. If it doesn't, it is probably caked up inside with crud and preventing the float inside from dropping down to break the circuit. I suspect it isn't working. When you mentioned that water runs very slowly out of the blow down, that's a pretty good indicator that it has a lot of buildup inside of it. McDonnell Miller reccommends they be cleaned annually and replaced every 10 years. Not sure how old that one is although I see it has the newer style blowdown ball valve on it.
If you can find a name on that vent, it would be interesting to see if we can determine what capacity it might be. I suspect it is a remnant from the old coal fired days (maybe an old Sarco 6T???) but it has some fairly modern straight cuts on the base of it that cause me to wonder what period it might be. assembly looks a bit more modern that early 1900's. Size is in keeping with thaat period though. In all probability more main venting will be required but let's see what that is.
Pipe size sounds like you probably have 2-1/2 inch pipe (inside diameter) A rule of thumb is the equalivant of 1 Gorton #2 per 12 to 15 feet of Main, if at the end of the Main. If the vents are at the end of the returns, additional venting will be needed to accommodate the added return pipe.
Post some more Pictures.0 -
You might want to test how long it takes steam to get from the boiler to the ends of the main. Clock the time it takes steam to travel from the boiler output (i don't know if you have a boiler header because of it's age) to the end of each main, this should be done when the boiler has been off for an hour or two.
The best way is to feel the boiler output and start the timer when that gets steam hot, then walk to the end of the long main and see how long it takes for steam to get to the vent (this assumes the vent is at the end of the main, if it's at the end of a dry return you want to feel the end of the steam main).
This wants to be as low as practical because it costs money to burn the fuel it takes to get that main hot. 5 minutes costs a lot less than 20 minutes.
BobSmith G8-3 with EZ Gas @ 90,000 BTU, Single pipe steam
Vaporstat with a 12oz cut-out and 4oz cut-in
3PSI gauge0 -
Bob- How do you know when the boiler is "steam hot"? Is it just a ball park thing?
Fred-The low water cutoff does work. I've been blowing it down minimum once a week per recommendation of previous homeowner and the tag on the LWCO unit. I will disassemble and clean all that piping up soon.
I will try to find a name on that vent. From the angle I was at I couldn't see anything, but I'll try to get a better look at it.
I'm going to dig up my camera also and try to get a nice set of photos for you guys.
I appreciate your responses, thank you for taking the time to respond.0 -
When you cant hold your hand on a pipe is a good rule of thumb with steam. Once steam heats a steel pipe the temperature of that pipe goes up very fast.
The time it takes to fill a main is usually a good indicator of the state of the venting on that main, assuming everything is sloped correctly.
BobSmith G8-3 with EZ Gas @ 90,000 BTU, Single pipe steam
Vaporstat with a 12oz cut-out and 4oz cut-in
3PSI gauge0 -
I took some better photos tonight. I also noticed why there is the dry return in addition to the wet return. They had to go above an I-beam, so have the dry return connected to the main on either side of the I-beam.
It also looks like that LWCO was installed in 2010 based on the service stickers.
0 -
Can't see the last 12 or 13 pictures. Just blank pages. From the pictures I do see, I noted there is no header on that boiler. Does it run pretty well? Any banging or water hammer? If it is running ok and not noisy, it probably isn't worth the cost to put a header in until the boiler needs to be replaced. It is extremely important if/when the boiler does get replaced that a header be installed and that the installation instructions be followed and not compromised. Even better if you come back to this site and let posters tell you how to improve the overall installation with maybe a drop header, pipe sizes, utilization of the risers out of the boiler, etc.The second thing I see is that someone, looks like a long time ago, used your skim port (pipe with the green valve on it) to mount the pigtail and Pressure gauge. If you ever have any pipe repairs/replacement done anywhere on the Mains and/or returns, you will need that skim port to skim oils off of the surface of the boiler water. The pressure gauge can be moved to the 1/4 tapping on the top of the Low Water Cut-off that the Pressuretrol is mounted to. You will just need to add a couple Tee's on the top of the pigtail and a couple nipples and you can remount the Pressuretrol, that gauge and a 0 -3PSI pressure gauge on the same pigtail (I think you said you want to add a 0-3 gauge anyway).
Here is a link to the 0-3 PSI gauge most of us use:
http://www.valworx.com/product/low-pressure-gauge-25-0-3-psi0 -
The main vent is an old Trane vacuum vent. It has about the same capacity as a Hoffman #75 or Gorton #1. With that main I'd start with three Gorton #2 vents, and add more as needed. Then watch how well it works.All Steamed Up, Inc.
Towson, MD, USA
Steam, Vapor & Hot-Water Heating Specialists
Oil & Gas Burner Service
Consulting0 -
Just finished doing the test ya'll suggested to time how long steam to to reach the end of my main....ouch...
18-21 minutes, depending on when I "called" the start time....It moved very slowly but surely down the main. I could just go from riser to riser and feel it's movement. I think I may have some non functioning rad vents also on some baseboard heaters because those didn't even get warm. I don't know if it's worth it just to order new rad vents while I'm ordering the Gorton's...The ones on my rads now are a mix of brands and all vintage.
As far as water hammer/banging....Not really. I've definitely never noticed any in the mains. I notice that I get a bit when it's coming on after being off for a while, but that is more in the rads as far as I can tell. On my list of things to do is check the pitch on all the rads and correct if needed.
I'm going to try to upload those pics that weren't working for some. I think those were the ones with more detail of the near boiler piping.
Once again thank you all for taking the time to respond.0 -
Definately put those Gortons on to replace that old Trane vent. You will be amazed at the improvement.0
-
Now can I just antler off the 1/2'' piping that the old vent is on? Or will the flow rate through that be restricting the venting?0
-
All but the last 3 pictures came up this time. Maybe there is a limit on how many you can post per posting. I don't know.
All of the Near boiler piping needs to be redone when a new boiler goes in. I'm surprised it functions well like it is but the older boilers with larger water capacities often seem to be more forgiving.
I also noticed the Hartford loop (or what should be a Hartford loop. It has to be well above the Normal water level of the boiler. I'm surprised that isn't giving you some hammer at that location. The Hratford loop should be about 2 inches below the water level. The purpose of the Hartford loop is to protect the boiler, in the event of a water leak in the wet returns (those returns below the water line). In your case, with that other return tapped into the bottom Tee, at the very bottom, should you have a leak in that return, yoour boiler will run dry so it is very important to always make sure the LWCO functions properly and that, whel a new boiler is installed, that issue is corrected.0 -
The Gorton #2 has a 1/2" male thread, try to get it as high up as you can using a pipe nipple.
BobSmith G8-3 with EZ Gas @ 90,000 BTU, Single pipe steam
Vaporstat with a 12oz cut-out and 4oz cut-in
3PSI gauge0 -
That Trane vent that's on there now should be a 3/4 inch isn't it? For 3 Gorton 2's, I think you need to stay with a 3/4 antler and use 1/2 reducers where each Gorton mounts to the antler.0
-
Fred- I'm trying to understand your comments about the Hartford loop.
It probably is above the water line, and I get that part.
The vertical pipe in this picture is the water feed line and dry return.
Should this be piped to the top somehow?
0 -
What Fred is saying is all the return piping should come together basically at the floor level then rise up and connect into that tee on the return piping. This makes up the Hartford loop. Your Tee is above the water line which isn't correct. What probably could have happened is on replacement the boiler water level changed from the old boiler and it wasn't corrected for this boiler. Just something else that would need addressed on a replacement. As has been said if/when you do have this replaced the installer will basically need to tear everything around the boiler out and redo it from scratch. Oh and those vertical pipes are considered wet returns.0
-
That dry return, when it drops below the water line, it becomes a Wet return. Yes, it should stay below the water line but be piped into the other wet return (again the two wet returns should tie together, below the water line, at the floor is fine but then that joined connection, via a Tee should pipe up into a Hartford loop that is below the water line in the boiler. That way, if you spring a leak in either of those returns, the water in the boiler can only drop to the level that the Hartford loop enters the equalizer.
Edited to correct typo0 -
OK thank you both for explaining it better. I get it now. If/when I ever need to replace (hopefully not for a while), I'll definitely have to form a plan with some of the guys here. Luckily there is a contractor in my area who advertises here, so that would be a good place to start on any big job like that.
I ordered a low pressure gauge, and some Gorton #2's. Hopefully with that I will be able to get a sense if the pressuretrol is working correctly, and be able to get that main heated up a lot faster. Next I'll need to clean out all that piping around the LWCO. Kind of hard to do in the middle of winter though lol. I'll need to wait until I get a day in the 40's or so, which is practically shorts weather around here.0 -
Hi. another homeowner here. Any chance we can get a look at your rads? I know you mention one-pipe, but a single location for main vents was a hallmark of two-pipe systems and i just wonder why you have a vacuum vent on a one-pipe system. I'm sure you know what you have, but some people have been confused on the two pipe thing and it can help in troubleshooting your system's requirements.Two-pipe Trane vaporvacuum system; 1466 edr
Twinned, staged Slantfin TR50s piped into 4" header with Riello G400 burners; 240K lead, 200K lag Btus. Controlled by Taco Relay and Honeywell RTH6580WF0 -
Vaporvac, sure thing. I'll grab some tonight.0
-
It was probably used along with vacuum-type radiator vents to allow the system to run below atmospheric pressure during the Coal Era.vaporvac said:..... i just wonder why you have a vacuum vent on a one-pipe system.
Which reminds me- if any vacuum vents are still on the radiators, replace them. This technique doesn't work well on oil or gas.
All Steamed Up, Inc.
Towson, MD, USA
Steam, Vapor & Hot-Water Heating Specialists
Oil & Gas Burner Service
Consulting0 -
A lot of the rad vents look like old hoffman's or varieties of that sort. I was going to upgrade them all when I bought the gorton vents, but got sticker shock and didn't want to blindly purchase non adjustable valves. I did buy one of the Danfoss thermostatic vents everyone talks about.
If I remember I'll grab some photos of the assortment of vents that are currently on there. There seems to be a decent variety of brands etc.0 -
@Steamhead , so would this set-up work today with a dual-stage or modulating burner for one pipe? I assume it's the constant heat of coal that enable it to work. Why does the vacuum work with on-off boilers for two-pipe:
@a1will , I just mention pics of the rads because recently someone posted who thought they had a one-pipe because they only had one riser coming out of the boiler when they actually had a two-pipe system! p.s. I don't mean to hijack your post, but you have an interesting set-up.Two-pipe Trane vaporvacuum system; 1466 edr
Twinned, staged Slantfin TR50s piped into 4" header with Riello G400 burners; 240K lead, 200K lag Btus. Controlled by Taco Relay and Honeywell RTH6580WF0 -
Be aware that you still have to put a Vent on that Danfoss.a1will said:A lot of the rad vents look like old hoffman's or varieties of that sort. I was going to upgrade them all when I bought the gorton vents, but got sticker shock and didn't want to blindly purchase non adjustable valves. I did buy one of the Danfoss thermostatic vents everyone talks about.
If I remember I'll grab some photos of the assortment of vents that are currently on there. There seems to be a decent variety of brands etc.
My 1 pipe also had a vacuum vent on the end of each of the mains when I bought my house almost 25 years ago. They vent relatively low volumes. Mine were Sarco's , huge cast iron vents about 4 inch diameter but they only vented .5PSI/min.
No other paraphernalia or remnants on the system that would indicate that the system was ever anything but a 1 pipe atmospheric system0 -
Vaporvac-I appreciate the questions... I am a young padawan trying to sponge up as much info from you guys as possible. Every time you ask a question, or make a statement, I learn a little bit more....
Fred-ahhh...so that is just the thermostatic unit? What vent is normally paired with it? Probably a larger one since you can back it down with the danfoss?
And here are some radiator pics....From my research I think they are 5 tube American Standard Arco's. I have these in the whole house and then 2 of the heat sink kind that are supposed to have a cover over them.0 -
Fred-ahhh...so that is just the thermostatic unit? What vent is normally paired with it? Probably a larger one since you can back it down with the danfoss?
You can put almost ny raadiator vent on them that you prefer. I like the Hoffman 1A's. They are adjustable (6 different settings) so you can regulate them more specifically to the radiator/room without having to change them out for different sizes. I've had really good luck with them although other say they are noisy. I haven't found that to be the case. Gorton makes good radiator vents as well but they are not adjustable, Maid-O-Mist also makes a variable vent that has 5 different sized orafices that you can change out to match your needs. II think ventrite makes a vari vent also but I have never tried them. There are mixed reviews for them. Many say they are prone to spit water. It all boils down to personal preference.
The thing to keep in mind is that Mains should be vented fast to move the steam down them as quickly as possible. Radiators should be vented slowly, no faster than necessary to get the room comfortable during a heating cycle. The size of the radiator and its distance from the boiler are factors that play into the setting that works best but most will spit or get sommewhat water logged if they are wide open.
Also keep in mind that the Danfoss really doesn't manage the vent. It either lets the vent access to the radiator port so that it can vent air and that allows steam in based on ambient room temperature or it shuts it off from being able able to vent air, keeping the radiator cold. It will shut the air way off when the room reaches set point. I guess from that perspective it does manage the vent but it won't say "hey, I only need to open the vent 50% this cycle or 25% this cycle." It just says "Hey I need to let the radiator vent" or, "I don't need to let the radiator Vent"0 -
From that description it would seem a danfoss would be more useful placed in a "hot" room, and not it one where I'm trying to heat a bit more.0
-
Ha! Here I am buying one to try to get a bit more warmth in a bedroom.Fred said:
That's exactly wht they are intended for, to help manage a hot room.a1will said:From that description it would seem a danfoss would be more useful placed in a "hot" room, and not it one where I'm trying to heat a bit more.
That's what an impulse buy will get you I guess.
Could have bought 3 hoffman's for the price of that dang thing.
0 -
What size vent is on that radiator? Maybe that room is one that you should try a larger vent on. Is it a large radiator? Furthest from the boiler? What size is the room? Do you know the EDR of the radiator?0
-
Second furthest from the boiler. We'll see how it does with the new main vents. Some pics of the radiator and vent. It does have an adjustable one on there now. I'll have to play with that and see if it is just set low or something. Maybe just the combo of proper main venting and fiddling with the rad vent will do the trick....Now to figure out where to put that darned danfoss....Maybe I'll just check out supplyhouse's return policy
Edit: Just checked and the valve is set on "10, fastest"0 -
Take that cover off the top of the radiator, that should help some.0
-
If you are having trouble getting enough heat out of a radiator try losing the metal cover. That cover is killing the convective properties of the radiator.
BobSmith G8-3 with EZ Gas @ 90,000 BTU, Single pipe steam
Vaporstat with a 12oz cut-out and 4oz cut-in
3PSI gauge0 -
Thanks.
I might try to disassemble that vent and see if the orifice is gummed up at all.
The room isn't cold really...It's just that the missus is always cold, and I'd like to try to get that room warmer than the rest of the house if that makes any sense....That way I can keep the thermostat set where I want it, and she can be a bit warmer in that room.
0 -
If you feel the room is ok and she is still uncomfortable maybe a small electric panel heater beside her chair would be the easiest route. Does this room have a lot of windows?
My living room is 12X15 and has 6 windows (good storms on them) on two outside walls. On cold windy days I use a electric heater to augment the heat in that room. A good stiff northeast wind will make you stand up and notice. I am planning on getting the walls insulated this year.
BobSmith G8-3 with EZ Gas @ 90,000 BTU, Single pipe steam
Vaporstat with a 12oz cut-out and 4oz cut-in
3PSI gauge0 -
Bedroom is fairly large, not sure of the measurements, and double windows on east and north walls.
No storms on any of my windows afaik. Another action item on my list is to pop trim off windows and insulate with the foam (previous owner did a lot of less than optimal work to put it nicely).
Was thinking about doing the window wrap also, but maybe storms for my windows would be money well spent.0 -
It's a valve, so all it can do is restrict flow (or not.) It can't call for heat, and it can't increase the flow of heat.a1will said:
Ha! Here I am buying one to try to get a bit more warmth in a bedroom.Fred said:
That's exactly wht they are intended for, to help manage a hot room.a1will said:From that description it would seem a danfoss would be more useful placed in a "hot" room, and not it one where I'm trying to heat a bit more.
0 -
That cover on top reduces the radiator's caapacity by about 20%. Just take it off and see how the room feels.0
-
Try Fred's advice. Redesigning my enclosures has made a world of difference. Painting it a matte colour, black preferably, also helps. Metallic paint will decrease the output.
Do invest in storms of some sort and make a couple of invisible changes to your windows. Visit oldehouseguy.com for some links to USParks Service sites on doing it right. I personally prefer the aesthetic of no exterior storms, but fabricated interior storms instead. I'd be glad to send you pics. They work GREAT! Peel'n'Seal is also a wonderful product for infiltration. I always try to give the prior owner some slack as I too, shall one day be the PO! One never knows what issues they had.Two-pipe Trane vaporvacuum system; 1466 edr
Twinned, staged Slantfin TR50s piped into 4" header with Riello G400 burners; 240K lead, 200K lag Btus. Controlled by Taco Relay and Honeywell RTH6580WF0 -
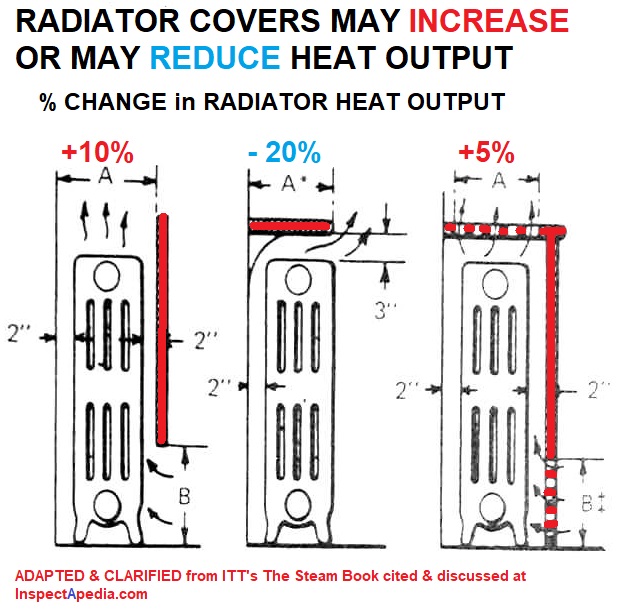
I found a reference that says that covers of the right design can increase heat transfer rate by 30% and I'm wondering if mine are that good. I removed most of them but still have them stored in the basement :
"Our sketch at left illustrates the impact on heating radiator BTU output depending on the type of radiator cover that might be installed. This is just one of the factors that impact the BTU output of a building heating radiator - which is why just using standard radiator sizing tables can be misleading."
http://inspectapedia.com/heat/Radiator_Volume_BTUs.php
http://inspectapedia.com/heat/Steam_Book_ITT089-dfc1s.jpg
EDIT:
This is confusing me now though, which seems to be contradictory. I think this topic warrants its own thread:
"According to InspectAPedia, a free online encyclopedia dedicated to building and inspection, "Because adding a radiator cover slows the movement of heat out of the radiator and into the room, the rate of heat loss out through the building's exterior wall is likely to be increased -- also increasing your heating bills."
InspectAPedia's Guide to Heating Radiator Covers suggests adding insulation or a heat reflector behind a covered radiator, as one way to prevent heat loss."0 -
@vaporvac Thank you! I'll be poring over that site you referenced. Unfortunately/fortunately (depends on how you look at it I guess) the PO ripped out all the original windows and put in Wallsides about 10 years ago.
And yeah, I really scratch my head at some of the stuff I see...A lot of it is just lazy work....cable cord penetrates exterior wall....runs across the carpet to other wall, then penetrates that to the living room....But I think a lot of the worse stuff was done by their kids as they aged. I can really tell that the owners tried to keep up...you can see tuck pointing get worse in quality until they are just smearing it all over from what the can reach from a window :'( But I think a lot of that might have been done by kids who were grudgingly helping out mom and pop. Get er' done!
I did meet the surviving wife at our closing. She seemed sweet. She raised 5 kids here and her face lit up when she said she was excited to see someone who was going to breath new life into the property.
But all in all, they left it structurally intact, which is a good thing lol....The only real issue is they had a long running leak in the bathroom that eventually caused them to tear our a large portion of the kitchen ceiling to get to it....The 2nd story floor sags really bad right along a joist that is severely water damaged right there, so a big project of mine will be to sloooooooowly try to raise that joist with some bottle jacks and then marry a new beam to the old one to try to help the poor guy out. I'll try not to snap my house in two while I'm at it.0


Categories
- All Categories
- 87.6K THE MAIN WALL
- 3.3K A-C, Heat Pumps & Refrigeration
- 59 Biomass
- 429 Carbon Monoxide Awareness
- 124 Chimneys & Flues
- 2.2K Domestic Hot Water
- 5.9K Gas Heating
- 119 Geothermal
- 168 Indoor-Air Quality
- 3.8K Oil Heating
- 78 Pipe Deterioration
- 1K Plumbing
- 6.6K Radiant Heating
- 394 Solar
- 15.9K Strictly Steam
- 3.5K Thermostats and Controls
- 56 Water Quality
- 50 Industry Classes
- 50 Job Opportunities
- 18 Recall Announcements