Rinnai Leaking Help

Comments
-
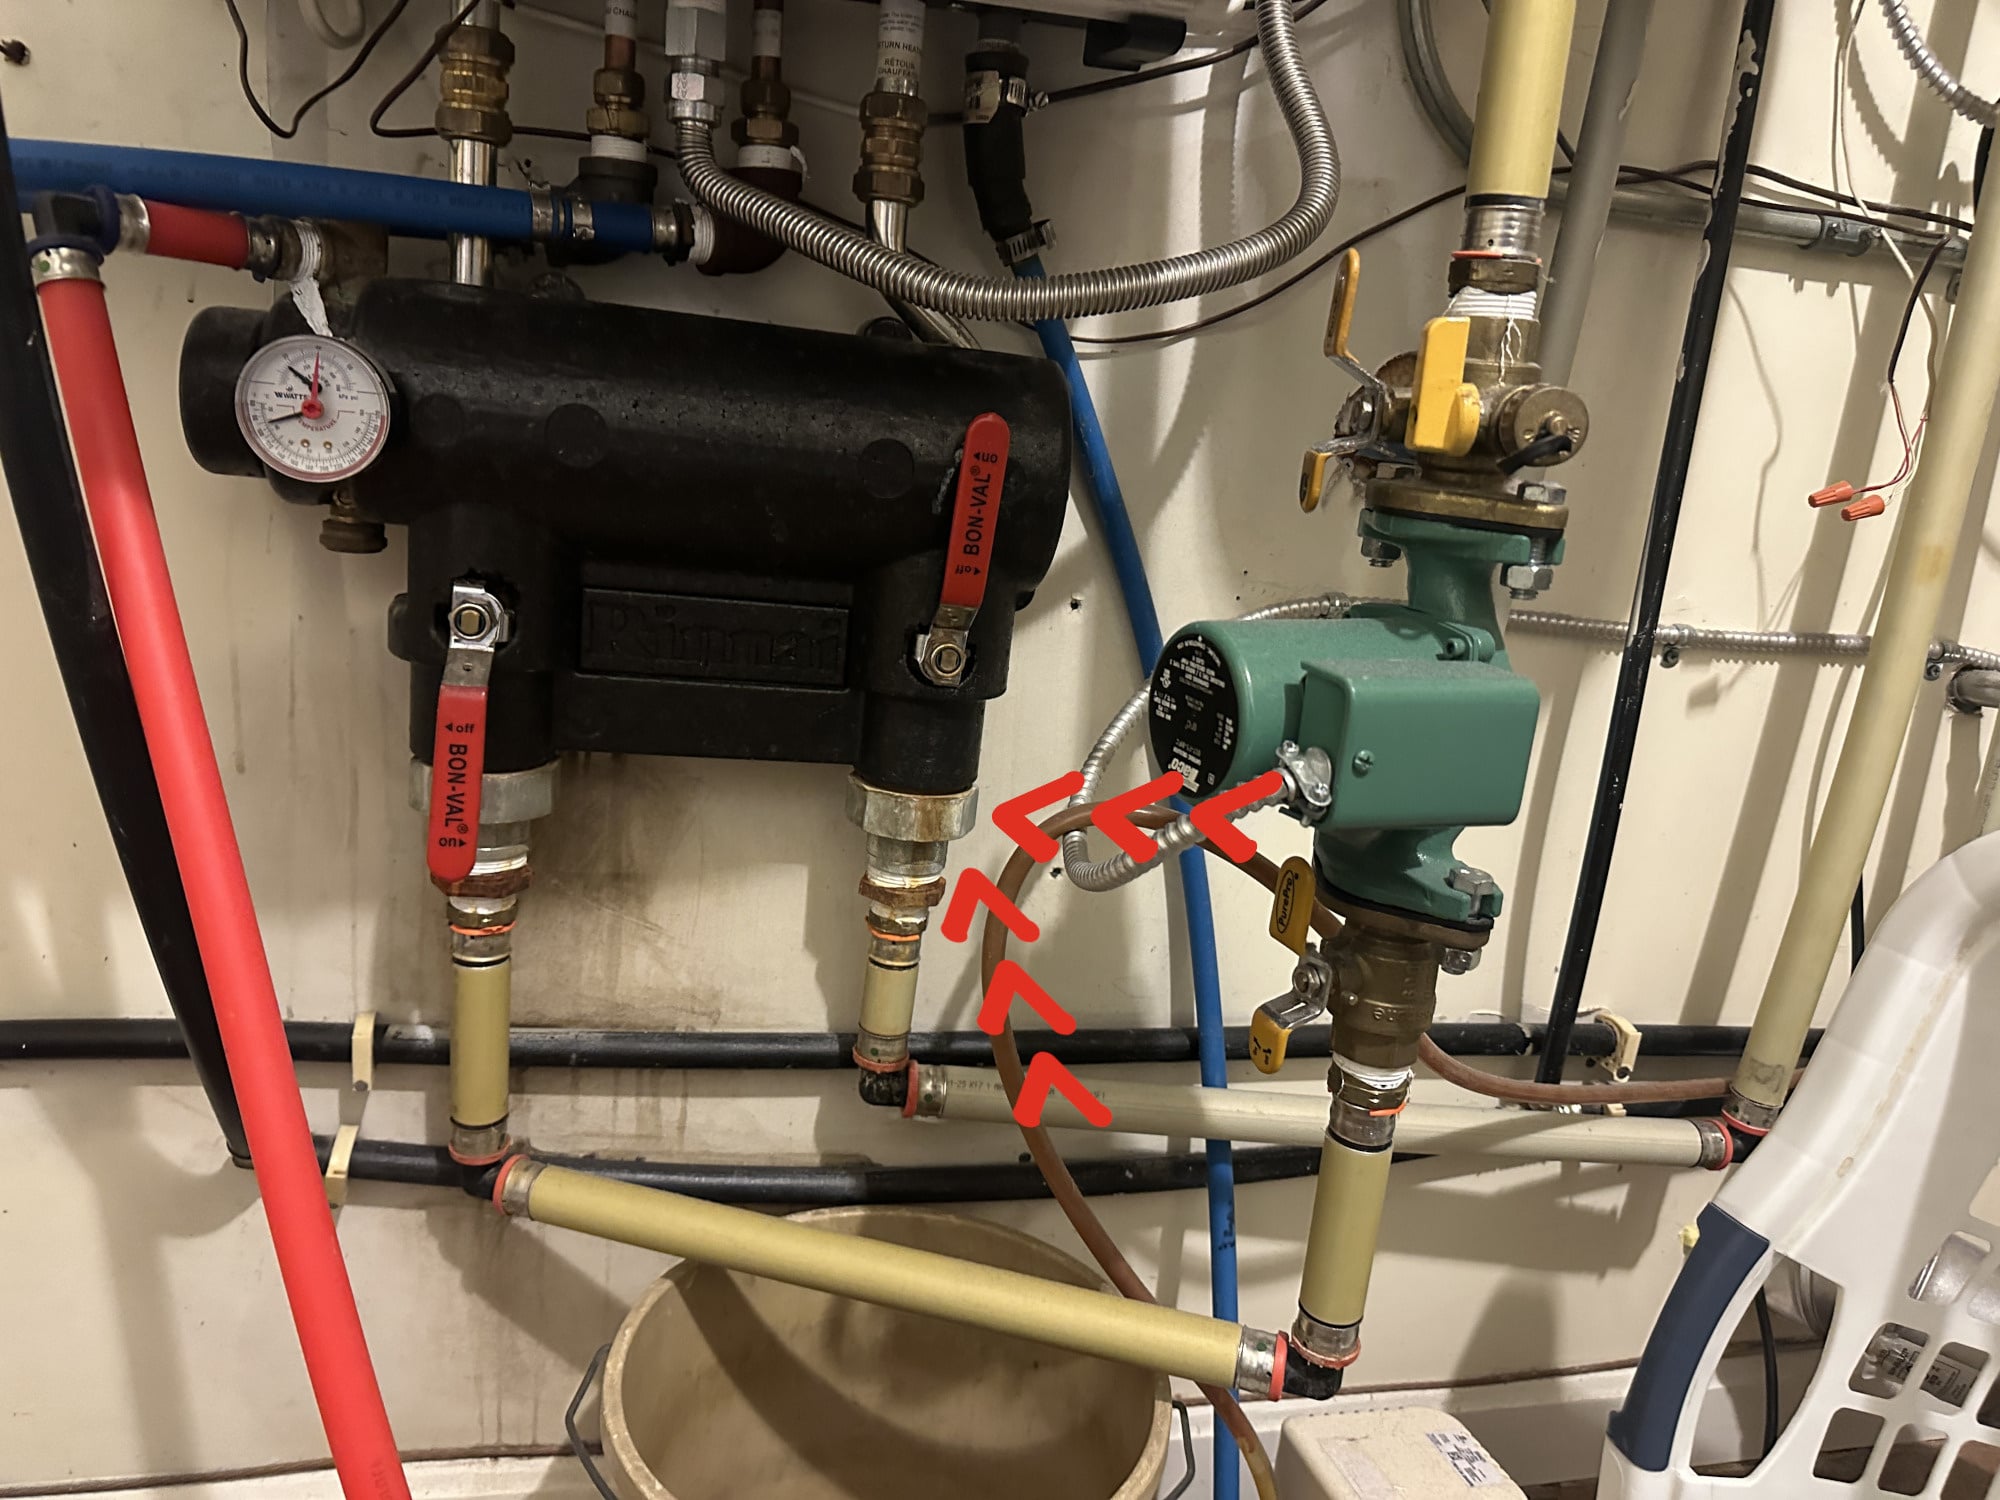
Your cold inlet is the blue line entering the combi unit above and to the left of the joint in question.
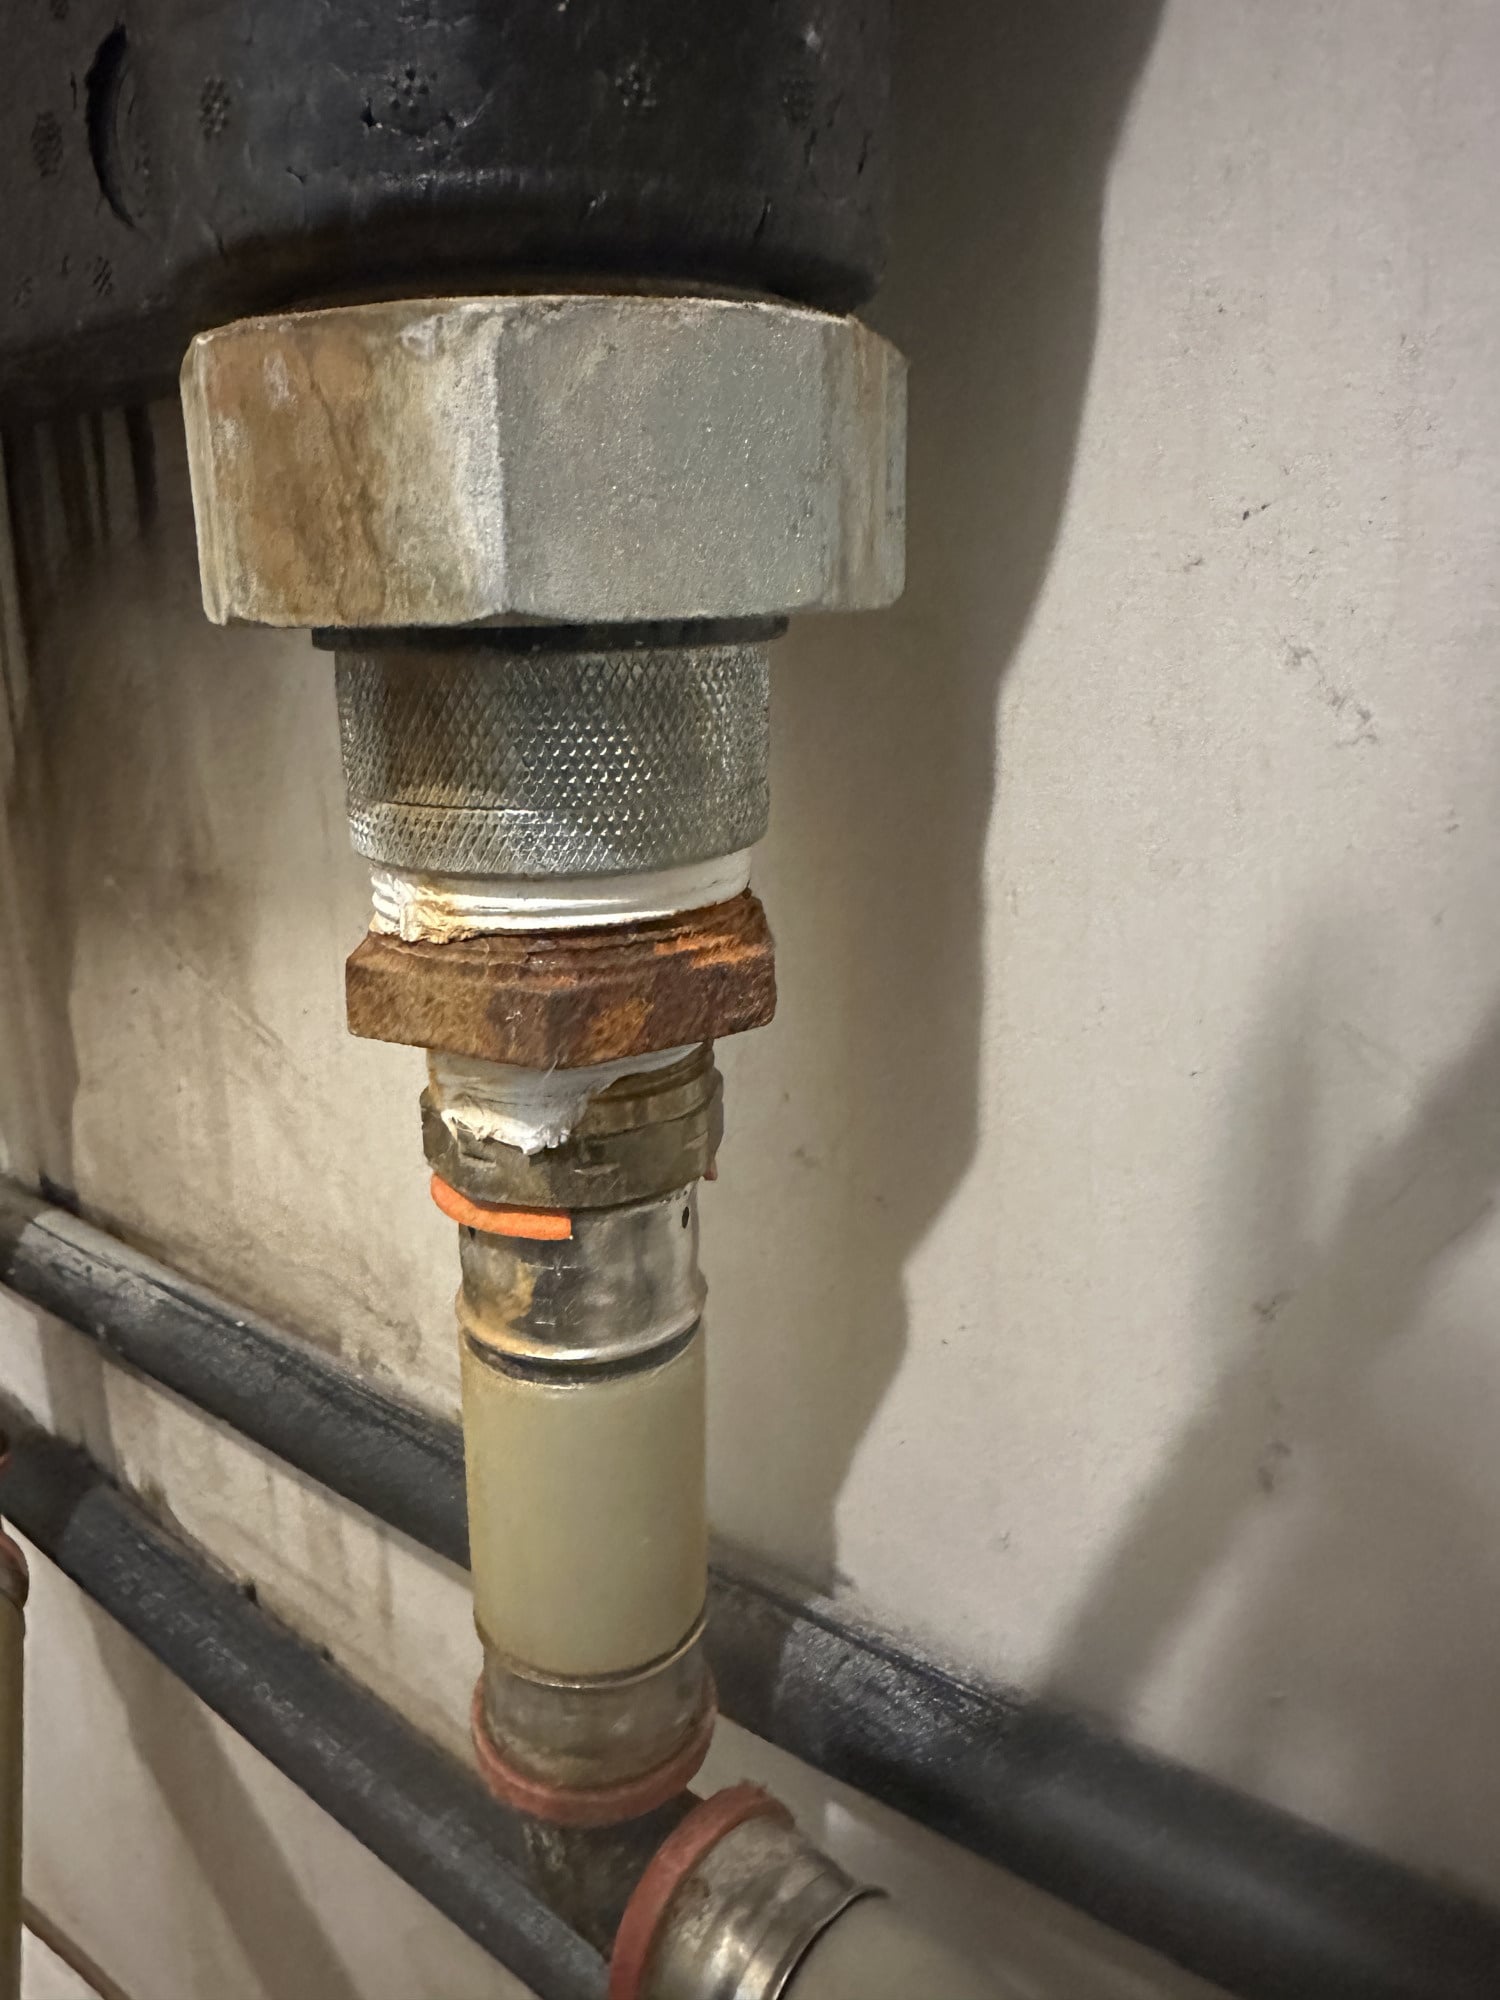
The leaker is on the space heating return. It is called a dielectric union and it uses a flat rubber gasket, this is an extremely common problem with dielectric unions. Not sure what sort of hydraulic separator is in that insulation block, but eliminating the dielectrics would be a good move if possible. If not, replace the gaskets for $10 and wait for another leak to appear.
 1
1 -
don't know why there are dielectric unions there. they are unnecessary and they leak.
1 -
Your response made me laugh! "replace the gaskets for $10 and wait for another leak to appear." Thanks that was a good one. Also thanks for information on the name of this fitting. It helped very much! Have a great weekend.
0 -
What's odd is that it's only a half union and that the threads of the union match the threads on the separator. I'll bet the dielectricts came with the separator. I've seen it with IBC and other brands and wish they just gave us brass unions.
8.33 lbs./gal. x 60 min./hr. x 20°ΔT = 10,000 BTU's/hour
Two btu per sq ft for degree difference for a slab0 -
i'm not so sure that you wouldn't find the rest of the union if you take the insulation off. no need for a dielectric union in to plastic pipe even if you think you need it on a closed system.
 1
1 -
@Alan (California Radiant) Forbes and @GroundUp, here is a better shot of what is under the insulator.
 1
1 -
I found two leaks. The 90 degree angle connector is leaking. Your assistance with finding the size of the pex pipe and types of crimp would be appreciated. This is what I was thinking of with regards to fixing the pex part. Cut the hose at the bottom and place a straight connector in it. Connect that to another short piece of pex and then connect that shorter side to the plastic elbow. Then cut off the part at the top with a Dremel so I can reuse it. I am not apposed to getting new hardware but will need your assistance finding the correct hardware. Then I would crimp this with another short bit of pex and crimp that to the bottom pipe. Open to your suggestions.
0 -
is there a name on the tube? those look like viega fittings of some sort.
i think the 2 halves of that styrofoam insulation pop apart to expose the manifold. i'd look at what sort of fittings go in to the manifold. it looks like it might just be npt or that might be a npt to bsp adapter. i'd make a short piece of copper to screw in to the manifold with an npt adapter to screw in to the manifold and adapt the ell to the pex but if you don't know how to sweat pipe black iron nipples and an ell or pex fittings for all of it might be easier.
0 -
Does this help with the name?
0 -
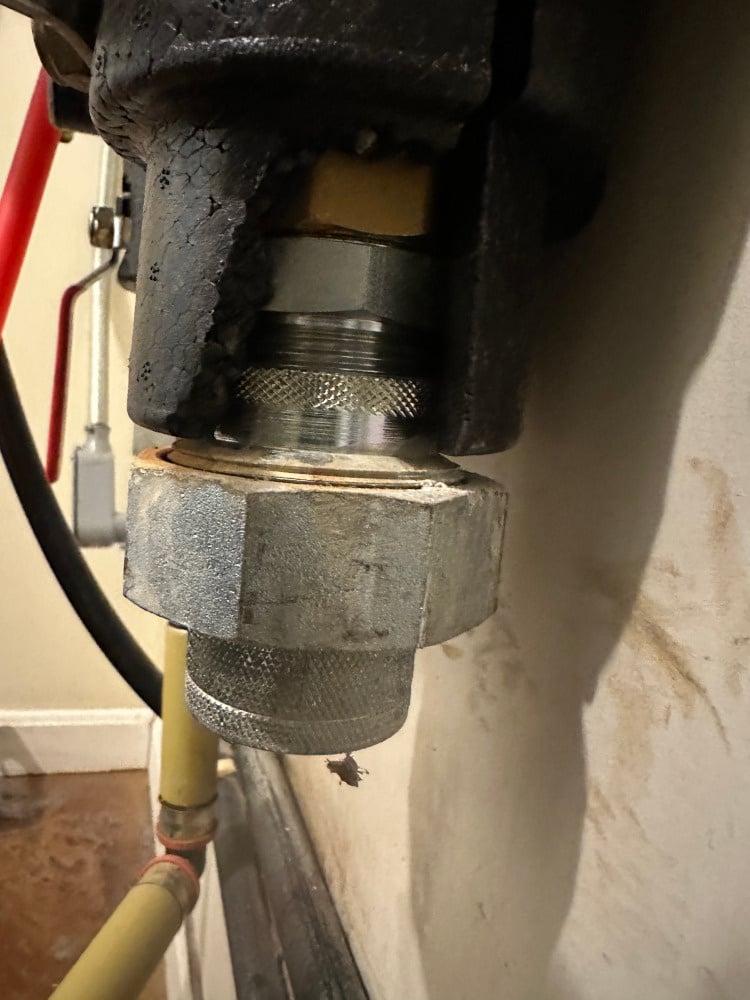
That is Viega Fosta Pex and is no longer made. It appears to be a 1.25" nominal NPT dielectric union and a 1.25" X 1" black reducing bushing and then a 1" MPT X PEX adapter. It's not exactly clear what is leaking, but if it's the top side of the elbow below the union, you can zip the collar off of the tubing with your Dremel and carefully remove the vertical tubing from it. If it were mine, I'd replace the union and bushing with brass ones then screw a new adapter into the bushing (or buy a 1.25" MPT X 1" PEX adapter and skip the bushing) then run a new piece of oxygen barrier PEX down to the existing elbow. Any crimp system will work here, whether copper rings, stainless collars, or cinch clamps. Be very careful though, that Viega tubing has a tendency to leak at the joints after it's been disturbed and may open up a can of worms for you. You can usually re-crimp them to seal, but that requires the same collar type crimper that was used originally. You cannot use a copper ring crimper to crimp the stainless collars. 9 times out of 10 when I work on these Viega systems, a new leak appears that wasn't there before and I have to re-crimp a few joints.
 1
1 -
"Be very careful though, that Viega tubing has a tendency to leak at the joints after it's been disturbed…"
I didn't know that FostaPEX was so fragile. Now you have me worried.
8.33 lbs./gal. x 60 min./hr. x 20°ΔT = 10,000 BTU's/hour
Two btu per sq ft for degree difference for a slab0 -
"Be very careful though, that Viega tubing has a tendency to leak at the joints after it's been disturbed…" this is exactly the hell I am experiencing now. I fix one thing another things starts to fail. ". You cannot use a copper ring crimper to crimp the stainless collars." thanks for this detail I was missing. I was making this mistake.
0 -
It's not the Fosta specifically and I don't know that I'd call it fragile, but my experience is that Viega tubing of any variety has a tendency to leak if you stress the joint after it's been in service awhile. Maybe the collars open up over time or something, because re-crimping solves it 99% of the time. I did have one recently on a 3/4" Viega domestic line that was dripping (I rotated an elbow to meet the heat exchanger I was installing) and it took about 20 crimps in different directions with my PureFlow jaws to finally make it seal, but I ended up replacing it anyway because I didn't feel comfortable leaving it like that. Heck, maybe it's the Viega fittings? I really don't know.
1 -
@lindylex the copper ring has a slightly larger outside diameter than the stainless collars, so using the copper crimper on the collars doesn't squeeze them all the way. If you have the copper ring tool, you can just replace the collar with a ring. The FostaPex has an aluminum layer on the outside which requires a stripping tool or a steady hand with a knife to strip it down to the black tubing, which is just a standard PEX sizes and will allow any crimp/cinch type of fitting.
0 -
i woudln't think you could rotate a fitting after you crimped it, the variances in the od of the fitting would some combination of expand the ring and force the tubing out from under the ring, at least not without installing a new ring
0 -
@GroundUp this is information that was new to me that would have helped me much in the begging "The FostaPex has an aluminum layer on the outside which requires a stripping tool or a steady hand with a knife to strip it down to the black tubing, which is just a standard PEX sizes and will allow any crimp/cinch type of fitting." I was confused with the larger outer diameter I was getting from my measurements. It was after looking at it I recognize that it has a thin metal sleeve on the outside. When I dremeled off the one end I noticed that a tool must have been used to strip back that metal cover to 1 inch pex below. Next I was on a quest to find this tool. No retailer had it because that type of tubing has not been produced in a long enough time. This sent me into a panic. The next issue I was having was using the wrong crimper. That tip about using the correct crimper was the game changer. I could see that is was not crimping tight enough and needed a solution. I got the correct stainless steel crimper and from the effort of the first crimp it was obvious we had found love.
Thanks everyone for the assistance that was an interesting situation. Here is a photo of the final work.
1 -
Well done, glad it worked out! Did you just replace the rubber washer in the union?
@mattmia2 with everything but the Viega system, fittings can be rotated pretty much indefinitely. The grooves in the fitting is what creates the seal so unless those grooves have been compromised, the tubing memory soaks up any potential diameter infraction. I don't pipe any of my installs in PEX, but just about everybody else in my area does everything in PEX so every retrofit has at least a few of those joints to contend with and Viega has been the only one to ever give me this problem.
1 -
they used this prep tool on the fosta, I supposedly have one for the 5/8"-1" sizes!
https://www.supplyhouse.com/Viega-54030-FOSTAPEX-Prep-Tool-1-2-3-4
0 -
I found that tool in my search. This is from that website you share a link to "54030 has been discontinued Discontinued January 7, 2022" No one makes that tool anymore. If I want one I would have to search Ebay or some estate sale of an old dead plumber.
0 -
@GroundUp, I could not find the rubber washer. The dialectric connector has this part number "LF3004 Watts 1 1/4 IPS lead free".
0 -
Hi, How about this?
Yours, Larry
0 -
I was at this retailer and they no longer carry this tool.
0 -
My inventory shows we have one in michigan thats why i posted the link, I know it is discontinued. but we have the the one for 5/8-1"
 1
1 -
Thanks for this. Not sure how I can purchase this. Looks like I need a special account. I was trying to purchase this today.
0 -
I have one you can borrow. PM me your name and address and I'll send it to you.
 8.33 lbs./gal. x 60 min./hr. x 20°ΔT = 10,000 BTU's/hour
Two btu per sq ft for degree difference for a slab1 -
I don't know how you guys can keep all that pex stuff in your head.
Different tubing, different crimp rings and different fittings.
I am old so I would just as soon sweat, thread, groove, weld , compression or flare or braze.

 3
3 -
there are what like 5 systems? there is the one that uses the memory of pex a to use a pex a ring to keep the joint in tension after you expand it, there are the 2 hose clamp versions, one that uses a copper ring you crush and another that uses an ear style hose clamp, there is the viega fitting that uses a crimp like that used on a hose and there is a compression fitting used on pex-al-pex.
0 -
I decided not to keep track of the different types of PEX tubing and only use the Oetiker crimp or the Viega crimp. This works on almost any PEX and any fitting, excluding the Uponor expansion fittings.
 0
0 -
Message sent and thanks a million.
0 -
You really don't need the tool. A sharp knife and 90 seconds will do the same job if it's only a couple joints. I have the tool but occasionally don't want to walk back to the truck to get it so I strip the joints with my Leatherman.
0


Categories
- All Categories
- 87.7K THE MAIN WALL
- 3.3K A-C, Heat Pumps & Refrigeration
- 59 Biomass
- 430 Carbon Monoxide Awareness
- 129 Chimneys & Flues
- 2.2K Domestic Hot Water
- 5.9K Gas Heating
- 121 Geothermal
- 170 Indoor-Air Quality
- 3.8K Oil Heating
- 79 Pipe Deterioration
- 1.1K Plumbing
- 6.6K Radiant Heating
- 396 Solar
- 16K Strictly Steam
- 3.5K Thermostats and Controls
- 56 Water Quality
- 51 Industry Classes
- 51 Job Opportunities
- 17 Recall Announcements