Welcome! Here are the website rules, as well as some tips for using this forum.
Need to contact us? Visit https://heatinghelp.com/contact-us/.
Click here to Find a Contractor in your area.
If our community has helped you, please consider making a contribution to support this website. Thanks!
The Ongoing Saga Of My Steam Heat System
Options

merikus
Member Posts: 73
I’m not writing this to ask advice. Rather, it’s to update folks on my steam system as I’ve often asked advice on this forum in the past. I’m writing this mostly so if people are having similar problems they might be able to learn from some of the mistakes I’ve made.
As I’ve mentioned in a previous post, I am in my third season with my old one pipe steam heat system in my mid-1800s house. When I first purchased the house, I learned about Dan Holohan’s books, and proceed to purchase and read all of them. I wanted to be sure I was going to be able to have my system run as efficiently as possible, and, frankly, it's just fascinating stuff.
It was obvious to me pretty quickly that the system was wonky. For one, there was no insulation on any pipes. For another, it uses a odd version of dry returns. The radiators were not properly tilted; the vents were old and failing. I was able to tune things up well, but it still continued to have long burn times and high heating bills.
Things came to a head this winter. We decided to install an Ecobee smart thermostat because our upstairs rooms get uncomfortably warm. Like, it interferes with our sleep, and tried every suggestion to try to make those radiators not as hot. Nothing worked.
The Ecobee has sensors that allow us to base the nighttime temperature on our bedroom rather than at the thermostat. This, in effect, is a nighttime setback. I know nighttime setbacks are controversial in the steam world due to the fact that it allows the system to cool down too much and is more inefficient on start. However, this was a major comfort issue—we sleep significantly better now. Also, Ecobee allows you to collect data through beestat.io, and I was able to demonstrate that my runtimes were not longer with the nighttime setback (in fact, I believe I am saving on runtime).
(As an aside, another cool thing about the Ecobee is that it learns how the steam system continues to heat after the thermostat breaks, so it actually breaks before it hits the set point and allows the system to rise naturally to the set point. Pretty cool.)
However, this created a major problem each morning: while our upstairs stays very warm, our downstairs does not. It took a significant runtime to get the system going in the morning, and I started noticing that the system was still running despite the fact that all radiators were fully hot. This made me realize that it was putting itself into an overpressure situation. I knew that an overpressure situation should be stopped by the pressuretrol, and so began to investigate that.
I detailed this in another post, but long story short, how my burner controller works is that it needs power to the limit terminal and the TT terminal to ignite and maintain flame. The idea here is that the low water cutoff and the pressuretrol are wired in sequence from the main power to the limit terminal, so if either breaks, it shuts off the boiler. In looking at the wiring, I learned whomever installed it wired the limit terminal directly to the main power, thus defeating every safety measure of the system. I rewired the system properly and confirmed via physical manipulation of the pressuretrol switch that the controller now operates as intended.
However, the system continued to put itself into overpressure situations. So I thought I had a clogged pigtail. Problem is that despite getting the pressuretrol off, I am unable to get the pigtail off the boiler. After learning this, I proceeded to try to ram every small, slightly flexible piece of metal in my house through the pigtail. I then used a gooseneck kettle to pour water into the pigtail. At first the boiling water drained very slowly, but by the second pot I was able to empty the entire pot into the pigtail at a high rate of flow without it backing up. I believe the pigtail is now clean, although I wish I could confirm that visually.
I then reattached the pressuretrol and intentionally attempted to put the system into an overpressure situation by setting the thermostat high and waiting for all radiators to get hot. It became clear that the pressuretrol was not going to break, so I shut down the system.
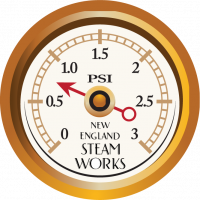
My next step will be to install on the pigtail a vaporstat and a 0-5 psi gauge (couldn’t find 0-3). While I realize a vaporstat is unnecessary with a one pipe system, honestly pressuretrols aren’t that much less expensive and I like the idea of being able to have more granular control over the pressure. The gauge will allow me to finally monitor the actual pressure in the system.
I write this because there may be others out there in similar situations. It’s very frustrating to me how little my contractors know about steam heat. Whoever installed it literally didn’t read the manual and set my boiler up to possibly explode or crack some day. My neighbor's near boiler piping is installed in a way that goes against what is in the manual and is literally an example of a thing to never, ever do in one of Holohan's book's.
Despite yearly cleanings no one has ever cleaned the pigtail, or tested the pressuretrol. I know I have main venting problems, but I don’t know how to tap cast iron, and that’s not something I want to mess up, and it’s clear that there are no contractors around me who sufficiently understand how the system works to be able to help me.
I love steam heat. It’s all the benefits of wood heat without the drawbacks. I believe when I’m finally done with this project of fine-tuning my system I will save money. But it’s disturbing to think how long this was the way it was (the boiler was installed 30 years ago!) and how may other people may be out there with incorrectly wired controllers, clogged pigtails, and broken pressuretrols. Hopefully this information will help someone, and I’ll continue to update as this progresses.
As I’ve mentioned in a previous post, I am in my third season with my old one pipe steam heat system in my mid-1800s house. When I first purchased the house, I learned about Dan Holohan’s books, and proceed to purchase and read all of them. I wanted to be sure I was going to be able to have my system run as efficiently as possible, and, frankly, it's just fascinating stuff.
It was obvious to me pretty quickly that the system was wonky. For one, there was no insulation on any pipes. For another, it uses a odd version of dry returns. The radiators were not properly tilted; the vents were old and failing. I was able to tune things up well, but it still continued to have long burn times and high heating bills.
Things came to a head this winter. We decided to install an Ecobee smart thermostat because our upstairs rooms get uncomfortably warm. Like, it interferes with our sleep, and tried every suggestion to try to make those radiators not as hot. Nothing worked.
The Ecobee has sensors that allow us to base the nighttime temperature on our bedroom rather than at the thermostat. This, in effect, is a nighttime setback. I know nighttime setbacks are controversial in the steam world due to the fact that it allows the system to cool down too much and is more inefficient on start. However, this was a major comfort issue—we sleep significantly better now. Also, Ecobee allows you to collect data through beestat.io, and I was able to demonstrate that my runtimes were not longer with the nighttime setback (in fact, I believe I am saving on runtime).
(As an aside, another cool thing about the Ecobee is that it learns how the steam system continues to heat after the thermostat breaks, so it actually breaks before it hits the set point and allows the system to rise naturally to the set point. Pretty cool.)
However, this created a major problem each morning: while our upstairs stays very warm, our downstairs does not. It took a significant runtime to get the system going in the morning, and I started noticing that the system was still running despite the fact that all radiators were fully hot. This made me realize that it was putting itself into an overpressure situation. I knew that an overpressure situation should be stopped by the pressuretrol, and so began to investigate that.
I detailed this in another post, but long story short, how my burner controller works is that it needs power to the limit terminal and the TT terminal to ignite and maintain flame. The idea here is that the low water cutoff and the pressuretrol are wired in sequence from the main power to the limit terminal, so if either breaks, it shuts off the boiler. In looking at the wiring, I learned whomever installed it wired the limit terminal directly to the main power, thus defeating every safety measure of the system. I rewired the system properly and confirmed via physical manipulation of the pressuretrol switch that the controller now operates as intended.
However, the system continued to put itself into overpressure situations. So I thought I had a clogged pigtail. Problem is that despite getting the pressuretrol off, I am unable to get the pigtail off the boiler. After learning this, I proceeded to try to ram every small, slightly flexible piece of metal in my house through the pigtail. I then used a gooseneck kettle to pour water into the pigtail. At first the boiling water drained very slowly, but by the second pot I was able to empty the entire pot into the pigtail at a high rate of flow without it backing up. I believe the pigtail is now clean, although I wish I could confirm that visually.
I then reattached the pressuretrol and intentionally attempted to put the system into an overpressure situation by setting the thermostat high and waiting for all radiators to get hot. It became clear that the pressuretrol was not going to break, so I shut down the system.
My next step will be to install on the pigtail a vaporstat and a 0-5 psi gauge (couldn’t find 0-3). While I realize a vaporstat is unnecessary with a one pipe system, honestly pressuretrols aren’t that much less expensive and I like the idea of being able to have more granular control over the pressure. The gauge will allow me to finally monitor the actual pressure in the system.
I write this because there may be others out there in similar situations. It’s very frustrating to me how little my contractors know about steam heat. Whoever installed it literally didn’t read the manual and set my boiler up to possibly explode or crack some day. My neighbor's near boiler piping is installed in a way that goes against what is in the manual and is literally an example of a thing to never, ever do in one of Holohan's book's.
Despite yearly cleanings no one has ever cleaned the pigtail, or tested the pressuretrol. I know I have main venting problems, but I don’t know how to tap cast iron, and that’s not something I want to mess up, and it’s clear that there are no contractors around me who sufficiently understand how the system works to be able to help me.
I love steam heat. It’s all the benefits of wood heat without the drawbacks. I believe when I’m finally done with this project of fine-tuning my system I will save money. But it’s disturbing to think how long this was the way it was (the boiler was installed 30 years ago!) and how may other people may be out there with incorrectly wired controllers, clogged pigtails, and broken pressuretrols. Hopefully this information will help someone, and I’ll continue to update as this progresses.


3
Comments
-
Thank you for all that!Br. Jamie, osb
Building superintendent/caretaker, 7200 sq. ft. historic house museum with dependencies in New England2 -
If you have a drill you can drill and tap the pipe or fitting to add vents. Maybe you want to wait untill summer to do this.
Did you try posting your location? Maybe this was already suggested.
The first step is to find out the vents you need.
Then find someone to drill and tap if you don't want to or can't find a contractor.
Maybe someone knows a machinist or auto mechanic or plumber or electrician those trades are familiar with drills and taps.0 -
-
This is a thing to think about.
The radiators on the top floors are too big.
Typically in one pipe steam systems when radiators are sized the top floors usually require smaller radiators than the lower floors.
Heat rises therefore smaller radiators would be used.
Not talking about houses with giant rooms upstairs.
JakeSteam: The Perfect Fluid for Heating and Some of the Problems
by Jacob (Jake) Myron
 2
2 -
@Jamie Hall: Thank you for all the help over the years!
@EBEBRATT-Ed: I live in Vermont. The closest folks who do steam are in New Hampshire. I haven’t hit the point of having to call them yet, I may do so this summer to see if I can get them to do an evaluation. I’m also hopeful I can convince the local plumbing contractor to just do what I tell them and stop asking me why.
@Mad Dog_2: We need you here in Vermont!
@dopey27177: They actually are much smaller radiators than in the downstairs. I think there’s basically two problems that does this, 1) the main venting is all messed up with the longest run being very slow. I need to vent that. 2) my downstairs has nearly 12 foot ceilings. So all the heat goes to the ceiling and so it feels colder downstairs than it is. I need to install ceiling fans to push that heat down do where we (and the thermostat) are.0 -
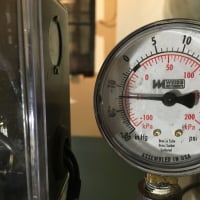
1. Not to be a spoiler, but code requires the 30psig gauge. If you add a low pressure gauge, it should be isolated when it is not attended unless it can handle the relief valve set pressure of 15psig. Lots of comments elsewhere about this subject.
2. See the current discussion about ceiling fans on HH.
3. I'm not sure if drilling and tapping pipe or fittings to directly connect a vent is allowed by the code. I know there are saddle tees and maybe some other devices that may be allowed. Does anyone know about this? It's a potential liability/insurance issue if something happens.1 -
@SteamingatMohawk: Yep, I’m aware of the insurance issues with the 30 psi gauge. According to the vaporstat instructions, you can put a T off your pigtail and mount the vaporstat on one part of the T and the gauge on the other part, so that’s how I’ll be doing it.As to your other points, that’s why I want to get a professional involved. Tell them what I want to do and have them do it in a way that is acceptable from a code/insurance standpoint.1
-
There is enough radiator in my upstairs bedroom to make it uncomfortably hot and could probably sufficiently heat the room with the windows open in winter. We used to just keep it turned off but a Ventrite #1 set at one of the lower settings controls it just fine.0
-
Steam at Mohawk. I would NEVER drill and tap a natural gas pipe or fitting, but I have done it thousands of times on low pressure steam and even hot and cold domestic water risers. Many times, because of asbestos pipe covering, I'm going to avoid a big expense by drilling and tapping rather than an expensive abatement and a cut out and repipe of a section of main. This is the choice: option 1) We drill and tap for $400 bucks OR option 2) we get asbestos abatement, air monitoring before during and after AND THEN cutting in a tee on a tight main with no flex. $2500-$3200. SAVE $2100 AND ACHIEVE same goal, EVERYONES GOING To go for that.
I've drilled and tapped boilers hundreds of times and even drilled out and brazed in to TP (threadless brass pipe) and schedule 40 screw brass risers when I had no play in the
Riser or money was an issue. Are you supposed to? Will it void warranty? Allowed to do it? Nope, but what I have found is that
The plumbing and heating contractor gets Married to these jobs once you go all in..you're the one they are going to keep calling when there's problems. Not the manufacturer or original installer. Would I do it on a new boiler?, only if homeowner signed of on it. Once a boiler or piping is 10yrs old, the warranty is over anyway and now your married to it. If I know in my heart of 💕 Hearts that there is ZERO danger to the public, I can save client a alot of $$ and its going to solve the problem l, I'll take the liability. Never had an issue in close to 40 years. Mad Dog 🐕
 2
2 -
@Mad Dog_2 From a "structural" point of view, I completely agree that drilling and tapping can physically be done with no integrity issue for the low pressures ( <=2psig operating pressure and 15 psig relief valve setting) we talk about in steam heat systems.
With a maximum temperature of about 250F (saturation temperature for 15psig steam) there are multiple materials that can withstand the conditions. (Temperature change cycles aside) It seems to me a saddle tee with appropriate fasteners and gasket material, like EPDM, will work. Saturation temperature at 5psig is about 225F. If it can be used at fire protection system temperatures, it should be OK with the proper gasket material for the slightly higher temperatures.
Although not necessarily "advocated", items like JB Weld have more than enough temperature and pressure capability to repair/seal. But I wouldn't just gob a blob of it on a hole in a pipe, even though the company mentions drilling and tapping (obviously this concept depends on the operating conditions for the usage).
I also understand the $$ issue. Some times, I think it is overblown for the occasional situation, but mesotheliomia can be a killer for the folks that work it every day.
 2
2 -
One final point of reference, doing any of these "non-standard" things has to depend to a large degree on the size, weight, loading, thermal movement and all other considerations before taking the plunge. Advocating for a saddle tee for a vent line is obviously quite different from using the same on a 50 foot run of 2 inch pipe that heats up and cools down with each heating cycle.
I should have qualified my above statements.0 -
My experience with every saddle tee I've found in a steam line is that the rubber gasket leaks badly and has to be replaced.0
-
Was it with EPDM or the standard rubber gasket material intended for hot water? My understanding is that at small-ish residential pipe sizes the EPDM gasket tends to be special order.Long Beach Ed said:My experience with every saddle tee I've found in a steam line is that the rubber gasket leaks badly and has to be replaced.
I was going to special order a saddle Tee to install at the end of one of my mains because the spot can't be fitted for a main vent easily and a saddle Tee would do the job. If I recall the standard gasket has a max temp of 180F and the EPDM was something like 250F.
Just curious.0 -
I wouldn't install one, so those I worked with were old work. I presume EPDM wasn't around when these were installed and they used the old pink sheet rubber gasket material, usually back in the 1950s. By the time I came along it was shot and leaked. We cut them out and thread new pipe and fittings when we find them.
I would hate to have to use something like that, but if I did, I would look at the specs for EPDM. I'd use the best I could find. The problem is that "saddle tees" aren't sold for quality work so I'd probably have to take what I could get.0 -
I used a Victailic.Tap saddle on my first dormer bathroom when I was a 2nd yr Apprentice. I didn't own a Ridgid 700 or any threading dies so.my older fireman mentor handyman told me to use a saddle and get all the pipe cut. It worked fine. Saw it 20 yrs later. No leaks. I made good $ on it and spent it all on more tools that I would need for the next one. I did it all in NH because NYC wasn't allowing ANY pvc
Yet. Mad 🐕 Dog0 -
I know they make nice saddle tees now with built-in gaskets that fit tight. But everything I've seen out there was ancient hardware store junk with a sheet of pink rubber as a gasket. That rubber turns to rock, just like it seems to on hot water coils.0
-
You can use a saddle tee with confidence as long as you use a reputable brand and get the EPCM gasket, which is usually an optional upgrade, see for example: https://www.jcmindustries.com/product/model-402/. Be sure to order the optional EPDM gasket which is rated for steam temperatures, the normal rubber gasket will not last. This is a pretty easy install, but many here believe it is better to cut and thread in a T instead. That said, I have installed two Big Mouth vents in 2-1/2" steam mains using similar service saddles about 8 years ago and am very happy. Below is a picture of one in finished space. While this solution may not last 100 years like installing a threaded tee in the seam main, it certainly is easier and within the capabilities of most handy persons. And, far superior to simply drilling and tapping a hole, which often does not provide enough wall thickness to allow a tight fitting threaded connection for the vent, particularly the larger size vents.

1 -
1. Installing large capacity main venting should be your first priority. That might well solve your problem, and will certainly save a lot on fuel expense.
2. Sounds like you've already insulated your pipes. If not, do that too. With 1".
3. If main vents don't solve your problem, then add TRVs to the upstairs radiators. That will do the trick.
4. We never tap or use saddles. Too weak and undependable. With the right equipment, it's just as quick to cut in a tee and do it right and permanent.New England SteamWorks
Service, Installation, & Restoration of Steam Heating Systems
newenglandsteamworks.com 3
3 -
Like I said earlier, it's not a great idea for larger pipes, just small lines for vents that won't have much stress, etc. on the fitting.
Here's the label for the gasket I used.
Here's a photo of the setup, but I now have only one vent tied in.
1 -
Very cool. Before I could afford a Ridgid Rachet Snap cutter, I tied in (against code- 1st yr Apprentice) I was told by my Fireman Handyman mentor to just use Tap saddles and rainbow 🌈 rubber gasket. They even made neat ones on a 45 creating a wye connection that was a little more like a "sanitary " connection. Mad 🐕 Dog0
-
I might do that next time with the Victailic.Tap saddle. If not just for the greater air volume you'll have
Mad 🐕 dog0 -
My take on it is I really haven’t met the end of a steam main that I would chose to use a saddle tee on unless it was over 2 1/2 inch and in a close to impossible space and even then w a grinder and small chisel nothing is impossible . As for cost of a saddle and any future issues w gaskets I thinks it just as easy to add a real tee and at worse a union or two or a pair of companion flanges to get it back together or just use a weld o lite fitting and call a welder in which case the cut and threading is cheap . Then again this is me and I’m a bit old school in a lot of ways being most of that old time stuff has ridden the test of time this cannot be said for what’s being spewed out by future hopes .
Peace and good luck clammyR.A. Calmbacher L.L.C. HVAC
NJ Master HVAC Lic.
Mahwah, NJ
Specializing in steam and hydronic heating1 -
I think we all are somewhat in agreement. Doing it right is best, then there are pluses and minuses with each option, whether it is safety, structural, arrangement, longevity, money and/or expediency.0
-
@New England SteamWorks Do you know anyone reputable serving western Vermont? I looked at your webpage and your comments here and you clearly know what you’re talking about. You’re the closest steam heating company I’ve found, so I’m hopeful you know someone closer. Thanks!0
-
I'm in Western Vermont sometimes. What Town? Bennington? My Buddy lives there. Another in Burlington . I can fit it in during a upcoming winter visit. This will save you all the travel time I'd have to get. Glad to Help if I can. Mad Dog.0


Categories
- All Categories
- 87.7K THE MAIN WALL
- 3.3K A-C, Heat Pumps & Refrigeration
- 59 Biomass
- 430 Carbon Monoxide Awareness
- 128 Chimneys & Flues
- 2.2K Domestic Hot Water
- 5.9K Gas Heating
- 121 Geothermal
- 170 Indoor-Air Quality
- 3.8K Oil Heating
- 79 Pipe Deterioration
- 1.1K Plumbing
- 6.6K Radiant Heating
- 396 Solar
- 16K Strictly Steam
- 3.5K Thermostats and Controls
- 56 Water Quality
- 51 Industry Classes
- 51 Job Opportunities
- 17 Recall Announcements