Welcome! Here are the website rules, as well as some tips for using this forum.
Need to contact us? Visit https://heatinghelp.com/contact-us/.
Click here to Find a Contractor in your area.
If our community has helped you, please consider making a contribution to support this website. Thanks!
Metal strips back of steam radiator?
Options

franzsf
Member Posts: 13
Long time listener, first time caller. Really appreciate all the advice on this site; we moved into a house with one-pipe steam last year and I've spent that time tweaking the system. Almost runs like butter now.
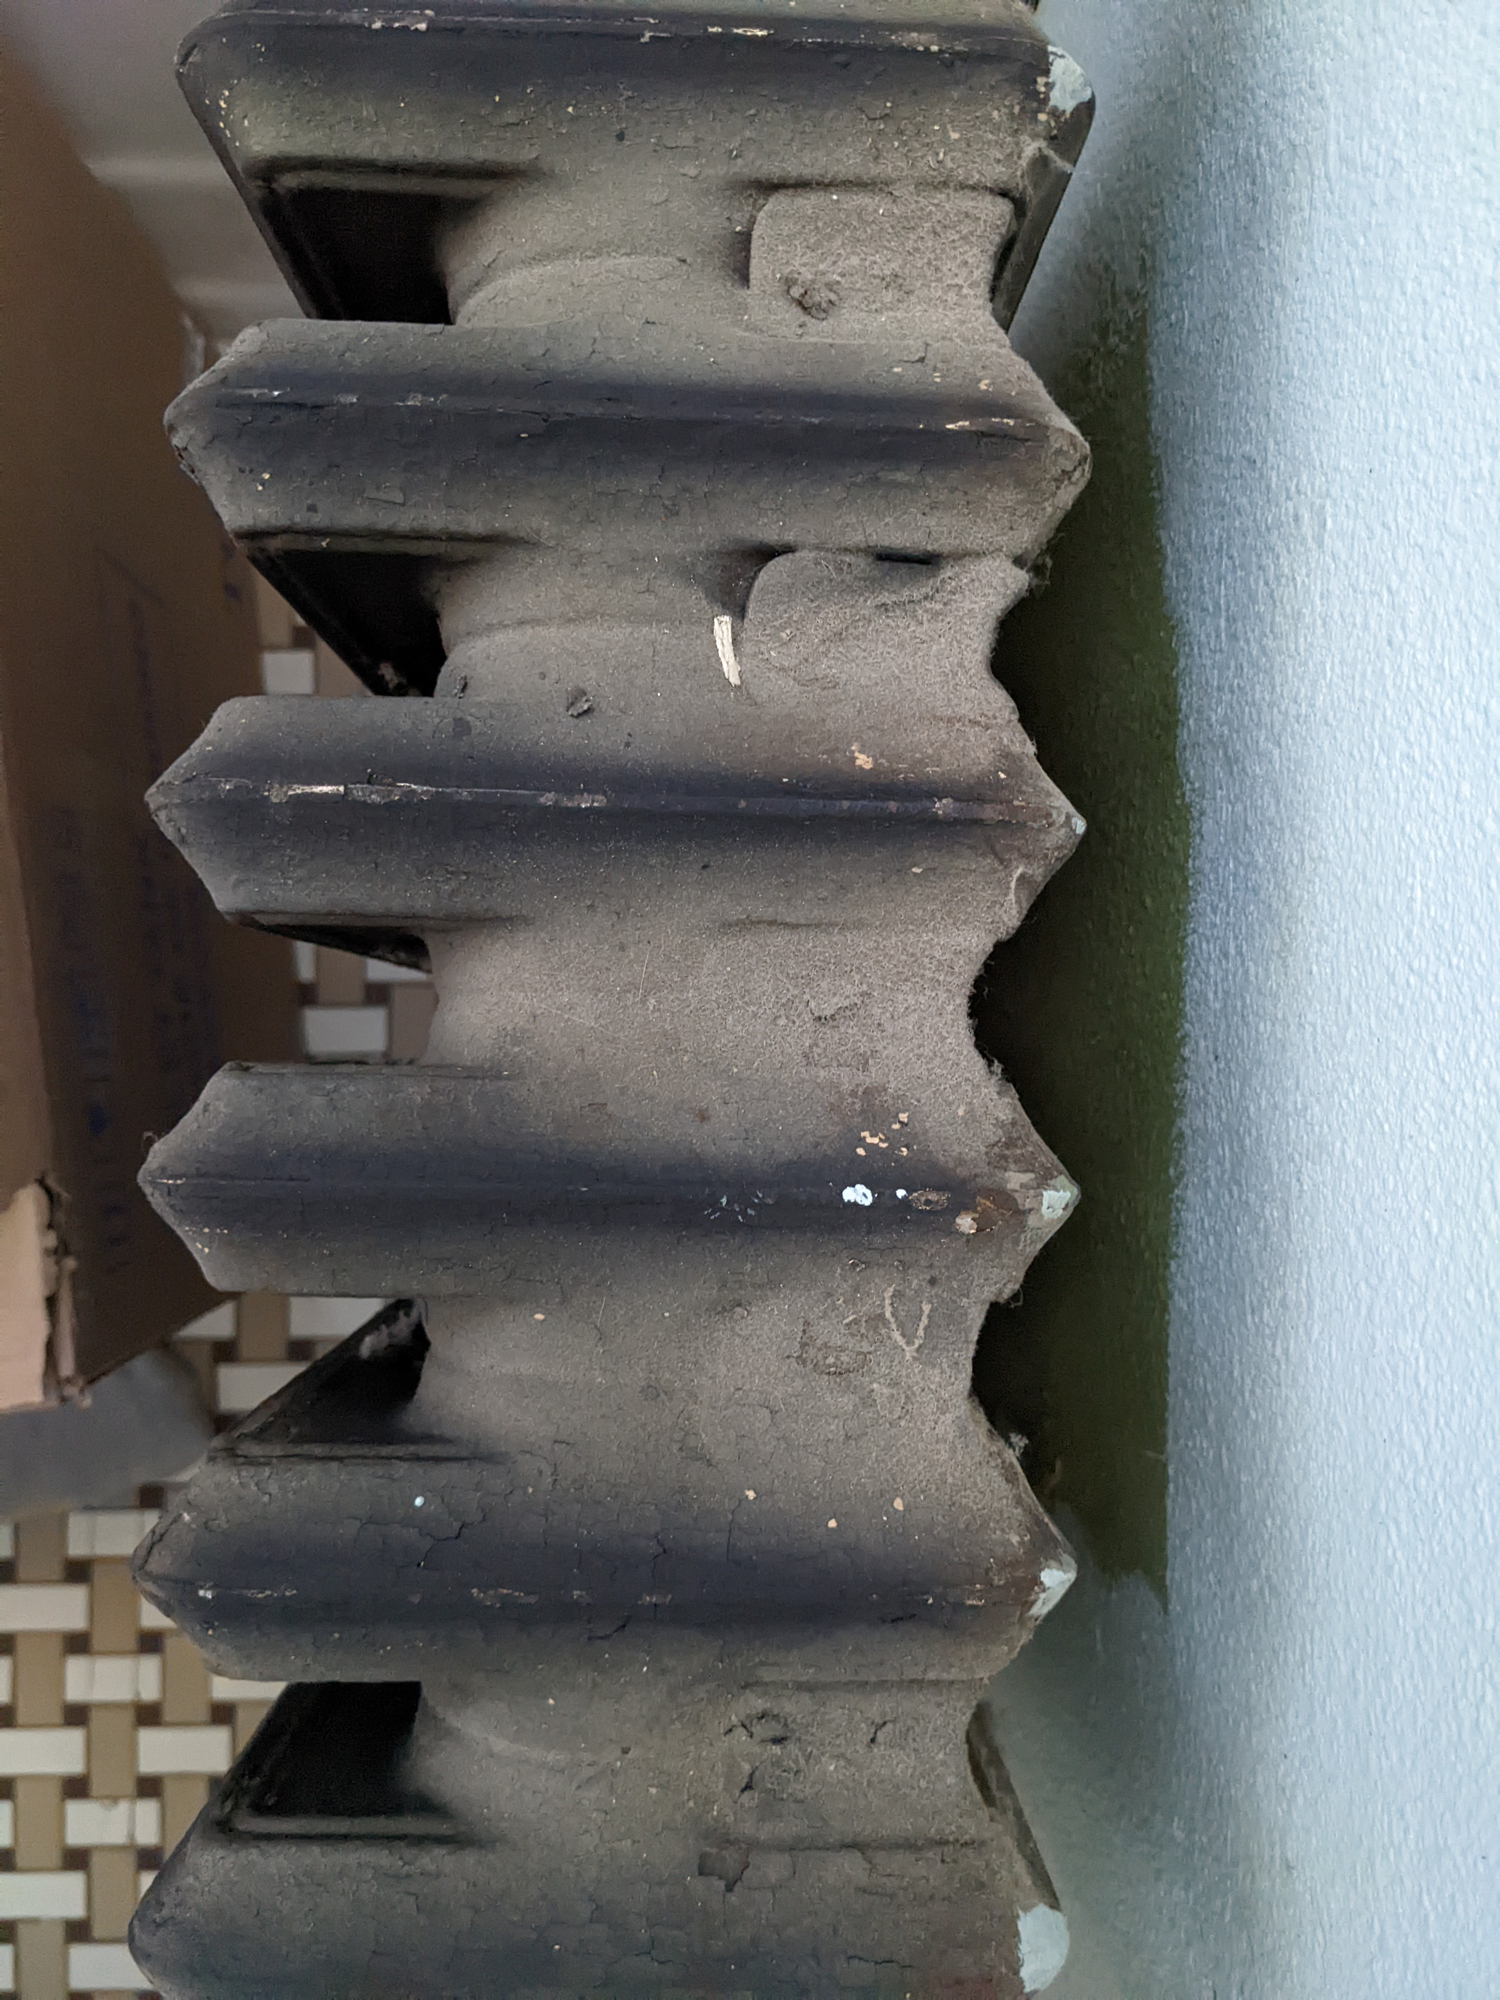
Has a question about (a) the function of these metal "strips" attached between the backs of the columns on most of our radiators and (b) if its a bad idea to remove them if we're intending to repaint and then rotate a radiator 90 degrees during a bathroom remodel.
I suspect the answer has something to do with trying to keep heat away from the wall? Or maybe something to do with convection.
Pictures of the rad in question. The rad will be rotated 90 degrees towards the bottom left of the frame of the first picture, so the metal strips will be on the new front.
Thank in advance for any insight.
0
Comments
-
That's a new one for me... but that's a pretty ordinary radiator otherwise, and I expect you can remove those...Br. Jamie, osb
Building superintendent/caretaker, 7200 sq. ft. historic house museum with dependencies in New England0 -
Another inventor has left his mark on the world. If we only knew what the dead man had in mind when this was done. Perhaps the wall paper around the radiator was being discolored by the heat currents passing by the wall at a different rate than the rest of the wall.
I think a dead wallpaper hanger asked a dead sheetmetal worker to make them for the dead steamfitter so the dead homeowner would stop complaining about the need to replace wallpaper every 3 years. Is there any wallpaper behind that blue paint?
OR NOT?
i agree with @Jamie Hall ... rip 'em out
Mr.EdEdward Young Retired
After you make that expensive repair and you still have the same problem, What will you check next?
 1
1 -
Nope. Paint is on plaster which is directly applied to the structural clay tile of the exterior wall (with brick veneer on the outside). I'll try prying one off and go from there. Thanks!0
-
Do they extend down the back of the rad?
They may have been used as a rear reflector to push more radiant heat out the front.
It seems like they would cut down on the convection thru that back part, maybe to save the wall above?
It looks like they just snap in place.0 -
Maybe the radiator is oversized for the room and someone was trying to reduce the output. Do they go all the way down the back?0
-
Yep, they go all the way down the back, in these grooves on either side of each column. After attempting to remove one from the top, I think it'll be easier to tap them out from the bottom, with the rad on its side.
Edit: I should note these seem to be on all our rads, so its not a one-off.0 -
They’re meant to block the radiant heat toward what is probably an uninsured wall. You can remove them.Retired and loving it.0
-
Radiators are in reality primarily convectors. I would be negligible I suspect, the reduction in the amount of radiant heat going to the wall by radiation as those metal strips are also metal themselves and there’s no air gap between it an the radiator. It encloses the radiator partially mike some recessed wall convector radiators. They mainly would reduce vertical air flow out of the radiator and therefore reduce its capacity. I’d guess about 25% or so.0
-
Thanks to everyone for their thoughts. I managed the get the strips off pretty easily by starting cuts at the bottom with a Sawzall. 95% slid out within seconds due the vibrating action of the saw alone.
I did have a followup question about the type of radiator construction, and whether or not power-coating would be a bad/good idea.
All the radiators in the house are Crane, likely 1930s, manufacture. The only documentation I can find online is this promotional pamphlet: https://www.historicnewengland.org/explore/collections-access/gusn/314219/ which isn't very helpful.
Since there are no threaded rods going down the length of the radiator, I am assuming these aren't push-nipple construction? Are they threaded together? Gasketed? If I go the powdercoating route, are there any issues there? Any tips on how to handle the rad so as to not have it leak?
Thanks in advance! 0
0 -
Well... I'm a conservative sort of person, and I wouldn't care for heating up something for powder coating unless I knew for certain what, if any, gasketing was used.
In fact, if I could get them out of the house, I'd have them sandblasted, sprayed with a good primer, and then sprayed with a top of the line acrylic (such as Benjamin Moore Aura) in whatever colour was wanted.Br. Jamie, osb
Building superintendent/caretaker, 7200 sq. ft. historic house museum with dependencies in New England0 -
Definitely considering, and there are a lot of good threads here on the refinishing issue.
I wish I had time to wire brush and paint myself, but as you might gather from the picture, I have skim coating, trim carpentry and finish painting to do on the room itself ... and all on my vacation time ...")
Anyway, just not sure if there are additional risks here with this kind of radiator construction.0 -
@mattmia2 said:Maybe the radiator is oversized for the room and someone was trying to reduce the output...........and I agree. Either the radiator was oversized, they added more insulation or someone made a mistake on the heat loss calc's. You may end up putting TRV's on some of those radiators, especially if you are adding insulation and/or replacing the windows.
I think moving those radiators around too much for powder coating would torque them and then you've got a leak that's hard to fix.8.33 lbs./gal. x 60 min./hr. x 20°ΔT = 10,000 BTU's/hour
Two btu per sq ft for degree difference for a slab0 -
If there are no rods then there are left-right nipples that screwed in between the sections with a spud wrench through the core.
 1
1 -
These should clean up fairly easily because there's plenty of space between the sections. Harbor Freight sells a wire brush that's perfect for radiators. I have a bunch of these, including one that I adapted to work on my reciprocating saw.
You don't need to get the surface pristine. As long as all the loose paint, dirt and rust is removed, the paint will stick. The most important thing is to wipe the surface with a damp cloth to remove all the fine dust.
I've had very good luck with Rust-Oleum High Heat paint. It's good to 1,200°F, doesn't give off a paint smell when it gets hot, and it doesn't require a primer. Just don't use the stuff that's made for engines—I've heard it smells terrible.
Maybe I'm just biased because the previous homeowners slopped multiple coats of interior house paint all over my radiators that I found peeling off in huge flakes, but I'm not a big fan of using house paint on radiators. To me it just makes sense to use a paint that's formulated for hot metal and resists rust.Just another DIYer | King of Prussia, PA
1983(?) Peerless G-561-W-S | 3" drop header, CG400-1090, VXT-24 2
2 -
Just as a followup, for anyone who's interested. Here's what I ended up doing:
- Had Five Men and No Truck move rads downstairs with an appliance dolly and place them in a utility trailer:
- Sawzalled off all the metal strips and hauled to local sandblasting company.
- Sandblaster also applied high-heat primer to prevent immediate rusting (in retrospect, I should have gotten white primer due to the lighter finish coats).
- Due to scheduling SNAFU with movers, rads had to sit outside in utility trailer for a week. Covered them up with a tarp, but some surface rust developed in places despite the primer coat.
- Four Men and No Truck took the rads back upstairs, in a room I was remodeling.
- Sprayed Ospho on the areas with minor surface rusting and waited 24 hours.
- Painted the rads with Duplicolor high-heat engine enamel ("Universal White"). Worked pretty well, but the application timeline (all coats within 1 hour) was stressful on some of the bigger radiators. Using the EDR to estimate the number of cans required resulted in an underestimate. I needed more coats due to the white paint on dark gray primer.
- Bought some cheap casters to put under the radiator feet to move rads to their original locations. Cleaned up union connections and re-tightened.
- So far, so good. They definitely have outgassed, but the smell is fading. No detectable leaks. The finish seems to have hardened more after the initial heating.
- Here's the bathroom rad from this post:
- And here's the rad from the bedroom (which is now finished).
In retrospect, Mistakes were Made, but overall things turned out ok. Thanks for all the advice on this forum!0 -
I have about 100 layers of paint on my radiators. I have thought about plugging the radiators up and putting it in a cheap kids pool and using electrolysis to remove the paint and rust. But that might be more of I science project than I am prepared to handle...
Those radiators look great!0


Categories
- All Categories
- 87.7K THE MAIN WALL
- 3.3K A-C, Heat Pumps & Refrigeration
- 59 Biomass
- 430 Carbon Monoxide Awareness
- 128 Chimneys & Flues
- 2.2K Domestic Hot Water
- 5.9K Gas Heating
- 121 Geothermal
- 170 Indoor-Air Quality
- 3.8K Oil Heating
- 79 Pipe Deterioration
- 1.1K Plumbing
- 6.6K Radiant Heating
- 396 Solar
- 16K Strictly Steam
- 3.5K Thermostats and Controls
- 56 Water Quality
- 51 Industry Classes
- 51 Job Opportunities
- 17 Recall Announcements