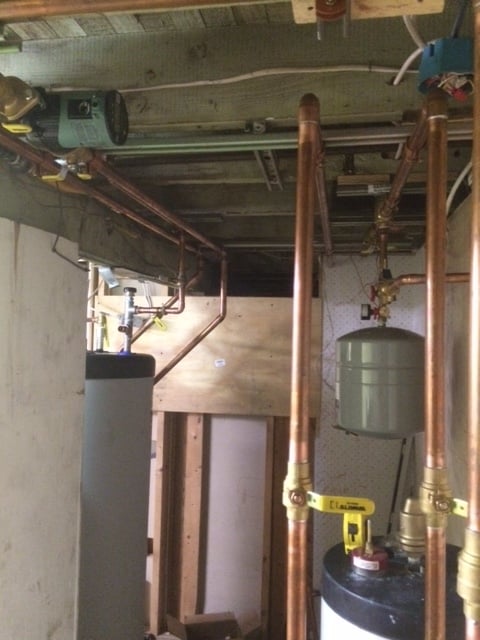
finally piped (pictures) ... now ... what? controls...

Second, I'm mostly pleased with how it turned out. Still need to figure out how to pressure test it. Tomorrow I'm finishing the system pump & manifolds [Caleffi 668S1 @hot rod can I reverse the drain & air separator and turn them around so the pex feeds up instead of down?
So... uh ... it occurred to me that I'm missing brain cell or two regarding controls. I decided that I would run the ∆P system pump 24/7 until WWSD by using the ODR inherent to the boiler (Lochinvar KHN), mounting the outdoor sensor and programming the ODR limits. Then, program the system circ for WWSD instead of CFH so that it runs 24/7 until WWSD [I think this ignores the heat/demand loops 1-3, if not I can jumper them]. That all seems simple & straight forward to me but am I right?
But how do I control the temperature in the buffer tank (boiler buddy)? ... I think I should use the system supply sensor that came with the boiler and connect it to its system sensor terminals, but it is too small for the boiler buddy's control well. Shoving it in the wrong size well seems crude. Should I ditch the boiler buddy's well? I could maybe use a 3/4 x 1/4 bushing and then use the system supply sensor; I have zero faith that I can tighten the bushing into the tank enough due to the insulation.
And can someone point me in the right direction on wiring up the thermostats and actuators (#6564 not purchased yet) - one actuator for each bedroom. I figure I get a 24v transformer, four T87 thermostats, the actuators, and wire them all up. Or do I need to buy a Taco control box thing? ... I believe this would all be totally independent of the boiler, except maybe I can take 24v off the boiler but probably not enough power for all that. And our general contractor will be putting in space pak A/C in a few months [I've had enough of this] so ideally I'd rather not use the T87 if there is a thermostat that can work both heat & cool.
Thanks for pointing me in the right direction.
Boon
My biggest gripe is that I delayed wiping off some excess thread sealant on the buffer tank tees and now it is harder to clean off. If something looks off-plumb I swear it is the angle of the photo or a few of the strut hangers aren't tightened.
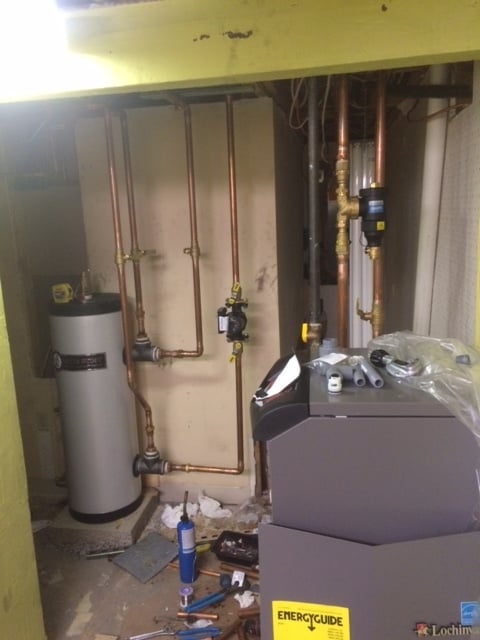
Manifolds will go on the wall where the partial plywood is hanging. Need to put up more plywood.
Comments
-
And I need to give a bigger shout-out to my wife because she hung ALL the radiators throughout the house while I was doing the piping.
For the life of me I have no idea how I'm going to manage to get the pex into these without destroying the wall. On one hand, I want to be surgical about it. On the other, I want a nice big open space in which to work.

DIY'er ... ripped out a perfectly good forced-air furnace and replaced it with hot water & radiators.
 2
2 -
Boon said:
Hey folks, First ... Cheers to y'all who do this routinely, and do it well. Piping this was ... challenging at best, soul crushing at the worst. 50+/- hours in four days with a couple hours of help from the wife.
Second, I'm mostly pleased with how it turned out. Still need to figure out how to pressure test it. Tomorrow I'm finishing the system pump & manifolds [Caleffi 668S1 @hot rod can I reverse the drain & air separator and turn them around so the pex feeds up instead of down?
So... uh ... it occurred to me that I'm missing brain cell or two regarding controls. I decided that I would run the ∆P system pump 24/7 until WWSD by using the ODR inherent to the boiler (Lochinvar KHN), mounting the outdoor sensor and programming the ODR limits. Then, program the system circ for WWSD instead of CFH so that it runs 24/7 until WWSD [I think this ignores the heat/demand loops 1-3, if not I can jumper them]. That all seems simple & straight forward to me but am I right?
But how do I control the temperature in the buffer tank (boiler buddy)? ... I think I should use the system supply sensor that came with the boiler and connect it to its system sensor terminals, but it is too small for the boiler buddy's control well. Shoving it in the wrong size well seems crude. Should I ditch the boiler buddy's well? I could maybe use a 3/4 x 1/4 bushing and then use the system supply sensor; I have zero faith that I can tighten the bushing into the tank enough due to the insulation.
And can someone point me in the right direction on wiring up the thermostats and actuators (#6564 not purchased yet) - one actuator for each bedroom. I figure I get a 24v transformer, four T87 thermostats, the actuators, and wire them all up. Or do I need to buy a Taco control box thing? ... I believe this would all be totally independent of the boiler, except maybe I can take 24v off the boiler but probably not enough power for all that. And our general contractor will be putting in space pak A/C in a few months [I've had enough of this] so ideally I'd rather not use the T87 if there is a thermostat that can work both heat & cool.
Thanks for pointing me in the right direction.
Boon
My biggest gripe is that I delayed wiping off some excess thread sealant on the buffer tank tees and now it is harder to clean off. If something looks off-plumb I swear it is the angle of the photo or a few of the strut hangers aren't tightened.
Manifolds will go on the wall where the partial plywood is hanging. Need to put up more plywood.
Here is the fix for inverting the manifolds. The vent and drain are installed with Loctite 545 and can be disassembled. I think Graingers and others sell these small 545 tubes to replace the parts, clean out the fitting with a 1/2" fitting brush to get the dried Loctite out, same with male threads.
You can make a reducer for the Boiler Buddy well to take that Lochinvar sensor. Is it a 6mm, about 1/4" diameter sensor from Lochinvar?
I would highly recommend a wiring relay like this.
It cleans up all that wiring and has some nice pump priority functions if you chose to use them. With this brand you do not need to watch a wire nut and pigtail tutorial, it is all terminal connections.
I
http://www.caleffi.com/sites/default/files/file/01286_16_na.pdfBob "hot rod" Rohr
trainer for Caleffi NA
Living the hydronic dream1 -
Happiness truly is a warm radiator next to the toilet.
You're going to love this setup once you've got it all running. I wish I could help with your questions but this stuff is out of my zone.
Looks good so far, keep it up!
Single pipe 392sqft system with an EG-40 rated for 325sqft and it's silent and balanced at all times.
2 -
Looking good. I like your indirect/2 pipe, short oversized headers!
Was wondering if there was a better way then bushing it down.There was an error rendering this rich post.
0 -
Nice! I just put the ZVR and 545 in the shopping cart.Is it a 6mm, about 1/4" diameter sensor from Lochinvar?
Yes. That's it. It slides into a 1/4" NPT brass well that was also included with the boiler. It also came with a 3/8" OD aluminum ferrule that I'm guessing is for adapting the sensor to a different sized well, which I'm trying to source now.
DIY'er ... ripped out a perfectly good forced-air furnace and replaced it with hot water & radiators.0 -
Most residential systems use 3/8" sensors. Is the Boiler Buddy larger than that when you get down into the well? The opening at the top is not necessarily representative of what lies beneath it.1
-
If it is a standard US sized well, what I found is
3/8" OD copper tube fits snuggly inside.
5/16" OD copper fits nicely inside the 3/8 tube
and the sensor is a snug fit inside the 5/16" tube
A Russian nesting doll solution!. A dab of transfer grease never hurts, silicone grease in a bind.
I'd be glad to mail you this piece, no sense in buying a coil of tube for one well adapter.
I make the sensor wells for our solar collectors this way. Most all Euro based controls use that 6 mm sensor diameter.
Bob "hot rod" Rohr
trainer for Caleffi NA
Living the hydronic dream1 -
Boom! The 3/8" (+/-) ferrule that was included drops/slides way down in there - a little loose, actually, but if it were any larger I'd be complaining it was too tight. I think I can use this as-is, Bob, but thanks for the offer.
I can hardly wait to discover what else I overlooked.
DIY'er ... ripped out a perfectly good forced-air furnace and replaced it with hot water & radiators.0 -
I'd love to buy a box of those ferrules. Might have to see what I can find in aluminum tubes.0
-
Nice work boon, what secondary pump did you choose? are you tempering the indirect i did i see an open t.0
-
Thanks. I'm waiting until after I pipe the radiators to select that pump. Yes, that open tee will feed a mixing valve that I can't pipe until I decommission the old water heater.DIY'er ... ripped out a perfectly good forced-air furnace and replaced it with hot water & radiators.0


Categories
- All Categories
- 87.7K THE MAIN WALL
- 3.3K A-C, Heat Pumps & Refrigeration
- 59 Biomass
- 430 Carbon Monoxide Awareness
- 127 Chimneys & Flues
- 2.2K Domestic Hot Water
- 5.9K Gas Heating
- 121 Geothermal
- 170 Indoor-Air Quality
- 3.8K Oil Heating
- 79 Pipe Deterioration
- 1K Plumbing
- 6.6K Radiant Heating
- 396 Solar
- 16K Strictly Steam
- 3.5K Thermostats and Controls
- 56 Water Quality
- 51 Industry Classes
- 51 Job Opportunities
- 17 Recall Announcements