Welcome! Here are the website rules, as well as some tips for using this forum.
Need to contact us? Visit https://heatinghelp.com/contact-us/.
Click here to Find a Contractor in your area.
If our community has helped you, please consider making a contribution to support this website. Thanks!
Prepping for in-slab radiant
Options

birch
Member Posts: 15
I have been here before asking about installing radiant in existing concrete and was thrilled with the educated responses. So, here we go again with a new project. I am remodeling an existing room. It is a 22 x 18 room. I have recently excavated the concrete slab and dug part (18x16) down for greater ceiling heights. I want to install radiant loop(s) to be set within the poured slab. I plan on running the loops and will hire a pro to connect to my boiler. The room currently does not have any heat as it was removed when gutted. I plan on installing a gas fireplace and radiant floors to be the heat sources. If my current boiler will not support the radiant, I hope to upgrade to a new system when funds allow. Here is my prep plan:
10 mil vapor barrier, 1" foam boards, 2" foam boards around the perimeter 6-12" below dirt and above slab, steel mesh layer out over foam, attach tubing to mesh
Questions:
Is my plan missing anything?
What type of underlying foam is recommended?
What type of tubing is required?
How many separate loops are recommended for this area (18x16)? The boiler is another 25' from the slab.
Can anyone give me specifics on the loops? Distance between tubing?
I will attach some pics of the space!
Cheers!
0
Comments
-
You'll want a minimum of 2" of foam under the slab. 2" is fine around the edge.
Most important thing is doing a heat load on the space and properly calculate your loop layout, spacing, ect..
You'll need a weather responsive mixing device to connect to that boiler. 1
1 -
Everything is predicated by an accurate heat loss. Once you have that, then it will dictate tube sizing, tube centers, flow rates, approach temperatures etc.
As for the foam, XPS is preferred over any other type of foam. (Blue, pink, green, take your pick so long as it is XPS versus EPS)
I'd suggest you contact a competent designer to have them perform the calculations for you.
As for tubing, you will need to use oxygen barrier type of tubing due to the nature of the other ferrous components in your system.
Placing your reinforcement mesh on adobe bricks (a.k.a. chairs) will keep the tubing nearer the top surface which lessens response time and also lowers the required water temperature.
We have a term called "future proofing" which means that for example, if the calculations are calling for tubing at 12" O.C., then by going with tubing at 9" or even 6" O.C., you can use it with solar, or ground source heat pumps, or hydrogen fuel cells. Consider that when you get to the final design.
ME 2
2 -
I downloaded the heat loss app but I don't know what boiler to choose? Can anyone tell what I have from the pic? All I know is that it is cast iron.
Also how would a thermo sensor be installed? Would it be set in the center within the slab? Can it be payed on top of the slab?0 -
Boiler size is also dictated by the heat loss. Do the whole house while you are doing the calculation. It would appear that you have either baseboard or cast iron radiators (based on near boiler piping). The new system depends upon the fuel you have access to. Looks like you are currently cooking with oil.
The lazy mans heat loss would be to figure out how much heat output you have, but it may not actually be the right amount.
If you've been comfortable, even at design conditions, then it is obviously large enough to handle the load. It may also be significantly oversized, and it if is, then that means you can operate at a lower temperature, which will equate to energy savings, but until you do both a heat loss and a radiation study, you will not know.
Your new radiant addition will require a means of mixing the water temperature down. Many ways of being able to do that, some better than others. A lot of it depends upon the contractors skill level and experience you will be dealing with.
Where are you located?
ME0 -
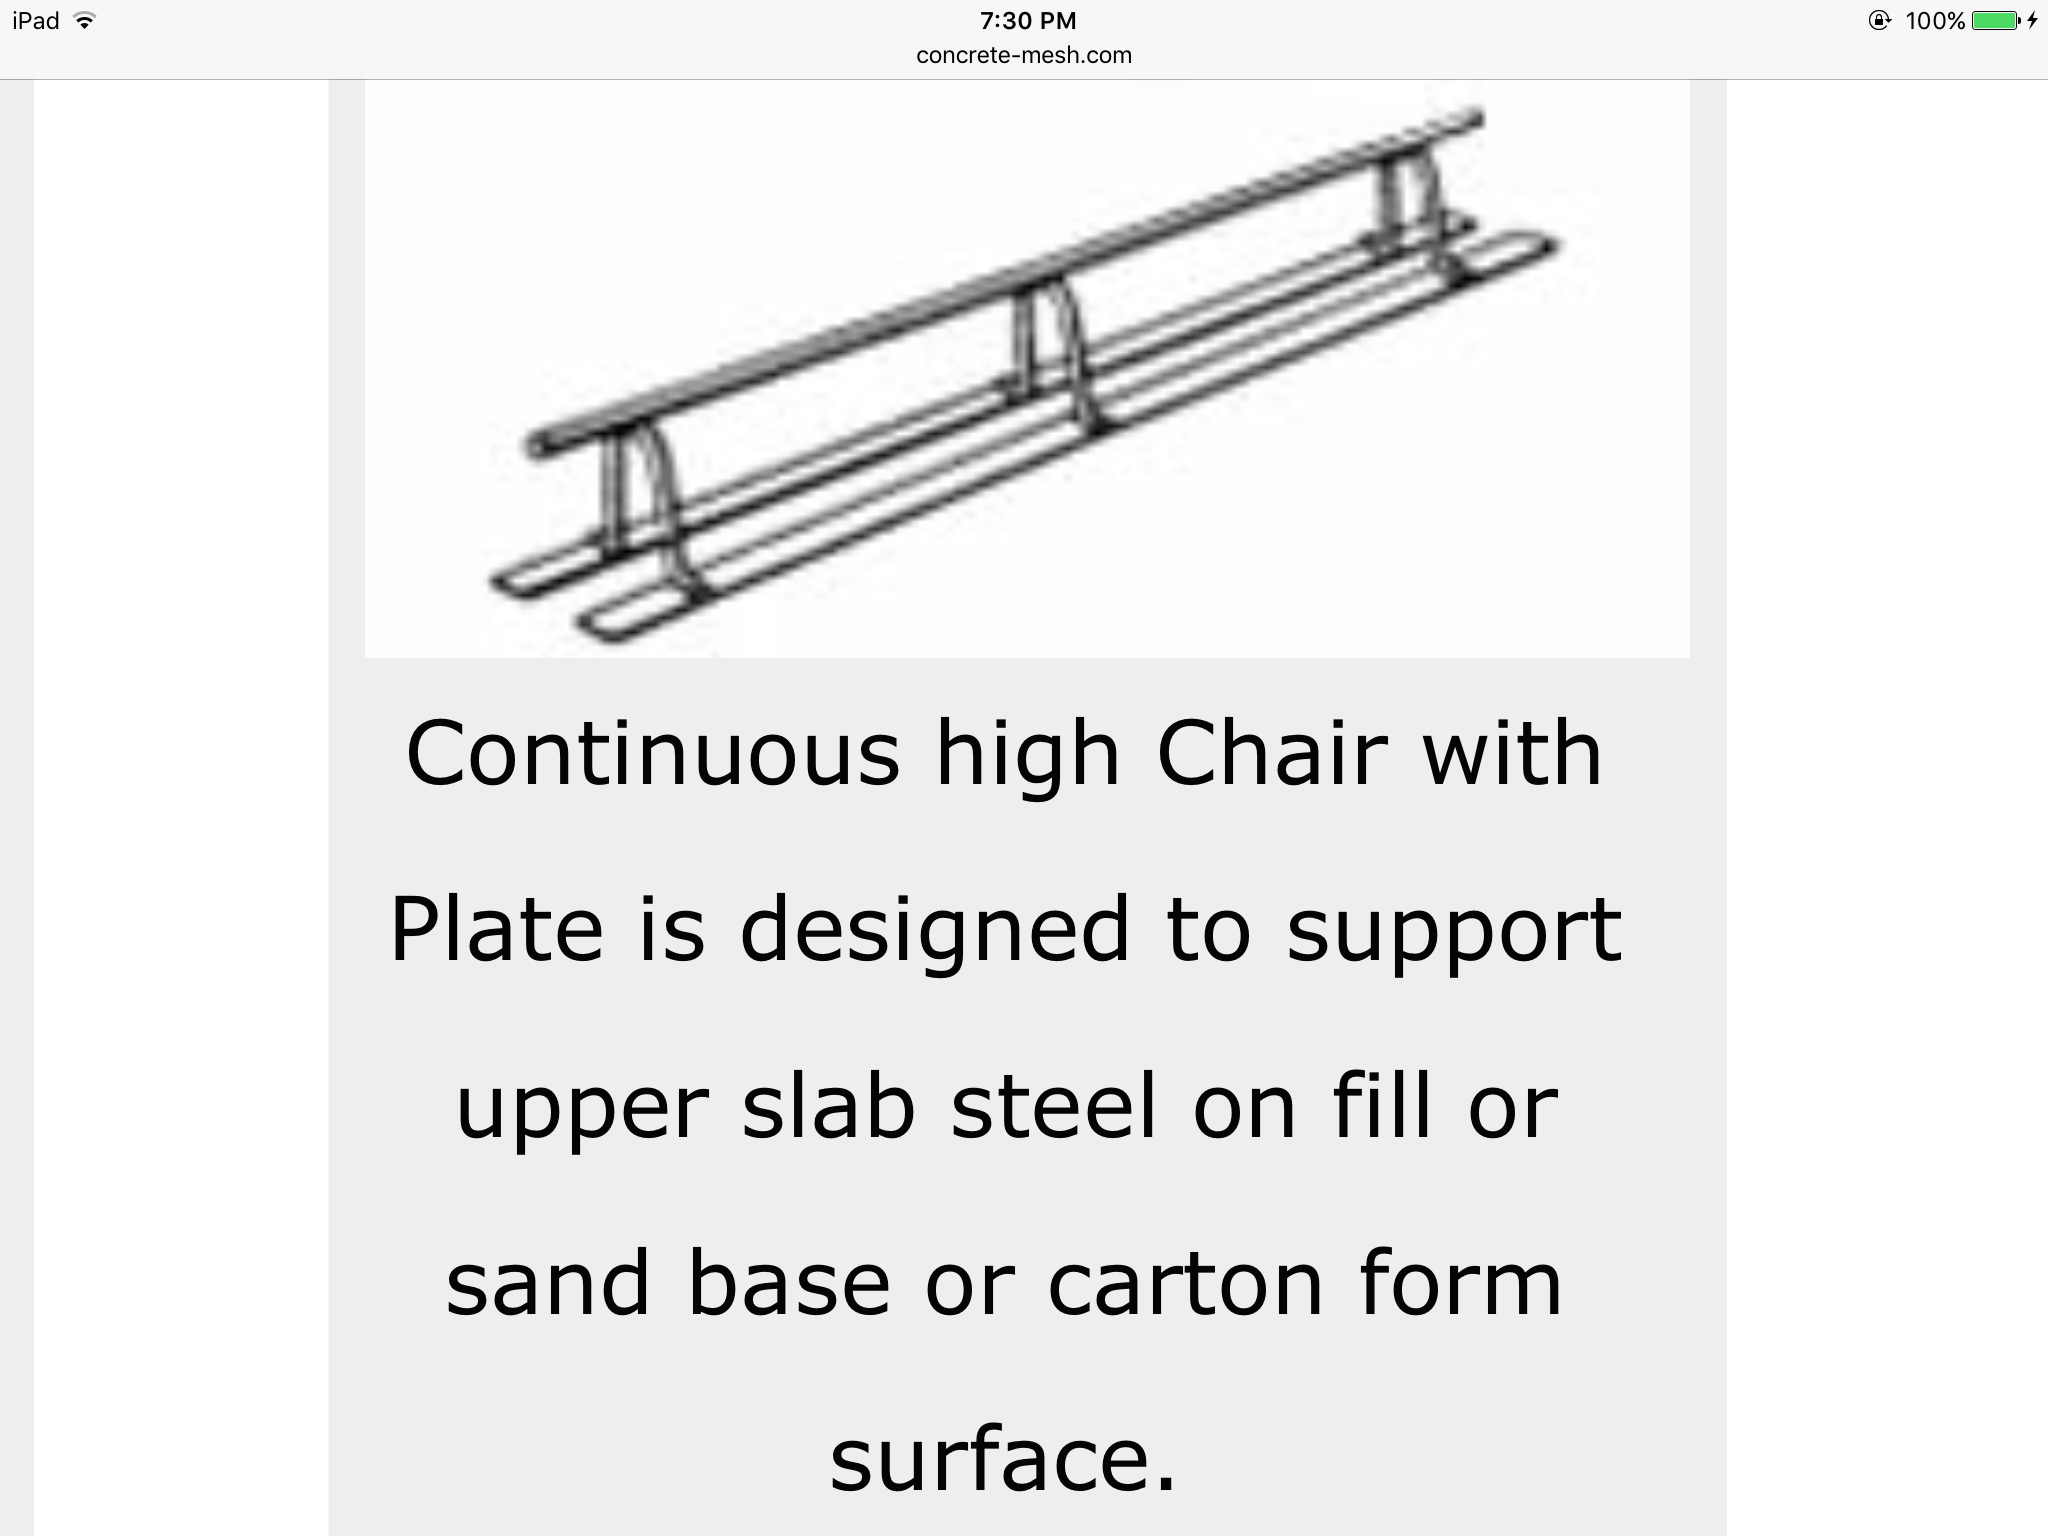
Here is the best way to keep mesh or rebar up into the pour. Called "continuous strip" chairs around here. Most concrete supply shops that sell mesh and rebar have them.
This allows the "mud" to flow all around the chair. Bricks or stones create thin spots in the slab, decrease integrity of the slab and lead to hairline cracks.
Don't let a structural engineer see those bricks or rocks under reinforcing steel, even if it is just to elevate the tube") Bob "hot rod" Rohr
Bob "hot rod" Rohr
trainer for Caleffi NA
Living the hydronic dream0 -
Those look nice, Bob. Less likely to tip over than the little plastic stands.0
-
They don't sink into the foam like the four legged chairs or the non-continous strip type.SWEI said:Those look nice, Bob. Less likely to tip over than the little plastic stands.
With 6X6 #10 wire mesh you need them every 3 feet. I would tie around the wire, chair, and tube to keep everything in place and spacing accurate. It takes a 7" or longer bar tie to accommodate all that.
If you go with a heavier gauge wire mesh, you can spread them apart more.
Commercial slabs sometimes speced the heavier gauge mesh. It sure was heavy to handle, especially in 20 footers!
Bob "hot rod" Rohr
trainer for Caleffi NA
Living the hydronic dream0 -
Guess I need to spend more time on the field. The Target store we did many years ago used adobe bricks in the truck ramp, and it still has no issues, but point taken.
I've also had contractors from California tell me that their structural engineers will not allow the tubing contractor to tie the tubing to their reinforcement steel. Concerns about incomplete bonding of cement to steel...
Thanks HR. I learned something today.
ME0 -
Hot rod
"With 6X6 #10 wire mesh you need them every 3 feet"
Is this the type of mesh I should get for my job? I was going to grab a roll of mesh from HD. Which should I use?
Cheers!
0 -
I never used the roll mesh, it may require tighter spacing of the rails, ask the supplier, maybe?
One trick I have seen with roll mesh is to unroll the amount you need. With two people flip it over. This keeps it from rolling up and chasing you Then you can grab an end, pull it up and towards you and walk backwards. This will take most of the memory and curl out of it. Use the very center of the roll in the garden to support tomatoes, it is tough to get it flattened.
Concrecte finishers hate the roll stuff it takes more work to keep it off the ground or foam and in the slab. Any suspended mesh is a real trip hazard. I've seen pissed concrete guys stomp down the chairs after tripping a few times.
Really no sense in using mesh or rebar if it lies on the foam or gravel. personal I don't believe #10 wire gives that much reinforcement benefit to the slab, it's just a simple way to keep the tube spacing and from floating.
I have used foam staples with good result, skipping the mesh altogether. Concrete finishers around here prefer that method and they add fiber to the mix, replacing the mesh. Power trowels will "burn" the fibers so you never see them in the finish.
The downside of a stapler or the foam board with grooves is that the tube is at the very bottom of then pour, not ideal.
Sheets of 8 x 16 or 8 X 20' mesh are the easiest to work with, but you need a flatbed to haul them or have them delivered.
Since they are perfectly flat it is easier to keep them suspended and in the center of the pour. For a small room like you have it is probably not a big hassle to use roll mesh.
Rolls are generally 5 X150'
A clever fellow could bend up some chairs on site with the extra mesh you will have.
Here is a thought. I cut off 12", 2 square wide and just folded it over, compress it to the 1-1/2 or 2" height you need, simple enough.
It is almost impossible to keep every inch of then pex suspended, as you walk in the concrete, do the best you can to keep it into the slab, and not too close to the top.
You want 1-1/2 times the aggregate above the tube. Typical red-mix is 5/8 stone, so 15/16 or 1" mud above the tube. Too close to the top and you get "road map" cracking, hairline cracks above all the tube.Bob "hot rod" Rohr
trainer for Caleffi NA
Living the hydronic dream0 -
I think HR's on his way to go skiing.
 -)
-)
I wouldn't use the rolled stuff. It will arch up where you don't want it to and is extremely tough to handle.
They sell 6' X 8' sheets of the flat stuff. Much easier to work with.
ME0 -
For a small job you could even use cattle or hog panels from the local box, farm, or lumber store. Those are easier to purchase and handle. A small bolt cutter and you could 1/2 them and haul in a pickup.
They usually cut deals on damaged ones Bob "hot rod" Rohr
trainer for Caleffi NA
Living the hydronic dream1 -
Shhh.... I thought they were my secret 0
-
Once again.. Thanks for the informative, quick replies!
Would I still need the mesh if using the continuous strip? I assume yes, but wanna be sure.
Cheers!0 -
The strips are just to elevate the mesh or rebar
You can als lift the mesh as you pour and try to get it centered in the pour. Fora small pour like that it is an option if you do not want to deal with chairsBob "hot rod" Rohr
trainer for Caleffi NA
Living the hydronic dream0 -
So, after doing some studying. My plan is for 3 loops of 1/2" tubing in the floor (17x20). 8" on center (6 " by outer wall for2 feet). Each loop is about 230'. Does anyone see any issues with this spacing plan? Would I be better with 4 loops at shorter distance?
Cheers!0 -
May I make one minor suggestion? I have had very good success in using fiber reinforced concrete -- either short steel fibers or better fiber glass fibers (doesn't rust) as well as the usual reinforcing. Almost completely eliminates microcracking, which can otherwise be a problem.Br. Jamie, osb
Building superintendent/caretaker, 7200 sq. ft. historic house museum with dependencies in New England 1
1 -
A large local farmer in NW Ohio built a 150'x80' $1.3 million shop and office complex. It has all 5/8" Pex in the floor. I didn't see it all. They used a 1" rolled type whit foam insulation on top of the gravel base. I thought it wasn't enough. Then 6"x6" mesh panels on top, strictly to tie the Pex. I think the Pex spacing was 12" and there was a boat load of loops. Then they used rebar on chairs for the concrete. I think he went with 6" of concrete. In this install the Pex is on the bottom of the slab. I wonder how much slower the response is and how much he may lose with only 1" of insulation under the floor. He brings in big 4x4 tractors, planters and combines. He farms 7K acres so the stuff is big. He has 2 IBC LPG boilers. I've been in the shop on subzero days. It's nice for a shop, which is different than a house. I don't know how much propane he uses. He probably doesn't care. He does have a 1000 gal LPG tank for the shop, but he also has a 30K tank for his grain dryers. When I was paying around $3 for LPG for residential he was buying it for$0.66 a gal. Is it worth the aggravation of trying to keep the Pex centered in the slab? Just trying to pull up regular mesh is a hit or miss proposition in most pours. In this particular install the concrete was all pumped so no buggys or wheel borrows rolling over the Pex.0
-
Back in the day when I thought the road to riches was paved with owning 2 Goodyear dealerships,... We designed a building with in floor radiant heat powered with waste oil boilers. I remember the design called for rebar on chairs, with the pex tied to the rebar. The rebar schedule was on 12" centers, but they first laid out on 24", then placed the pex, then offset the 2nd layer to form the final 12" grid with the pex trapped between the layers, to keep everything suspended mid-slab. Then I think a wire mesh was placed on that.
Apparently selling upscale Hamburgers is WAY more profitable than Tires & Service, because that guy paid a bunch of money for my lot.
TimWinter Park, CO & Arvada, CO0


Categories
- All Categories
- 87.7K THE MAIN WALL
- 3.3K A-C, Heat Pumps & Refrigeration
- 59 Biomass
- 430 Carbon Monoxide Awareness
- 127 Chimneys & Flues
- 2.2K Domestic Hot Water
- 5.9K Gas Heating
- 121 Geothermal
- 170 Indoor-Air Quality
- 3.8K Oil Heating
- 79 Pipe Deterioration
- 1K Plumbing
- 6.6K Radiant Heating
- 396 Solar
- 16K Strictly Steam
- 3.5K Thermostats and Controls
- 56 Water Quality
- 51 Industry Classes
- 51 Job Opportunities
- 17 Recall Announcements