Welcome! Here are the website rules, as well as some tips for using this forum.
Need to contact us? Visit https://heatinghelp.com/contact-us/.
Click here to Find a Contractor in your area.
main vent location
Options

STEAM DOCTOR
Member Posts: 1,967
thanks for the great site. i have posted here a few times and the advice was very helpful. I'm a plumber with almost no heating experience. i read through we got steam heat and lost art. these books are a gold mine. my question for today is about locating the main vents. i read in lost art about the importance of elevating the main vent to prevent water hammer damage. many of the main vents that i have seen are not on the main itself but rather on the top of the vertical leg of the dry return. do these vents need to be elevated as well? my intuition is that they do not need to be elevated. the reason is that since the main almost always turns 90 degrees before leading to the dry return therefore it is not likely that there will be a blast of steam hitting the top of the dry return at high speed and therefore there is a very low risk of water hammer damage. please correct me if I'm wrong and thanks as usual for the great advice.
0
Comments
-
It's both
the blast of steam -- and the slug of errant condensate. The location you describe is pretty safe, on the whole, but I'd still put in a short nipple if I had the overhead room.Br. Jamie, osb
Building superintendent/caretaker, 7200 sq. ft. historic house museum with dependencies in New England0 -
Antler
Here's an alternative that works very well and has the option of easily adding extra vents if you need them. Position the "antler" so the condensate has to do a "U" turn to get to the vents. Note the union- using this allows you to make up the unit on a bench and saves trying to swing a wrench and banging your knuckles on the floor joists.
The drawing was done by Brad White.
- Rod0 -
thanks
thanks as usual for the info and advice. i am planning on an antler on one of the jobs that I'm doing(i saw the antler previously on this site). one quick question. is there any risk that the horizontal leg of the antler will fill with water and block the air flow? thanks again.0 -
Antler Slope
Good question! Since it's connected to the sloped main it should have slope "built in".
However it wouldn't be a bad idea to check it for slope and "tweek" it a bit if necessary.
The idea of the antler is to add some bends that will slow down the condensate a bit.
Since the condensate wants to follow gravity it doesn't take too much to turn it away.0 -
thanks rod
if the antler is on top of the main then i would not be concerned. my concern is when the antler is on top of the vertical leg that drops top the dry return. that leg has no slope at all. if water would back up that leg then is there a risk that the water would not be able to drain out of the antler? any thoughts would be greatly appreciated.0 -
what i see alot
is that the leg is not at the end of the main as in your diagram rather there is a 45 degree elbow, a length of pipe and another 45 degree drop into a tee that has a vent on top and the leg on the bottom of the tee that leads to the dry return. the vent in that setup is 100% vertical with no slope if i would put an antler on that tee the antler leg would be 100% horizontal with no slope.0 -
Chinese Fittings
Possible solutions:
1) Go to the local home center and try out a few combinations of elbows and nipples from their stock. As hard as it is to find fittings that are threaded straight, I'm sure you can find one that will give you the right pitch.
2) When you make your antler, use either two 45 degree elbows to make the turn from vertical to horizontal, or two 90 degree elbows to make a swing joint at that place. In either case, you can adjust the orientation of the pair of elbows to give you whatever pitch you want. Having back-to-back 90's would also create an additional turn for a slug of condensate to overcome before it reached the vent.
3) The antler on my system is quite horizontal, but it's only about a foot long, so there are no apparent drainage issues.0 -
Antler
While each installation is different generally I don't think it will be a problem. However if you are worried about a particular installation use a couple of street elbows together coming out of the union and you then could adjust it to what ever pitch you thought necessary. Keep in mind you need very little slope to drain water away. The main idea of the "antler" was that if space was tight and it wasn't feasible to go straight up, it allowed you to move the vent to a better location between the ceiling joists.
- Rod0 -
thanks
another option could be to use 45 degree elbows instead of 90's. headroom might be more of an issue with the 45's.0 -
Adding another Gorton #2
Rod, I installed two Gorton #2 at the end of both our mains. The original vents that I replaced were installed right at the very ends of the mains so to minimize the amount of work I used the existing 1/4 inch nipples and used couplings to add the Gorton #2's. I am looking to increase the venting on one of the runs because it is longer and runs through our unfinished crawl space under the house which is much colder. Am I crazing to think I will see any benefit by adding a second Gorton #2 on a similar antler setup but still using the 1/4 inch nipple? Will the 1/4 inch choke it too much?0 -
antler pipe size ..
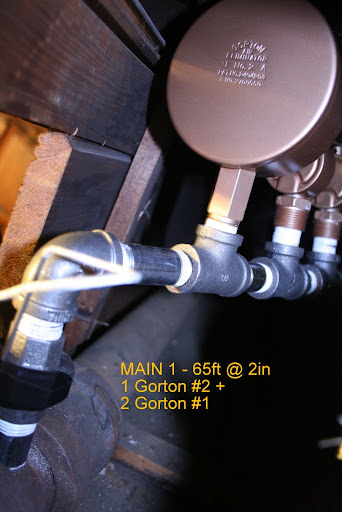
going back to a much earlier question .. an 1/8" nipple will just barely support 1pc of Gorton #2 .. a 1/2" nipple will support 2pcs #2 and 1pcs of #1. I'm not sure that a 1/4" will support additional #2s.1-pipe Homeowner - Queens, NYC
NEW: SlantFin Intrepid TR-30 + Tankless + Riello 40-F5 @ 0.85gph | OLD: Fitzgibbons 402 boiler + Beckett "SR" Oil Gun @ 1.75gph
installed: 0-20oz/si gauge | vaporstat | hour-meter | gortons on all rads | 1pc G#2 + 1pc G#1 on each of 2 mains
Connected EDR load: 371 sf venting load: 2.95cfm vent capacity: 4.62cfm
my NEW system pics | my OLD system pics0 -
Vents
Hi Nick - If I read this right, you now have 2 each Gorton # 2 venting through one 1/4 pipe nipple? That pretty well maxs out a 1/4 pipe nipple. In fact I think it would be much better to go to a larger nipple (1/2 inch) as I doubt that your 2 Gorton #2s are now being used at their fullest capacity. Unless you have a huge main normally 1 ea. Gorton # 2 will do it for most mains.
Tapping a 1/2 inch pipe thread is easy. You need a 45/64" drill for the pilot hole and 1/2" -14 NPT Pipe tap. The tap will run about $15. The overhead clearance maybe a problem and you may have to borrow an angle drill if you don't have one. Start with a small (1/8) hole first and then drill the 45/64ths. To tap,insert the tap in the drilled hole, turn it a bit clockwise and then reverse it a bit to clear the chips and then forward (clockwise) a bit more and so on, till you have the hole tapped. It's easy to do. I find that people are always afraid of messing up if they have tapped a pipe before. If for any reason you aren't happy with your job (It's too loose etc.) you can reinforce the pipe nipple with JB Weld which you can get from any autoparts store.
- Rod0


This discussion has been closed.
Categories
- All Categories
- 85.2K THE MAIN WALL
- 3.1K A-C, Heat Pumps & Refrigeration
- 55 Biomass
- 424 Carbon Monoxide Awareness
- 73 Chimneys & Flues
- 1.9K Domestic Hot Water
- 5.2K Gas Heating
- 129 Geothermal
- 160 Indoor-Air Quality
- 3.3K Oil Heating
- 61 Pipe Deterioration
- 884 Plumbing
- 5.9K Radiant Heating
- 376 Solar
- 14.7K Strictly Steam
- 3.2K Thermostats and Controls
- 58 Water Quality
- 49 Industry Classes
- 89 Job Opportunities
- 28 Recall Announcements