How to Remove Sweat Unions

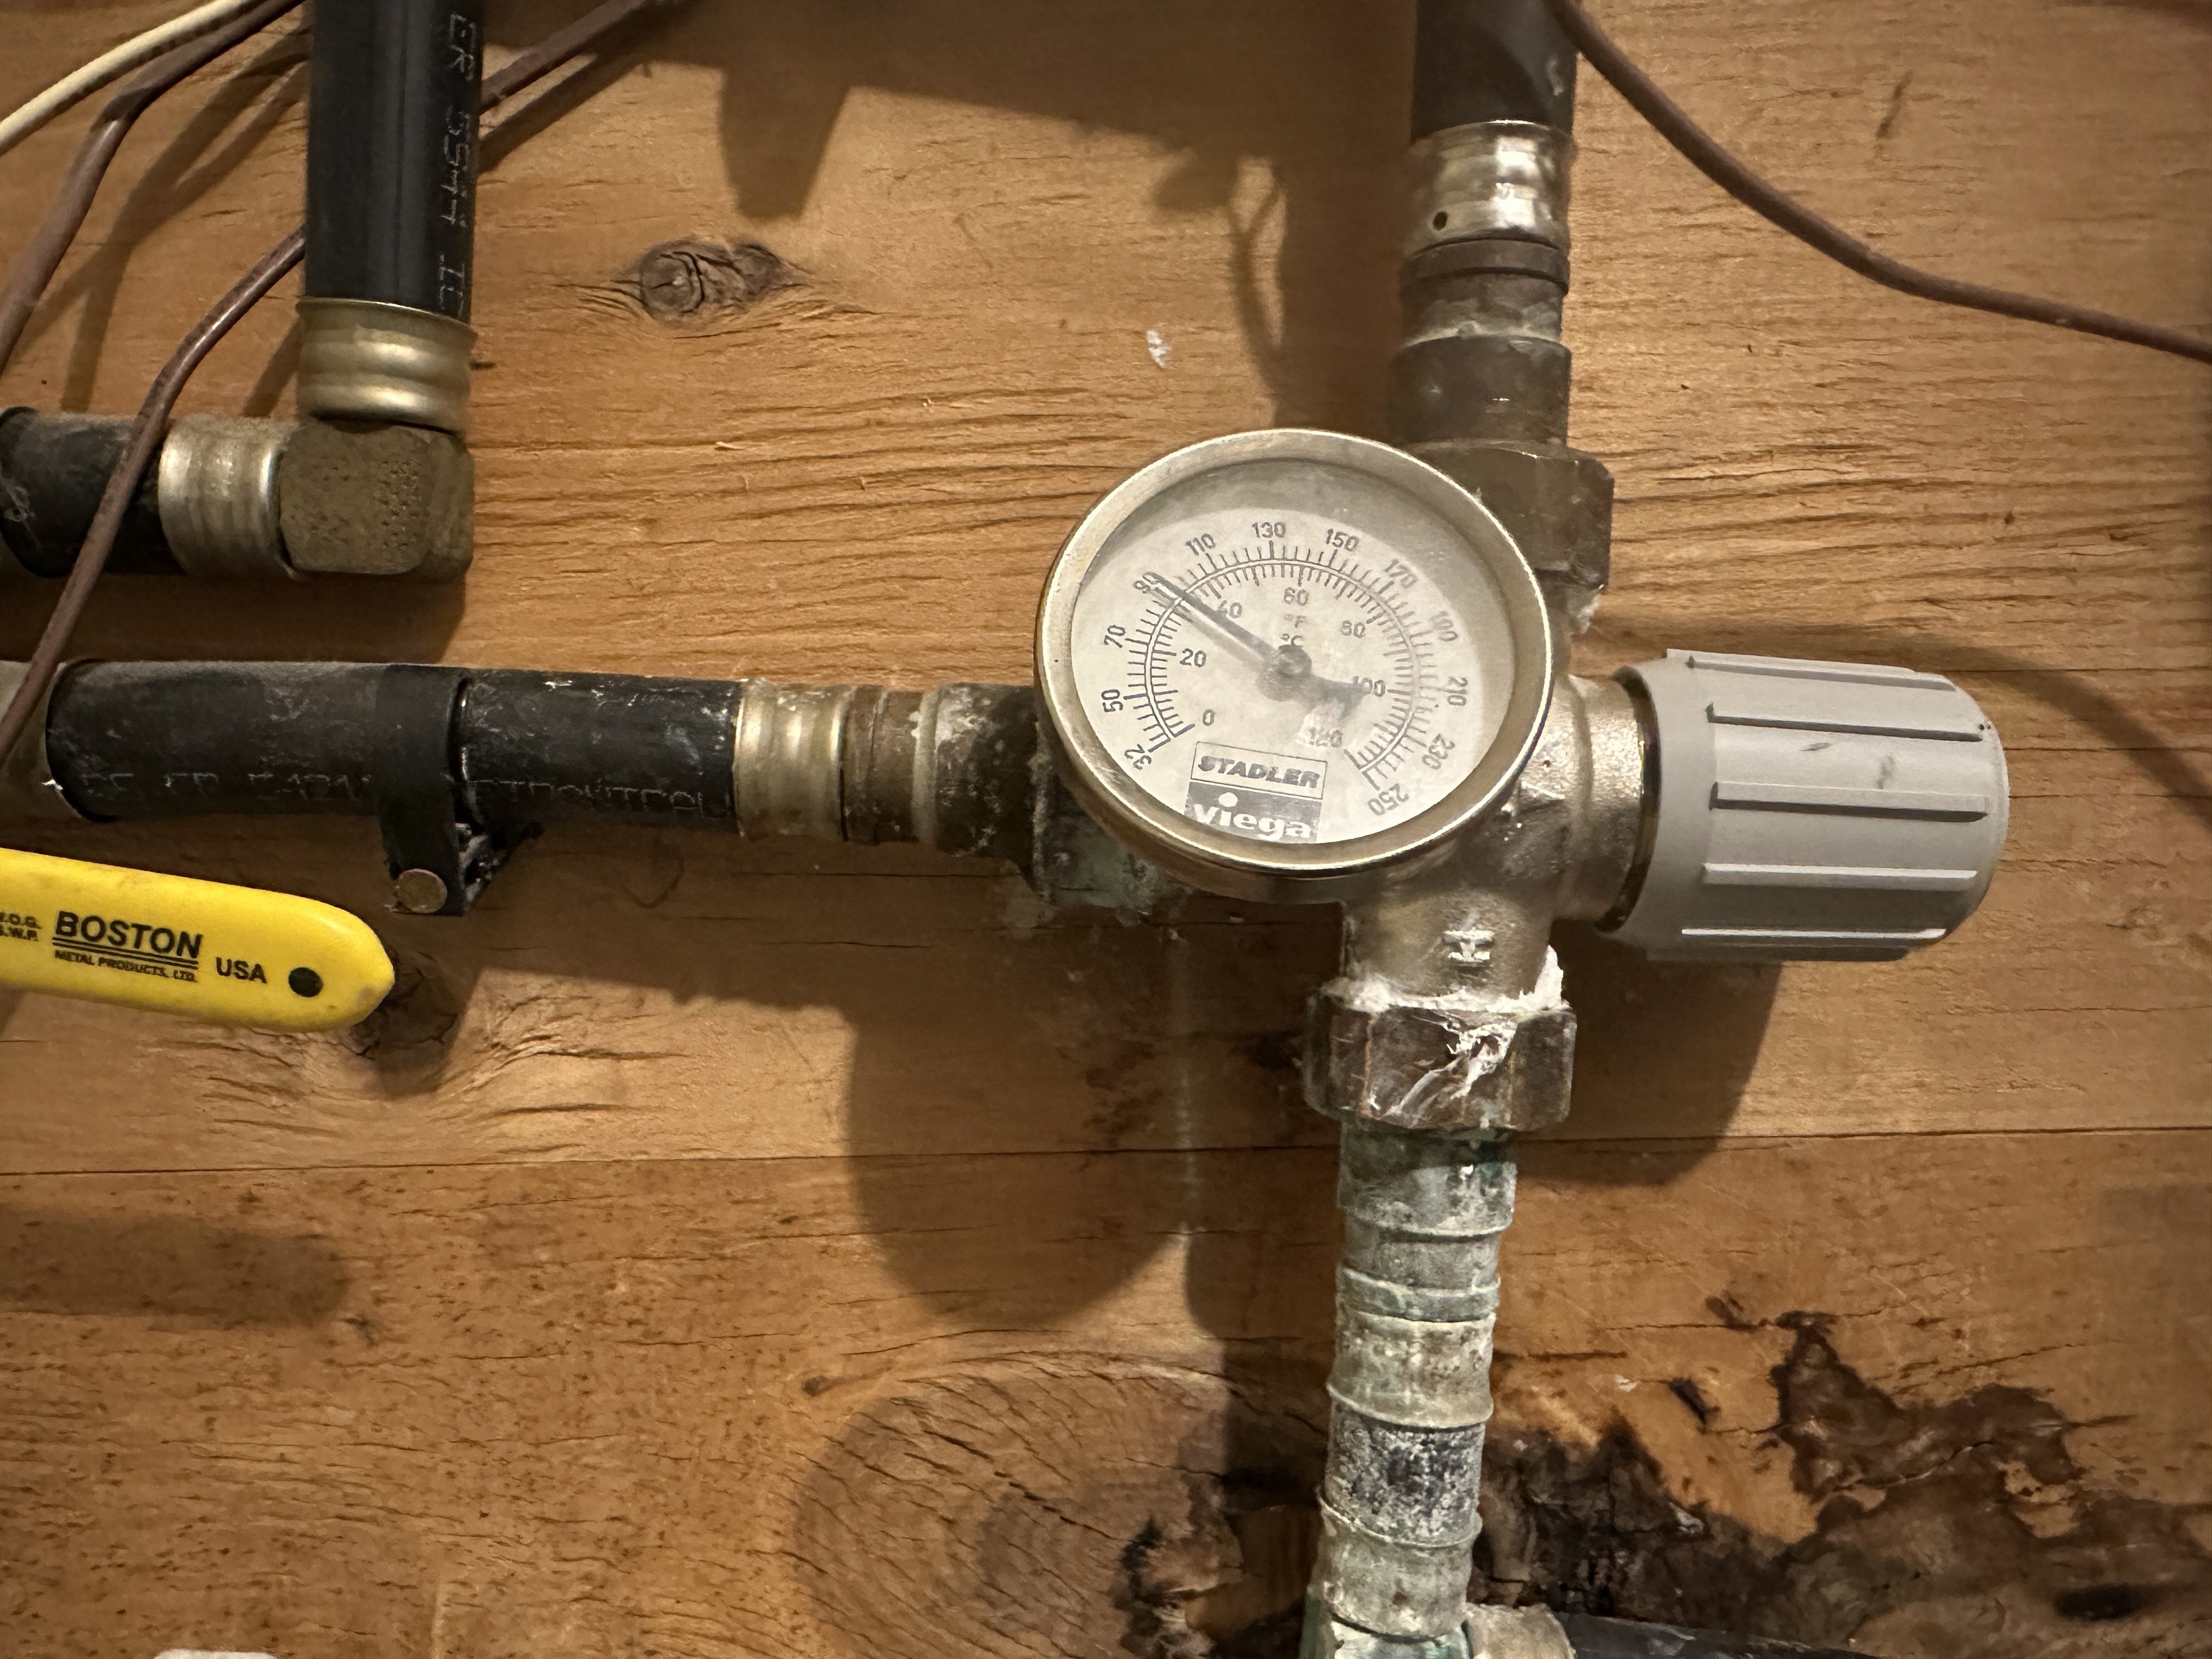
I have the following three sweat unions I need to remove and replace from a thermostatic mixing valve. What tools would you suggest and what process would you use? At this moment all I can think of trying is cutting them off with a Dremel.
Comments
-
Which parts are you trying to remove and which parts are you trying to save?
0 -
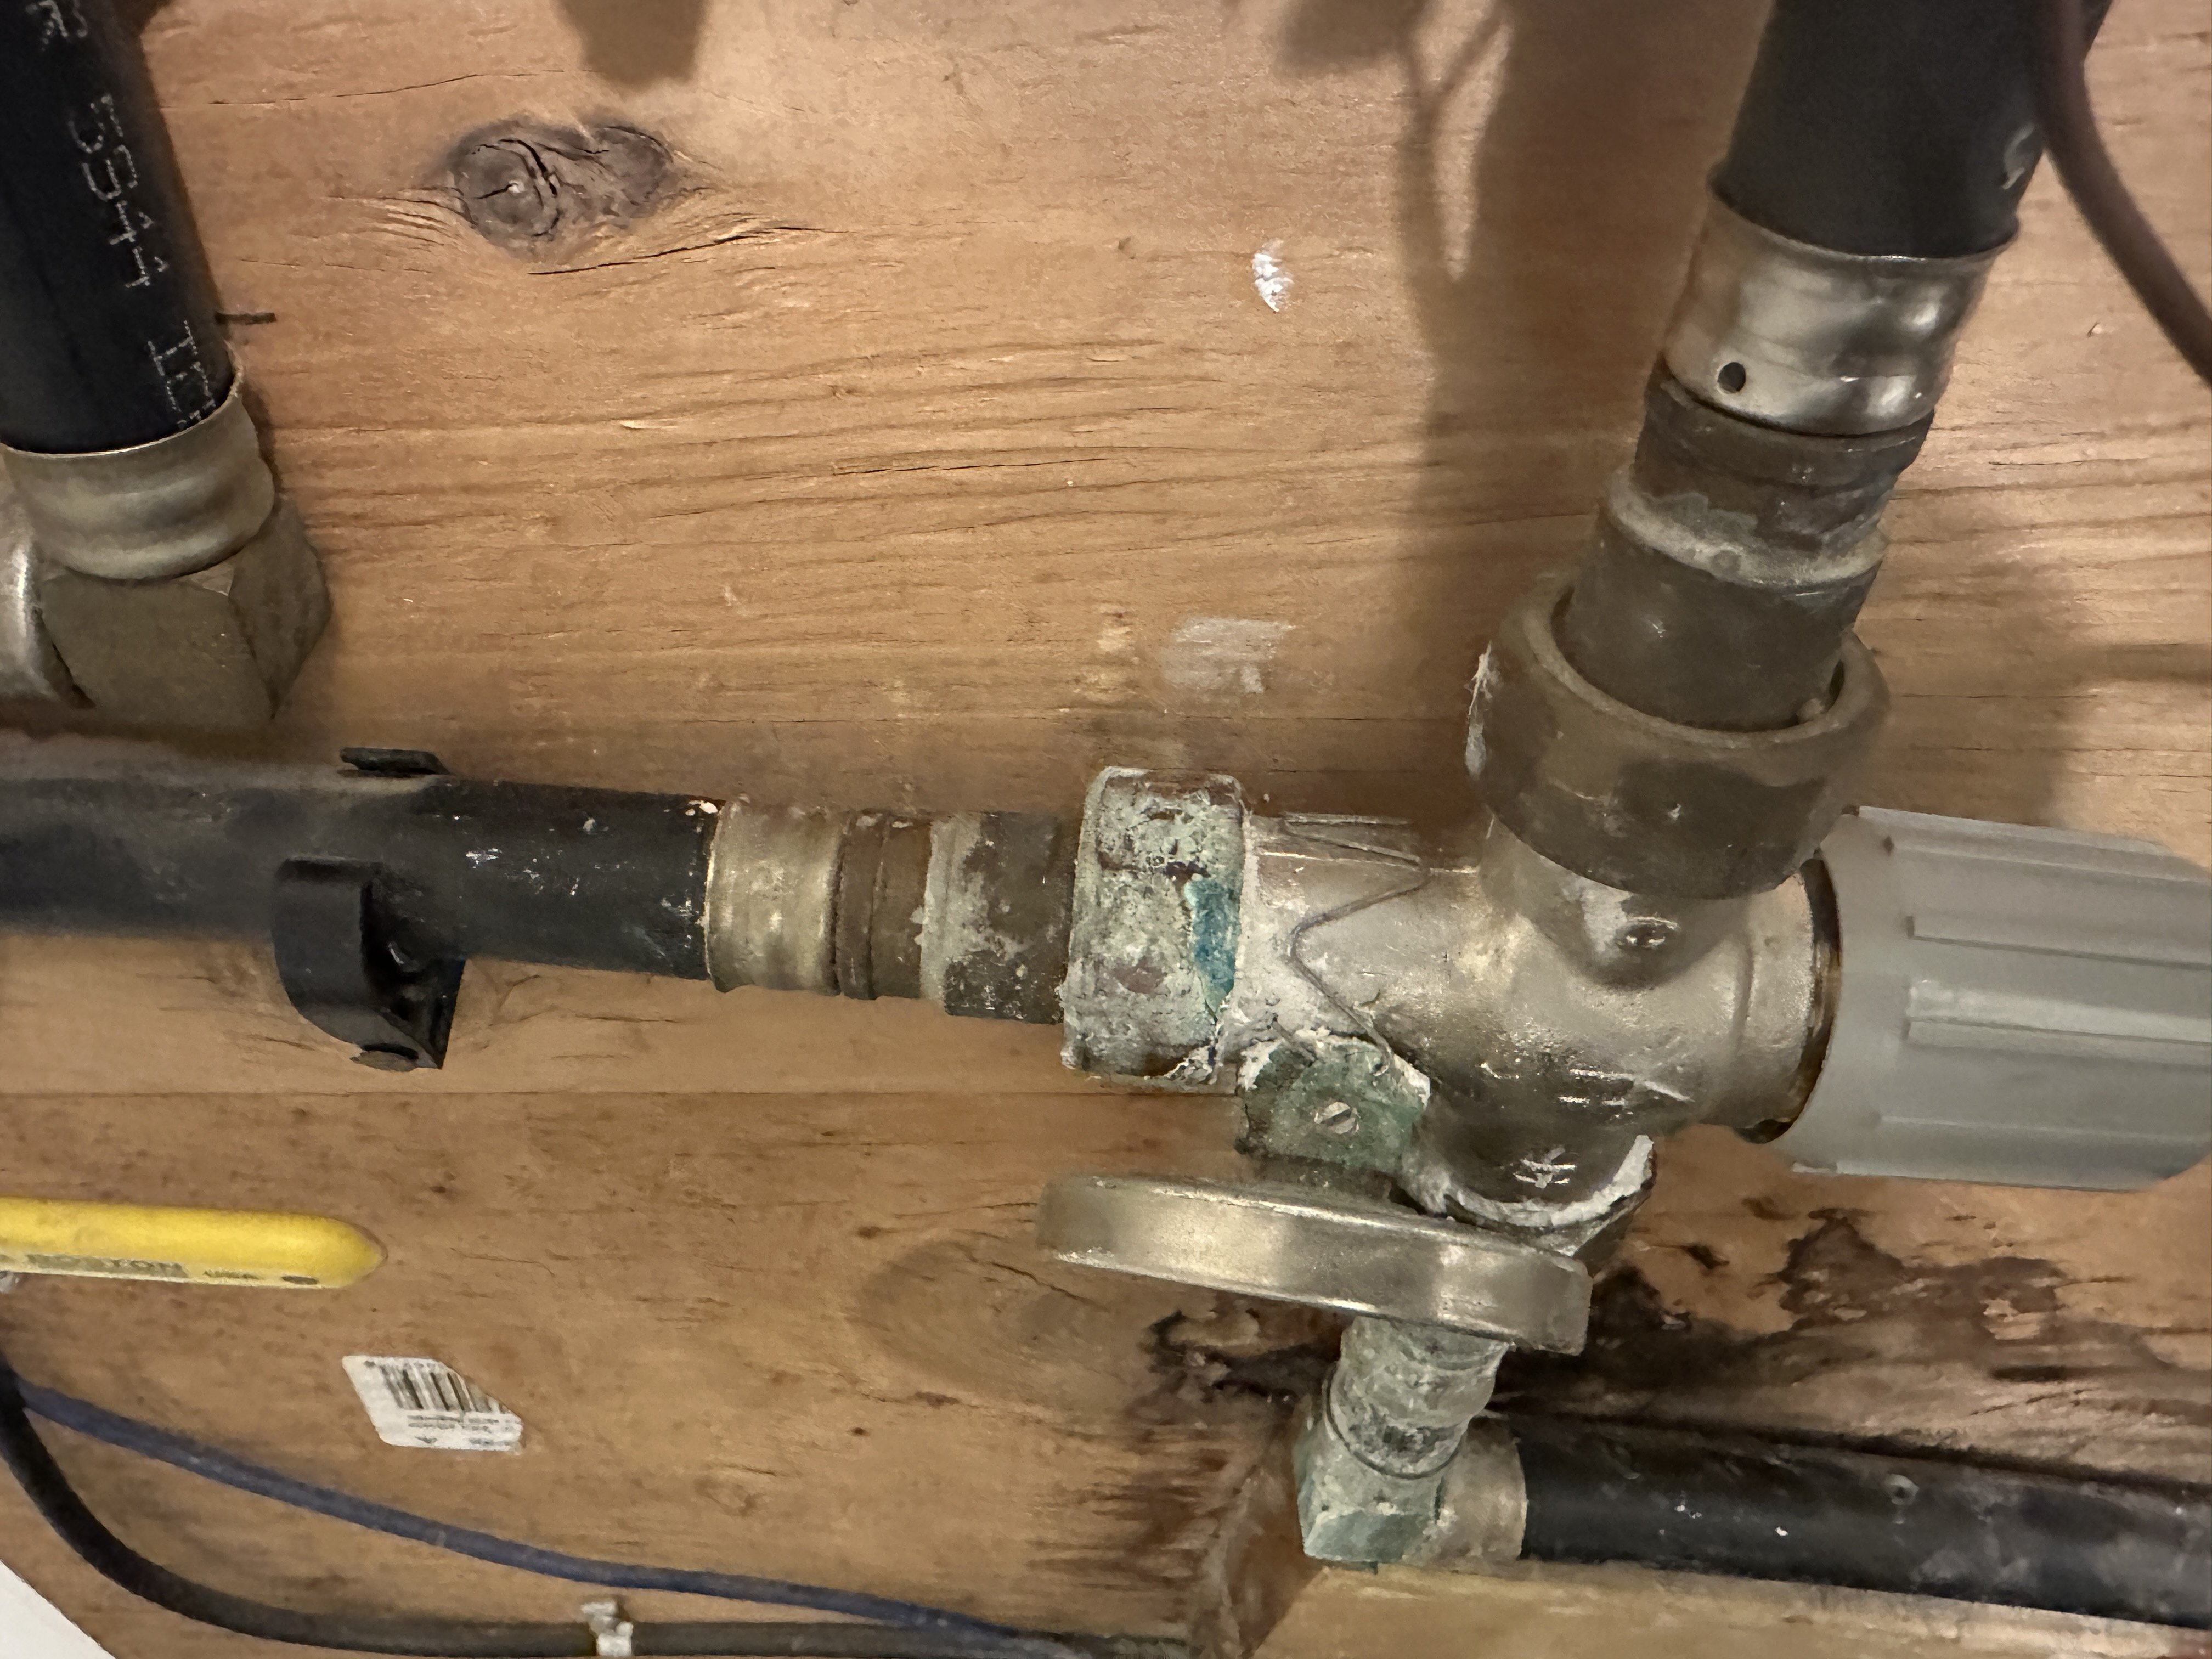
I would like to remove the tailpieces, that have the old nuts on them. Look like I need to cut the ferrules of and in doing so possible damage the pex pipe which will need to be replaced. Then I will need to use some form of clamp around the new fittings. I am not sure what that might be an open to suggestions.
0 -
The nuts should be fine? Just loosen all three nuts, remove the valve, clean the face of the tailpiece, use a new rubber or fiber gasket.
That looks like a Honeywell AM series valve, measure the face to face, so a new one should drop into that spacing.
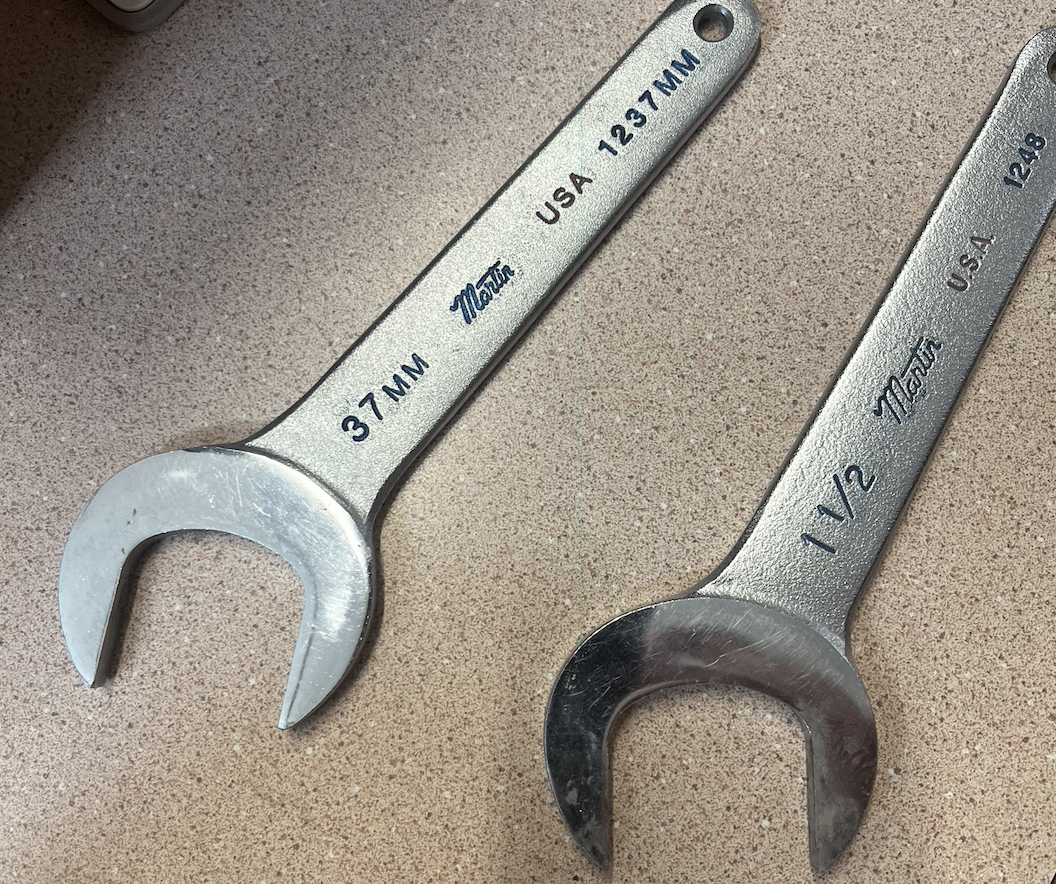
I work with brass nuts quite a bit so I have an assortment of exact fit open ends. Martin Tool, Kansas City.
 Bob "hot rod" Rohr
trainer for Caleffi NA
Living the hydronic dream0 -
I'm at a loss to understand. Do you want to replace the Honeywell thermostatic valve? What's your overall goal? If you want to get rid of the Honeywell thermostatic valve, just unscrew the nuts, clean up the nuts and re-use them on a new Honeywell valve. AM101 I think.
If you do that, wet the gaskets on the new valve before installing it and tightening the nuts.
0 -
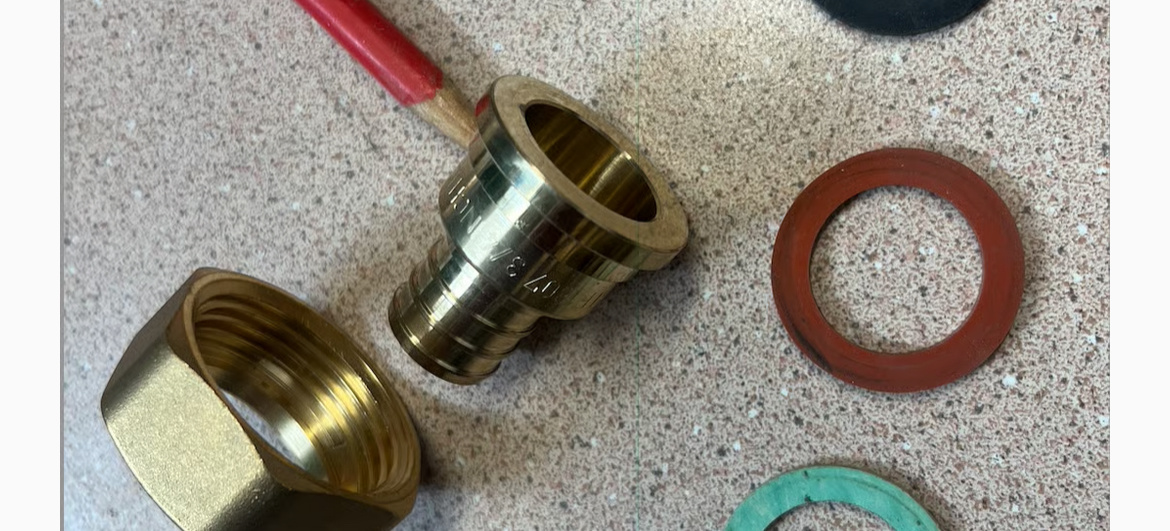
It is a two piece fitting, the nut and tailpiece.
Nowadays you can pex tailpieces, but you piping would need to extend the pex.
If you want to clean up the leaks, disassemble, clean, new gaskets, reassemble.
I would soak that valve in CLR or vinegar if you remove it.
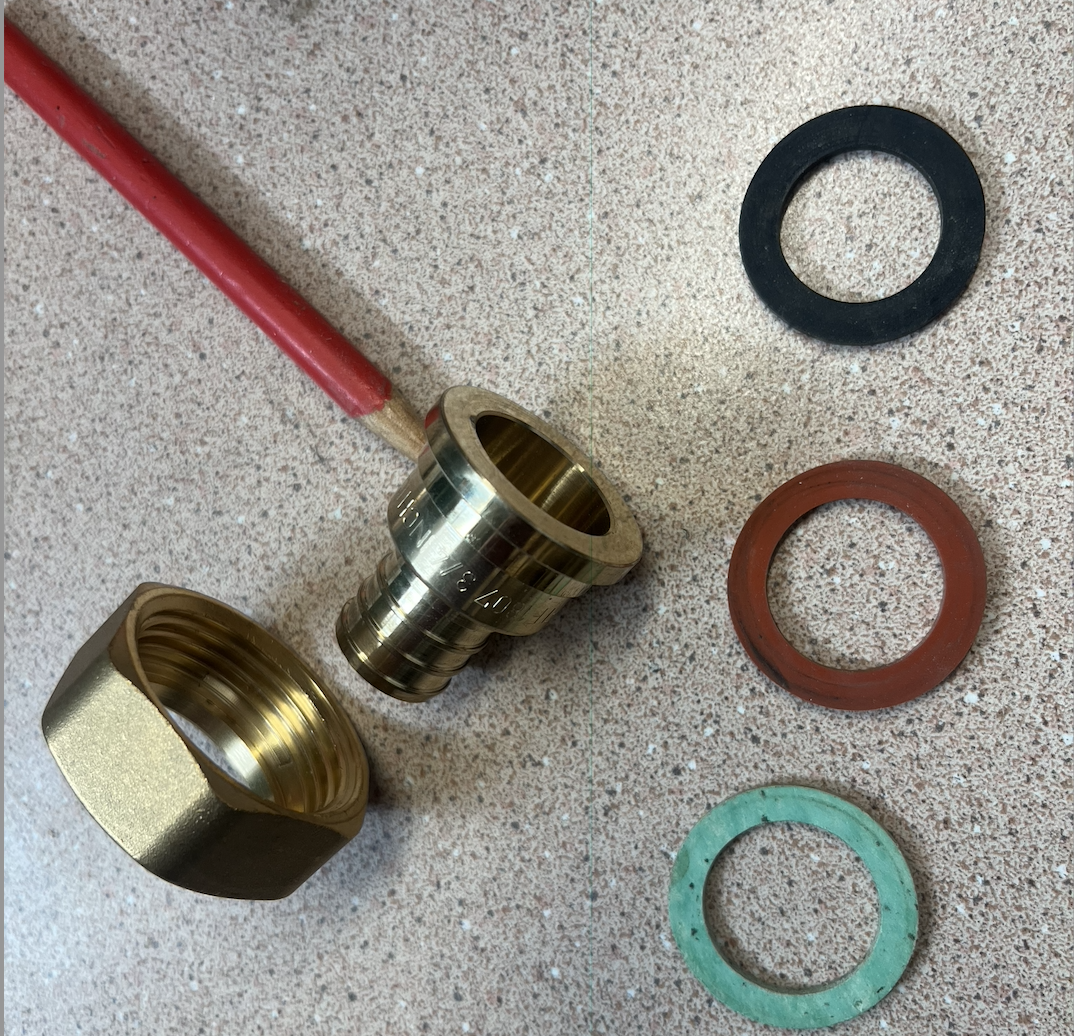
Fiber, EPDM or silicone gaskets are available.
Personally I would put a thin film of teflon pipe dope on both sides of any fiber washer. No not overtighten.
 Bob "hot rod" Rohr
trainer for Caleffi NA
Living the hydronic dream0 -
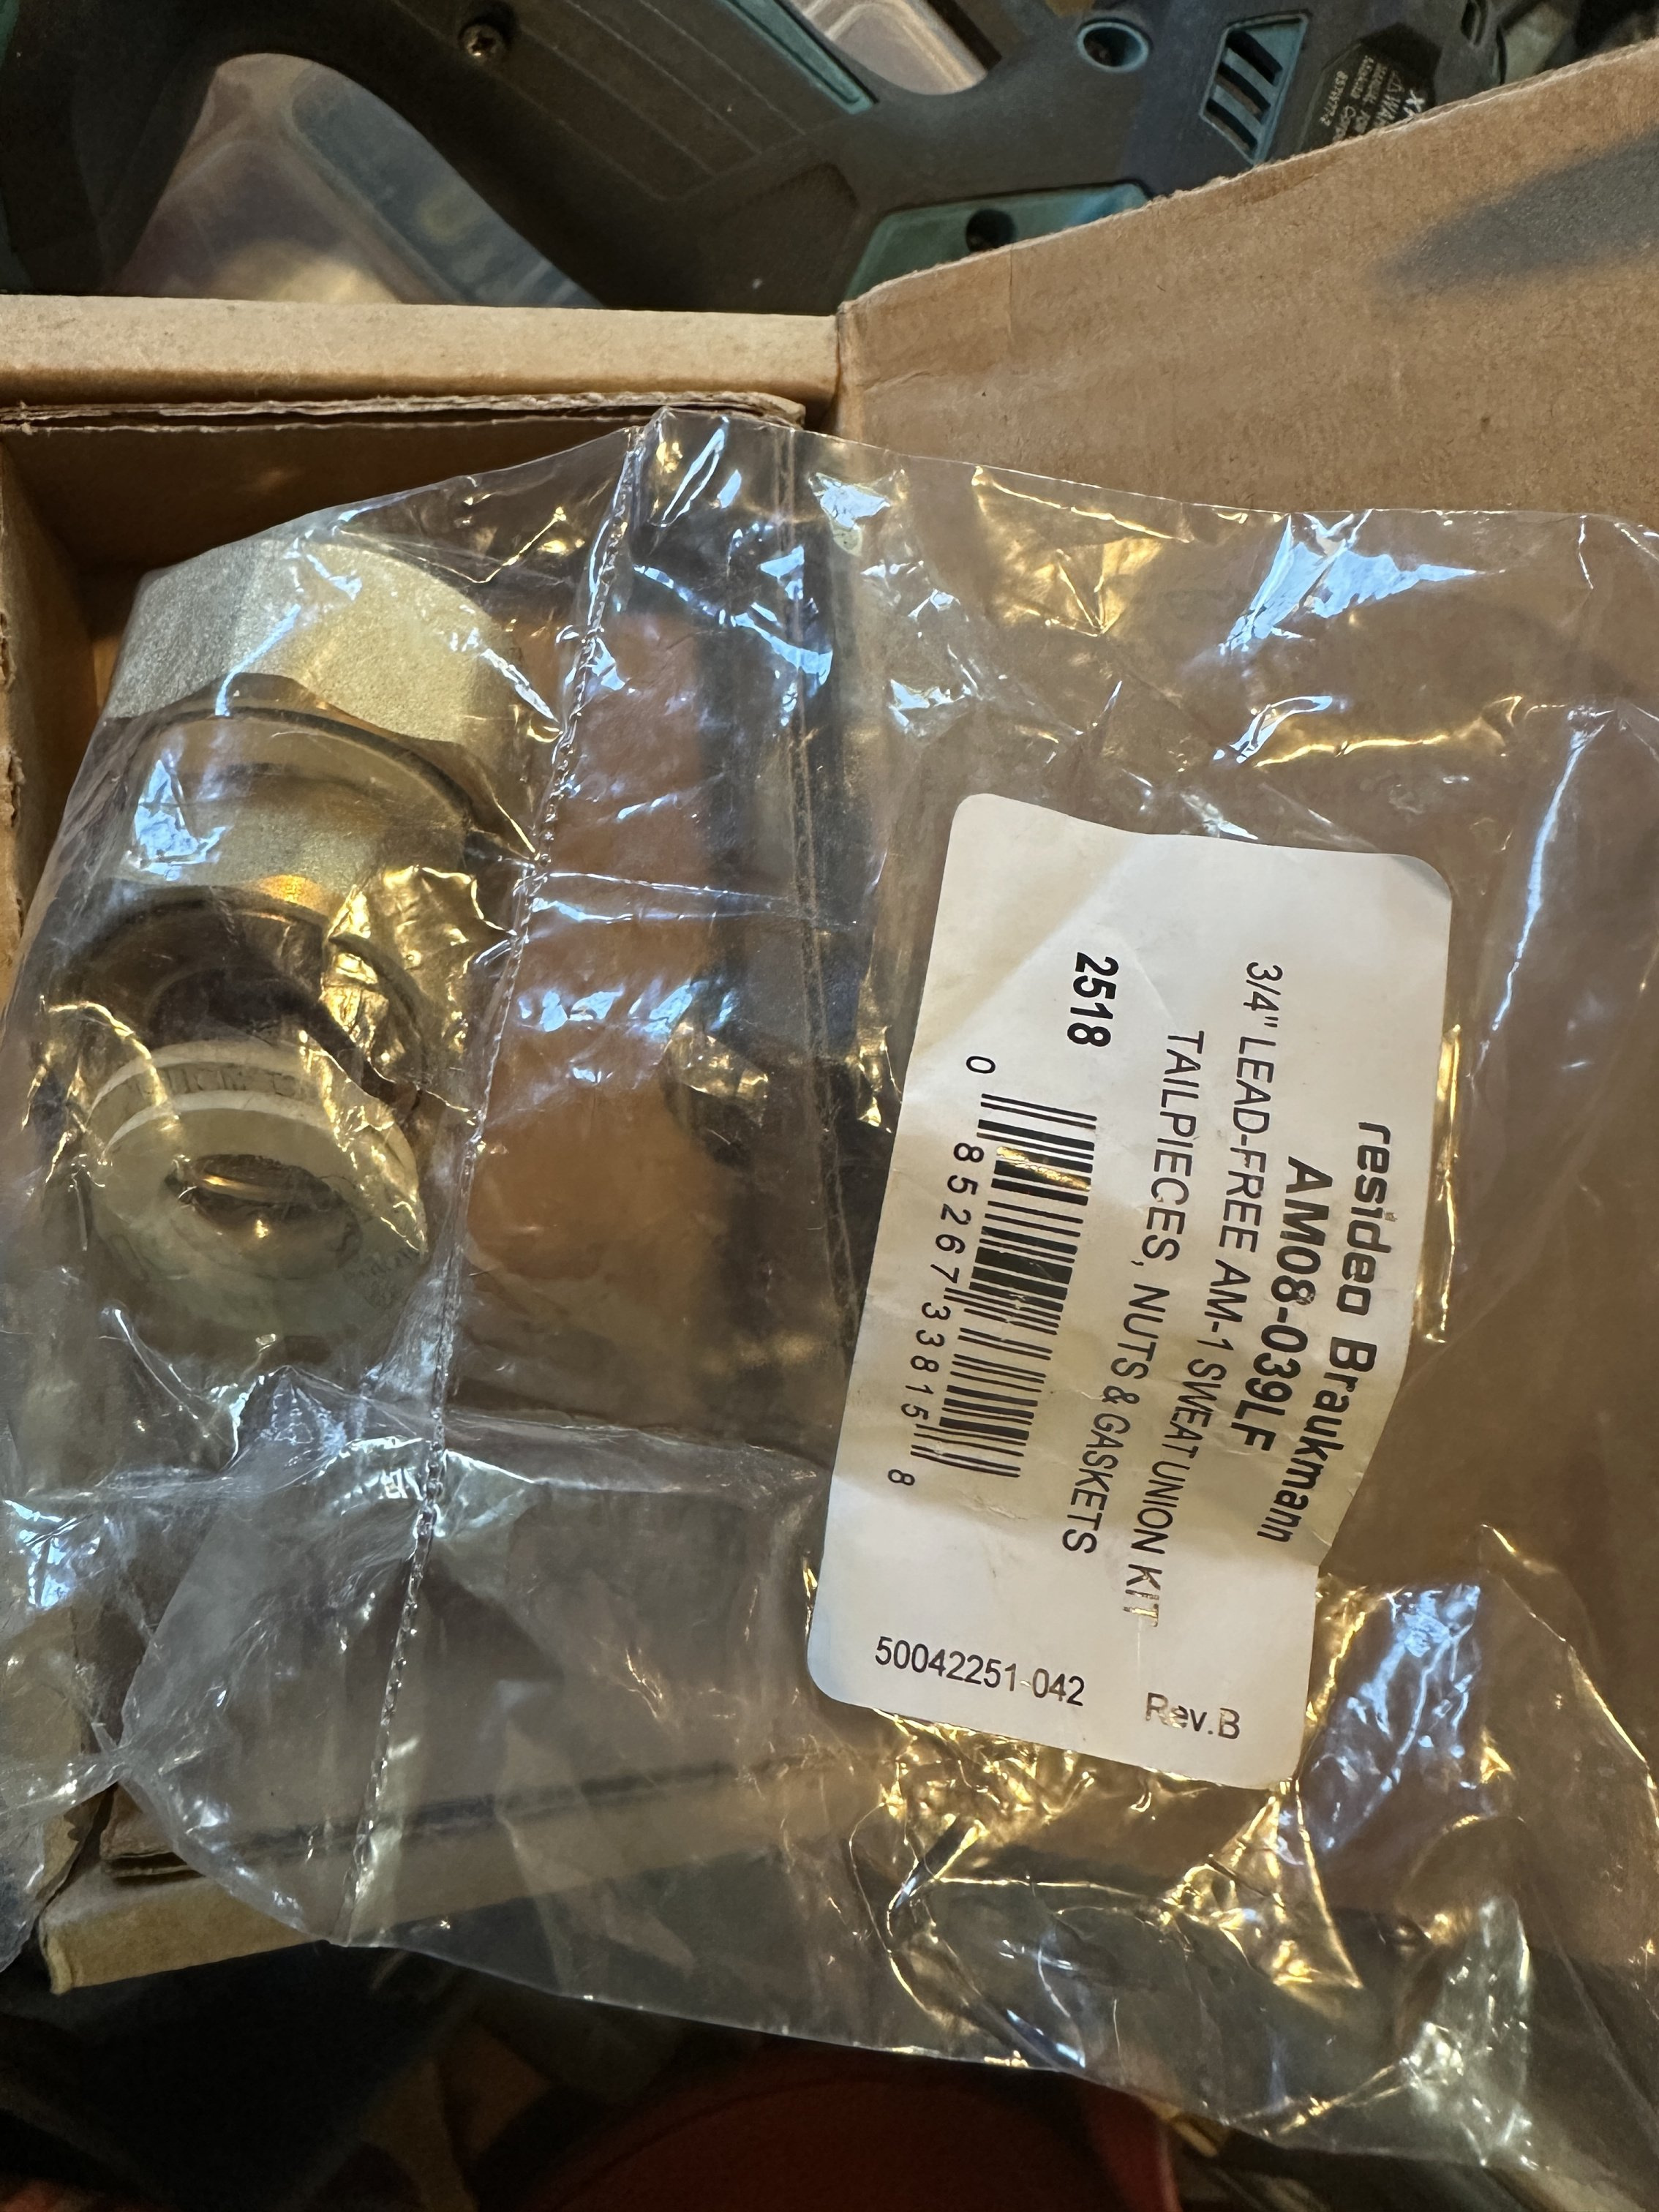
Does the mixing valve still operate at the desired temperature? IF yes then all you need are 3 new union gaskets. AMU200 AM-1 Gasket kit
If the valve is no longer operational, ther the replacement valve comes with new gaskets. AM1010US-3/4
Edward Young Retired
After you make that expensive repair and you still have the same problem, What will you check next?
0 -
It looks like I was not clear enough. I replaced a failed thermostatic mixing valve. Those nut are leaking from both sides. I would like to replaced them and I need to cut off the pex pipe to do so or the compression metal around it. Attached are images of what I would like to replace.
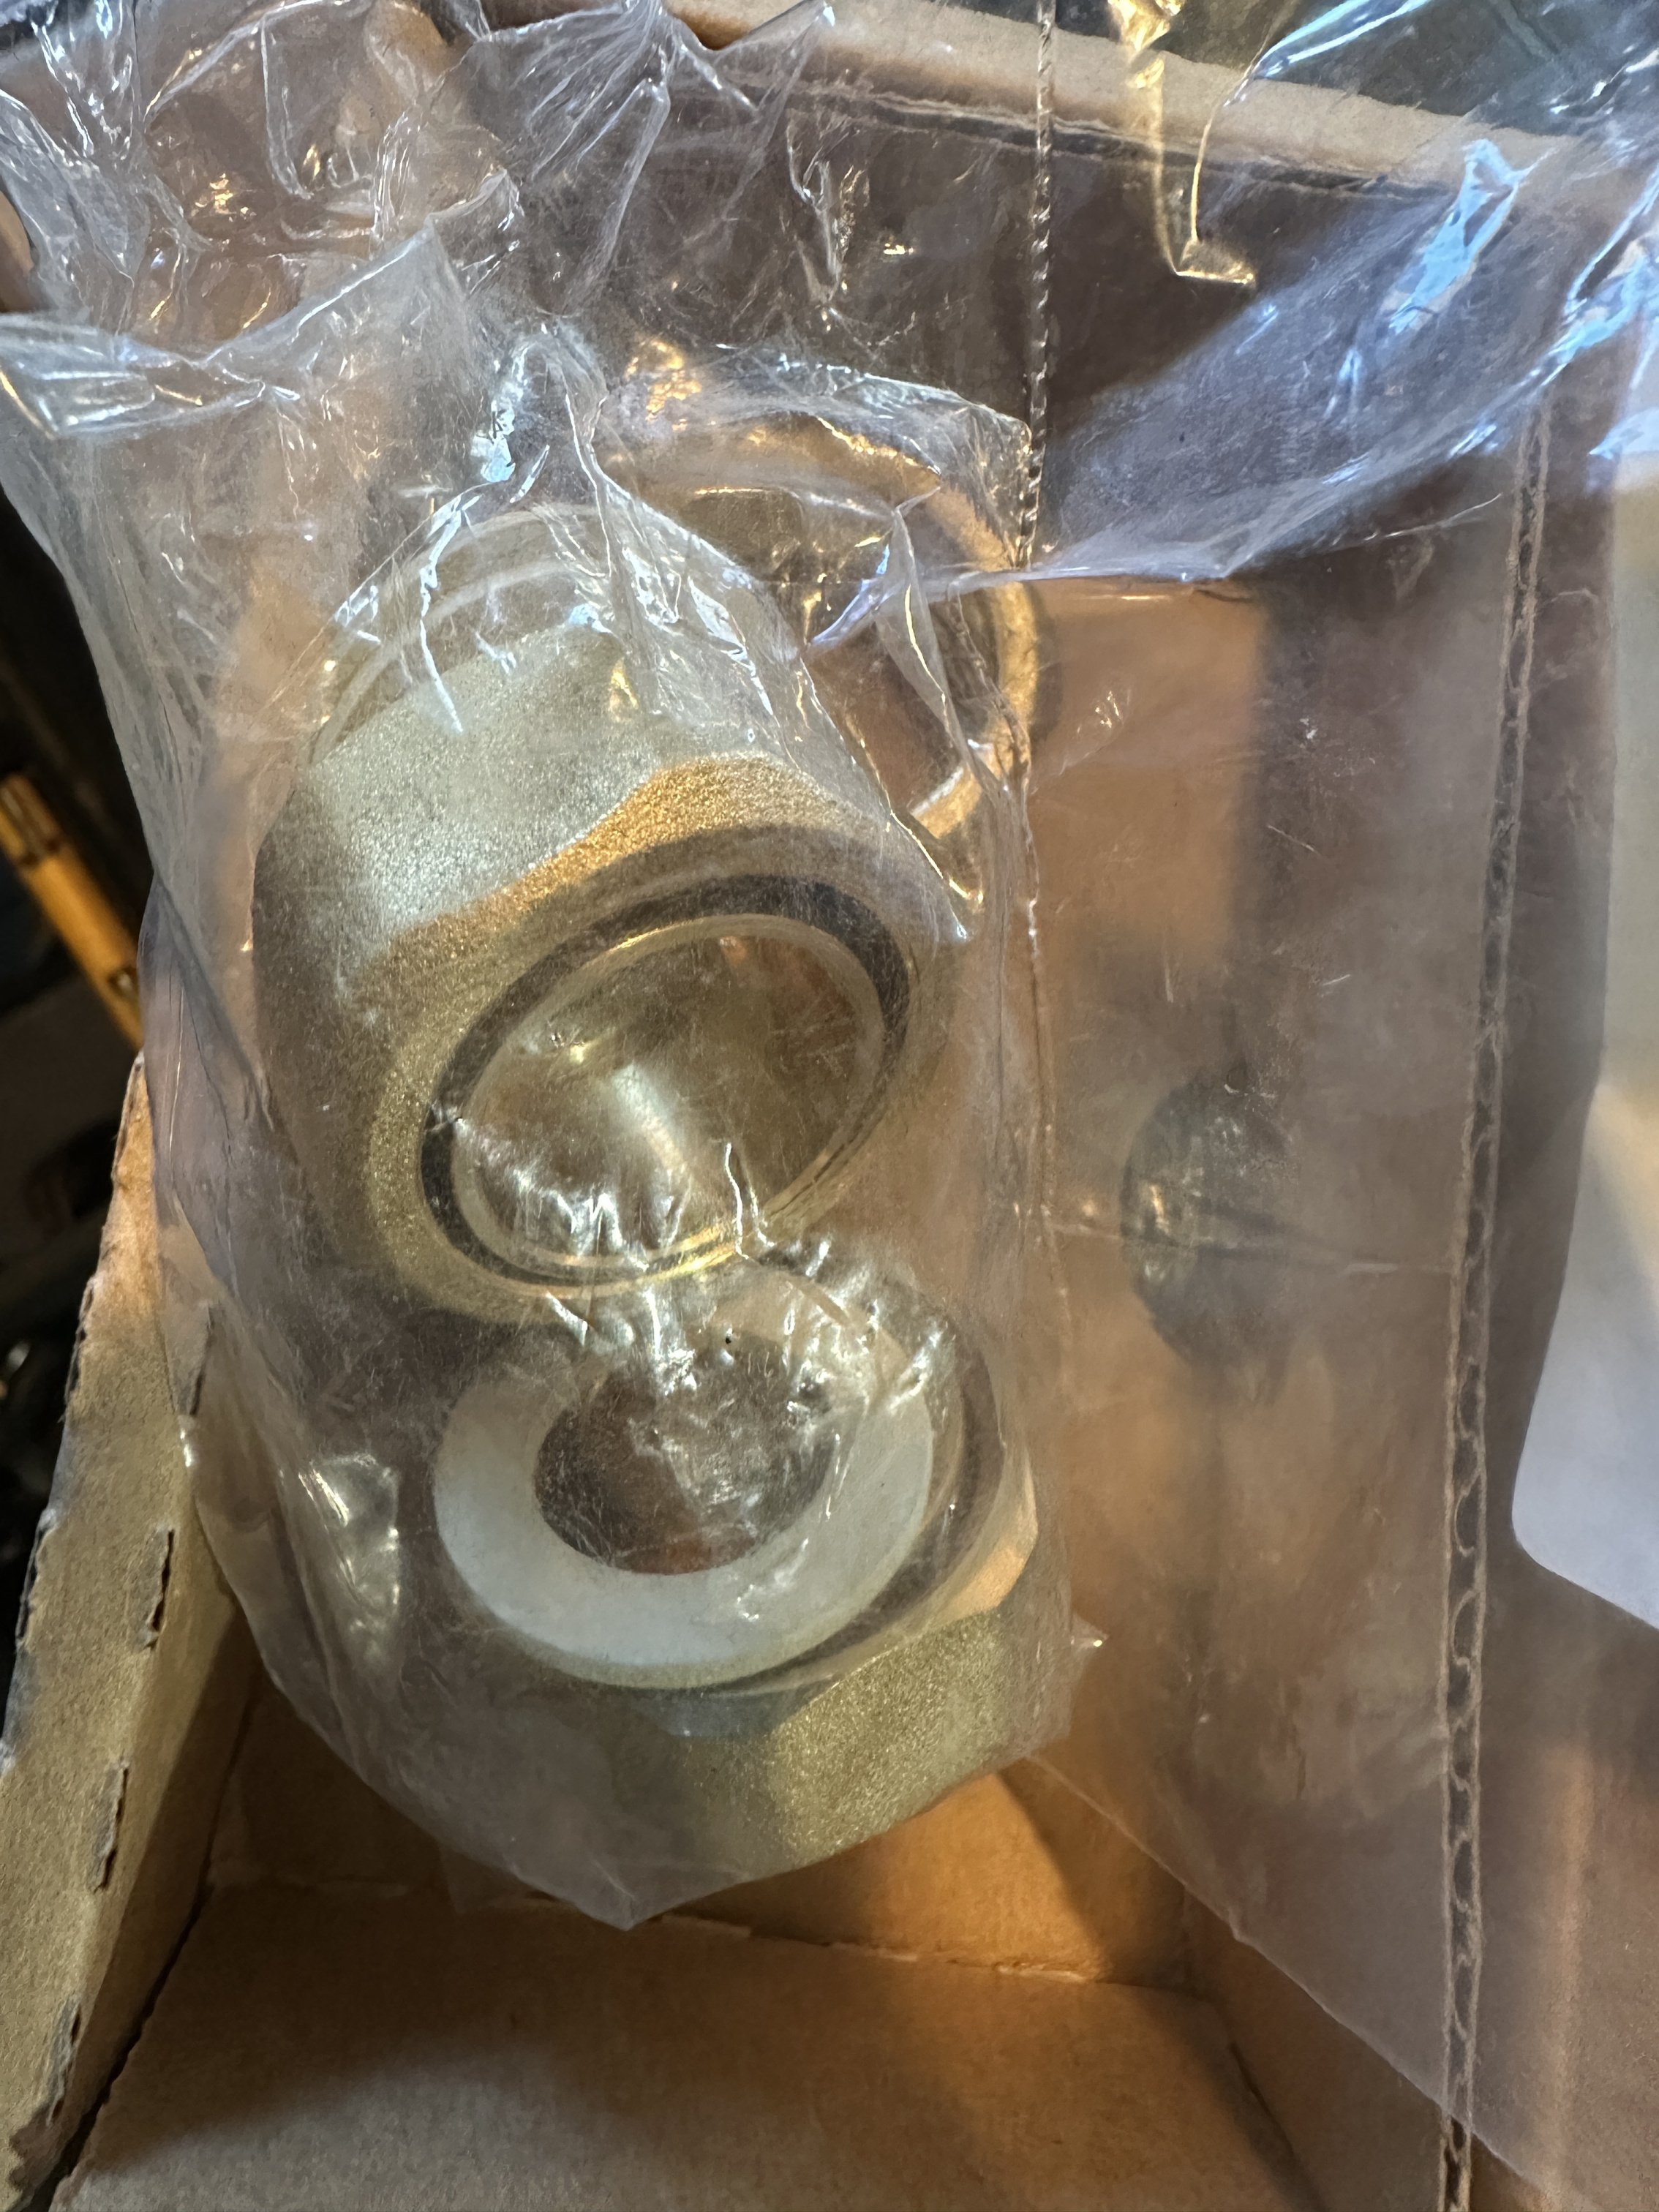
 0
0 -
hot_rod, I needed to know the size of those wrenches. Thanks very much for this.
0 -
I will replace the gaskets and see if that solves the issue. Thanks
0 -
the nuts are not the sealing component, changing them will not accomplish anything. It is the face of the tailpiece that does the sealing, the nut just holds the tailpiece against fiber washer and valve body
 Bob "hot rod" Rohr
trainer for Caleffi NA
Living the hydronic dream

 2
2 -
those composition gaskets suck. i opened one that was pretty new to service a prv and i couldn't get it to seal, had to change the gasket. pretty sure it didn't tear but it wouldn't re-seal.
0 -
They are a compression set type of material, they should not be reused. Ideally they will stick to both surfaces. Then you need top scrap them off with a knife.
Bob "hot rod" Rohr
trainer for Caleffi NA
Living the hydronic dream0 -
like i said, they suck :)
 1
1 -
I think that the new AM 101 valves use fiber seals which is why I wet them before installation. As stated the surfaces of the fittings must be cleaned because the old fiber seals sticks to the surfaces. I use a fine file to remove the debris (the old gasket still stuck to the fittings) and wet & dry sandpaper to finish the cleaning of the surfaces. I don't replace the nuts, just the valve body + gaskets and have never had a leak.
You have hard water which gums up the valve and interferes with its regulation. I don't spend the time cleaning valves as it is uneconomical. I just replace them.
 1
1 -
Yes, getting them wet does help them seal the first attempt. Most often they are overtightened which distorts the nut and prevents it from sealing the tailpiece properly.
There is actually a torque spec the the fiber washers suppliers spec to us. I doubt many plumbers have or
would use a torque wrench on fiber washer connections.
Bob "hot rod" Rohr
trainer for Caleffi NA
Living the hydronic dream0 -
especially since you'd need a huge crowsfoot wrench and to do some math to torque those. and the thread conditions on those is so all over the place you would probably be +-30% or so on the tension you put on any given joint
0 -
Fiber washer seals are used by the millions for plumbing, heating, hydraulic, pneumatic, and automotive seals. They handle heat, pressure, temperature well.
They are not going away as they check all the boxes for those applications. There is no rubber or composite replacement, we have searched the world, tried EPDM, Buna, silicone, various hard composite plastics, multi layer materials, etc. We see other brands going through the same gymnastics..
If YOU can't get them to seal, there are people that know how to :)
Bob "hot rod" Rohr
trainer for Caleffi NA
Living the hydronic dream0 -
it sealed when i scraped the old gasket off the side it was stuck to and used a new gasket (and supplyhouse.com had them backordered). they are great for a carburetor or water pump or pump housing but in something that needs to be serviced and is round there are better options.
0 -
Hydronic fiber, all the ones we have tested and offered are a one time use.
If you remove the component for service, buy new fiber
Or upgrade to PosiStop if you plan on taking them apart and reassembling. The "stop" part of PosiStop prevents you from over-tightening and destroying the o-ring.
O-ring manufacturers give you the compression %, so the valve or tailpieces machines to allow that required tolerance.
Bob "hot rod" Rohr
trainer for Caleffi NA
Living the hydronic dream0 -
@mattmia2 , and @hot_rod , these are great tips. Bulk of my experiences are in automotive, so I have a torque wrenchs. What I need is a 37 mm crowfoot wrench. Not much information can be found on the torque specs.
The replacement thermostatic valve I purchased came with the gaskets. I will replace them, clean the surfaces and wet them before install. These tips have been useful. Thanks for everything.
0 -
I could dig out the torque spec for the Caleffi fiber washers when used on a Caleffi component, we do have that. However releasing it often causes more confusion or questions, i.e. how to torque a large brass nut :), and date from Italy will be in metric units Nm Newton Meters to add more confusion.
A torque meter on a socket wrench with a crowfoot wrench would be one option. I imagine people that work on heavy equipment have large sized torque tools. Probably at the Caterpillar factories, etc.
Bob "hot rod" Rohr
trainer for Caleffi NA
Living the hydronic dream0 -
you have to correct it because the center is offset from the center of rotation of the wrench if you use a crowfoot. most wrenches sold in the US are calibrated in ft*lb and n*m or sometimes kg*cm through the last 40 years or so.
0 -
That offset will indeed change the torque output from the wrench.
0 -
The numbers I hear engineering use for various Caleffi assembly is inch pounds or with zone valve spring settings inch ounces
I have not seen ft*lbs used on brass nut torque, probably too course of a scale
Bob "hot rod" Rohr
trainer for Caleffi NA
Living the hydronic dream0 -
smaller wrenches are in in*lb. easy enough to multiply or divide by 12(or 16 or both). i have seen specs for torque screwdrivers in in*oz but never actually had one, if i didn't just guess i used a 1/4" torque wrench and converted to in*lb. actually i usually would use the metric spec and convert. it is all just an approximation for the tension you are putting on the fastener and the tension that corresponds to a given torque varies widely depending on the condition and tolerances of the fastener
0 -
@lindylex Seems your leak is coming from the union nuts supplied by the mixing valve manufacturer. You really do not need to replace the unions. Clean them with a sand cloth, steel wool, or sand paper both inside and out. When clean, replace the washers. Tighten the nuts. You do not need special wrenches or tools to tighten the union nuts. A couple of adjustable wrenches or channel lock pliers will do. One is used for tightening the other as a backer wrench.
 1
1 -
The torquing is a lofty goal as to get a crowfoot in that size that does not come in a 1/4 or 3/8 drive, the angle the torque wrench would be on and the size reduction adapters I would need to go from 1/2 to 1/4 or 3/8 would make this a torque nightmare.
I will clean the mating surfaces and install the new washers and see how things go.
 2
2 -
] Solved Solution [
After replacing the gaskets three days later I have no leak. Thanks for the help everyone.
2 -
The best scraper I have found to remove gaskets on McDonnell-Miller steam boiler parts or any other gasket material is the Wiha Universal Razor Edged Scraper- Item # 43090- I give one to each of my guys when I am training them. The right tool for the job.
0 -
I love a good scrapper. Thanks for this tool suggestion.
0 -
looks like the large xacto blades and handle system. there are carbide edge gasket scrapers too that can help. a razor blade or utility knife blade with the edge held parallel to the surface works well too as well as scotchbrite but the scotchbrite isn't the greatest idea on something you can't scrub and rinse of with detergent to get rid of the abrasive.
0


Categories
- All Categories
- 87.7K THE MAIN WALL
- 3.3K A-C, Heat Pumps & Refrigeration
- 59 Biomass
- 430 Carbon Monoxide Awareness
- 127 Chimneys & Flues
- 2.2K Domestic Hot Water
- 5.9K Gas Heating
- 121 Geothermal
- 170 Indoor-Air Quality
- 3.8K Oil Heating
- 79 Pipe Deterioration
- 1.1K Plumbing
- 6.6K Radiant Heating
- 396 Solar
- 16K Strictly Steam
- 3.5K Thermostats and Controls
- 56 Water Quality
- 51 Industry Classes
- 51 Job Opportunities
- 17 Recall Announcements