DIY boiler supply leak woes

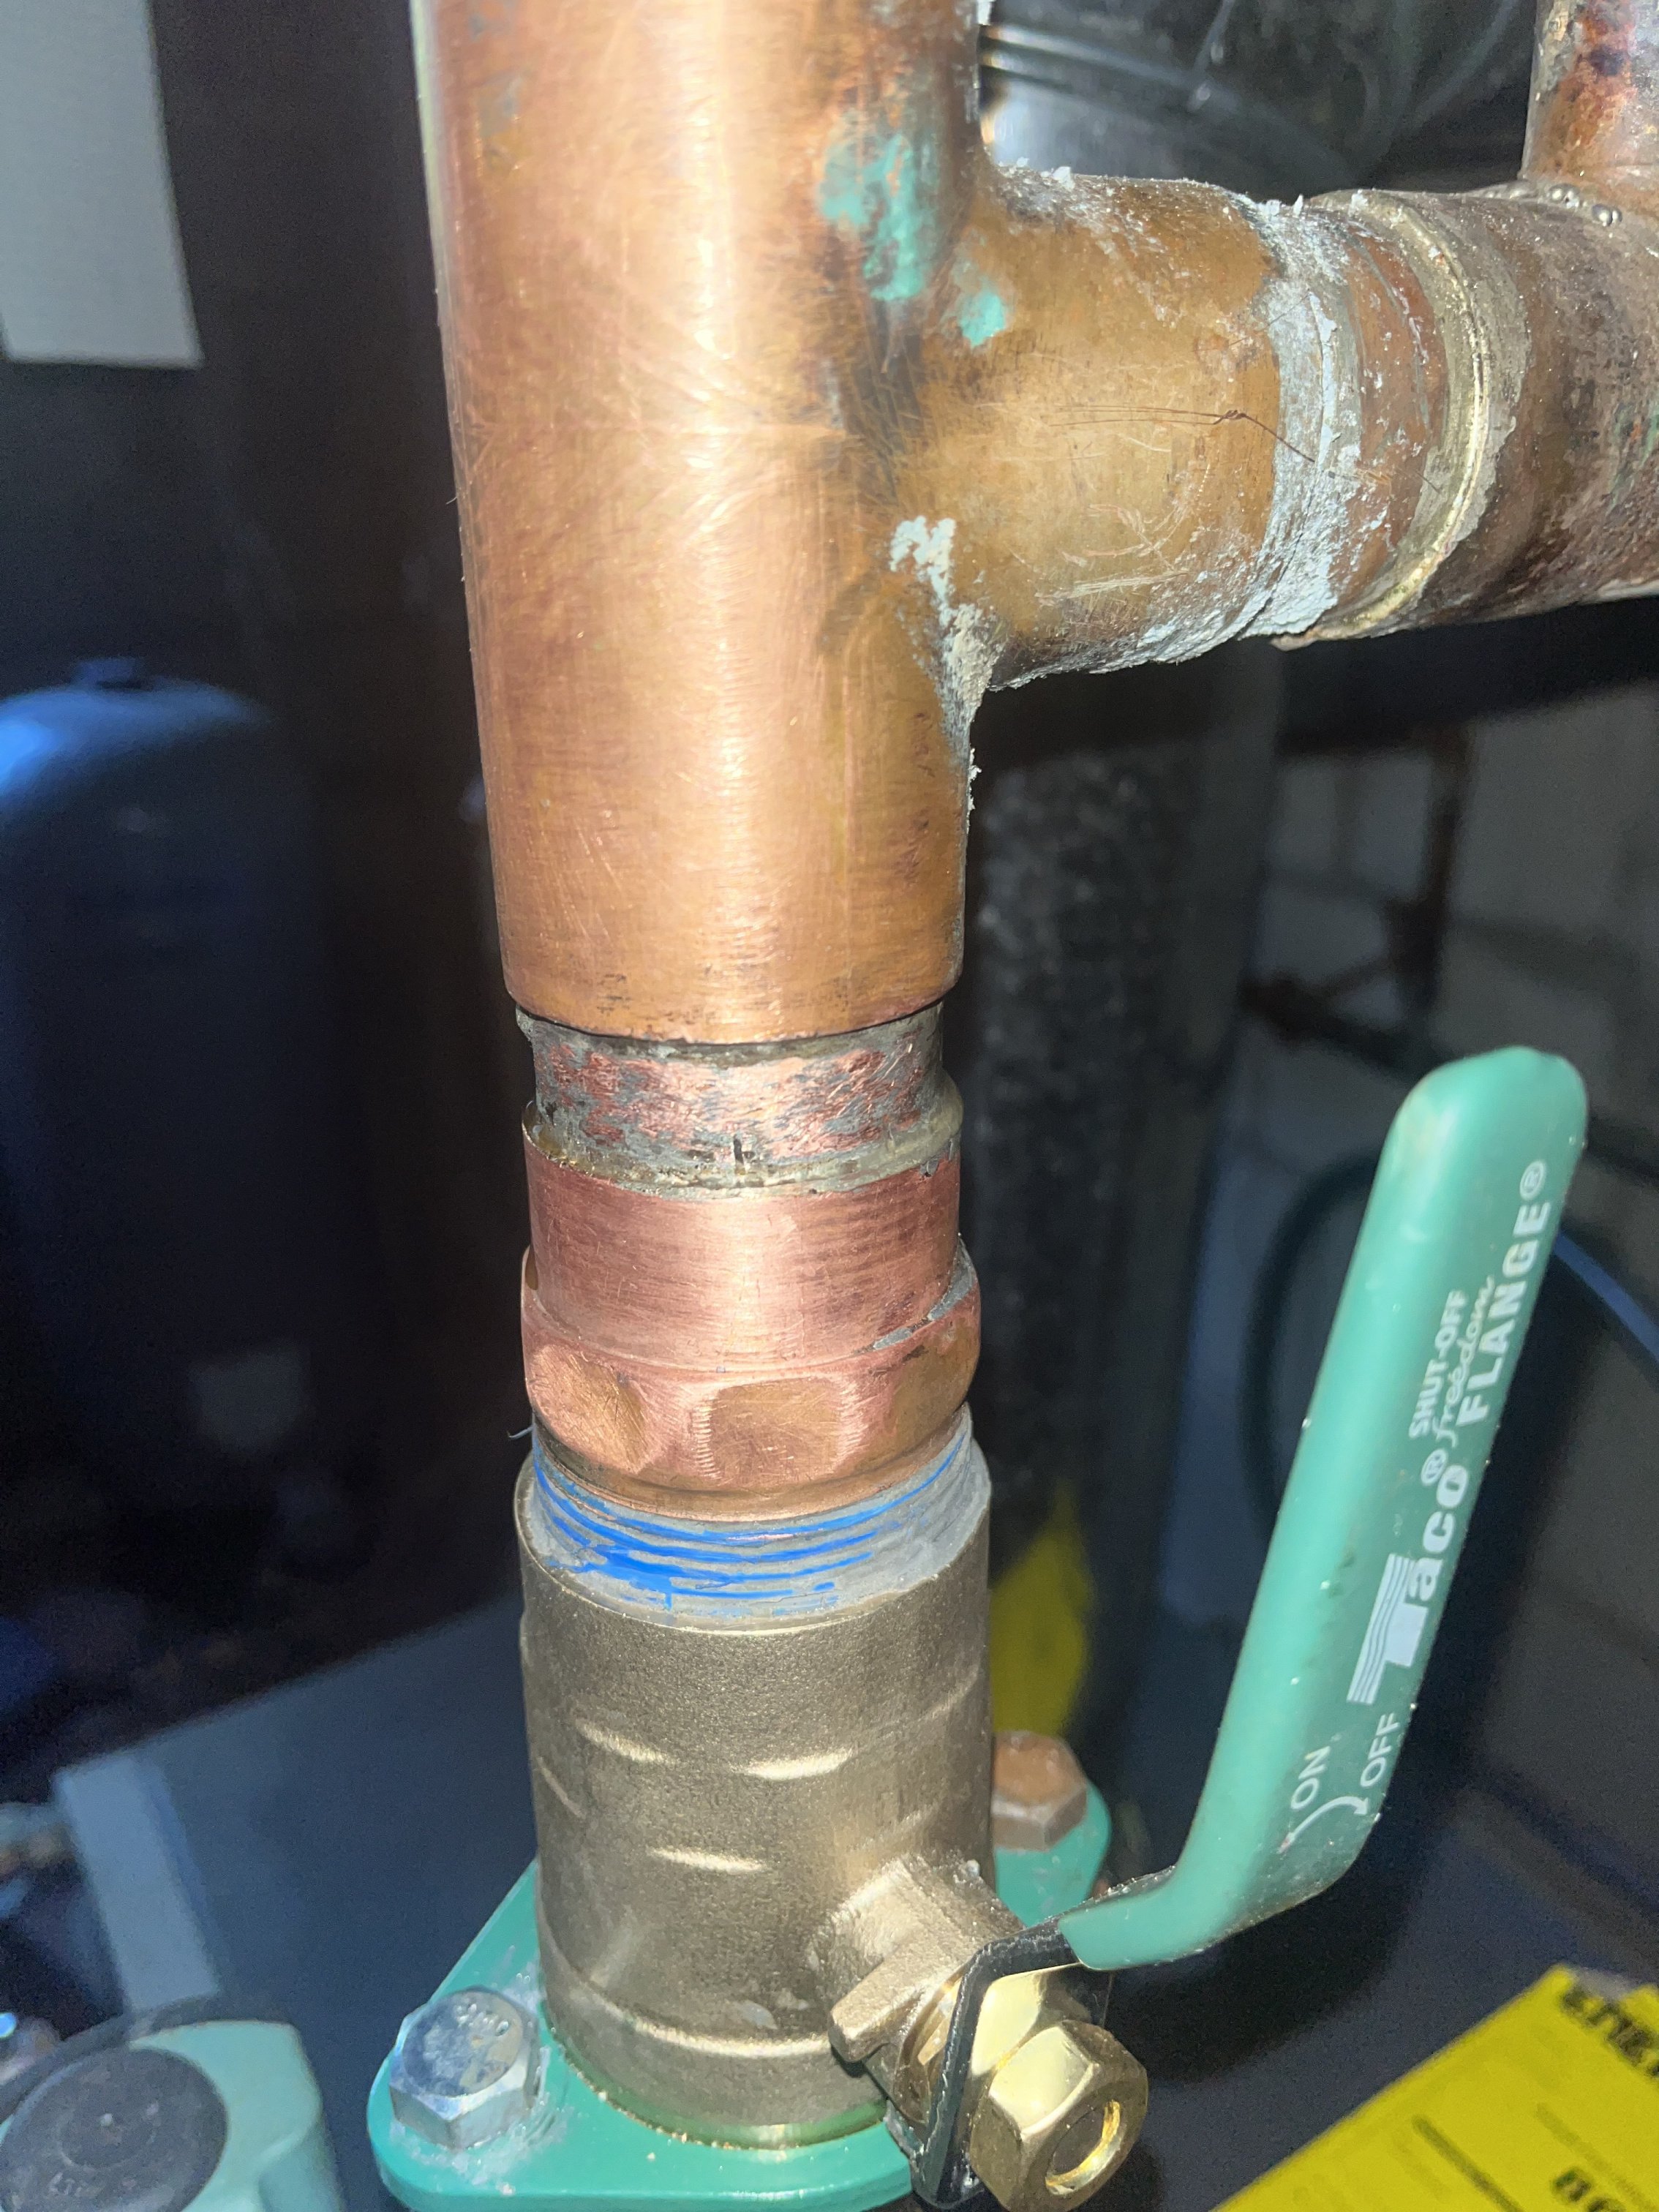
I have a small leak in a copper sweat-to-NPT adapter in the supply coming out of my boiler, above the circulator (see photo). I got a LOT of help with this and other stuff in a thread that started as "How drain boiler for repair" but I figure that thread was becoming about everything but draining a boiler, so I'm starting this one so maybe other DIYers with a similar problem now or in the future can find this. The old thread was:
So, last fall I tried to unsolder the leaking adapter to replace it but it just wouldn't come off, so I lived with the leak for the winter. I tried again this September with a hotter torch tip, but it wouldn't come off, so I went to Plan B, suggested by @mattmia2, which was to cut slits into the adapter (which I did with my Dremel multi-tool), heat, and peel it off in strips. It worked like a charm. Long story short I got the new adapter on and felt like a hero until I saw this one was leaking too, maybe a little more than the old one, and I think it's also leaking at the top edge of the little nipple. (I might have inadvertently unsoldered that too, despite the application of heat paste at the nipple/tee joint—thank you @HVACNUT for telling me about heat paste, it's great stuff—which might be too close to the joint I was trying to unsolder for even heat paste to help.)
Frankly I'm hoping someone here can reassure me (as somebody did last year) that I can live with this leak (now a little bit larger, but not dripping or anything) until next spring, because I do not want to screw up the tee by trying to remove the little nipple and then have to chase leaks into the manifold and maybe have to rebuild a lot of that stuff, with cold weather coming. I figure the little bit of fresh oxygenated water that will replace what seeps out will not cause significant corrosion on this short time scale. That's basically the TL:DR of this post, so please feel free to reassure away.
In any case, when I saw this new one leaking, I admitted defeat and called a very experienced plumber I've never used but who came well recommended (I haven't used a plumber since mine retired), sent him photos of the adapter and he came over seemingly ready to try to fix it. But I have a couple of questions:
- When we were texting and I sent photos he seemed fine with trying to fix the leak, but when he arrived he didn't have any 1-1/2" pipe for the nipple but he did have a manifold, so he suggested tearing the old manifold out and putting this one in, and he said trying to fix the leak first would probably only unsolder the tee. But I kind of thought a wet rag or heat paste should take care of that, which is what I had used, and those legs didn't unsolder. (Although I have to say I was applying the bulk of the heat to the lower adapter-to-nipple joint, not the nipple-to-tee joint. Also what I did not do, and wish I did, was follow @EdTheHeaterMan and @mattmia2's advice and use 50/50 solder which melts at a lower temp. I had plunged ahead and only saw their posts afterwards.)
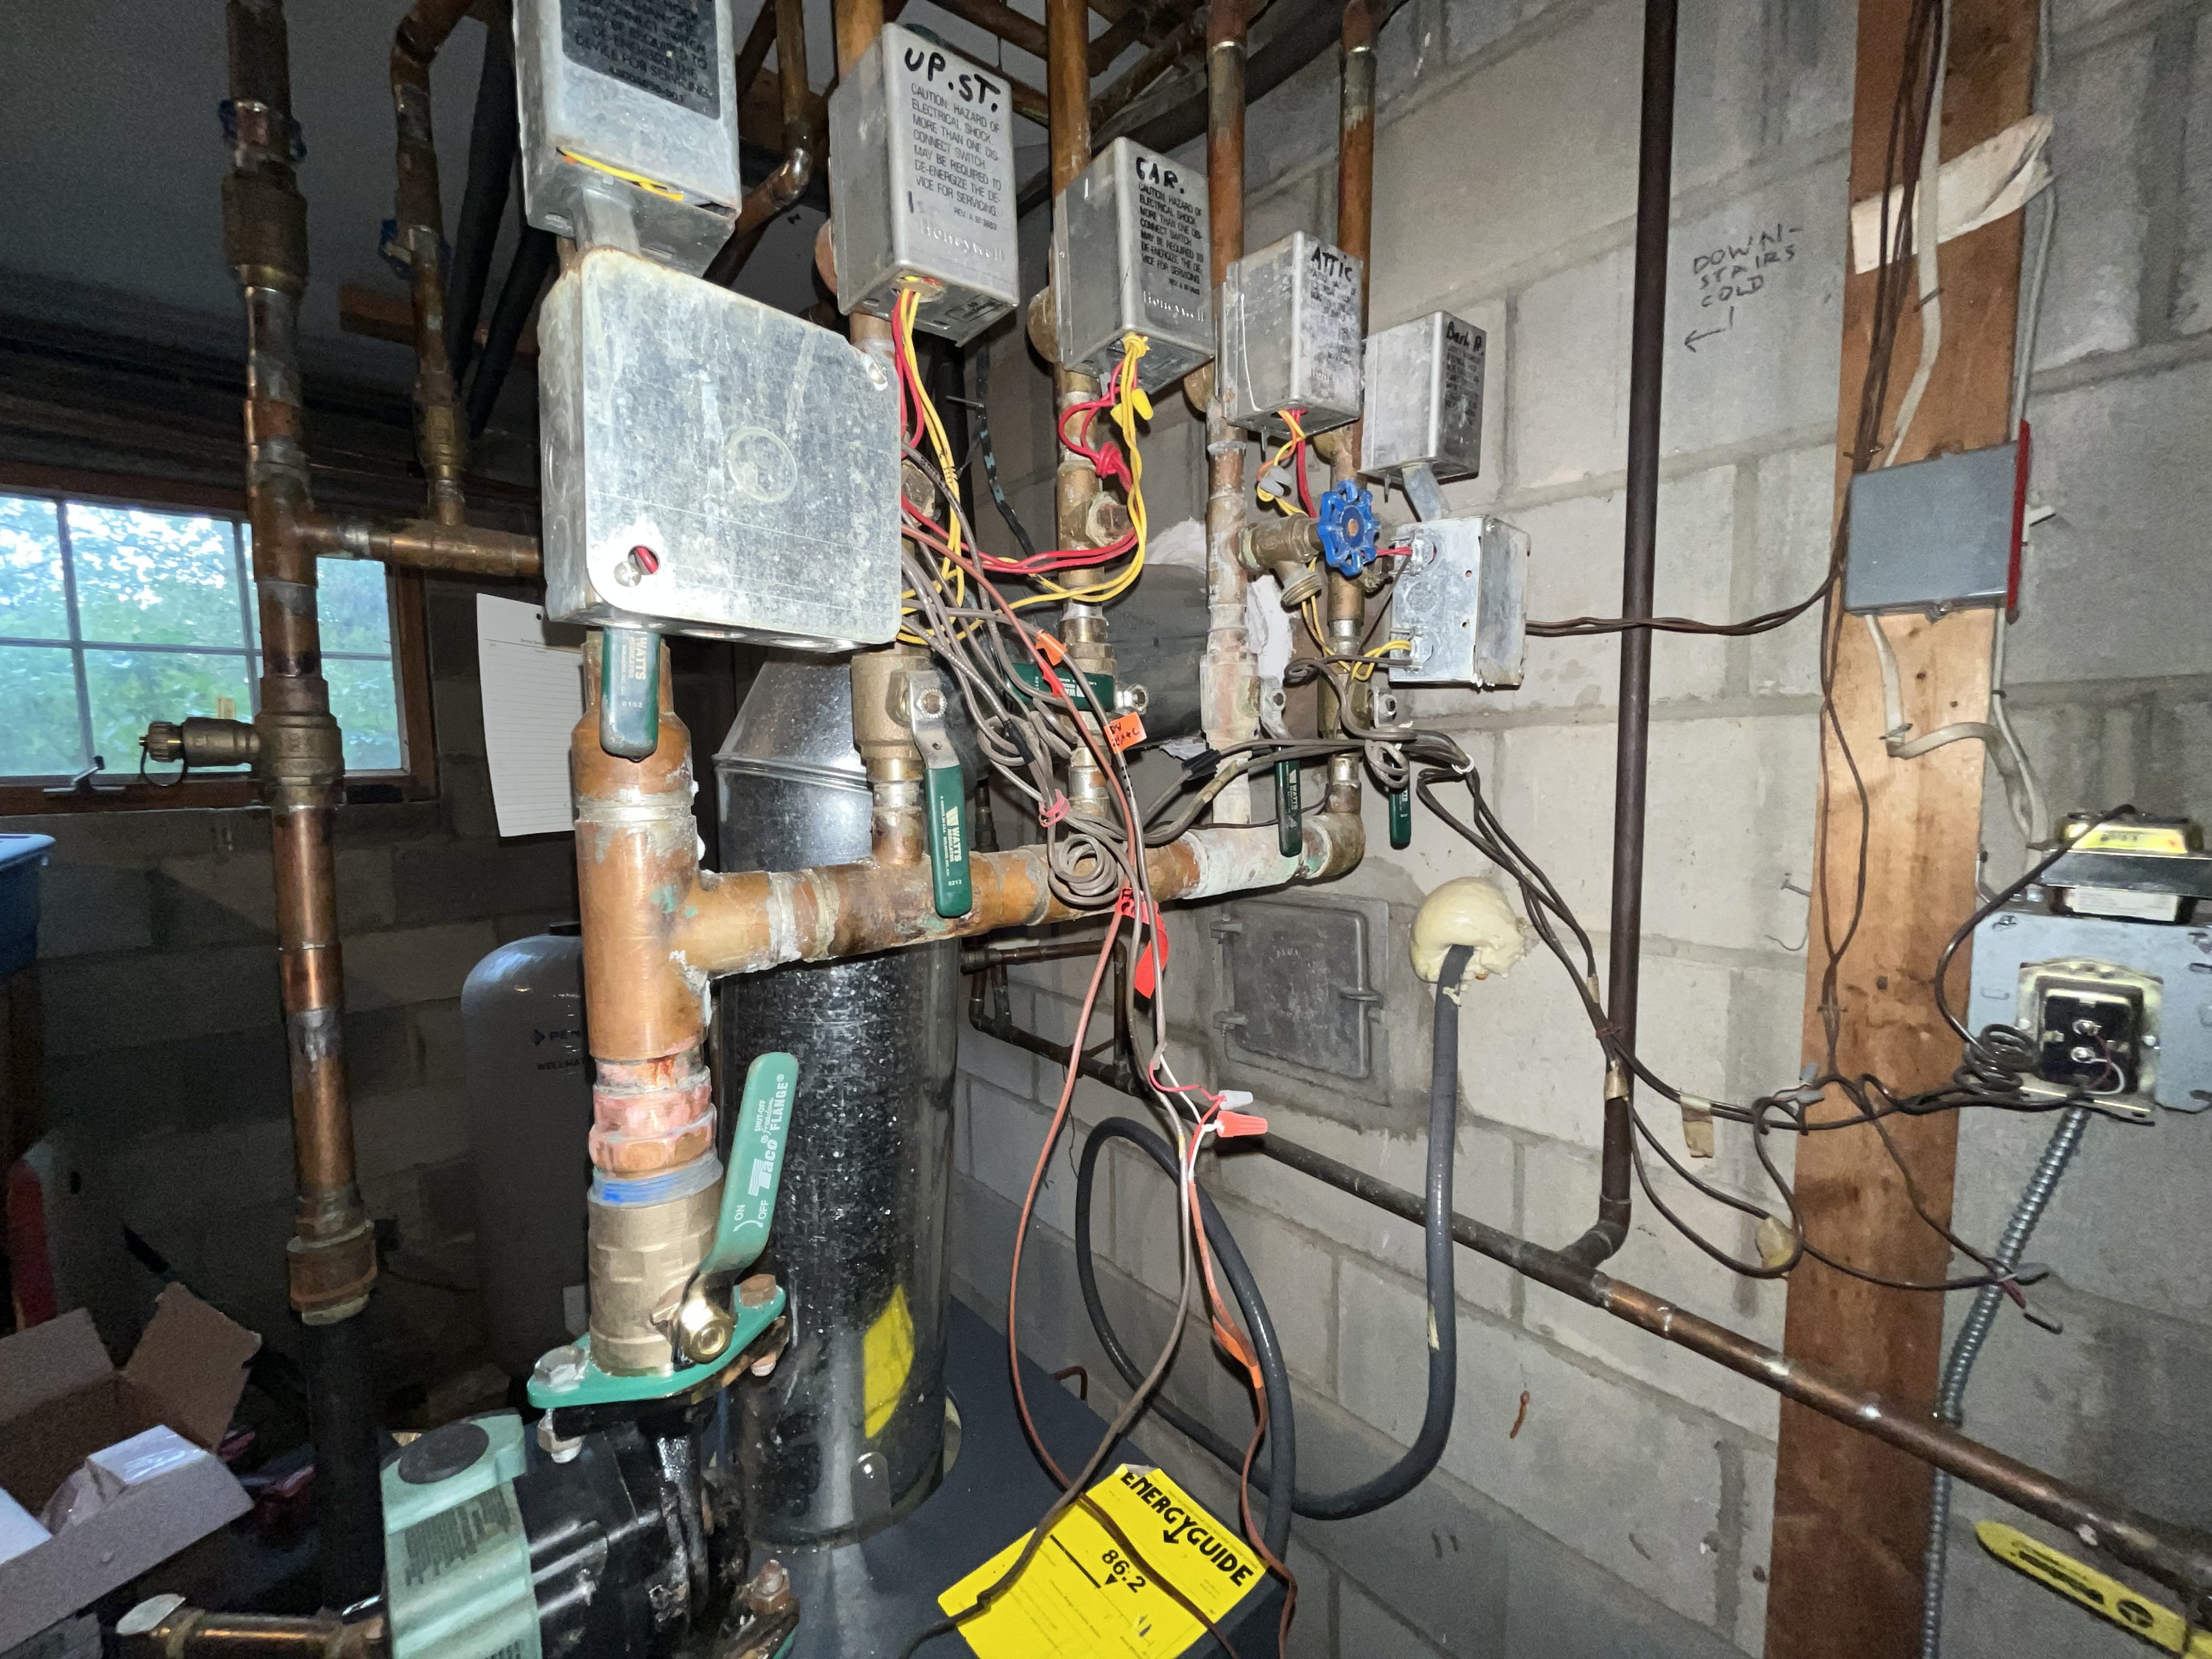
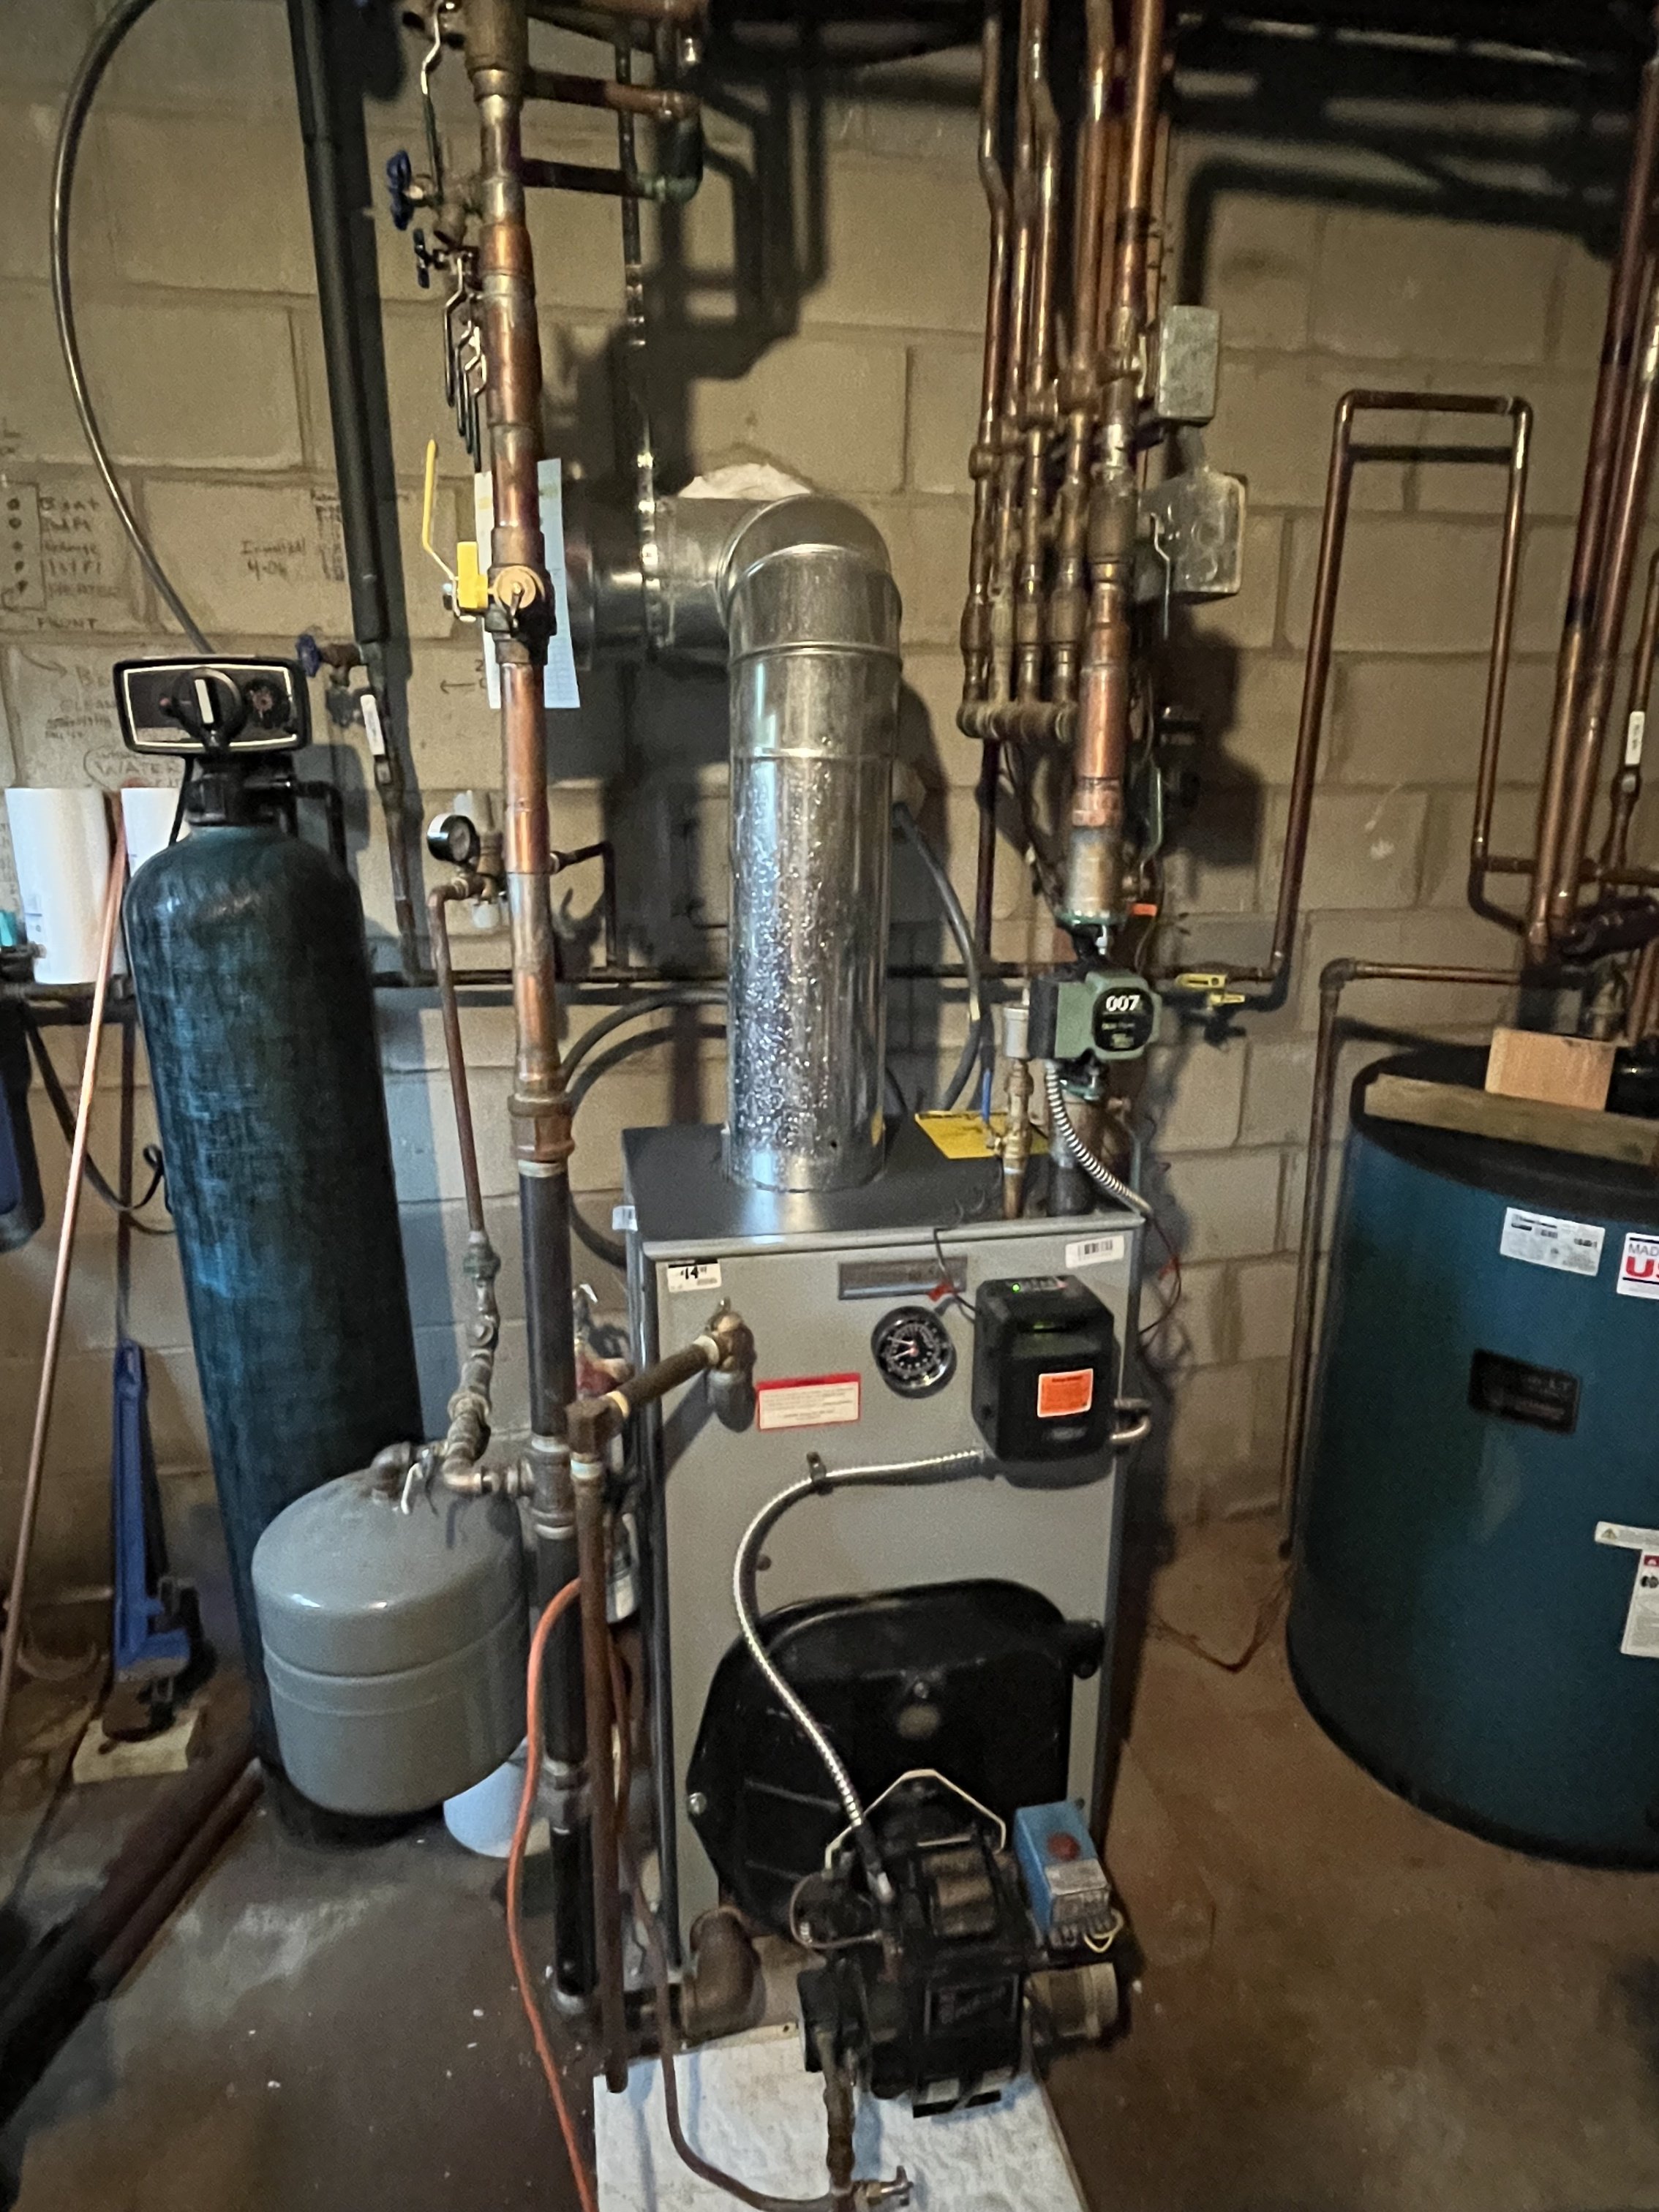
- The plumber also was unhappy with the 1-1/2" piping out of the supply in general, saying that is "oversized" for my size house. The 1-1/2" in question is (see photo): one 6" black iron nipple out of the boiler's 1-1/2" supply tapping, then the circulator surrounded by two 1-1/2" isolator flange valves I just put in at the suggestion of folks on this forum, then the troublesome adapter and the nipple and the tee. The upper leg of the tee gets reduced immediately to 1" for the hot water heater zone, the horizontal leg goes to a 1-1/2" manifold with four 3/4" risers to the zones, and that's it for 1-1/2". So two or three feet in total. So why is this few feet of 1/1/2" undesirable? I asked why and he said it's like a five lane highway going down to two lanes. But I figure since the tapping is 1-1/2" it has to "go down to two lanes" somewhere, he seemed to want it to happen as close to the tapping as possible. (Or maybe he just wanted to further justify skipping the leak and putting on the manifold he had, which was smaller diameter.) Maybe he's right, but I don't quite understand the issue, maybe someone here can explain it.
- He said the circ shouldn't be on the supply side because that's where the water is hottest and that will shorten its life (and ideally for the same reason zone valves should be on the return too), so he wanted to move the circ. I mentioned what @EdTheHeaterMan has said about Weil-McLain having an air separation action built into their boilers, and that the circ has to be on the supply side for that to work; the plumber said he was familiar with that built-in separation but put no stock in it and wanted to put a Spirovent where the circ now is. Okay, maybe a Spirovent or Discal would be good for my system or maybe they are not necessary, but installing one and leaving the circ on the supply side would take advantage of both the WM separation and the added separator. Also, he wanted to put the circ on the return above where the cold water feed comes in, and since the expansion tank is on that feed line I said wouldn't that be pumping towards the tank, and aren't you supposed to pump away? but he didn't seem familiar with that.
- By now he also wanted to rebuild everything manifold and above and replace all the zone valves with identical new ones because these are old, and to redo the wiring, which is admittedly messy and ugly but so far works fine. He also noticed that my one year old Caleffi combi auto-fill/backflow preventer was dripping from the provided port on the backflow preventer, which it has been, chronically; but I figure that just means it's time for me to clean it as Caleffi suggests. I mentioned that, but he said we could just plug it up so it won't drip. A short time later he mentioned that as part of this master plan he wanted to replace the whole combi unit, since it obviously wasn't working right.
Now he's an experienced plumber and obviously knows way more than me, and I understand wanting to update and improve, but we went from trying to fix a small leak to replacing or moving half my heating system plus reshingling the roof and paving the driveway. Maybe he just didn't want to deal with that little leak, which admittedly might get ugly and we'd have to go into the manifold etc. Or maybe I am misjudging out of ignorance, which I do have in decent supply
In any case I actually have gained enough confidence to be willing to try and replace the nipple and adapter and if it doesn't work go on to rebuild whatever I have to of the manifold and all that stuff, but I would really like to wait 'till spring to attempt it, when it's warm and I can take my time. (Multiply how long it would take you by a factor of ten or fifteen.)
Comments
-
Situations like that with the Plumber become DIY motivation. Maybe the plumber went down that road to gracefully just get out of there. That can be an awkward or difficult repair.
I would not have cut into the nipple, if the solder does not fill the cuts (grooves) it will leak. Debris, trapped flux, not super clean, the solder won't fill.
As for the present leak, be real sure what is leaking before proceeding.
I hope the actual soldering prep was much much better than what is pictured. Both the male and female part of the joint. Good solder joints need great prep.
 National - U.S. Gas Boiler 45+ Years Old
Steam 300 SQ. FT. - EDR 347
One Pipe System0 -
@109A_5 that’s just what I was thinking, I think he may have gone into the radical upsell so I’d either say no and he could go on to better things or I’d say yes and he’d have a big easy job and could just cut out the troublesome leak.
I cleaned it the best I could with abrasive cloth and a flat file, and got into the grooves.
Now it’s pretty clear the nipple’s leaking up top so I’d have to try to take that out, which I would not look forward to.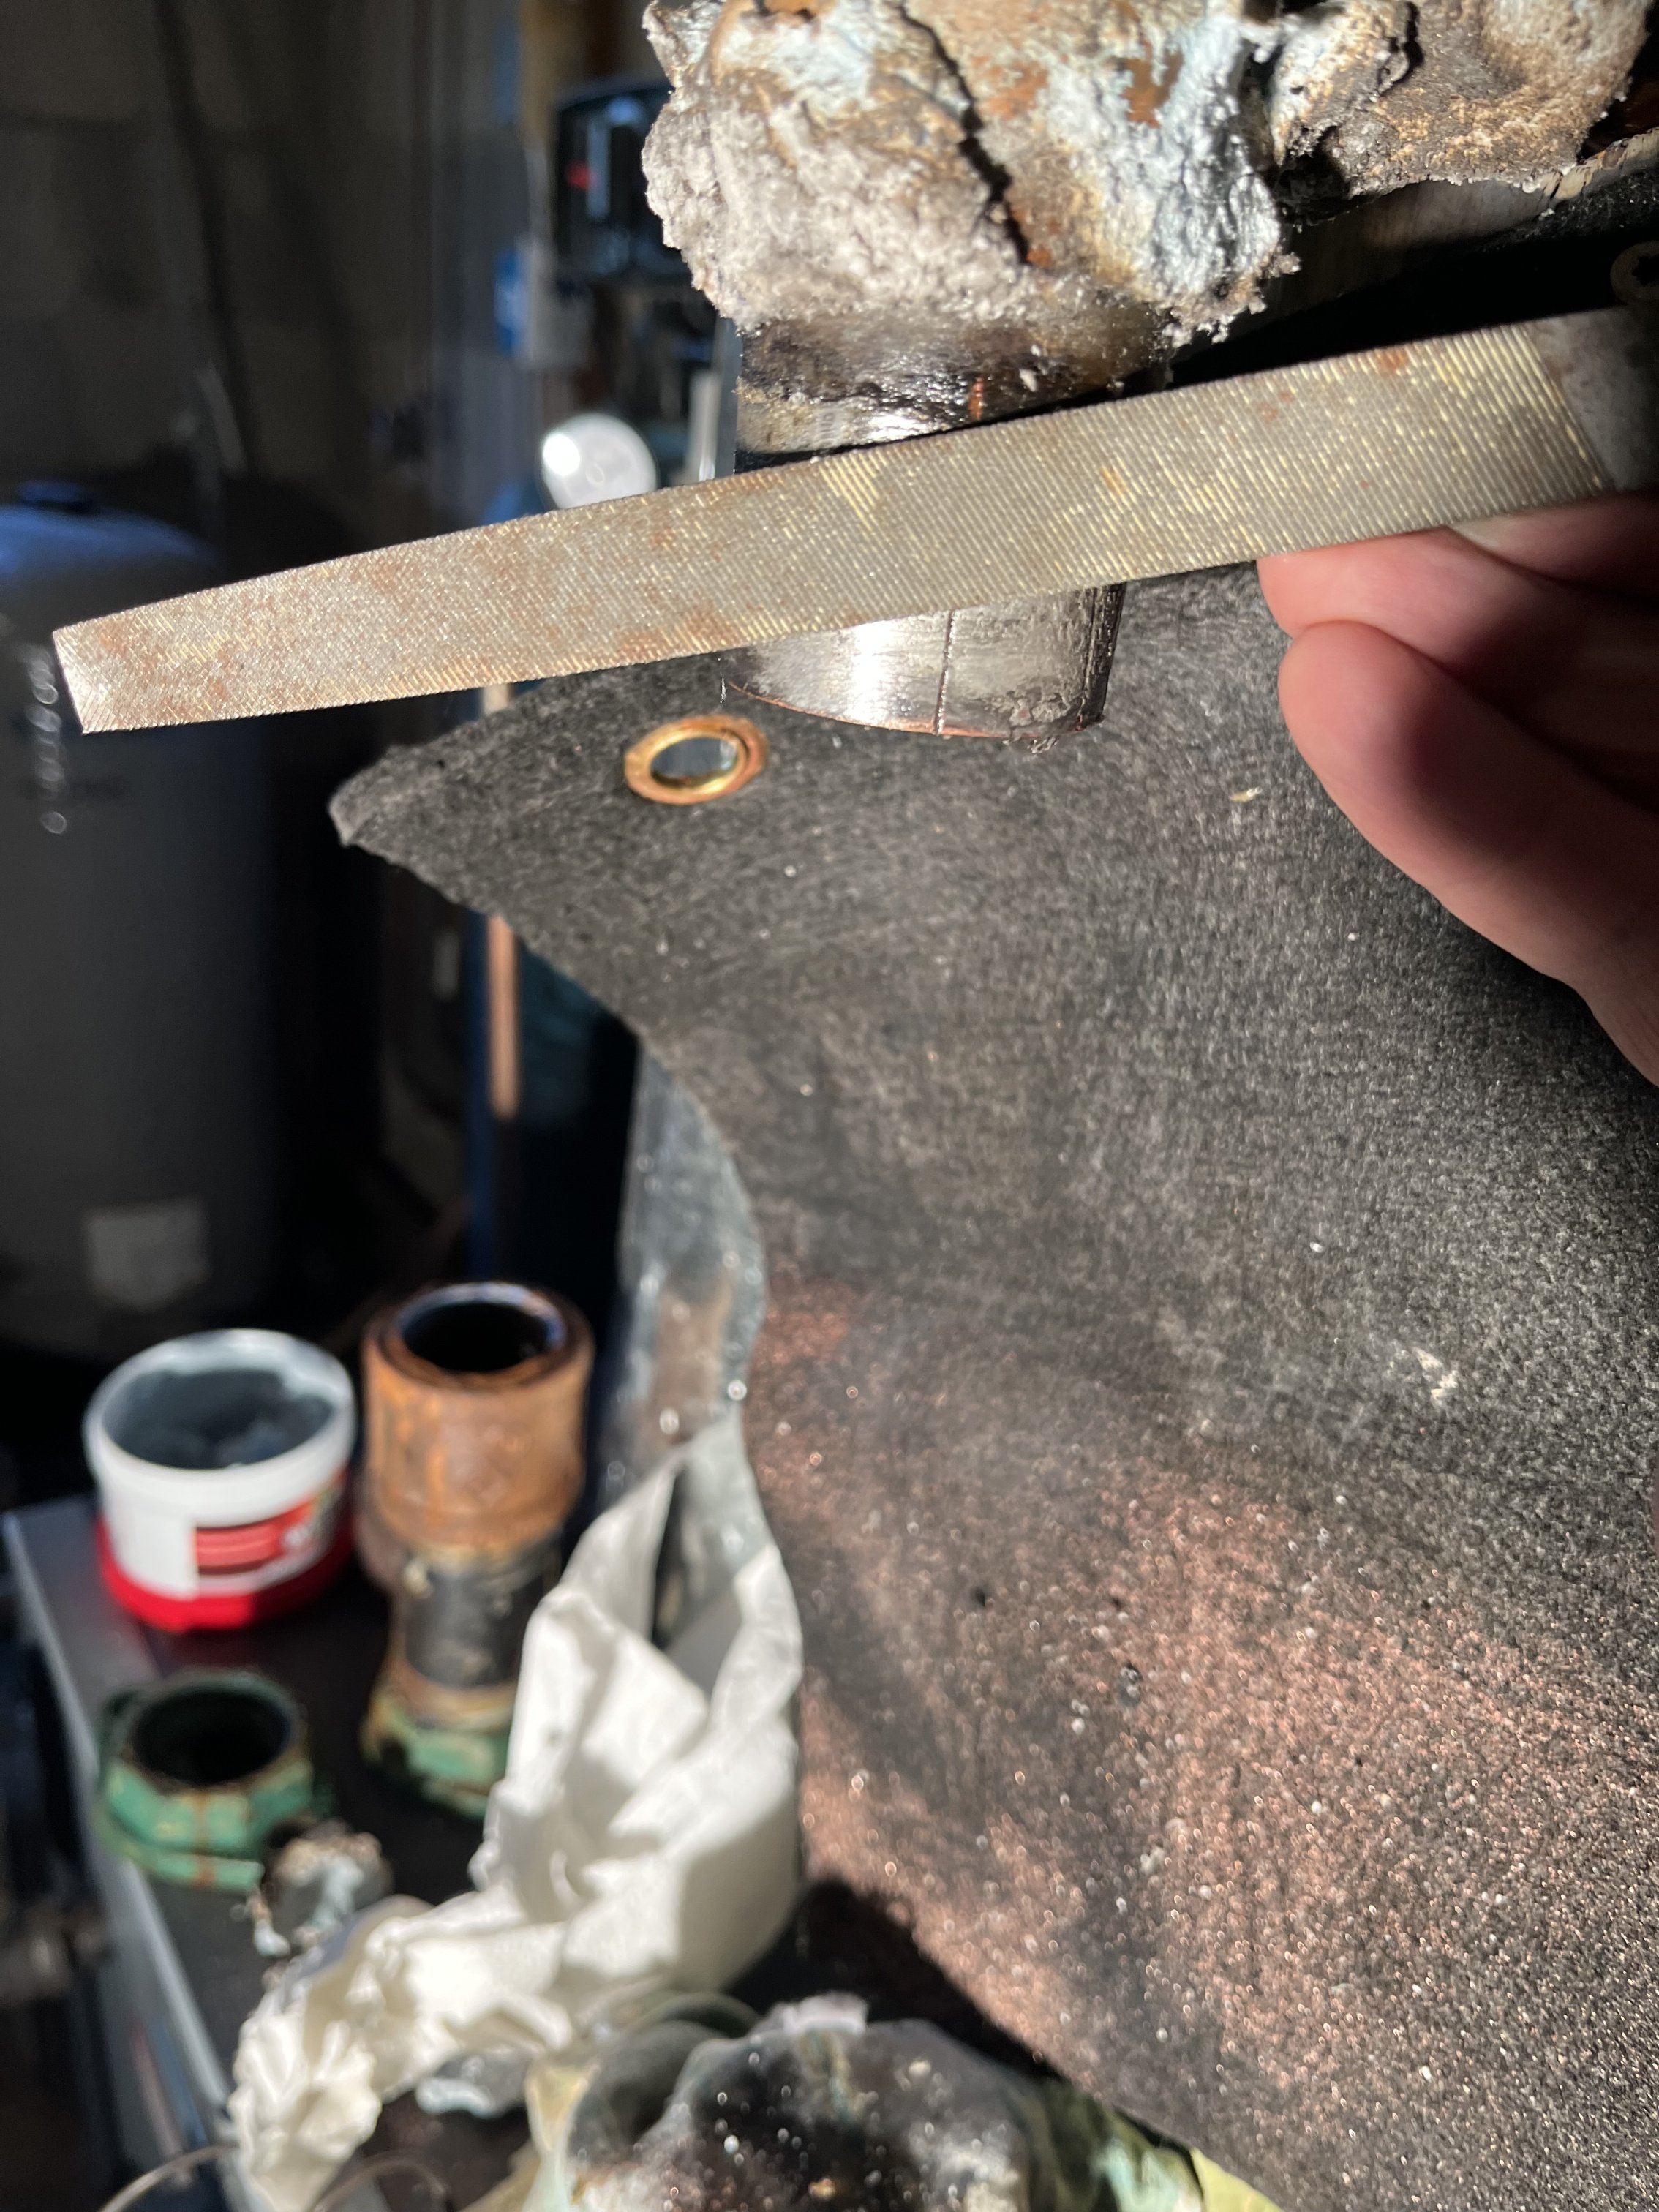 0
0 -
Are there other issues ? Is this a drip and corrosion ?
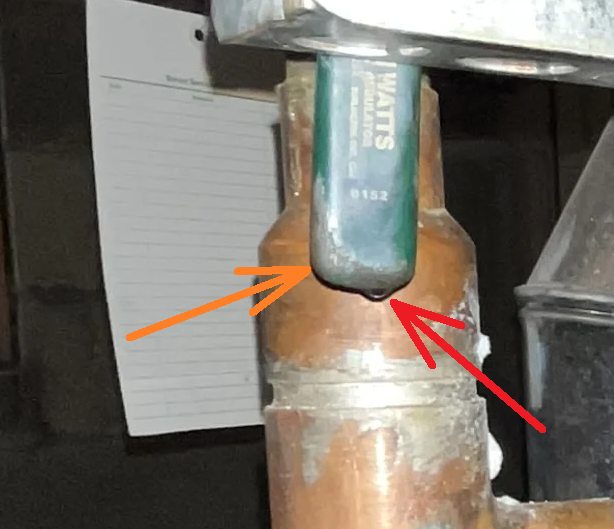
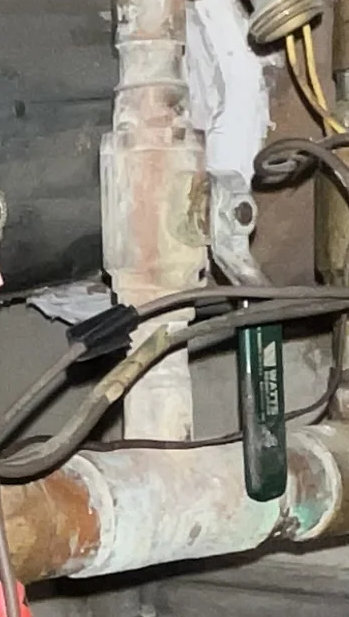
This is looking kind of crusty.
 National - U.S. Gas Boiler 45+ Years Old
Steam 300 SQ. FT. - EDR 347
One Pipe System0 -
@109A_5 good eye, I went downstairs and I don't know what that thing that looks like a drip is in the first photo, but all seems okay there now. The stuff in the other photo does have a thin sheen of whitish corrosion, but it's not as bad looking in person as in the photo. Don't see any leak or anything there, I could probably clean it up fairly easily.
0 -
He (the plumber) said the circ shouldn't be on the supply side because that's where the water is hottest and that will shorten its life (and ideally for the same reason zone valves should be on the return too), so he wanted to move the circ.
This plumber does not understand that it is no longer 1950. And does not understand the concept of Boyle's Law, and has never read Pumping Away. That said, he is trying to sell you on something you do not need And anything he charged you to tell you this misinformation was money ill spent. Especially if he didn't fix the leaking sweat joint you hired him for. Don't call that guy for heating anymore. He might know how to clear a drain line or install a faucet, but he is clueless about Hydronics.
Also there is no such thing as a pipe that is too big. "2 lanes down a 5 lane highway". I have been on that road, and it makes for easy, congestion free driving.
It appears that you can easily get to that leaking fitting by closing all the zones and the valve below the circulator. that will allow you (or a plumber that has a brain) to access that leaking fitting to heat it up and get the leak to stop with some sort of soldering. I can only think that the fitting was not clean or the copper pipe was not clean or you burned the flux away by overheating the sweat joint. That new adaptor on a polished piece of copper should sweat together nicely.
Sorry you got stuck with a plumber that does not want to do his job.
Edward Young Retired
After you make that expensive repair and you still have the same problem, What will you check next?
 1
1 -
@EdTheHeaterMan I thought you'd like the stuff about the circulator on the supply side, also the part about pumping into the tank. Glad to see also that there's nothing wrong with the 1-1/2".
Yup, getting to that fitting is easy, especially with those new isolator valves that I think you suggested I put in around the circulator. (I also put in a Webstone combo valve/drain as a purging station on the return, which you definitely recommended. I think it's in the photo.)
I'm glad you think a retry on the adapter might work, and it might. Unfortunately the short nipple going into the tee is now leaking at the top edge too, and getting that out is a lot more intimidating to me than getting the adapter off was, because if I deform the nipple in the attempt to get it out, but it still won't budge, or if I deform the tee in the process, now I've got a much bigger problem than the little leak was and I'm chasing leaks into that complicated structure above. May have to do it, but I'd rather do it in the spring when I can take my time and not worry about cold weather coming. So I'm hoping I can get through the winter with this little leak, which I did last winter except the leak was a little smaller than this one. (You once mentioned that it will leak less or not at all when hot, which it presumably will be most of the winter.)
Does it ever make sense with faulty joints like these, in an attempt to make things temporarily better, to slap flux and solder and heat on the joints and hope enough gets sucked down to maybe fill some voids and make it leak less? Or could that make things worse?
0 -
As far as the top of joint at the bottom of the Tee is concerned, that is easily done with a little finesse. You can protect the other two tee joints with heat absorbing compound, and you dont actually need to heat the Tee at all. Just clean the joint with grit cloth and put lots of acid paste flux on the un sweat joint. Allos the heat from doing the lower joint travel up the nipple, Do the bottom joint (copper Male Adaptor first) and when it gets just enough heat swipe the 50/50 solder at that joint. As you get the solder to start to melt, pull the flame back a few inches to reduce how fast the heat increases on the joint. Move in and out with the flame to get the heat to allow the solder to get sucked into that bottom joint. Just before you are finished see if there is enough heat on the top of the nipple by swiping a little solder there. Then remove the flame and paint the top joint with flux. Then put the heat back and see if you can get another swipe of solder to melt. Once that is done, let the joint cool by painting it with flux. It may not look professional but you can get it to stop leaking.
A leak is a void in the solder. That void is from dirt, overheating, or insufficient flux. So clean with grit cloth or a fitting brush until you get past the dirt. use plenty of flux
Edward Young Retired
After you make that expensive repair and you still have the same problem, What will you check next?
0 -
@EdTheHeaterMan that is very helpful. Just so I'm clear, are you talking about trying to improve the joints between the fittings and nipple soldered together in place as they are now, without removing the adaptor or nipple? (By basically trying to cram more solder down the already soldered joints?) I think you are, but just wanted to make sure.
0 -
That would be my first try.
if that does not work, then I would remove the Tee fitting above completely, clean the copper to a polished shiny finish with 150 grit sand cloth, clean the new Tee fitting with a fitting brush or sand cloth, then carefully solder it all back together.
Edward Young Retired
After you make that expensive repair and you still have the same problem, What will you check next?
0 -
I wonder what your Plumber might say about this Weil McLain circulator placement in this product brochure WGO Series 3
Edward Young Retired
After you make that expensive repair and you still have the same problem, What will you check next?
0 -
Yup, I’m not sure but I think the circulator came with the boiler and it might even have been mounted there.
I might try the first way as soon as I can get some 50/50, but if it doesn’t work (hopefully it won’t make matters worse) I’ll go to the tee like you say, though I’d like to do that in the spring, living with the leak over the winter. Warm weather would give me more time and leeway.
 1
1 -
Not proud of it but it has held for over a decade. JB weld putty over leaky joint.
Make sure to release the pressure from the system so the joint is not leaking while the putty dries.
 1
1 -
Interesting!
0 -
Here’s a general question for you guys. The plumber suggested replacing all five Honeywell zone valves with identical new ones (and he’s not the first free-associating visiting plumber to suggest this). Does it ever make sense to replace a functioning zone valve with a newer cousin, just because it’s old (like we replace old cars)? Or do they fall under the category of if it’s not broke don’t fix it?
Also, if you replace a zone valve that no longer works, is the common thing to just swap out the motor and gear and stuff, the whole silver box, leaving the old brass part that has the actual valve mechanism (thus not having to do any soldering and unsoldering?) Do those brass valve parts actually attached to the zone risers commonly fail over time? In other words, when they say “replace the zone valves” can I assume it means just the box and mechanisms inside, not the whole valve/motor assembly?
1 -
If it's not broke …don't fix it!

Sometimes when you have the older version, The quality and workmanship of the old part is superior to the new model, having less expensive plastic parts replacing older metal gears and stuff. Same part number, different quality.
I think Inspector 12 retired 35 years ago and the stuff ain't been the same since!
Who remembers Inspector 12?
Edward Young Retired
After you make that expensive repair and you still have the same problem, What will you check next?
 1
1 -
Often when a zone valve fails, you have three options.
- Replace the entire valve which includes soldering
- Replace only the actuator. (the entire silver box), No soldering involved
- Replace the valve core and leave the valve body in place (no soldering involved, but you will need to drain the system if there are no valves to isolate the zone valve.)
#1 and #3 are only needed if the valve getting stuck is the problem. If the valve operates freely as is the usual case, then you only need to replace the actuator (motor, gears, cam, end switch, and wires). This is the most common repair when you have a zone valve failure. Here are the part numbers:
Edward Young Retired
After you make that expensive repair and you still have the same problem, What will you check next?
0 -
this valve can be rebuilt by replacing the snap on motor, replace the flapper and stem, or swap the entire valve via the union connections
 Bob "hot rod" Rohr
trainer for Caleffi NA
Living the hydronic dream 1
1 -
@EdTheHeaterMan as always great answer, clears everything up.
@hot_rod that valve looks cool. Both the snap on feature and the unions for easy removal of the whole thing.
Small update on my leak saga. When the boiler was hot (so no moisture visible at the leak site) I started watching in real time as it cooled to see what happened. (Shows what an exciting life I lead.) After a while (hour maybe) small drips started to appear in two discrete spots along the upper joint (close nipple to tee) while the lower rim (adapter to close nipple joint) remained dry. As the two upper spots slowly leaked down, some of the moisture settled into the lower rim around the upper edge of the adapter, since some parts of that were a little sunken because the solder did not bulge up out of the joint there. As moisture dripped down from the upper joint and collected it slowly worked its way around the top edge of the adaptor, so that if you just came in and looked at it right then, you'd think that both upper and lower joints were leaking. I now think the lower joint is fine, which makes sense to me because I had thoroughly cleaned nipple and adapter and the solder seemed to feed in nice and smooth all the way around, so I really thought it would be a good connection.
But I did use that hot torch tip to do it, and did probably repeat my habitual beginner's mistake of adding more solder than I needed along with probably more heat than I needed, so I think what happened was that despite heat paste on the upper joint I inadvertently heated up that darned close nipple so much that the upper joint unsoldered some, causing the leak there.
So I will try what you mentioned, but only on the upper joint—being careful not to apply too much heat so that I don't inadvertently unsolder the lower one! The fact that it's only leaking at two small points gives me more confidence that this will work (less that I need to fill in).
I'm not going to use 50/50 leaded solder, which I think is what you suggested, only because apparently in New York State all leaded solder is now forbidden, even on the non-potable parts of an hydronic system. If I can find an unleaded solder with a lower melting point (if such a thing exists) I can try that. Otherwise I'll just be careful, use my old standard torch tip, only apply heat at those two points, and feather the flame away as you described so I don't overheat.
0 -
its possible but rare that you can just cap over a solder joint leak. There is a void in the joint, unless flux can get to that, I doubt you will pull solder into that joint.
Rimming it just treats a symptom, not the problem.
The best way is to disassemble clean, flux and start from square 1
Bob "hot rod" Rohr
trainer for Caleffi NA
Living the hydronic dream1 -
Soldering and unsoldering joints on a tightly spaced return, as shown on your boiler, is probably the reason that some plumbers are suggesting removing them. The solder joints are very close together. If it were me, I would swap the location of the manual ball valves and install new valves above the zone valves where there is plenty of room on the pipes. While doing that, replace the zone valves. I'm thinking the plumber might be concerned about inadvertently damaging the soldered manifold. Or be held accountable if and when a zone valve malfunctions due to the said solder repair. That one leak could open a can of worms. It's not as easy as it looks, and it can turn into a nightmare job.
0 -
Either he doesn't know what he's doing or is knowingly lying to sell you things you don't need. Very likely both. Try another plumber.
0 -
Yes, @mattmia2 I agree. I wrote what follows before reading your post, sort of leaning towards agreeing with @Intplm. that this is a can of worms that would be hit or miss for any plumber. Interested in what you think.
@Intplm. I think you have absolutely hit the nail on the head. Even though I disagree with much of what he said (relocate circulator; the 1-1/2" pipe is no good; doesn't like circ isolater valves (?)) and won't use him, I agree with you that he probably saw the tight spacing and a potential (or probable) can of worms and so skipped right to a total rebuild. There's a kind of logic to that: If he started trying to desolder the nipple where the leak is and that didn't work and he tried to desolder the tee and that didn't work, and so on, now we're into a total rebuild PLUS the labor for those failed attempts, messy. Easier and even cheaper to go right for a nice clean rebuild.
That's why I think I'm not going to try calling someone else for a second opinion; I have to accept that the reality is, as you say, "It's not as easy as it looks, and it can turn into a nightmare job" for anyone, no matter what their skill level.
The difference between a pro and me (besides of course my lack of skill and experience) is that since I don't charge myself for labor and I have a lot of time (I'm retired), I can try the unsoldering route until that totally fails, realizing I might have to go to the total rebuild. (All for one tiny leak at the beginning of the whole assembly! Yeesh, that does kind of hurt.)
If it comes to that, this thread will become: "Rebuild of boiler supply manifold and zones: Suggestions?" You have already made a few interesting ones. A couple questions:
- Why exactly would you flip the ball valves to above the zone valves?
- If I did this rebuild and replaced the zone valves, it seems to me that although copper is expensive, five brand new zone valves would double or triple the cost, getting me perhaps towards $1K for supplies rather than (hopefully) a couple hundred. I'm all for spending $ for quality stuff that I need, but as far as I can tell the zone valves are working, and my instinct is to try everything I can to incorporate the old zone valves into the structure, thinking if it ain't broke don't fix it. So:
- What exactly is the potential danger to a zone valve when I am unsoldering/soldering around it? Note that I would at least try to do the unsoldering not right at the zone valve, but try to unsolder the manifold below it where the manifold risers go into the ball valves, leaving the whole assembly up to the zone valve intact. (But of course those five unsolderings might not work and now I'm working my way up to the zone valves anyway …!)
- I noticed when I refilled and reheated the boiler after putting in the new adapter that, as it heated up, in one or two zones the piping got hot above the zone valve even though those zone valves were supposedly closed because no zone was calling for heat. Above the other zones that section of pipe was cool (though hot below the valve, of course). I pushed the little switch that you can use to manually open the valve towards open (feeling resistance because there was no call for heat) and it sprung back firmly as it is supposed to. Might this indicate that the actual valve part of the zone valve (in the pipe) could be failing? That would be an argument for replacing at least those zone valves.
0 -
You probably dried the heat paste out, the wet rag can absorb more heat. As long as there is liquid water on the fitting it is below 212f and the solder isn't melting.
I said to file flat on the side of the fitting until you started seeing solder so you wouldn't nick the pipe.
0 -
When you got the original leaking fitting off did you see the part that did not tin causing the leak?
0 -
Oh, and use a wire wheel on a drill to clean the outside and a wire brush on the inside of the tee to clean it. The file or emery clothe will only work on flat surfaces.
Use wet rags on the other run and branch of the tee and make sure the stay pretty wet, just almost to the point of dripping.
0 -
You might have to collapse the nipple in with channelocks if it seizes in the fitting.
0 -
@mattmia2 yes, I think I dried the heat paste out. Next time around, I plan use a wet rag cut into long strips for easy multiple wraps and tying around the joint.
I didn't think to look when I took the old adapter out to see where the solder didn't take.
Yes, if by "file flat on the side of the fitting until you started seeing solder so you wouldn't nick the pipe" you're referring to the cuts I made to get the adapter off, I didn't have the patience to try a flat file so I used my loud and effective Dremel multi-tool, naturally cutting a bit too far, causing those furrows. Too late I figured out that I should go very slowly and watch closely and when shiny copper turns to silver solder: stop!
The good thing is I think the new adapter I put on is a good joint, not leaking, and those cuts filled in okay. I just caused that brand new leak just above it with all that heat! This may be my fate: keep trying to unsolder stuff but failing and so work my way up to the ceiling and through the floor and realize I have to rebuild the whole thing. Regarding that, please see my prior post above re: zone valves etc.
0 -
I wonder if it always was just the upper joint. Paper towel wrapped/tied around the pipe will stop the drip so you can figure out which fitting is actually leaking. Note that a homeowner has the luxury to do something then wait a couple days, not so much with a pro.
0 -
@mattmia2 could have been! I will try the paper towel trick, though I'm pretty sure it's the upper one after watching water eke out of the upper joint at just two discrete points, with the bottom joint staying dry until the water at those points dripped steadily down and worked it's way around the top of the bottom joint, making it look like that was leaking too if you had just looked at it then. (This was over an hour or two.)
0 -
That really shouldn't require a whole lot of heat. It is a largish diameter but both the pipe and the fitting are very thin so there isn't a lot of mass.
No one is going to check if it is 50/50 and it isn't going to leach in to the boiler water in any meaningful way.
0 -
There are many different scenarios for this repair. The reason for the valves above is to save time and a big mess when the need to replace or even repair the zone valves. Locating valves above the ones you have now would isolate them from the rest of the system, creating fewer repair issues in the future.
The isolation valves should have been installed above and not below the zone valves. If it were done the way I suggest, you would be able to isolate the boiler and not have to drain an entire zone(s). And have purge the entire zone.
Another way would be to just add valves above your current zone valves while making provisions for future repairs. Propress as @hot_rod has shown above is an excellent choice. Many fittings are offered and you can rent a tool to install the fittings. No torch flame needed. This will save you a lot of time and mess.
Imagine the issues as a DIY'er. Solder and resolder. Purge. Woops! Over heated the valve fitting etc. You have a leak. Start all over. Solder and resolder…You have a leak, etc, etc, etc. If you are comfortable with soldering, good. Go for it. But remember, you must get all of the water out, follow proper soldering prep and technique. Some of what @mattmia2 is talking about above. It all depends on your comfort level.
0 -
@Intplm. these comments of yours were very gratifying to read: Soldering and unsoldering joints on a tightly spaced return, as shown on your boiler, is probably the reason that some plumbers are suggesting removing them. The solder joints are very close together….That one leak could open a can of worms. It's not as easy as it looks, and it can turn into a nightmare job…. Imagine the issues as a DIY'er. Solder and resolder. Purge. Woops! Over heated the valve fitting etc. You have a leak…
It was good for this DIYer to read that this can be a tricky situation, even for an experienced plumber. I think that plumber saw in an instant all that you describe, and I admit that if he had gone with my request to just try the unsoldering/repair first but then if that didn't work go to a rebuild of the whole structure, I'd end up paying more money than if he had just done the rebuild from the start—so he went right to the rebuild option.
[Trigger warning: I could have condensed the following into two sentences, but instead I drag it out to emphasize the pathos, the drama, the heartbreak, the hope … ]
But like I mentioned as the homeowner I don't charge for my own labor and can afford to take it one step at a time. So I took a deep breath and decided to skip trying to patch up the existing joint (as @hot_rod said: Rimming it just treats a symptom, not the problem. The best way is to disassemble clean, flux and start from square 1) and tried to become comfortable with the fact that if this becomes a real can of worms I may have to rebuild the whole manifold and stuff, all because of one tiny leak. I decided to at least be ready for the next step if the unsoldering ruined the tee, so I bought a new tee and even the 1-1/2" to 1" adapter that is above that on the riser if I needed to unsolder that too.
I took out the circ and screwed a circ flange onto the bottom of the sweat-to-thread adapter as a place to rest a pipe wrench, thinking also that the flange would support the wrench so I could bang downward on it to get the pipe off if it came to that.
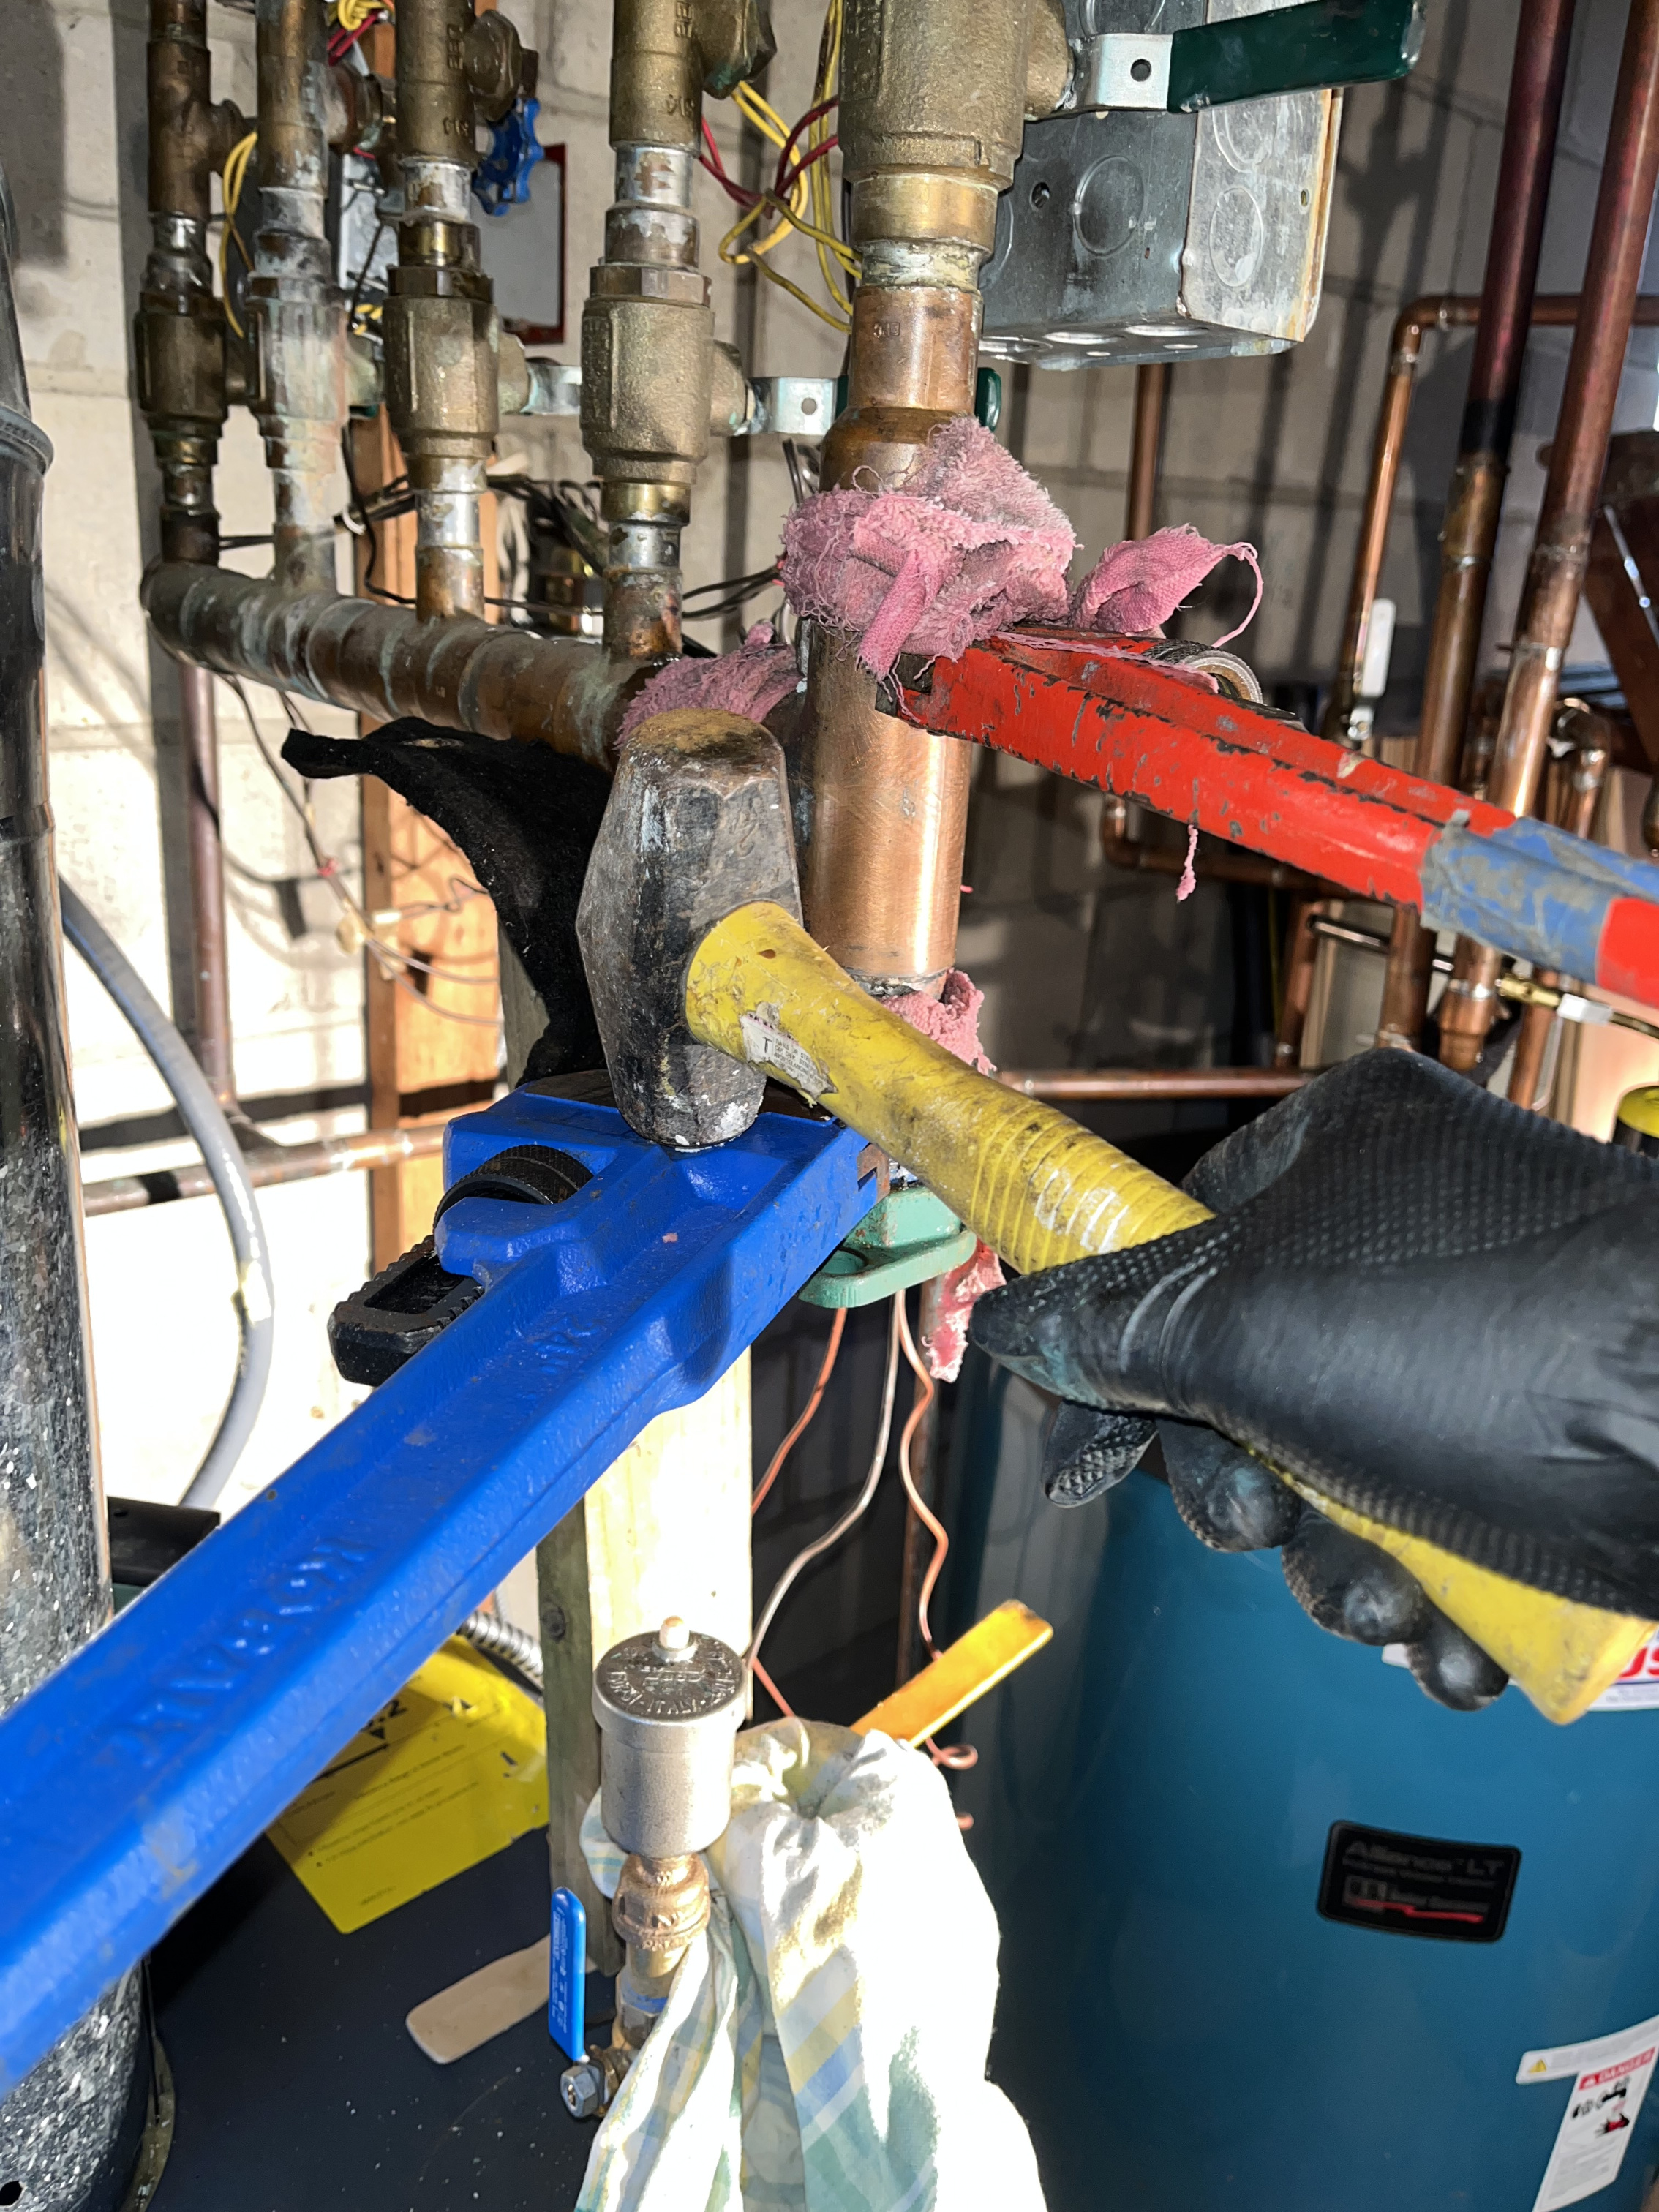
It did come to that, sort of. I used my new hack (probably well-known to you guys) of instead of using a whole wet rag, cutting rags into strips so when I wet them I can tie them snugly around a joint, and tied them on the remaining two joints of the tee and also on the lower adapter-to-nipple joint. First time: nothing budged. I sat on a bench and moped. Second time, I banged down on the wrench with a hammer and the thing started coming loose and came off. I was ecstatic until I realized it was the adapter that came off, the short length of pipe into the tee was still there. (I knew that was always a possibility. I did have a wet rag on the adapter-to-pipe joint, but it's so close to the upper joint that the adapter unsoldered.) I sat on the same bench and moped. I tried heating just the upper joint and then twisting with a pipe wrench and also grabbing it with a channelock and twisting and also trying to crush and crimp it's sides in, away from the tee walls, with no luck. I moped some more and realized I'd have to go to the next step and try to remove the tee, more unsoldering that could go haywire. But then I said try just one more time so I heated the heck out of it, but this time didn't leave the pipe wrench (two actually, one around the tee to scissor the wrenches) hanging angled on the pipe, which I did so I could go right to them and wrench away after removing the flame and turning off the torch without wasting time. I'm guessing it's a general thing that you shouldn't do that, because those wrenches will just suck up heat (?) After heating with no wrenches on the pipe I got a wrench on quick and twisted and it actually twisted loose and I almost fainted, but I decided not to faint just yet and then grabbed the channelock to twist and pull down, and off the dang thing came, a 35 year old joint I had become convinced would never come loose. So this was much more than just a little success with one joint, an added result is that my unsoldering confidence level just went up a notch or two.
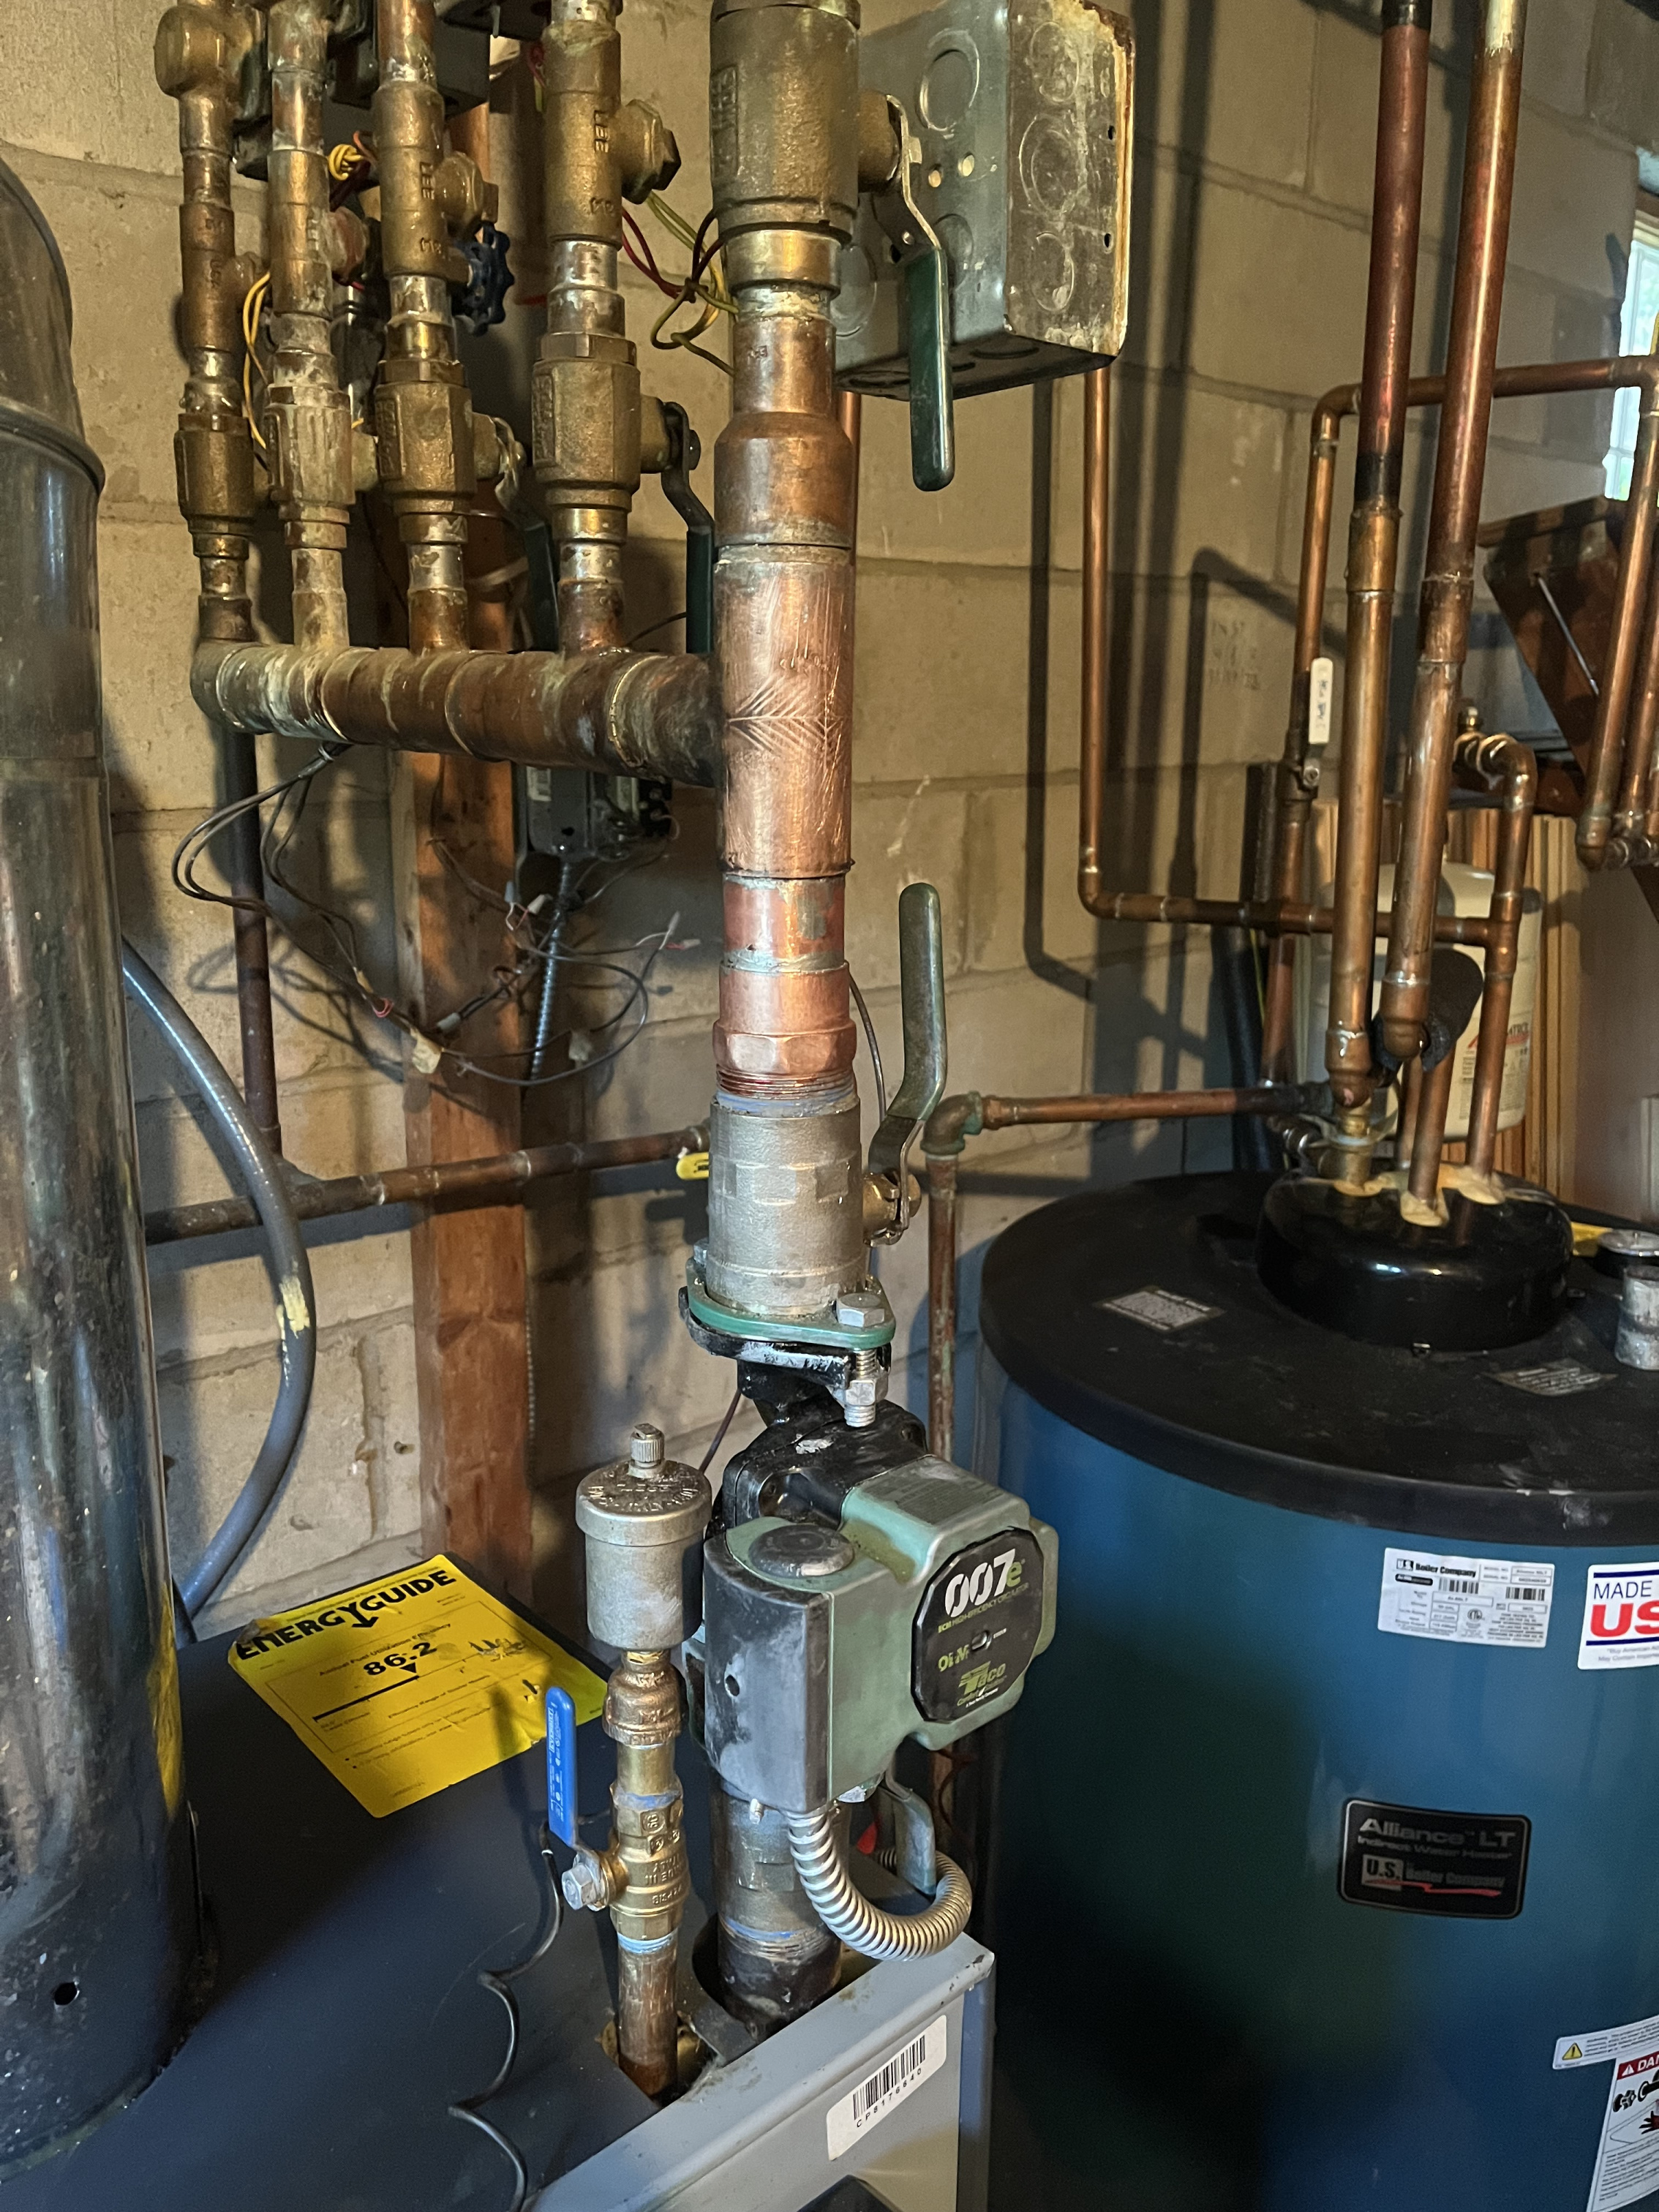
Thanks to SupplyHouse which sells short lengths of 1-1/2" I got a new adapter and close length of pipe onto the tee and, though I will not be satisfied for at least two-and-a-half years that it will not leak, so far after a few days or maybe even a week it's bone dry, both when the boiler is hot and cold.
Thanks a ton for all your help.
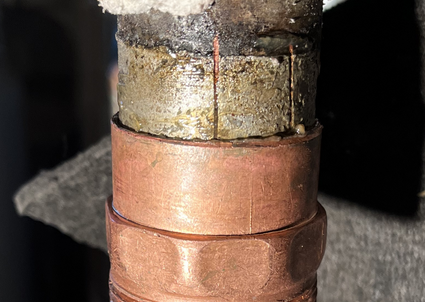
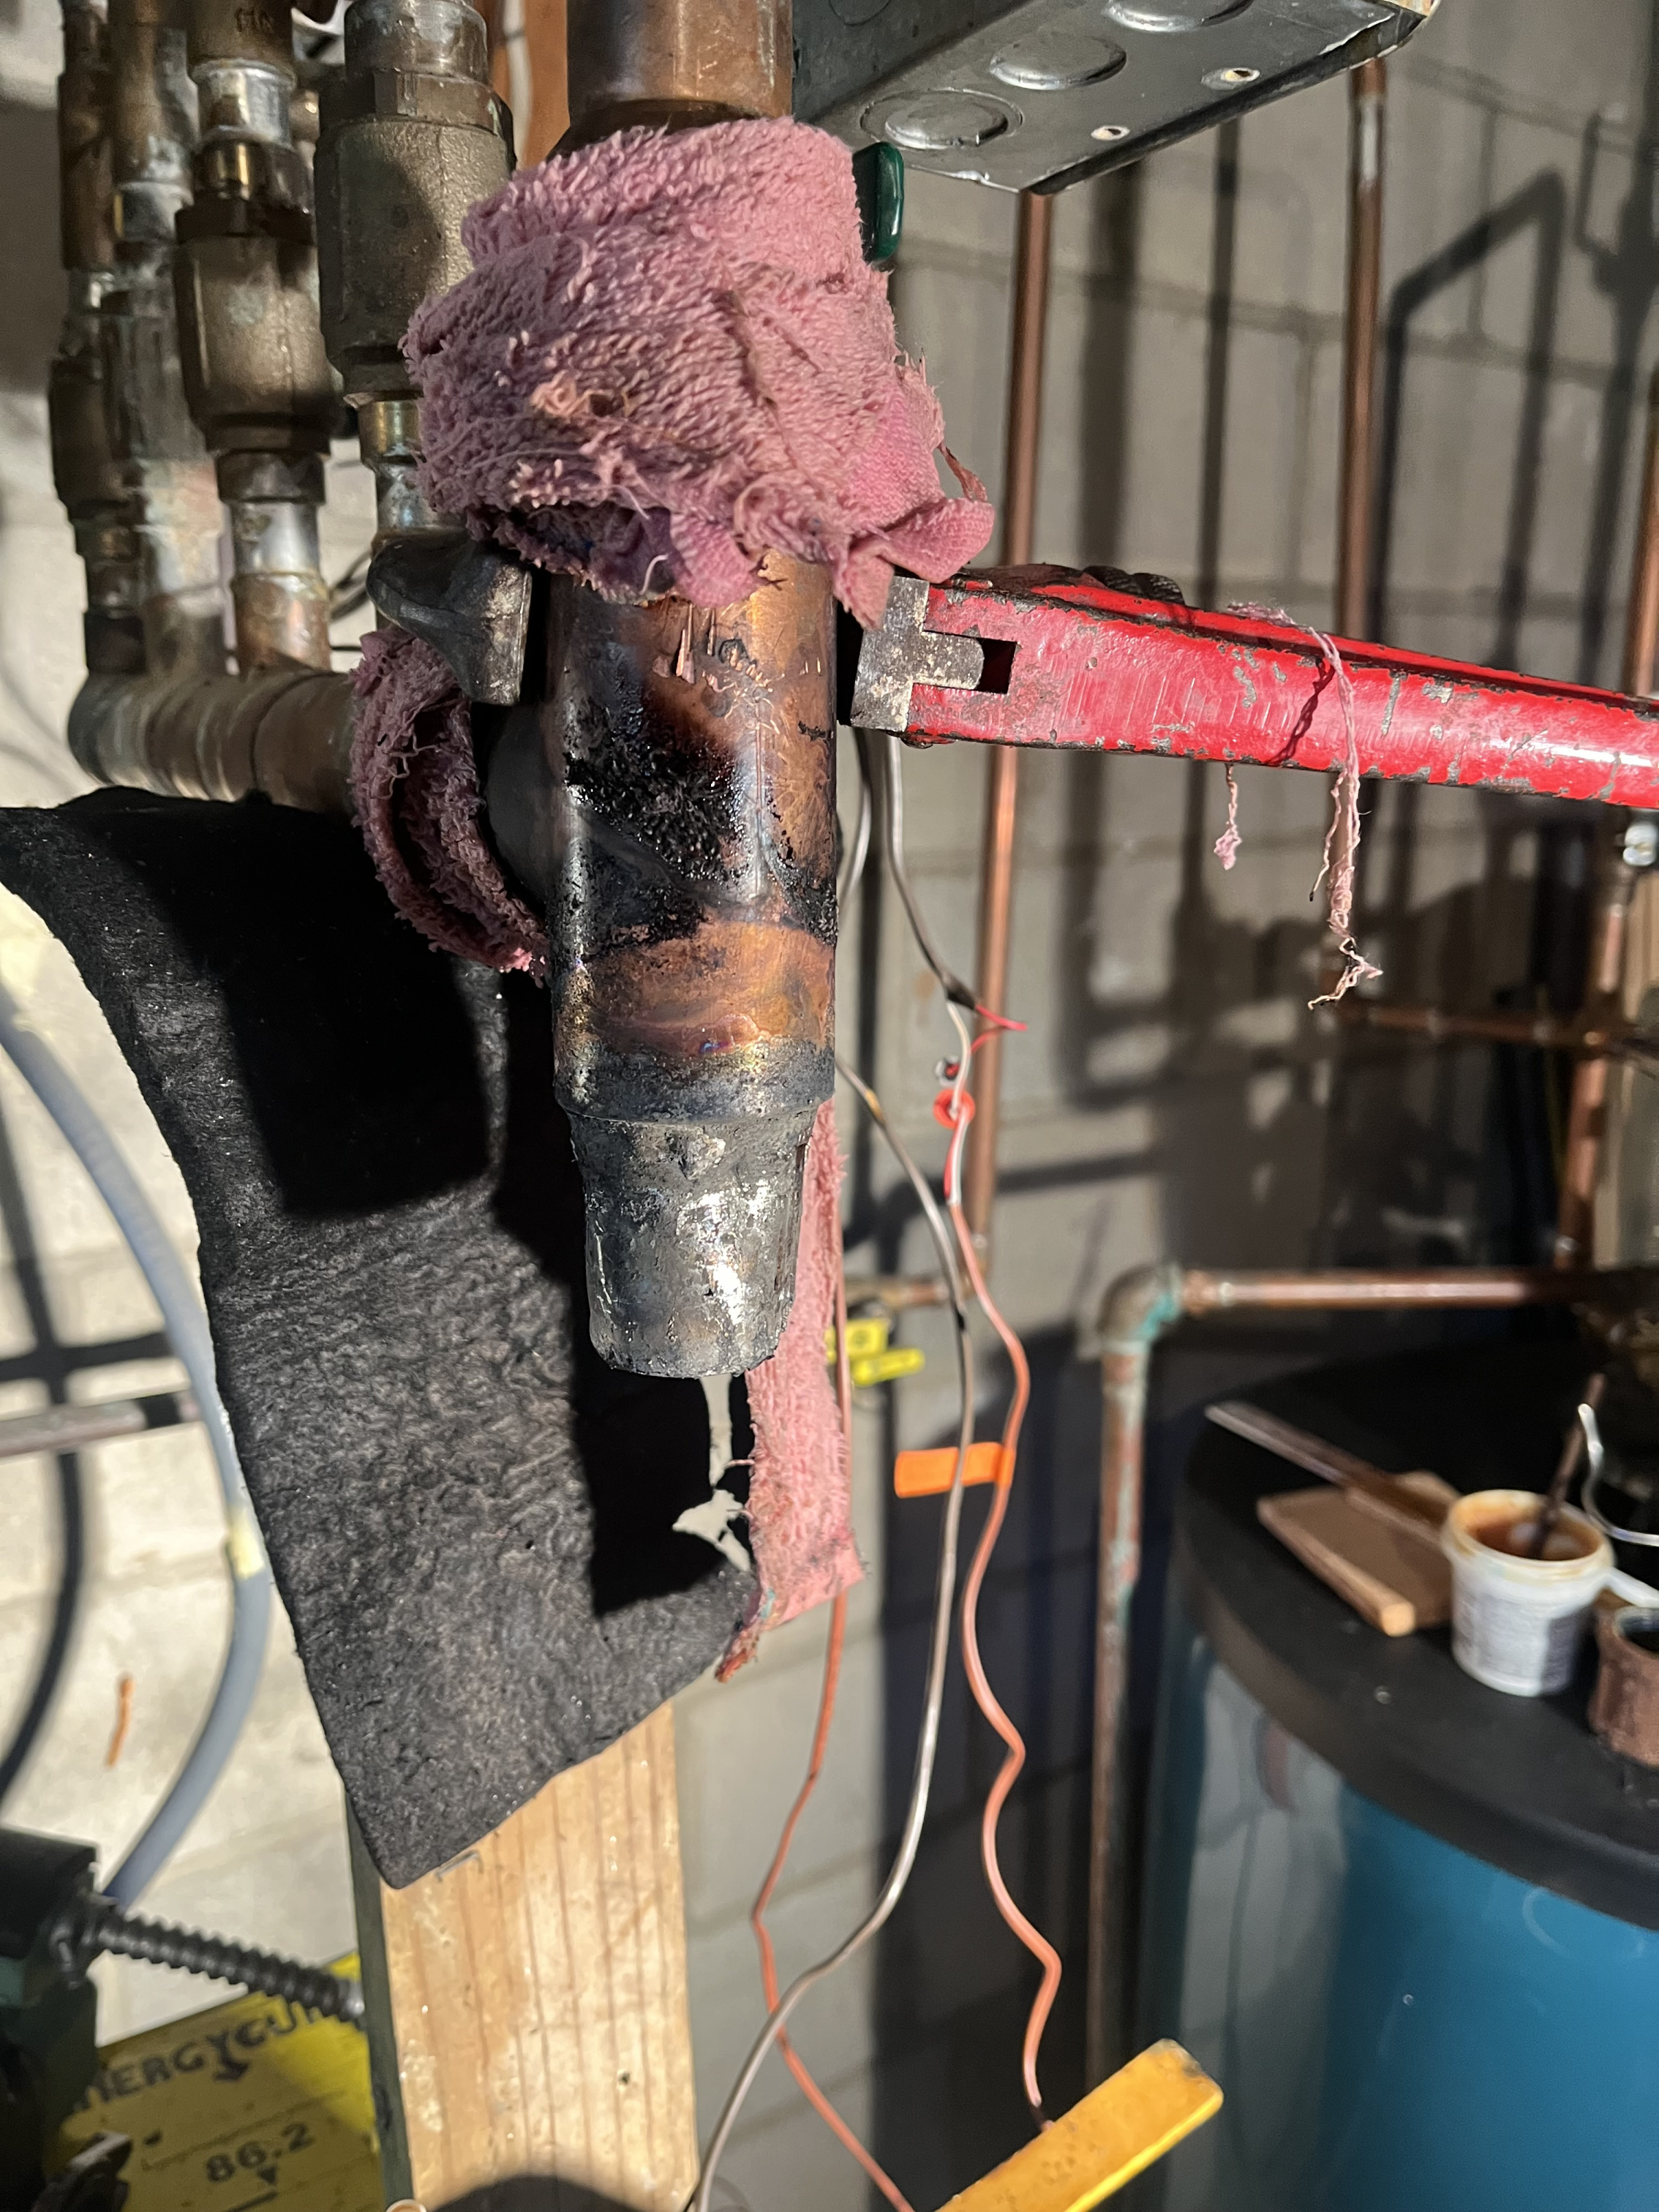
Photos: Banging with the hammer got the adapter off, but the nipple stayed until I thought of not leaving the wrenches on the pipe while heating (you might say Duh)
Deformed “nipple” of pipe still in:
End result (I cleaned the old tee up). The reason the short length of pipe between adapter and tee is slightly longer than the original is I put in an iron nipple out of the boiler tapping that is 1-1/2” shorter:
 2
2 -
Great description of our successful efforts. Well done. If it's not leaking now, it probably won't in the next two and a half years…
0 -
I didn't let myself believe it wasn't going to leak for at least two weeks. @Intplm. your realistic and clear-eyed description of just what I might be facing (and, I think, accurate guess about what the plumber might have been thinking) helped a lot. And thanks everyone else too.
1


Categories
- All Categories
- 87.7K THE MAIN WALL
- 3.3K A-C, Heat Pumps & Refrigeration
- 59 Biomass
- 430 Carbon Monoxide Awareness
- 127 Chimneys & Flues
- 2.2K Domestic Hot Water
- 5.9K Gas Heating
- 121 Geothermal
- 170 Indoor-Air Quality
- 3.8K Oil Heating
- 79 Pipe Deterioration
- 1.1K Plumbing
- 6.6K Radiant Heating
- 396 Solar
- 16K Strictly Steam
- 3.5K Thermostats and Controls
- 56 Water Quality
- 51 Industry Classes
- 51 Job Opportunities
- 17 Recall Announcements