Welcome! Here are the website rules, as well as some tips for using this forum.
Need to contact us? Visit https://heatinghelp.com/contact-us/.
Click here to Find a Contractor in your area.
If our community has helped you, please consider making a contribution to support this website. Thanks!
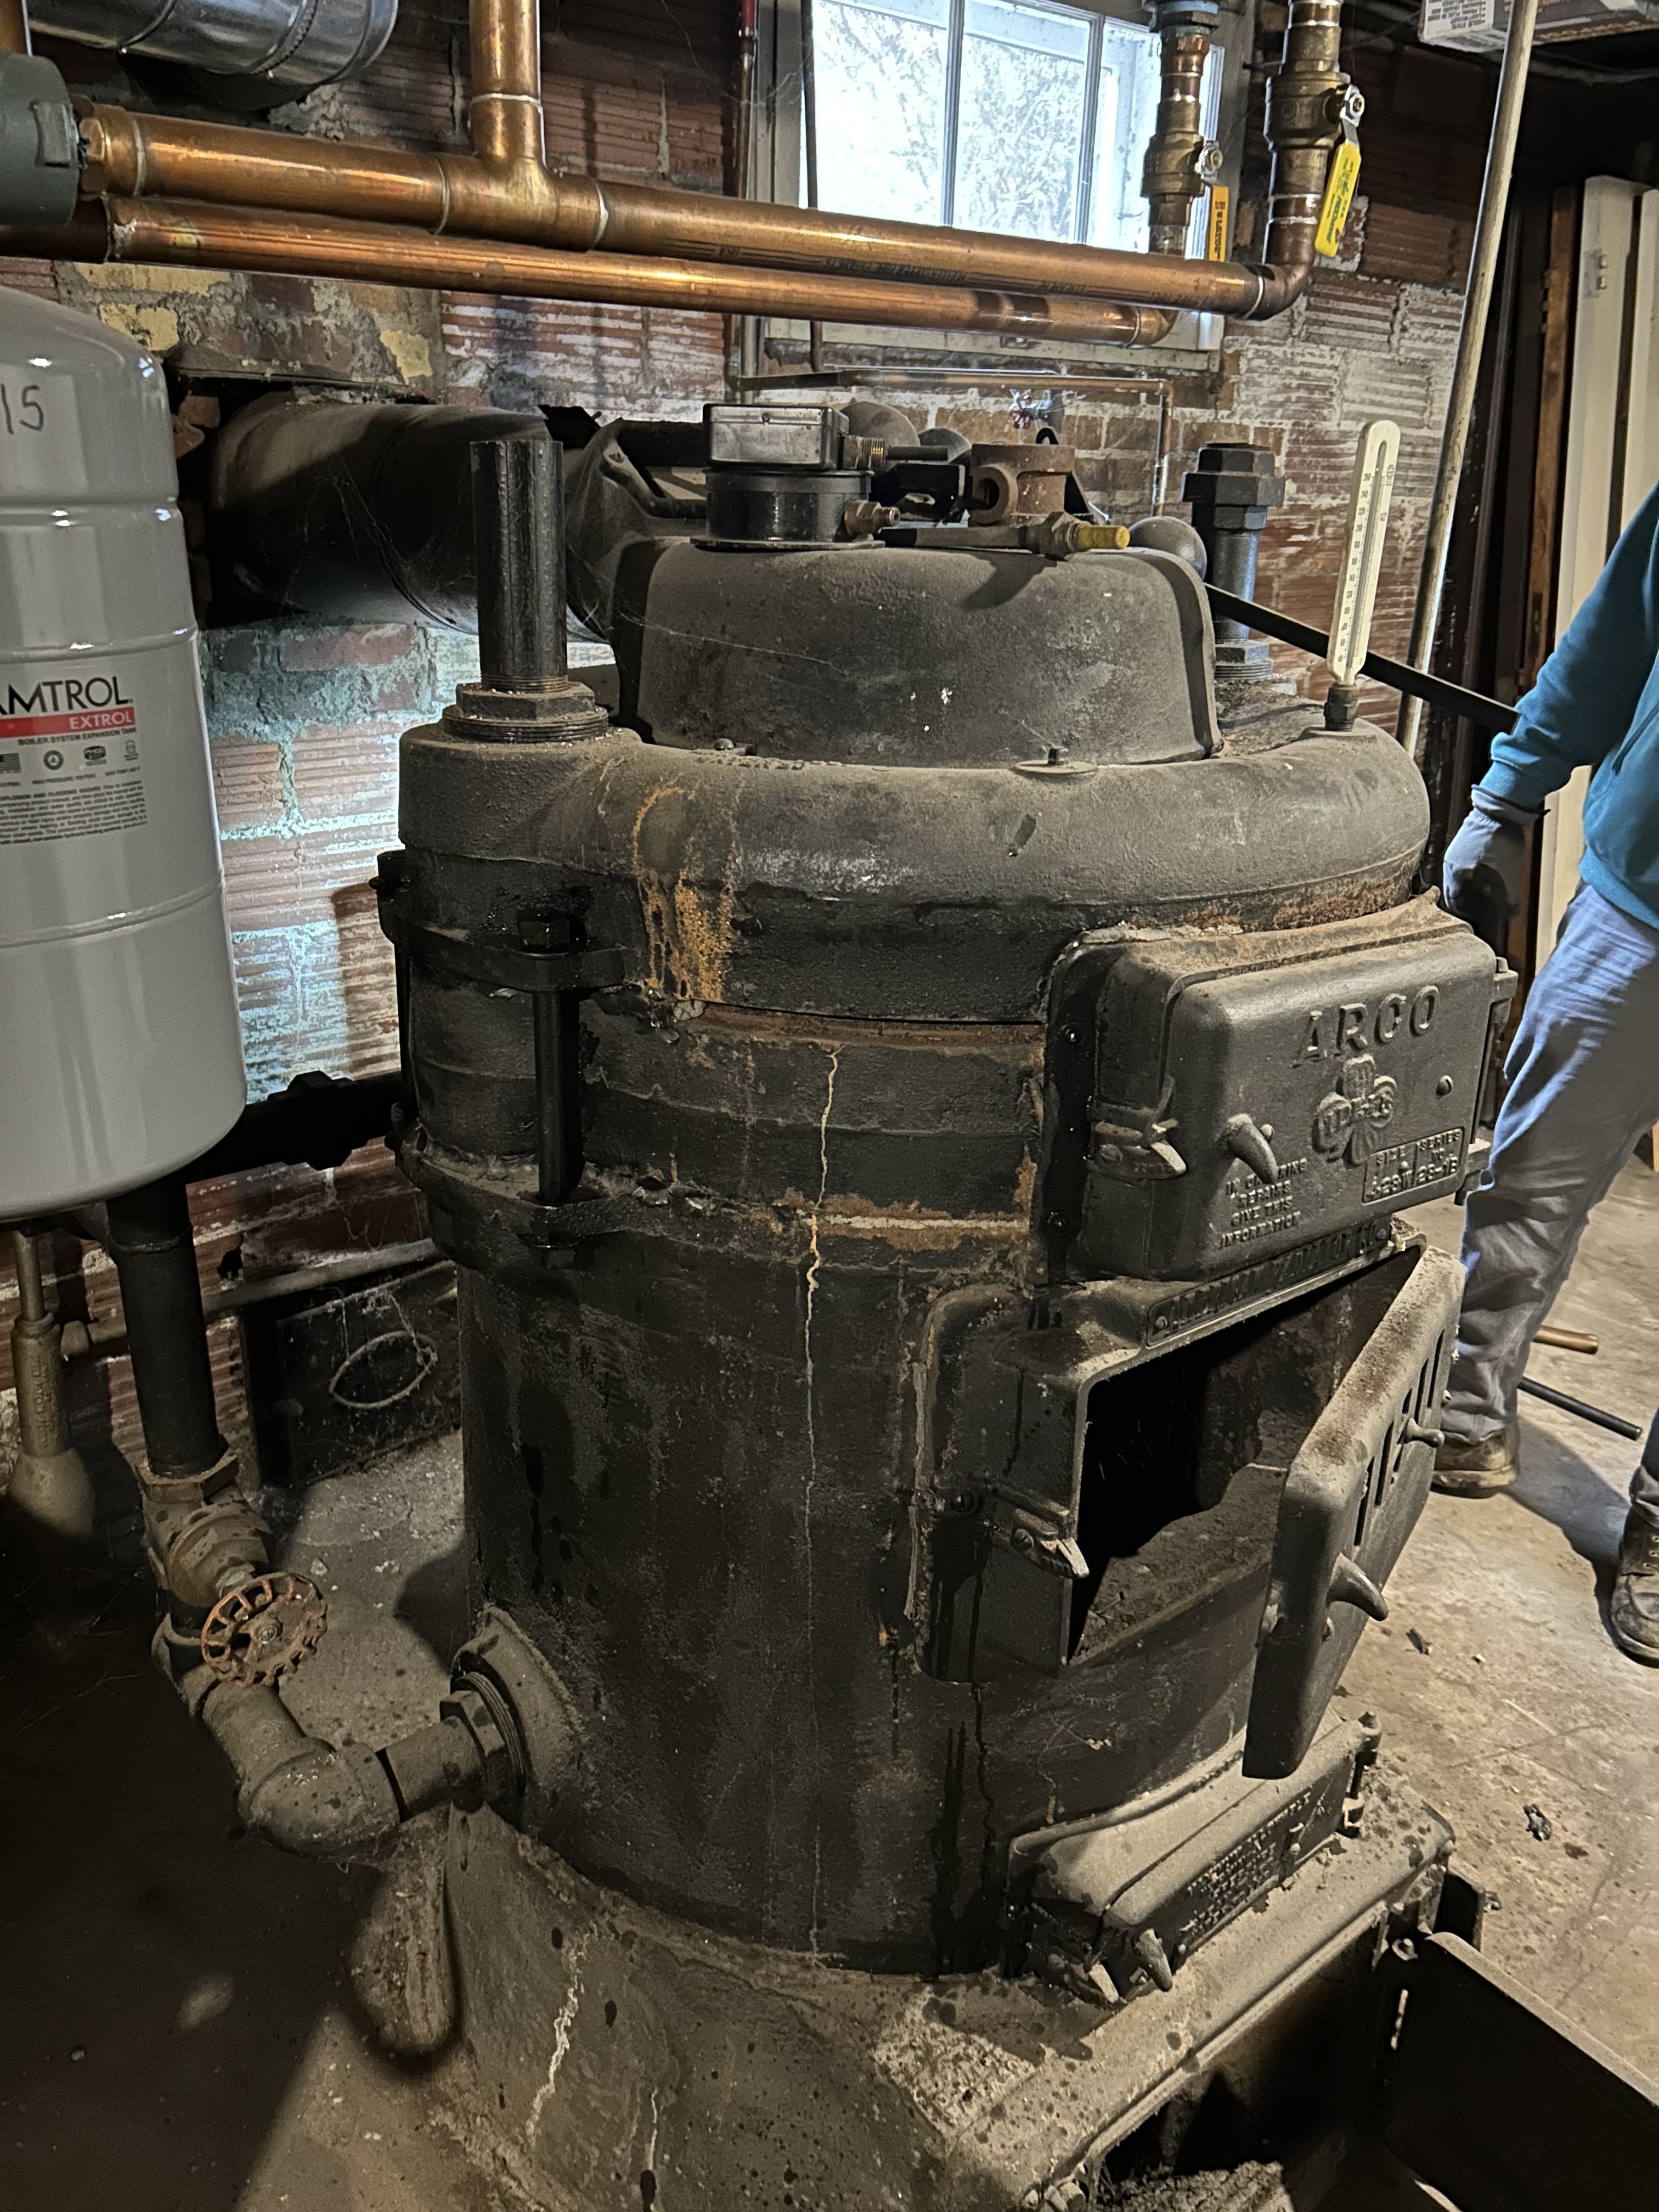
ARCO Ideal Round Water Boiler (1920’s)
Options
sopcopotoptop
Member Posts: 26
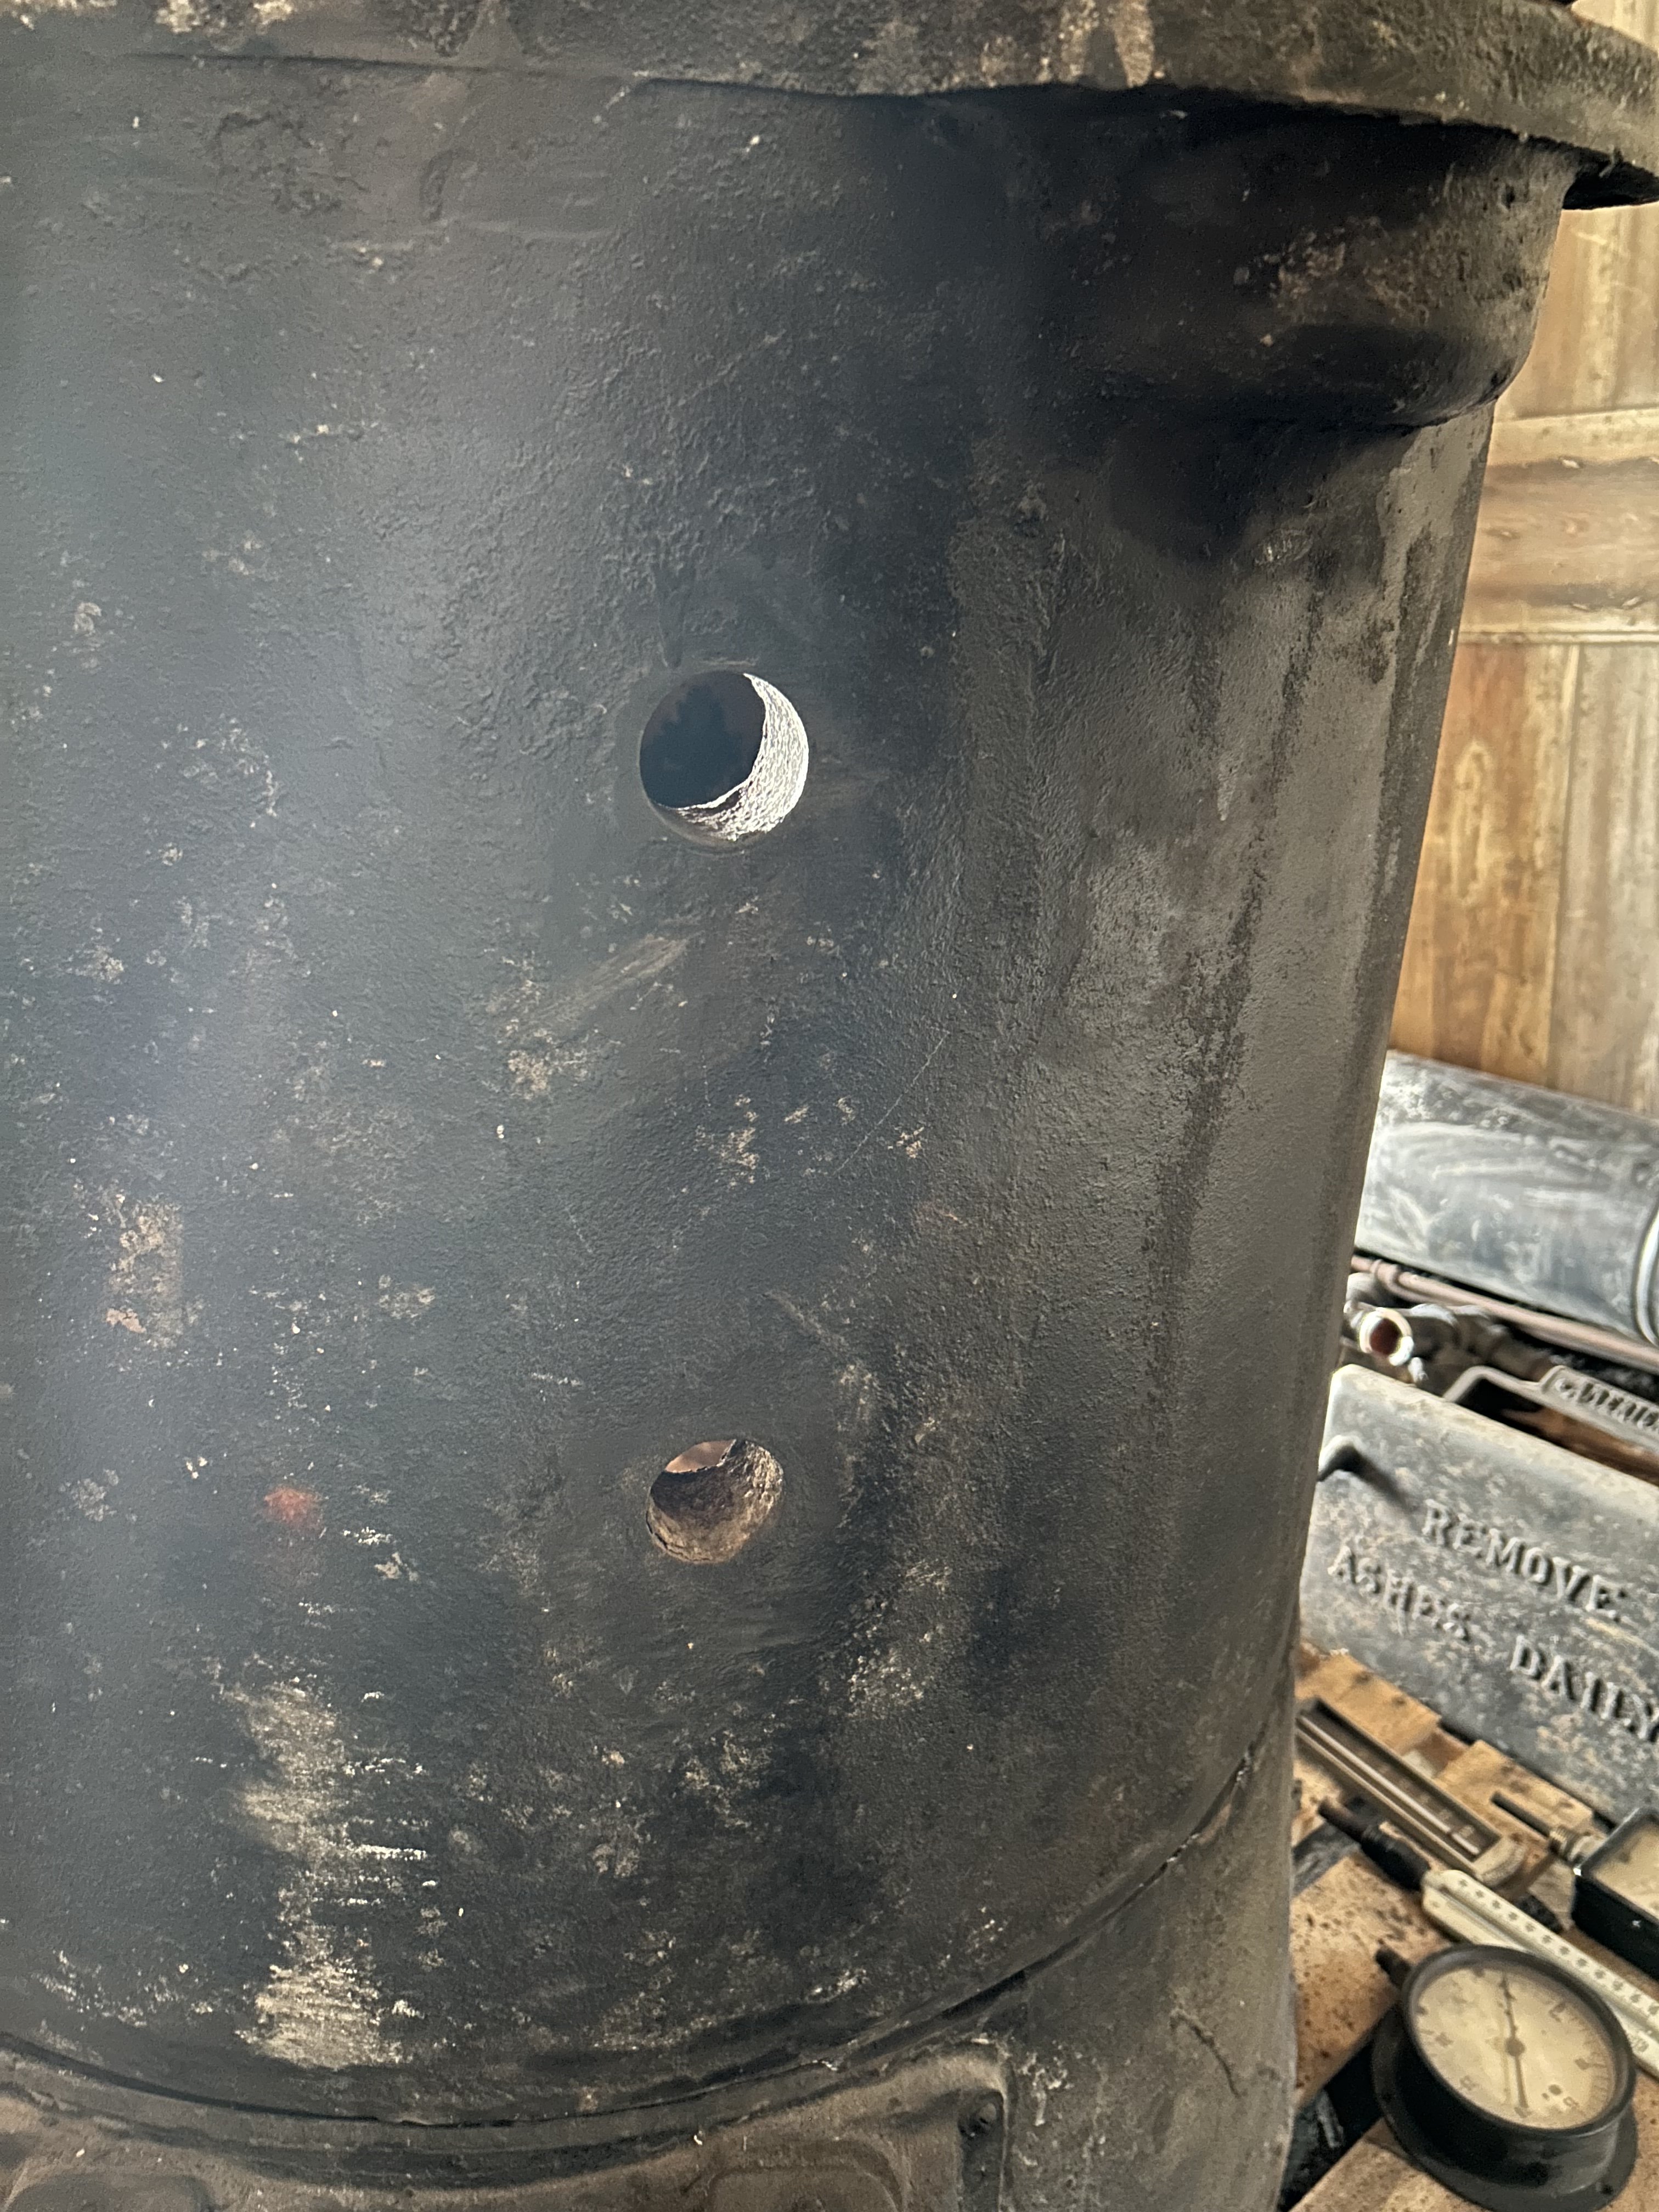
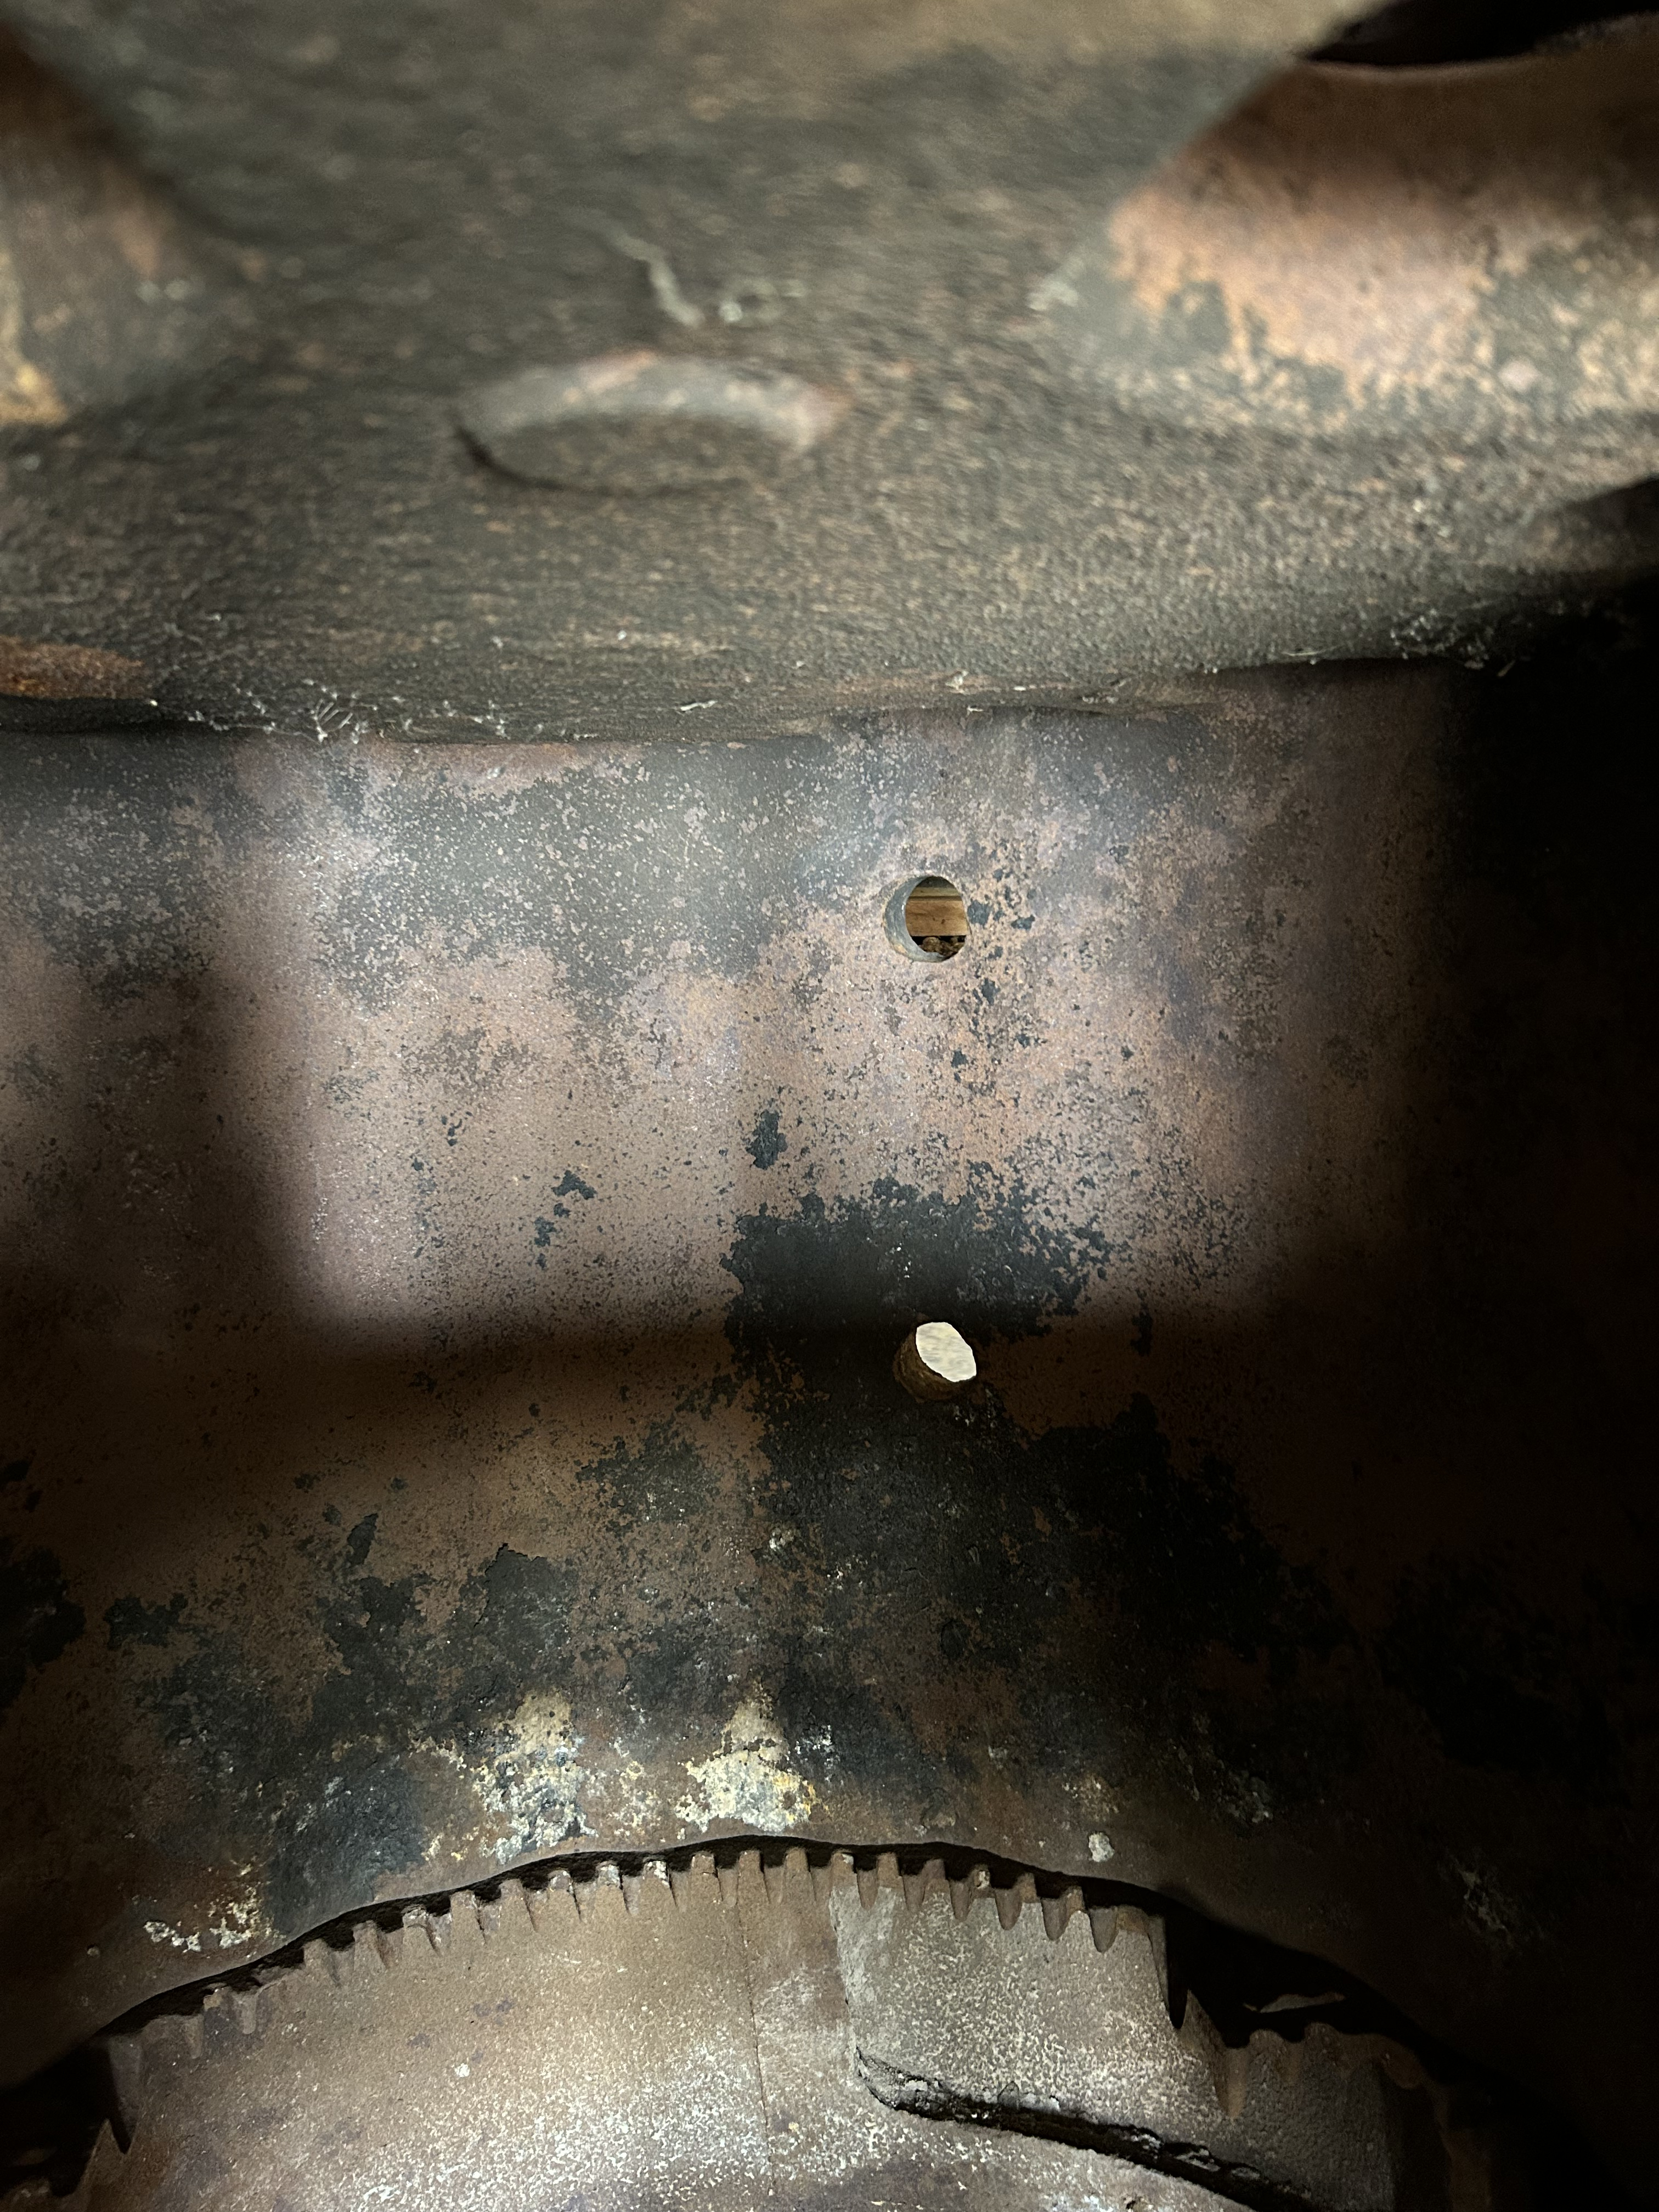
I have just picked up this museum piece with the intention of setting up but may never fire it. That is to be determined. May only be a conversation piece. It is complete but I’m wondering what to do with the two ports in the back of the fire pot. I’m guessing that in a steam boiler these would have had plugs that would melt away to relieve pressure in case of a low or dry fire situation 

 but what about in normal operation as a hot water system? They were open when I retrieved the boiler. What should I use to close them up? The boiler is a model 4-28-W, Series 28-1B. Any information would be appreciated.


 but what about in normal operation as a hot water system? They were open when I retrieved the boiler. What should I use to close them up? The boiler is a model 4-28-W, Series 28-1B. Any information would be appreciated.
 2
Comments
-
This boiler is heating the home today and was installed the year her grandparents got married and built the house. 19234
-
-
If there were fusible plugs -- and there might have been, some power boilers had them -- they would be between the crown sheet or top of the firebox and the combustion chamber. Dump boiler water on the fire if things got out of hand... NOT safe, as in a power boiler the pressure would tend to blow the fire or the coals out of the firebox through the front dampers or loading doors. Very exciting.Br. Jamie, osb
Building superintendent/caretaker, 7200 sq. ft. historic house museum with dependencies in New England1 -
-
I would tend to agree that the we’re openings to run tubing through for a tankless hot water coil. They are not threaded. Just open hoke about an inch and a quarter in diameter. Just plugging with bolts, nuts and washers should be all that is needed to cap them off.0
-
Confirmed from an Ideal Fitters book from 1925. TACO water heater on 9” centers.
Thanks for the responses. 0
0 -
-
Then close nipples and caps might be a better look.Trying to squeeze the best out of a Weil-McLain JB-5 running a 1912 1 pipe system.0
-
I’ve seen them closed with what looks like boiler cement as well.0
-
Back in the day that your boiler was operating, a piece of galvanized pipe went thru those openings. The water jacket or coil or heat exchanger of some type that hovered over the coal fire was connected to those pipes. At some point in the life of that heater, the DHW HX was removed and the openings were covered with asbestos cement. Thus was to match the asbestos cement that insulated the rest of the boiler's exterior as seen in Art Taylor's photo.
Since no one sells Asbestos insulating cement for this purpose any more, I would say that you can just use furnace cement to do that job. If you are actually going to try to commission this with a real fire at some point, you may want to try to find some way to insulate the boiler as shown in Art's photo. If I were going to do that as a museum project, I might start with sections of semi rigid fiberglass (like duct board) and carve some ridges in the fiberglass to allow it to conform to the curves of the boiler as needed. Once the boiler is covered with the fiberglass I would wrap the fiberglass with chicken wire in order to hold a coating of a plaster sub base. Something like a Structo-lite brand of plaster wall base coat. You may need to get someone that can sculpt the coating of plaster to conform to all the ridges, peaks and valleys of the boiler This was an artform in itself back in the days of boiler builders and steamfitters of the 1800’s and early 1900’s If you want to take the time to learn that skill, it would be a nice touch.
With the furnace cement in the holes, the fiberglass and plaster coating, those openings will not be of any consequence when it comes time to fire that boiler.
From what I remember of those boilers, that coating of asbestos insulation was about 1½” to 2” thick. So to get the look as realistic as possible I would start with 1” duct board for the base of the insulation and use Structo-lite as a glue to hold the pieces of insulation in place. As soon as you get a section completed I would wrap a 12” wide section of chicken wire around the boiler to hole the fiberglass in place. Continue to add insulation and chicken wire as you go up to the top barrel of the boiler . Custom pieces of fiberglass can be cut to form the base of the insulation on the boiler, with the chicken wire acting as the outer strap to hold the fiberglass, and as the support for the last outer coat of the plaster. I have had great success with Structo-lite when securing vent connectors of boilers to the chimney base. There is very little shrinking and cracking of the Structo-lite after it cures. It also dries very fast, usually within 20 minutes of initial mixing, allowing for multiple coats to be applied in the same day.
Once you get it close to the form you want, it can be sanded , and any high spots can be reduced to a very smooth finish. Since it is used for plaster walls, it will accept white wall paint for a professional look. That is one ides that I would try if I were in your shoes.
Edward Young Retired
After you make that expensive repair and you still have the same problem, What will you check next?
1 -
Here is what the first layer, the fiberglass insulation might look like.
Start with a manageable size of duct board, say 12" x 36".
Then cut some wedges from it about every 2”.
Then those wedges will allow the board to curve.
Then you can cut out for the doors and pipes.
Then make a dry fit and adjust as needed.
Then apply the structo-lite to the boiler as an adhesive.
Then place the duct board on the boiler.
Continue until the boiler is covered with fiberglass.
Then chicken wire over the entire boiler.
Then become an artist with plaster.
Edward Young Retired
After you make that expensive repair and you still have the same problem, What will you check next?
1 -
This car was also built in 1923. I wonder if her grandparents owned one back in the day?ArthurTaylor said:This boiler is heating the home today and was installed the year her grandparents got married and built the house. 1923

Edward Young Retired
After you make that expensive repair and you still have the same problem, What will you check next?
1 -
-
EdTheHeaterMan, thank you for the fantastic step-by-step procedure in insulating this wonderful relic of heating history. I can’t get over what great shape it is for being a 100 years old. I suppose that it could have been taken out of service anytime within its first 20 years or so of service when gas mains became available. At the very least I could have imagined it to be converted to gas but there was no sign of that ever happening. It’s just well built!
Since I have your ear what cement product do you recommend to seal the seams of the sections as well as the doors to the carcass? I am thinking some type of refractory cement? The stuff I dug out was very hard and brittle but was not necessarily loose. Further it did not seem to got the full depth of the sections but rather only about an inch deep.
Also what problems do you envision I may have with leaks around the nipples. They stayed with one section or the other when I split them apart and all have gone straight back together as they came apart. I also greased them up so they wouldn’t rust until I get the boiler into the cellar. It sits partially assembled in our barn. Very heavy at 1,480 pounds assembled.0 -
Would like to find or have made new push-nipples for this boiler. The measurements are 3-7/8” ID and 4-3/8” OD both at the openings. They look to be iron.
Utica has a 4” boiler push-nipple but I can’t get actual dimensions from their suppliers.
Looking for advice on these. I can’t imagine they would be too hard to machine on a lathe with the right 4” ID cast iron pipe.
Thanks for your time.0 -
Those sound like standard 4" push nipples. I would order them from Utica. Thru a local supply house that sells utica boilers
Let me make some inquiries. Probably won't here from my source until Monday or Tuesday
Edward Young Retired
After you make that expensive repair and you still have the same problem, What will you check next?
1 -
Super! Thanks much!0
Categories
- All Categories
- 87.4K THE MAIN WALL
- 3.3K A-C, Heat Pumps & Refrigeration
- 61 Biomass
- 430 Carbon Monoxide Awareness
- 122 Chimneys & Flues
- 2.1K Domestic Hot Water
- 5.9K Gas Heating
- 115 Geothermal
- 168 Indoor-Air Quality
- 3.8K Oil Heating
- 78 Pipe Deterioration
- 1K Plumbing
- 6.6K Radiant Heating
- 395 Solar
- 15.8K Strictly Steam
- 3.5K Thermostats and Controls
- 56 Water Quality
- 51 Industry Classes
- 50 Job Opportunities
- 18 Recall Announcements


