Advice for replacing torn Flex with metal ducts
So I will replace this myself with metal duct work and a couple of elbows. Is this job as cut and dry as it seems, just screw, tape, and insulate, with pipe something like this:
https://www.homedepot.com/p/Master-Flow-14-in-x-5-ft-Round-Metal-Duct-Pipe-CP14X60/100137981
(5 ft. length is under $50 so charging 6500 seems criminal)
What other tools/equipment would I need to do this, (what to cut with) and what insulation is used for metal ducts? I will be probably buying everything at Home Depot.
R8 insulated flex was installed, is that rating necessary for the northern Florida climate? Here's a pic of what was left over from the prior install:
The 14"/R8 flex ducts installed now are tightly crammed together with no room at all in between them, the ground, or against the floor joists. Probably not the way it should have been done, but that's what they did.
Any help would be greatly appreciated before I go back there in a few weeks. Currently the system is off and I have to fix this before the heat arrives.
Thanks
Comments
-
-
Thanks @HVACNUT, looking into scrim, isn't standard R8 Insulated Duct Wrap sufficient, or would humidity be an issue with it in a hot crawl space? I'm trying to keep everything available from the local Home Depot there.
https://www.homedepot.com/p/Master-Flow-60-sq-ft-R-8-Insulated-Duct-Wrap-INSWRP60R8/302000644
As for the metal, is there a required steel gauge, ex: 28 gauge, for replacing both ducts?0 -
According to an employee of mine that moved back to NJ from Florida, it seems that the thicker metal screws are required in Florida to connect the metal duct work to the next duct. https://www.supplyhouse.com/Malco-BT143T-3-4-Length-5-16-Head-Size-Bit-Tip-Drill-Tap-Screws-500-Pack?_br_psugg_q=sheet+metal+screws On 14" diameter I belierve you need at least 5 screws around the seam. I would suggest that you purchase mastic tape fr each joint connection. It's more expensive than the paint on mastic but less mess. https://www.homedepot.com/p/Nashua-Tape-1-89-in-x-33-9-yd-Foilmastic-Sealant-Duct-Tape-1542730/302091382 Cover each seem of duct work to make an interior vapor barrier to the insulation.
For insulating the exterior of the 14" round duct, I would just purchase a box (or bag) of 14" flex with R8 insulation. 25 foot long sleeve of insulation can be pulled over the metal duct by just putting the flex over the Crimp end of the duct. then pulling the sleeve over the metal duct and pushing the interior flex liner out the other end.
I do this because sometimes the 5ft sections of R8 sleeve is ofter the same price or even more expensive than the flex duct that comes with the 25 foot section of insulation, and there are less seems to tape together to secure the exterior vapor barrier to the next seam. Also it is easier to slide the sleeve over the edge of the metal duct when you tape the inner sleeve on to the metal duct. https://www.supplyhouse.com/HC-Flex-27831-14-x-25-F218-Insulated-Flex-Duct-Silver-Jacket
5 of these cost more than one 14" flex duct https://www.supplyhouse.com/HC-Flex-553283-14-x-5-F208-Sleeve-Silver and they need to be special ordered.Edward Young Retired
After you make that expensive repair and you still have the same problem, What will you check next?
4 -
@EdTheHeaterMan I'm not there to measure the diameter from the AC unit to the ducts, so I'm assuming since they used 14-inch R-8 flex duct, that 14 inches is also the size needed for the replacement metal ducts, is that correct?
Great tip about using the insulation sleeve w/o the duct, but considering the problem with the animals the exposed insulation will probably get ripped again (It or THEY burrow under the house, it's a manufactured home w/no foundation, probably armadillos). So if they can't get rid of the animals, maybe it will be better to insulate and seal small sections, so if/when it happens again the entire one-piece sleeve wouldn't have to be replaced. That will be very costly. What do you think?
0 -
If the AC worked with 14" Flex, then 14" round metal will have less restriction because it is smooth inside. So you are probably correct with the size. If you want to be sure that the critters stay away from the insulation, you can get sections of 20" metal duct to put around the insulation and seal it with tape. If you insulate any metal duct with bubble wrap or fiberglass duct wrap, then you will always have that same concern. The best critter repellant is to get something they don't like the smell of and place it around the duct work. Moth balls are offensive to some critters, find out what type critter and what smell they don't like, then put that stuff near your stuff that you don't want the critters near.
Just don't tell EllieMay that you don't like Critters
Edward Young Retired
After you make that expensive repair and you still have the same problem, What will you check next?
4 -
@EdTheHeaterMan loved that show, and EllieMay )
Ok, so won't the new 14" duct fit directly on the AC unit's collar, in place of the flex that's on there now?
Plan was to not use any more flimsy flex, and replace the entire length with metal. I have to assume the pipe end will fit over the AC unit's collar like the flex did, no?
I guess another option could be to just replace the flex and PROTECT it with an outer 20" metal barrier, but that will be costly. I'd rather replace it with metal altogether, no flex anywhere, and not connect the two together like your pic shows.
This is looking out from the condenser coil, where the flex is attached and has to be replaced with metal.
0 -
You are correct. You can use adjustable metal elbows (twist the sections to make custom angles) and the insulation will fit over those elbows. The illustration you selected is step 2 of sliding the sleeve over the 14" duct. If you don't use the inner liner to protect the insulation, the edge of the metal duct will rip the insulation to shreds when you try to slide it over the metal edge. Step three shows the inner liner with an X over it indicating you should throw it away. I'm just giving you the benefit of my experience because I have used that method for the last 25 years. I stopped installing rectangular duct in attics a long time go. (Only use rectangle duct in basements for head room) With manufactured home systems, the standard of the industry is to use flex duct. I like your idea of metal duct connected to the outdoor unit and the other end to the round adaptor to the home's duct system. This is the easiest way to insulate it.
Edward Young Retired
After you make that expensive repair and you still have the same problem, What will you check next?
1 -
As far as cutting the 5 Ft pieces of pipe to a custom size, you will be better off with offset snips because your hands stay above the work. With the standard snips your hand is between the upper side of the sheetmetal cut to the left and the lower side of the sheetmetal cut to the right. right between the two razor sharps edges of the metal. and when you cut a 14" round duct, that is over 43" of cutting that edge. A person can end up with lots stitches if thy are not careful. Have band-aids ready. If you need to use the flat cut end to go into a 90° elbow you might need a crimping tool also.
Also, to reduce noise, the air flow should go from the flat edge opening to the crimp end. Try not to make a pipe or a fitting with a crimp end on both ends of the same piece.
Here is a set of both right and left snips from HD. You may find that only right snips will not get you everywhere you need to cut. https://www.homedepot.com/p/Milwaukee-Left-and-Right-Offset-Aviation-Snips-2-Pack-48-22-4523/302716388Edward Young Retired
After you make that expensive repair and you still have the same problem, What will you check next?
3 -
Sliding the insulation removed from the flex is going to be a PITA for one person and the fiberglass is going to get all torn to S--t.
I would cut the duct outside the crawl space and insulate it before installing it will be much easier than crawling around and insulating it. You will probably have to insulate some of it in place. Screw the duct together and use mastic on the joints not tape.
Buy a pair of Bull dog snips to cut the seam on the duct. But do yourself and buy a pair of nibblers to cut the round duct....don't cut the seam with nibblers or double cutters. use the hand snips for that.
You can buy double cutters from Kett or Milwaukee or I think they make attachments for drills now that you can use. I bought a Kett nibbler 40 years ago and it still works great and it cost $100 at that time You can find them for $200.
Don't know how good the drill attachments one work but get something it will speed the job up and save you hands cutting 14" is no fun.
0 -
@EdTheHeaterMan All clear now on insulating, thanks. I guess my only question now is when connecting the round metal duct directly to the outdoor unit - will it attach directly to it (either crimped or not crimped) so I can run a straight length from the ac appliance (to a new metal elbow going up into the house), or do I need to attach adjustable metal elbows or other adapters/connectors to the outdoor unit first so the metal duct fits?
I know crimping has to be done on the side of ducts according to the direction of the air flow, but the flex looks like it was attached right over the AC unit's connection. Not sure how the metal duct will fit.0 -
@EBEBRATT-Ed, I use to use a bucket of mastic to seal my ductwork. but my guys would always destroy their uniforms. That stuff does not come out in the wash. Cintas can't even get it out of the uniforms.
Since this is just a one time job for this guy , the MASTIC tape with the rubberized side that has a white peal off protector is much less messy. And it makes a better than painted on mastic seal. I agree that duct tape is not the right stuff for sealing ductwork. MASTIC is the only way because once it is on there it is not dry-rotting away. I just think that MASTIC Tape is a cleaner and more professional look. Even if you are covering it with insulation. I like it for the parts of the equipment that does not get insulated.
I was that guy that put masking tape on the plenum and furnace before painting the MASTIC on the joint. then when the mastic was halfway dry, I would pull the tape off to reveal the clean strait edge of the sealed joint. My fellow installers told me I needed to get a lifeEdward Young Retired
After you make that expensive repair and you still have the same problem, What will you check next?
1 -
The strait duct can be attached to the starting collar of the equipment. You may need to crimp the starting collar on the equipment so the first piece of duct can fit over the start collar. It may not rest on the ground like the Flex Duct did. You may need to hang it from the floor trusses of the home or put a support under the duct.PNJ said:@EdTheHeaterMan All clear now on insulating, thanks. I guess my only question now is when connecting the round metal duct directly to the outdoor unit - will it attach directly to it (either crimped or not crimped) so I can run a straight length from the ac appliance (to a new metal elbow going up into the house), or do I need to attach adjustable metal elbows or other adapters/connectors to the outdoor unit first so the metal duct fits?
I know crimping has to be done on the side of ducts according to the direction of the air flow, but the flex looks like it was attached right over the AC unit's connection. Not sure how the metal duct will fit.Edward Young Retired
After you make that expensive repair and you still have the same problem, What will you check next?
1 -
Hi, A question. What would it take to exclude the critters? 🦨🐍🦖🐘🐲🐩 🤔
Yours, Larry0 -
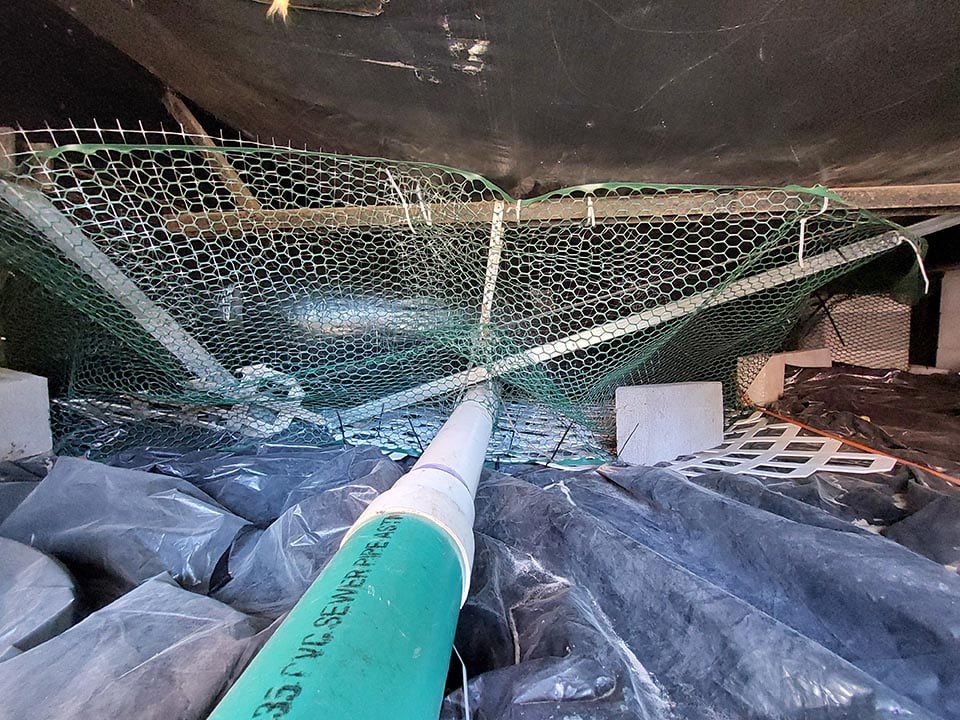
That's a good question. They tried mothballs, cementing in holes they dug, but nothing helped. The property is on old farmland bordering a tree line and acres of undeveloped land. Trapping probably wouldn't help much, staking a metal barrier under the home's skirting would help but they don't have that kind of budget, especially for the contractors in that area. I'll try to enclose the new duct in the crawlspace somehow, thinking either with chicken coop wire or maybe vinyl lattice on eye hooks so I could remove it later if needed. Any ideas?Larry Weingarten said:Hi, A question. What would it take to exclude the critters? 🦨🐍🦖🐘🐲🐩 🤔
Yours, Larry0 -
I am not a fan of Duct Liner for insulating ductwork. I just dont like putting insulation on the inside. However the HVAC manufacturers insulate their equipment with it on the inside of the cabinets. So what if you took a 14" x 20" round increaser (insulat that on the outside) then put duct liner inside the 20" duct the entire length on the interior with 2" thick fiberglass duct liner, including a 20" elbow, then put anther 20 X 14 reducer at the mobil home connection. (insulate that on the exterior).
This way all the duct would have a metal surface on the exterior except for the short 14" sections at either end. If you painted that stuff with animal repellant of some sort, you might mitigate the critter problem.
Edward Young Retired
After you make that expensive repair and you still have the same problem, What will you check next?
0 -
@EdTheHeaterManEdTheHeaterMan said:I am not a fan of Duct Liner for insulating ductwork. I just dont like putting insulation on the inside. However the HVAC manufacturers insulate their equipment with it on the inside of the cabinets. So what if you took a 14" x 20" round increaser (insulat that on the outside) then put duct liner inside the 20" duct the entire length on the interior with 2" thick fiberglass duct liner, including a 20" elbow, then put anther 20 X 14 reducer at the mobil home connection. (insulate that on the exterior).
This way all the duct would have a metal surface on the exterior except for the short 14" sections at either end. If you painted that stuff with animal repellant of some sort, you might mitigate the critter problem.
That won't work, condensate will collect at the end and cause hammering. I'm sorry, I really couldn't help my self.
@PNJ
All in all, I'd probably tell them to have it replaced with the same thing (Preferably better) and use the extra money to having someone seal up the house. I know that much flex isn't great, but having mice, rats etc in the house is a bigger concern in my opinion.
Rodents do a whole lot more than chew things. They poop and pee where they eat, and everywhere else.
Single pipe quasi-vapor system. Typical operating pressure 0.14 - 0.43 oz. EcoSteam ES-20 Advanced Control for Residential Steam boilers. Rectorseal Steamaster water treatment0 -
@EdTheHeaterMan
That won't work, condensate will collect at the end and cause hammering. I'm sorry, I really couldn't help my self.
Fixed it @ChrisJ :
Also added a Hartford loop and a stinking wet return
Edward Young Retired
After you make that expensive repair and you still have the same problem, What will you check next?
2 -
@EdTheHeaterMan
Wh..
Why is there a toilet on it. I don't know what kind of steam systems you've been working on......
Single pipe quasi-vapor system. Typical operating pressure 0.14 - 0.43 oz. EcoSteam ES-20 Advanced Control for Residential Steam boilers. Rectorseal Steamaster water treatment1 -
The Manufactured housing kind.
But I thought this was the supply duct. You made it clear that it is the return duct. So I had to pitch it the other way.
I hope no one thinks this is real adviseEdward Young Retired
After you make that expensive repair and you still have the same problem, What will you check next?
0 -
Thanks @ChrisJ
Looks like there is only one other with this badge of honor?!? Wonder who that could be????
Edward Young Retired
After you make that expensive repair and you still have the same problem, What will you check next?
2 -
Why doesn't Sony sell robot cats? Where's AI when I need it?Larry Weingarten said:Hi, A question. What would it take to exclude the critters? 🦨🐍🦖🐘🐲🐩 🤔
Yours, Larry
1 -
jumper said:
Hi, A question. What would it take to exclude the critters? 🦨🐍🦖🐘🐲🐩 🤔 Yours, Larry
Why doesn't Sony sell robot cats? Where's AI when I need it?
Single pipe quasi-vapor system. Typical operating pressure 0.14 - 0.43 oz. EcoSteam ES-20 Advanced Control for Residential Steam boilers. Rectorseal Steamaster water treatment0 -
@EdTheHeaterMan Yeah, I'm just going to replace the flex and do my best to box it in. Thanks Ed. Is mastic necessary, or would zipties and mastic tape be sufficient to seal it in place? TIght spot, is crunched between the ground and floor of the house, not even a millimeter in between.
0 -
Been there, done that.PNJ said:@EdTheHeaterMan Yeah, I'm just going to replace the flex and do my best to box it in. Thanks Ed. Is mastic necessary, or would zipties and mastic tape be sufficient to seal it in place? TIght spot, is crunched between the ground and floor of the house, not even a millimeter in between.
You get creative in those situations.
I have extended the collar with 2 feet of 14" metal. Then I painted the interior seem with mastic. ( you could use the mastic tape) then started the flex duct further away from the edge of the home under the home. I use duct ties and mastic to air tight the connection. I have even dug some of the ground under the duct to get more clearance to work. Then I could pull the insulation from the Flex over the metal until it reached the equipment connection. I then made the vapor barrier connect to the equipment with metal tape the is rated for exterior use. I can't remember the ASME # of that product
Once it is sealed internally and externally the flex can run to the home's duct connector and the same connection can be made there.Edward Young Retired
After you make that expensive repair and you still have the same problem, What will you check next?
1 -
Armadillos, not rodents. I don't think they eat there, they probably just drop by to cool off.EdTheHeaterMan said:Rodents do a whole lot more than chew things. They poop and pee where they eat, and everywhere else.
1 -
There's no mice in the area?
Single pipe quasi-vapor system. Typical operating pressure 0.14 - 0.43 oz. EcoSteam ES-20 Advanced Control for Residential Steam boilers. Rectorseal Steamaster water treatment0 -
@EdTheHeaterMan and anybody else that can hopefully help, What am I looking at here? Everything I learned for installing flex duct looked pretty straightforward, slide the insulation back, attach the inner duct with mastic tape , then zip tie the insulation, all from the crawlspace.
I am now at the house. From the outdoor packaged unit I "assumed" both flexducts were 14", but the return duct is larger, this is what I see inside:
How do I replace that? Is that a flange that holds it in place inside the house? They cemented the hell out of it. I can't even tell what the width is since it's so badly torn, but it's not the same as the 14" supply duct, which also looks like it's cemented from the outside:
What I thought was a somewhat simple job now looks like a nightmare. Before I start tearing into this, any advice on the best way to replace both of these? I guess the only way to know the diameter of the larger return (is that normal?) is to rip out the old stuff and measure the collar width on the unit? This is the nameplate on the unit but it doesn't say anything about what duct to install:0 -
The return is 16" Flex Duct. That makes sense to some folks. The cooler air is more dense so it takes up less space. The return is larger to accommodate the same amount (by weight) of warmer air that is less dense. I personally don't believe that you need the larger duct, but there are some that will dispute the issue, and want the larger duct to reduce air velocity, with the goal of lower noise from the air flow.
I have noticed that on some installs. Someone is going the extra mile for a quality job. Trane dealers like to think that are better than everyone else. And if you look at all the control wires inside that box... they are probably all black with numbers numbers printed on the insulation. I guess that is so colour-blind technicians can work on them.Edward Young Retired
After you make that expensive repair and you still have the same problem, What will you check next?
1 -
@EdTheHeaterMan is there a reducer I can use to make the return also 14"?0
-
Yes. But you need to make the collar round. In the photo the collar is oval to fit the hole in the side of the unit. I have found that the manufactured reducers must be round, not oval.
I have made my own reducers by purchasing a 16" x 2' section of pipe and cutting a triangle off the one side of the pipe so the crimped end is 14" diameter and the raw end is 16" diameter like this:
Once you trim the one side place the raw edge of the metal in the slot on the other side and use mastic tape and at least 3 screws to hold the custom cut edge in place.
Edward Young Retired
After you make that expensive repair and you still have the same problem, What will you check next?
1 -
-
How about this @EdTheHeaterMan, to fit the oval section without dealing with the floor - there is still a foot or so of good flex duct coming out of that to the crawlspace, and the flex is round, so my idea is to splice a 16" to 14" reducer on the small good part of flex in the crawlspace (or maybe even a reducing metal elbow?), and add another reducer to the collar at the AC unit, and use the same 14" flex duct for the small length of return. I won't have to buy 25 ft. of 18" flex for the 5 or 6 feet I need.EdTheHeaterMan said:Yes. But you need to make the collar round. In the photo the collar is oval to fit the hole in the side of the unit. I have found that the manufactured reducers must be round, not oval.
It looks like there could be just enough room to add a reducer there, to the flex beneath the oval, for a metal reducer to attach the two flex ends to. Will it work? Is it a bad idea to splice a metal coupler/reducer to join to two ends of flex?
0 -
jumper said:
How about expandable chimney liners? Fit one inside and a bigger one outside original flex. Not as professional as metal ductwork but.....
You're saying feed that inside the entire length of flex, then put all that into another liner? That would be expensive, but would it affect the moisture?0 -
There is no way to access and replace this flex duct attached to the 16" OVAL floor return flange from beneath the house, the old flexpipe connection is not accessible, running through a box frame in the floor joists. So the only way to replace the flex (other than splicing into it, and there is not much room in the crawl space) is to peel this old flange up.
It doesn't look in too good of shape, and I can't find a replacement oval floor flange at SupplyHouse or anywhere else. Does anyone know where that oval can be purchased, or is there a better way to do this?
I assume the new round flex strecthes into an oval, and will just be taped and zip tied from inside the house, then lowered back down?0 -
That will work great. here is one place to get the 16 x 14 reducer https://www.amazon.com/Single-Wall-Galvanized-Metal-Reducer/dp/B00B6JOUTG?th=1. I believe SupplyHouse.com also has them and perhaps even a local HVAC supplier will stock them.PNJ said:
How about this @EdTheHeaterMan, to fit the oval section without dealing with the floor - there is still a foot or so of good flex duct coming out of that to the crawlspace, and the flex is round, so my idea is to splice a 16" to 14" reducer on the small good part of flex in the crawlspace (or maybe even a reducing metal elbow?), and add another reducer to the collar at the AC unit, and use the same 14" flex duct for the small length of return. I won't have to buy 25 ft. of 18" flex for the 5 or 6 feet I need.EdTheHeaterMan said:Yes. But you need to make the collar round. In the photo the collar is oval to fit the hole in the side of the unit. I have found that the manufactured reducers must be round, not oval.
It looks like there could be just enough room to add a reducer there, to the flex beneath the oval, for a metal reducer to attach the two flex ends to. Will it work? Is it a bad idea to splice a metal coupler/reducer to join to two ends of flex?
All you need is about 10" to 14" of inner liner to make the connection from the collar to the reducer. but you will want to salvage about 3 feet of the insulation from the old 16" flex duct so you can pull it over the 14" insulation for a few inches past the 14" flex duct insulation. Then gently tape the outer vapor barrier from the 14' to the 16" outer vapor barrier. You don't want to crush the insulation by pulling the tape too tight. As you already know, you will want to leave room for the fiberglass to expand as much as possible to get the full insulation value.Edward Young Retired
After you make that expensive repair and you still have the same problem, What will you check next?
1 -
I removed the old flex from the packaged unit's collars, it looks like the previous tech might have added extra plastic and lots of mastic to seal the round starter collars to the rectangular flanges on the unit? My question, before I start tearing something I shouldn't apart, should I start peeling away all that plastic to get down to bare metal, like the collar, or what's the best way I reseal these to the unit?
0 -
You need a smooth transition from square to round.That return is what 10
or 12” at best without it.0 -
Its very funny that everyone thinks everything is so easy and that ever contractor is out to make a fortune off of them and that materials are cheap and that no real skills or nothing beyond minor brain capacity would need to be required . until there on there belly in the dirt sucking in dust that they say yeah not so easy and maybe it does required a few brain cells or lack of . Its all dust in the wind and money in the pocket until its beyond your skill set and your forced to make the call or you get it all done and there's a issues. i m all for do it yourselfers that's what made this country what it is today . But not everyone and everything can be done following a you tube video at least i think so . i tip my hat off for willingness to do it yourself and seek some advise that's honorable . But like i always say at some point everyone pays the piper it comes with the territory of doing it yourself . please take zero offense i use this post as a example of possibly over helping some one when there are business struggling and every bodies gonna do it themselves until they did it wrong and have to pay some one and re doing other work is never cheap . i see it all the time so many think its so easy and really don't do all the home work and rely on others for information . Personally i try not to give all the info just enough for them to hang themself being i have to eat also . in closing everybody is expensive nothing is cheap including advice and certainly not all things can be learned without doing a couple of millions of times in my book . One can lie about all there experience and time in the field but the proof is in the pudding and shows through in there knowledge and true quality of the craft they do . There is never a ego attached just some one who know what they can change and what they can't and are willing to walk then force a lower price to get a job ,everybody has there price and nobody works for free also there are no free rides .
So good luck on your project and please post some pic when complete . a free side note on a side shot package unit a dog house cover is usually installed over the duct work from the elements usually going from the unit to building or roof curb , but now adays they cover w a crappy exterior insulation foam garbage which usually disengages w time and exposure to the elements and then leaks but its cheaper then making dog house covers . lol . also a nice transition from the units duct connections to round is the usually way to do it not boxes w collars but hey that's just me and how it was done in the past now just boxes and collars . I also like that the top portion of the condensing coil is semi blocked due to being to close to the home meaning the unit should have been placed away from the foundation for proper air flow through the condenser i would image its in the installation manual but if they had done that they would have had to do some thing to prevent the flex from the weather the cure jam the unit close to the building ,they cared . . Reading that comes w some thing that not seen much and no price can be placed on and that is caring ,when a mech or one man shop cares things are done properly when you dont care its just all about money and getting outta there and never returning a very common thread . just being the clam
peace and good luck clammyR.A. Calmbacher L.L.C. HVAC
NJ Master HVAC Lic.
Mahwah, NJ
Specializing in steam and hydronic heating1 -
PS has anyone ever cleaned that condensing coil ? wrong contractors if they charge for yearly maintenance they should be fired . peace and good luck clammy
R.A. Calmbacher L.L.C. HVAC
NJ Master HVAC Lic.
Mahwah, NJ
Specializing in steam and hydronic heating0 -
@clammy Don't defend all the HVAC "workers" out there, the only license needed is for the boss, the people they hire are the issue here. And the STORE CLERKS can lose the attitudes talking to non-licensees and show a little HUMAN DECENCY. Without having a licensce it is difficult to even buy the flex duct in 16". FWIW, I'm also a HVAC student now but the course on ducting didn't cover repairing hack jobs.
The problem here is it should be EASY to replace just the flex, but it shouldn't have been installed and even if they think they had to, it obviously wasn't installed correctly. They used what was on the truck to get it running, and took the money and ran. Common problem in Florida where "some" like to take advantage of the elderly homeowners here.
Dog house - I've seen where installers fabricate a metal box to cover the space where the duct enters the crawlspace, but these hacks did none of that here, left an exposed gap (along with jamming flex into the ground, no filter install, wrong starter collars, etc etc etc...).
As a contractor for some years in the construction industry, I have full respect for hard working professionals. I have no tolerance for hacks (I have another word for that I won't say here).1
Categories
- All Categories
- 86.2K THE MAIN WALL
- 3.1K A-C, Heat Pumps & Refrigeration
- 53 Biomass
- 422 Carbon Monoxide Awareness
- 90 Chimneys & Flues
- 2K Domestic Hot Water
- 5.4K Gas Heating
- 99 Geothermal
- 156 Indoor-Air Quality
- 3.4K Oil Heating
- 63 Pipe Deterioration
- 915 Plumbing
- 6K Radiant Heating
- 381 Solar
- 14.8K Strictly Steam
- 3.3K Thermostats and Controls
- 53 Water Quality
- 41 Industry Classes
- 47 Job Opportunities
- 17 Recall Announcements