Welcome! Here are the website rules, as well as some tips for using this forum.
Need to contact us? Visit https://heatinghelp.com/contact-us/.
Click here to Find a Contractor in your area.
If our community has helped you, please consider making a contribution to support this website. Thanks!
Redoing my large system. Need help with how to organize it.
Options

rsilvers
Member Posts: 182
in Oil Heating
I am replacing my ~32 year old Burnham with a G215/5. It's a large system that has four hydro-air units, two radiant manifolds (one that they plastered into a wall with no access door that I only discovered when it leaked), and a garage unit. I will wait until Spring to tear it out so I am under no time pressure, and the hot water will come from a heat-pump tank because I have solar-electric.
This system makes my brain hurt to even look at it. I think what I need to do is establish a primary loop with 1.5 inch pipe over to an empty wall. Once I have that in place, I can have the other systems attach to the loop - which I would probably do with 3/4 and 1 inch ProPex. I know that low temp things like radiant should be last on the loop. I sure wish the original installer made labels for what each pipe goes to and comes from.
Looking for suggestions.
Video: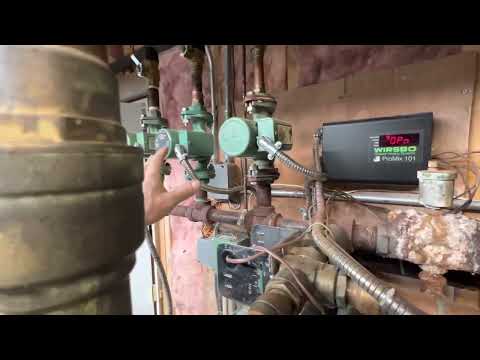 https://youtu.be/yuZ18ufr-Cg


This system makes my brain hurt to even look at it. I think what I need to do is establish a primary loop with 1.5 inch pipe over to an empty wall. Once I have that in place, I can have the other systems attach to the loop - which I would probably do with 3/4 and 1 inch ProPex. I know that low temp things like radiant should be last on the loop. I sure wish the original installer made labels for what each pipe goes to and comes from.
Looking for suggestions.
Video:
https://youtu.be/yuZ18ufr-Cg0
Comments
-
I like mounting things to walls. Even if I have to build one with studs and (ideally) good grade 3/4” plywood. Laid out so that it is intuitive. At least to me. Enough space that I can get to it. Piping on stand offs. Waist high for water. Well supported. Tees and caps headed down to the floor to support what I do in black pipe. A few extra plugs and tees in case I want to add things. Don’t have to bend over if it is waist high. And I am getting up in years. Wiring goes on the wall, in conduit, about a foot higher. Less water headed towards the electrical stuff if I need to replace a pump. Liberal on isolation valves, places to vent air, drains. Heavy on instrumentation so I can see what it’s up to. And to help balance things.
I am a newcomer to pex. And store bought manifolds. Which is easier. I have had a tendency to build my own controls out of surplus parts and left overs. I color code zones etc with whatever colors of THHN wire I have on hand. Grew up poor so it is an old habit. Works for me. Not a pro so take it with a grain of salt.You will probably come out ahead if you hire a true pro and can be done with it. I can’t help myself and it is a bit of a hobby. So I do it. Nice part in doing it yourself is that you understand it. If the heat goes out, you can diagnose it and fix it. With parts on hand. Usually.
Best wishes

 3
3 -
Actually what you have doesn’t look that bad. Can always be better. Could re use much of it. Cleaned up of course.0
-
It's about $10K extra to hire a pro vs me doing it and then paying a plumber to tighten the last fitting and get an inspection. I really want to do it myself. I am doing my oil burner exam this month.
Looking at it again, I think I should clean it up. Change the broken radiant mixer to a mechanical diverter. Raise up the zone valves about 18 inches. Move the pipes to connect to the rear of the new boiler. Replace the corroded stuff. Do a HydroLevel Outdoor Reset Primary.0 -
From a schematic point of view, you should basically pipe the new one the same way as what you have. I think you could sheet the wall to the left and move everything over there with unistrut."If you can't explain it simply, you don't understand it well enough"
Albert Einstein1 -
I have two zones of radiant on this large system, and one 007 circulator feeds into the two zone valves for them using 1 inch copper to the Pex manifolds. The 007 is 23 GPM. Does that seem too much flow? The entire boiler is a 1.9 max firing rate, but these are just a portion of the entire heating system.
I am replacing this portion now as it needs new o-rings at the very least, but want to change the flanges and motor also.
0 -
Double check the part number on that circulator. I don't think it is the standard 007. From the sensors, it appears to be a variable speed delta T circulator.0
-
I got the part number off the data plate. The sensors are for the ProMix 101.
In any case, I decided to use an Alpha2 pump instead of this.0 -
I finished it. My first boiler install.


 9
9 -
Awesome job! I like your choice of components.1
-
Awesome! Let's be honest Wallies. None of us were expecting it to look that good.
There was an error rendering this rich post.
1 -
looks great0
-
nice job
0 -

Someone needs to learn about stove pipe crimping and which way the flow of the gasses in the pipe go!Really... I'm Impressed
Job well done
Click on the Spoiler above.Edward Young Retired
After you make that expensive repair and you still have the same problem, What will you check next?
0 -
Thank you everyone.
And as for the duct, I did male pointing down because inspectapedia.com said to use at least three screws per connection and point the male down to contain any corrosive dripping. The old duct did have brown stains running down the duct.1 -
It is working perfectly once I got the Nest thermostats to have C wires by adding FAST-STAT Common Maker Thermostat Wire Extenders. An awesome product.
I used a compressor and pressure tested it to 45 psi before filling it. I didn't go higher because if a soldier joint failed in some wall in the house, I would have not been able to repair it.0


Categories
- All Categories
- 87.7K THE MAIN WALL
- 3.3K A-C, Heat Pumps & Refrigeration
- 59 Biomass
- 431 Carbon Monoxide Awareness
- 127 Chimneys & Flues
- 2.2K Domestic Hot Water
- 5.9K Gas Heating
- 121 Geothermal
- 170 Indoor-Air Quality
- 3.8K Oil Heating
- 79 Pipe Deterioration
- 1K Plumbing
- 6.6K Radiant Heating
- 396 Solar
- 16K Strictly Steam
- 3.5K Thermostats and Controls
- 56 Water Quality
- 51 Industry Classes
- 51 Job Opportunities
- 17 Recall Announcements