Welcome! Here are the website rules, as well as some tips for using this forum.
Need to contact us? Visit https://heatinghelp.com/contact-us/.
Click here to Find a Contractor in your area.

Drain Pan Heater ?

Looking for some advice regarding a "drain pan heater" option for a new Daikin 4MXS36NMVJU 36K BTU outdoor unit I'll be installing this spring.
Unlike our 6 year old existing cool only minisplit, the Daikin will have heat/cool capability and I intend to use it as a short term backup to our HPT UFT-80W mod-con if it ever fails and I have to wait for parts, etc. FWIW our DD (15F) heatloss for our Long Island home is 30K BTU's.

The condenser will be wall mounted above the average snowfall line, protected from north winds on the south side of the house. Even in the winter that location gets several hours of sun every day.

So, my question is... since the condenser will be wall mounted with no drain pan draining restrictions... would it be a good idea to install the ($240) option KEH063A4E Daikin Drain Pan Heater?

Thanks in advance..... Rob
«1

Comments

  • Jamie Hall
    Jamie Hall Member Posts: 24,700
    I'm a conservative sort of chap, @NY_Rob , so I'd probably install it. On the theory that when you most need it (a cold night) the pan could freeze, and if it stayed cold it just might not thaw...

    But as I say, I tend to be pretty conservative on that sort of thing.
    Br. Jamie, osb
    Building superintendent/caretaker, 7200 sq. ft. historic house museum with dependencies in New England
  • EBEBRATT-Ed
    EBEBRATT-Ed Member Posts: 16,364
    Sounds pricy. How does that unit defrost? For the amount you will need it for heating it seems like a bit much.
  • JUGHNE
    JUGHNE Member Posts: 11,266
    I would guess it does a hot gas defrost with all fans off.

    Have you needed back up heat yet?
    And if you did, what did you use?
  • Harvey Ramer
    Harvey Ramer Member Posts: 2,261
    I have never installed a drain pan heater in that application. I have a bunch of them out there and no problems.
  • GW
    GW Member Posts: 4,821
    The pan heater melts the ice build up. Too much ice and there can be damage to the condenser coil. I’ve never seen damage but it’s certainly possible. I make it clean on my paper work what it’s for and if they don’t want it’s thats ok too. The price you mentioned seems normal
    Gary Wilson
    Wilson Services, Inc
    Northampton, MA
    gary@wilsonph.com
  • NY_Rob
    NY_Rob Member Posts: 1,370
    edited March 2018
    Thanks for the reply's so far gents!
    Don't really fancy spending extra $$$, but I would hate to be worrying about damaging the unit if I actually did need to use it if the mod-con crapped out.

    FWIW- the HTP UFT-80W did fail to start one Jan morning... It would fire up then when modulating down to lowest output the flame would slowly peter out. It tried to restart five times then locked out. After speaking w/HTP support at 9am (the house was down to 65F at that time) they advised me to richen the gas mixture slightly via throttle adjustment. As it was just dying out again on a restart attempt I turned the throttle screw 1/4 turn rich and she kept flame this time and ran perfectly!
    After the house heated up a bit I set it on low fire and checked with my CA.. CO2 was down to 7.7% (factory recommends 8-9.5%) and that's after turning it 1/4 turn rich to keep it running... so it must have somehow become so lean it couldn't run on low fire.
    I've been checking CO and CO2 on the weekends and it's been a bit erratic since the event. I set it at 8.9 CO2 and the next weekend I find it at 10.0, reset it to 8.9, the next weekend it was at 7.9. I've kind of been chasing it. Don't know if the gas valve is going bad, etc.. but I purchased a spare to have on hand just in case. My CA is back at UEI being re-certified and calibrated- once it's back next week I'll log the results and if it's still erratic I'll speak with HTP about warranty replacement.

    Right now I have a pre wired 240v 6.6kW 10gal hot water heater I can pipe in quickly in an emergency for spaceheating... but the 36K BTU minisplit will be much better if it's ever needed.
  • GW
    GW Member Posts: 4,821
    A 3 ton mini split wow that’s a big one. Keep an eye on it down the road, more prone to getting mold. I suspect you will have shorter run times in ac mode
    Gary Wilson
    Wilson Services, Inc
    Northampton, MA
    gary@wilsonph.com
  • NY_Rob
    NY_Rob Member Posts: 1,370
    edited March 2018
    ^ Thanks Gary,

    Good thing it's on the sunny side of the house with a great southern exposure and plenty of air. I'm going to wall mount it too, so that will get it up off the damp ground.

    I'm using 3 of the four ports on the condenser. Will be installing 7K, 12K and 18K indoor units (all with heat option).

    Looking forward to installing it, I installed the Panasonic minisplit we have for the upstairs bedrooms (four indoor units) back in 2013 and it's been excellent since. I'm actually going to relocate one of the upstairs Panasonic (cold only) indoor units to downstairs and replace it with one of the Daikin indoor units with heat so this way we have an upstairs heat source backup if needed.

    I have some other install questions I'll create new post for... as always thanks for help to all who posted!
  • GW
    GW Member Posts: 4,821
    well then please forgive me, my brain went to single zone, don't know why.

    I know the Mitsubishi Multis we install have the pan heater installed at the factory. The Single Zone units----it is an optional part.
    Gary Wilson
    Wilson Services, Inc
    Northampton, MA
    gary@wilsonph.com
  • NY_Rob
    NY_Rob Member Posts: 1,370
    edited March 2018
    ^.. no sweat... my head is spinning at this point between the different brands available and options... it's probably harder to choose a system than actually install it!

    To muddy the water even more....
    Looks like the LG Multi F series (LUM36CHV) offers heating operations down to -4 degrees Fahrenheit. There is also a defrost feature, which removes frost from the condenser coil in frigid conditions.
  • GW
    GW Member Posts: 4,821
    Yes all Heat Pumps have 'defrost' cycle', it's nice for them to call it a 'feature'!

    It's the pan heater that is a hit or miss. In super cold weather i would rather see a pan heater than roll the dice.
    Gary Wilson
    Wilson Services, Inc
    Northampton, MA
    gary@wilsonph.com
  • NY_Rob
    NY_Rob Member Posts: 1,370
    LOL... I guess everything is a "feature" then!

    It has an "on/off" feature :D

    In the end, since it will double as a backup for my mod-con... seems like it's worth spending a little extra to add the pan heater.
  • John Mills_5
    John Mills_5 Member Posts: 952
    We've always used pan heaters. With what those minis cost, a bit more to protect the unit & coil is worth it.
    NY_Rob
  • ratio
    ratio Member Posts: 3,777
    ISTR that one of them, Mitsubishi HyperHeat maybe, energizes a pan heater of some kind to help it heat in colder temps.
  • GW
    GW Member Posts: 4,821
    @ratio, it just keep the blob of ice from killing the outdoor unit.
    Gary Wilson
    Wilson Services, Inc
    Northampton, MA
    gary@wilsonph.com
  • mikeg2015
    mikeg2015 Member Posts: 1,194
    Maybe in a damp coastal climate, or if its in a shaded location that never gets sun. But I have heat pumps at my house and haven’t seen any significant ice buildup in in Iowa winter. If the unit defrosts well, most frost becomes vapor.

    Good reason to install the unit where it will get some sunshine once a day to eliminate buildup. Plus if you have shade trees that drop their leaves in winter in that location, you get some free solar heating in heating mode, but shade in summer cooling.
  • GW
    GW Member Posts: 4,821
    Good point about the sun. Still, the contractor is semi on the hook if the unit ices and crashes, and the contractor didn't offer the heater. I cover my bases on this. If it's an option, then they get presented with the option. No arm twisting here!
    Gary Wilson
    Wilson Services, Inc
    Northampton, MA
    gary@wilsonph.com
  • clammy
    clammy Member Posts: 3,156
    Just one word of advise ,I have switched from wall mounted brackets to the free standing bases and mount them to lentials that we level into a gravel base .Reason being we had one or two complaints about vibrations plus its a lot easier to wash them down .We have just been installing hyper heat mitz and w the cold snap this winter not a call or complaint thank god .Peace and good luck .I believe the pan heater is to remove ice build up in heat pump mode peace and good luck clammy

    R.A. Calmbacher L.L.C. HVAC
    NJ Master HVAC Lic.
    Mahwah, NJ
    Specializing in steam and hydronic heating

  • NY_Rob
    NY_Rob Member Posts: 1,370
    ^ thanks Clammy!

    I had originally considered the wall mount, but the possibility of vibration/noise concerned me (I see it in my slab mounted Panasonic mini-split) - so I decided on a free standing base for the new unit.


    I'll dig down to hardpack, backfill a bit w/gravel then top it w/a small concrete block which the four foot pads will sit on.


    Now that the 'winter without end' is finally over (supposedly) I will start the new mini-split project this weekend. It was 28F Sunday overnight... so it will probably be 80F next week :o
  • Terry O
    Terry O Member Posts: 67
    edited April 2018
    "To muddy the water even more....
    Looks like the LG Multi F series (LUM36CHV) offers heating operations down to -4 degrees Fahrenheit. There is also a defrost feature, which removes frost from the condenser coil in frigid conditions."

    Actually they now have the Multi F RED with rated heating capacities to -13*F
    Terry O
  • clammy
    clammy Member Posts: 3,156
    Rob what i do is get 48 inch lentials and then use 1/4 cherry rivets to mount the base to then back fill around it all w gravel ,much easier to level and square 2 lential over 4 cap blocks .Most HO are always impressed on the mounting as well as others peace and good luck clammy

    R.A. Calmbacher L.L.C. HVAC
    NJ Master HVAC Lic.
    Mahwah, NJ
    Specializing in steam and hydronic heating

  • NY_Rob
    NY_Rob Member Posts: 1,370
    Terry O said:


    Actually they now have the Multi F RED with rated heating capacities to -13*F

    Thanks,

    The Multi F RED option adds another $1,200 to the outdoor unit. I'm good with -4F minimum outdoor temp for heating. FWIW our DD temp here is 15F. In all likelihood I will never use the heating feature, I'm getting it just in case my boiler ever craps out and I don't have a spare part for it on hand.

  • NY_Rob
    NY_Rob Member Posts: 1,370
    clammy said:

    Rob what i do is get 48 inch lentials and then use 1/4 cherry rivets to mount the base to then back fill around it all w gravel ,much easier to level and square 2 lential over 4 cap blocks .Most HO are always impressed on the mounting as well as others peace and good luck clammy

    That sounds very interesting.... do you have any photos of that setup?

    Thanks!

  • clammy
    clammy Member Posts: 3,156
    Sorry Rob i dont bother to take pics any more .Some times i get HO that are very perticular so i ll go a little crazy and do a rail road tie square and fill with a gravel bed and have either a pad for convential condensers or 2 lentials and mount the stand to that .Whats really nice about it is it provides some drainage and cuts down on mulch and vegataion growth on the base of the unit also makes it easy to wash down .peace and good luck clammy

    R.A. Calmbacher L.L.C. HVAC
    NJ Master HVAC Lic.
    Mahwah, NJ
    Specializing in steam and hydronic heating

  • NY_Rob
    NY_Rob Member Posts: 1,370
    Thanks Clammy....

    I was doing some advanced prep work in that area last weekend..
    I ran/trenched the 10/2 UF cable and AC disconnect box to where the condenser will be located.
    I have an electrician coming Sat morning to replace my old 100 amp (16 slot) breaker box with a 200amp 30/40 load center and new 2/0 SEU cable, weatherhead & mast, new point of attachment, new meter pan, new water bonding, new ground rod, new fuzzy boxes, (plus generator interlock and outlet) etc...
    After that (and the inspection), the electrical part will be done.

    I think I'll trench two runs (5" wide by 36" long), add 5-6" of gravel then lay 4X4 on the gravel and level the 4X4's. I'll attach the stand in the photo above to the 4X4's. That should provide a pretty stable base that will be easy to re-level if needed.

    Will order the condenser and three indoor units next week.
    Have to measure for linesets and lineset covers.


  • clammy
    clammy Member Posts: 3,156
    Rob for refregerant line set i have been using muller w a heavy outer white coating it does seem to degrade from uv and is fairly tough to rip .I moved from using wood to mount stuff to plus the lentials are about 10 bucks a piece and will never rot .peace and good luck clammy

    R.A. Calmbacher L.L.C. HVAC
    NJ Master HVAC Lic.
    Mahwah, NJ
    Specializing in steam and hydronic heating

  • NY_Rob
    NY_Rob Member Posts: 1,370
    Thanks Clammy.....

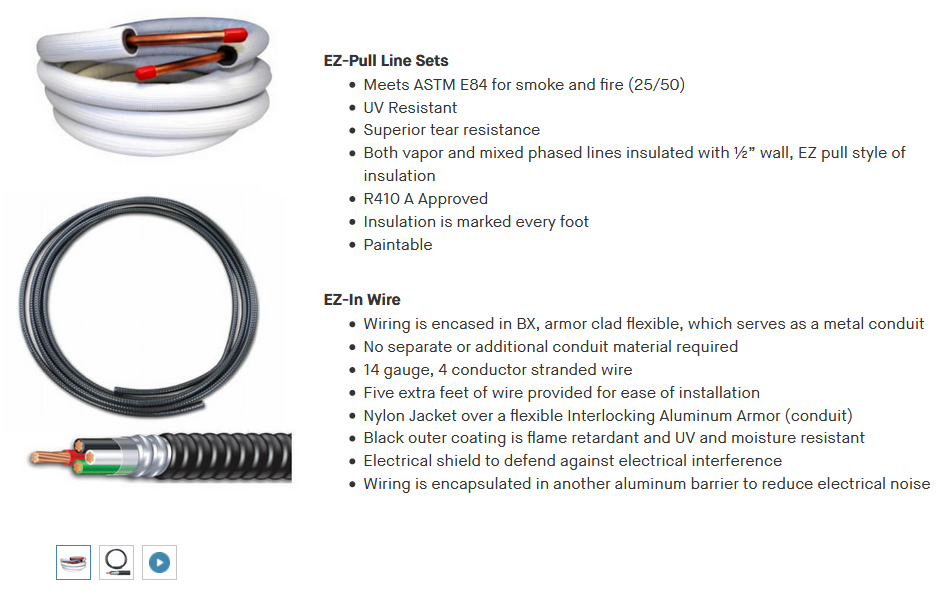
    I'm going to try these for the line sets:
    https://www.supplyhouse.com/JMF-406-50-12-144EZ-A-1-4-LL-x-3-8-SL-x-1-2-Mini-Split-Line-Set-w-Flare-Nuts-EZ-Pull-Insulation-EZ-IN-Wire-50-Ft

    For the lineset covers I was looking at the RectorSeal Fortress line. Seems like they have all the parts needed for a complete end-to-end solution.

    Jut ordered the 36K BTU condenser this morning...
    https://www.ecomfort.com/LG-LMU36CHV/p50833.html


  • ratio
    ratio Member Posts: 3,777
    Just in case you're wondering, the factory "flare" on the lineset is only there to keep the nut with the lineset. You'll want to cut it off & put a real flare on it.
  • clammy
    clammy Member Posts: 3,156
    ratio is correct on that use the units flares not the pos that com w lineset .

    R.A. Calmbacher L.L.C. HVAC
    NJ Master HVAC Lic.
    Mahwah, NJ
    Specializing in steam and hydronic heating

    NY_Rob
  • NY_Rob
    NY_Rob Member Posts: 1,370
    Thanks guys!

    I have a 410A clutch type flare tool, I've practiced with it on some 1/4" and 5/15" lineset remnants I had from my existing minisplit I installed several years ago. I'm pretty happy with the flares the tool makes.

    Agree about using the LG supplied nuts vs. the lineset supplied nuts.

    I also read that I should probably use "Nylog Blue Gasket & Thread Sealant" on the connections?
  • ratio
    ratio Member Posts: 3,777
    I use Nylog on flares with no issues. Used to use the different flavored stuff, but I went with the Type O this time.
    NY_Rob
  • GW
    GW Member Posts: 4,821
    Fortress is yukky, the SlimDuct is way better. We loathe the Fortress, it’s so thin and cheap. The SlimDuct snaps on with authority
    Gary Wilson
    Wilson Services, Inc
    Northampton, MA
    gary@wilsonph.com
  • GW
    GW Member Posts: 4,821
    We were encouraged to stop using sealing products on flares years ago. Now we are plain metal to metal and it’s 100% good.

    We started using a torque wrench in 2016. When I first heard of this I thought it was silly. I bought a few old school wrenches for me and the guys. This year I bought a digital wrench and the guys love it because of its adjustable head (small pain to switch heads and adjust the torque). The digital has pre set torque values. Now we just punch the button and the tool scrolls through our pre set values

    I also started using the zoomlock fittings last year on a few jobs. Now this year we are fully switched. The flares are perfect. They cost more but doing a proper flare takes time. Time is money so pick your poison.

    We use the BlueVac vacuum gauge and it’s simply the best. It shows you in 10ths of a micron how fast you’re pulling or losing your vac. We use a core removal tool and the vac gauge is mounted on the core removal tool.

    A couple years ago we started “holding” the vac for 30 minutes. Sadly it took me years to understand this. Hey we all have our moments. Holding under 500 for 30 min is the standard for a new line. If your pulling on an open condenser then it takes forever

    A few years ago we stared triple evac, another misconception I had that it wasn’t necessary. I was wrong there too. It’s so stupid easy and it cuts down on your overall vac time.
    Gary Wilson
    Wilson Services, Inc
    Northampton, MA
    gary@wilsonph.com
  • NY_Rob
    NY_Rob Member Posts: 1,370
    edited April 2018
    @GW Thanks for the heads up on the SlimDuct.
    It's expensive, but I don't need too much.

    I didn't use a torque wrench on my original Panasonic mini-split I installed 5yrs ago. But times have changes- I will be using a (click style) torque wrench this time around.

    Will do triple evac- I can rent a nitro tank locally for about $30- so I'll nitro purge and 450PSI/24hr pressure test as well.
  • NY_Rob
    NY_Rob Member Posts: 1,370
    edited April 2018
    Re the "leak test" and "triple evac", here's the procedure I have found....
    Not really sure what Step 2 on the triple evac means?
    "Step 2- Break the vacuum with O FN to 14 PSIG"

    *********************************************
    Make sure to use fresh oil, once the vacuum pump oil becomes milky it has absorbed too much moisture.
    Good HVAC mechanics will use fresh oil on every vacuum. The moisture is absorbed into the oil so use fresh oil!!!

    Leak Testing in 3 easy steps:
    Step 1 45 PSI (N2) - Test for a minimum of 3 minutes
    Step 2 220 PSI (N2) - Test for a minimum of 3 minutes
    Step 3 450 PSI (N2) - Test for a minimum of 24 hours (if using R410A)

    Triple evacuation in 6 easy steps:
    Step 1- Evacuate the system to 1000 microns from both service valves. To measure the vacuum a vacuum gauge must be used at all times - do not use a system manifold gauge
    Step 2- Break the vacuum with O FN to 14 PSIG
    Step 3- Evacuate to 500 microns
    Step 4- Repeat Step 2
    Step 5- Evacuate to the lowest pressure that the pump will achieve (200 microns for a minimum of 1 hour)
    Step 6- The rise test must then be carried out for a minimum of 30 minutes

    Before removing evac hose from service port- open liquid stop valve to pressurize lines, then remove evac hose from service port.
    This prevents vacuum from pulling wet air back into the system after evac.
    *********************************************


  • Canucker
    Canucker Member Posts: 722
    @NY_Rob It's reminding you to release the vacuum to atmospheric pressure with nitrogen. Don't want to mess up that hard work drying the line set by letting air right back in.
    You can have it good, fast or cheap. Pick two
  • ratio
    ratio Member Posts: 3,777
    And for the record, you cannot "leave a system under vacuum". As soon as you pull a hose off you're no longer under vacuum. It took a while to stamp out that pernicious error, but I think I got through to my guys. Now it's positive N2 or juice before the hoses come off, period.
  • NY_Rob
    NY_Rob Member Posts: 1,370
    Canucker said:

    @NY_Rob It's reminding you to release the vacuum to atmospheric pressure with nitrogen. Don't want to mess up that hard work drying the line set by letting air right back in.

    Fixed up the instructions.... how does this look?

    Triple evacuation in 6 steps:
    Step 1- Evacuate the system to 1000 microns from service valves.
    Step 2- Break the vacuum with N2 to 14 PSIG
    Step 3- Evacuate to 500 microns
    Step 4- Break the vacuum with N2 to 14 PSIG
    Step 5- Evacuate to the lowest pressure that the pump will achieve (200 microns for a minimum of 1 hour)
    Step 6- The rise test must then be carried out for a minimum of 30 minutes

  • GW
    GW Member Posts: 4,821
    Step 6 doesn’t seem super clear. It’s gonna rise some. Under 500 for 30 min and it’s good to go
    Gary Wilson
    Wilson Services, Inc
    Northampton, MA
    gary@wilsonph.com
  • NY_Rob
    NY_Rob Member Posts: 1,370
    ^ Thanks Gary!

    Ordered the 3 indoor units (7K BTU, 12K BTU, 18K BTU), linesets, etc.... today.

    The three linesets, tray cables, drain hose, lineset covers, fittings, etc... came to almost $1K :#

    Fun times to come!!