Steam Boiler: Rusted, leaky water gauge + corrosion under top panel

Problems:
1. Small leak on water level gauge releases steam, rusted all around - seems to be bad seals around the sight glass - some sediment in the bottom of sight glass but water is clear-ish and at the correct level: Steam comes out when the system is heating up which has caused the gauge area to rust along with the left side of the manifold cover. Underneath the burners on the left also looks like there has been moisture, but it does seem like it could be related to the steam coming out of the gauge.Seems like the gauge/glass/etc need to be replaced. Not that big of a deal, right?
2. Burners look fine when I removed them - one wasn't correctly put back in place after one of the repair guys left, so flames were coming through underneath. It stopped once I fixed the placement.
3. Under the top panel on the left, back side, there is significant corrosion, maybe the flue collector? This is the one area I cannot figure out and I am wondering if this is the death knell repair?
Hopefully the pictures help too. I have a video that I will post next. I am happy to give more detail if needed. I am just grateful for any insight you may have!


Comments
-
Link to video of water gauge leak. https://vimeo.com/2406050650
-
I'm pretty sure that boiler needs to go in the garbage but it's hard to tell for sure from your micro-photography set of pictures and video. Step back and get a wider shot of the boiler, please.Contact John "JohnNY" Cataneo, NYC Master Plumber, Lic 1784
Consulting & Troubleshooting
Heating in NYC or NJ.
Classes 1
1 -
Of course, it's always best to service things in timely fashion, regularly and methodically per op instructions manual. Since you bought into its condition, gauging how long it will last is impossible to know.
For now, get that leaky sight glass repaired. You can easily (maybe not that easily, could be - but certainly doable if you are handy) replace the entire sight glass assembly. Look at supplyhouse.com, or any local supplier of choice for replacement parts. It's not expensive. This site and YouTube can be your friend and teacher for that project.
Any other leaks in the system will also need to be addressed and fixed. Any excess amounts of fresh make up water is literally killing the boiler with new solids and O2 (like that sight glass leak). If you are steaming like this in the boiler room with each firing up of the boiler, you are taking on a lot of fresh water. Not good.
As to other corrosion, this humidity may be why it's corroding. If this is a recent development, you need to find the source of corrosion. How are the pipes around the boiler - corroded? Is the basement humid during the summer months? Are there any chemicals stored in the vicinity of the boiler? Is the draft good? If burners are in good shape, as well as boiler block, corrosion may be recent and source of it has to be addressed. You can scrape it off and use some thin coating of high temp grease to protect the surface of the metals not in direct contact with the fire.
It would be good to check the operating pressure. This has to be as low as possible. Usually less than 1 psi will do, but most pressuretrols will do 1.5 psi high (cut out) with 1 psi differential (cut in), so that's fine. Is pigtail (pipe with the loop) clear? Is pressuretrol calibrated? Do you have a low pressure gauge (3 psi) so You know what your op pressure is? If not, get 3 psi gauge and install it.
You also need good main vents, good vents on rads if 1-pipe, and any steam traps if present need to be in working order, whether 1 or 2 pipe. Your rad that's slow to heat may just need a better/ new vent, may need to be pitched... There may be a sag in a pipe coming to the rad - is it hammering?
Boiler water needs to be clear and definitely not muddy. Looks pretty dirty in your sight glass. How is it when you blow down the boiler (are you, have you)? Dirty muddy water or clear? You may need a good cleaning with a wand, or at least some Rectorseal 8-way cook and drain, rinse and refill. Or 8-way power blow down cleaning (which will require some piping into a drain). You can also fill the boiler with fresh water above normal water line and add lye (be super careful with the mixing and safety protective gear), bring boiler to 170-180 degrees and let cook like that with fire off/on for an hour - without boiling. Then drain and rinse and refill. Weil-McLain manufacturer recommends lye for cleaning their boilers.
Gauging by the boilerplate, unless your house is 3,200+ sq ft brick with no insulation, that boiler is likely oversized. This brings on another challenge as you likely would have to run higher psi to avoid short cycling, or will short cycle and couldn't do much else about that, other than perhaps downfiring the boiler or having a 2-stage gas valve installed.
Next matter of business is to read "Lost Art of Steam Heating", and also "Greening Steam" by Dan Holohan. You can buy them here in the site store.
So, for now do what you can asap to stop leaks and replace that sight glass assembly. Make sure all your safety devices are in working order (pressure safety valve, low water cutoff aka LWCO, and any other spill and co switches). Make sure your draft is adequate. Then read about steam systems here and books, educate yourself, and look for a knowledgeable steam man locally. Look at "Find a contractor" here on this site. If no one is close, ask your neighbors who they use (Nextdoor site is good for that). Don't be surprised if there are not many men who know how to do this - It's a lost art for sure. Keep looking.
Then start planning for a replacement. Size boiler to the attached EDR of the rads.
As you know, a boiler failing in the middle of night in January is no time to speed through a replacement with an unknown contractor. As prices are not to be discussed here, use your best judgement when getting bids and do start asap on that, to have it lined up. Near boiler piping MUST be included in the quote, and MUST be per manufacturer spec, or with a drop header. Ask for pics from other steam installs and post here. Contractors who know what they are doing will be easy to spot, as will those who don't.
In conclusion, that boiler may last a while longer and you may be able to nurse it along, but you should also get ready for a replacement on your terms, with a knowledgeable installer.0 -
Agree with everything @MilanD wrote, especially the quoted part.MilanD said:Then start planning for a replacement. Size boiler to the attached EDR of the rads.
As you know, a boiler failing in the middle of night in January is no time to speed through a replacement with an unknown contractor. As prices are not to be discussed here, use your best judgement when getting bids and do start asap on that, to have it lined up. Near boiler piping MUST be included in the quote, and MUST be per manufacturer spec, or with a drop header. Ask for pics from other steam installs and post here. Contractors who know what they are doing will be easy to spot, as will those who don't.
In conclusion, that boiler may last a while longer and you may be able to nurse it along, but you should also get ready for a replacement on your terms, with a knowledgeable installer.New England SteamWorks
Service, Installation, & Restoration of Steam Heating Systems
newenglandsteamworks.com0 -
You can check for leaks by turning off, and overfilling the boiler well above the top, and letting it rest for a few hours. Any drips underneath will reveal a leaky section-the impending death of the boiler. If you do have leaks, then come here for advice on selecting a contractor who knows what he is doing.
Assuming no leaks, then replace the sight glass assembly, and install a low pressure gauge, (0-3 psi, Valworx). Adjust the pressuretrol to limit pressure under 1.5 psi.
Next locate your main vents on the returns most likely, and verify that they are of generous capacity.
Finally, never use that inspector again.—NBC0 -
Ok great. Thank you everyone. Trying to digest it all. FYI the house is big and brick from 1923 - main floor is 2000sqft - 7 radiators, attic has one radiator with a 1 finished bedroom that is insulated (rest of attic is not insulated under clay tile roof), basement is approx 2000 sqft and heated by the radiator pipes only.
I will prioritize those books because I am not sure how to flush the system, check PSI, etc. And replacing the sight glass I will do asap (I'm handy), but it seems like I need to determine if there is a bigger issue first. Here are broader pics of the room and detail on where the corrosion is.
So the corrosion under the hood - what is that piece that has build up on it? It looks like there is silicone on it - past repair? Not far off from the steam from the gauge, but could this be a larger issue?
I am working on getting quotes (sorry won't mention prices again) to be prepared and avoid the dead of winter boiler failure. But honestly, I am trying to educate myself because I certainly have been told just to replace it and that corrosion is the reason. Am I being taken for a ride?
And thank you for the call out on replacing the near boiler piping. I will make sure that is in there.


0 -
Fixing the sight glass is 1st line of business, as is checking your pressure setting on the pressuretrol - gray box to the right of the sight-glass. More on that below.
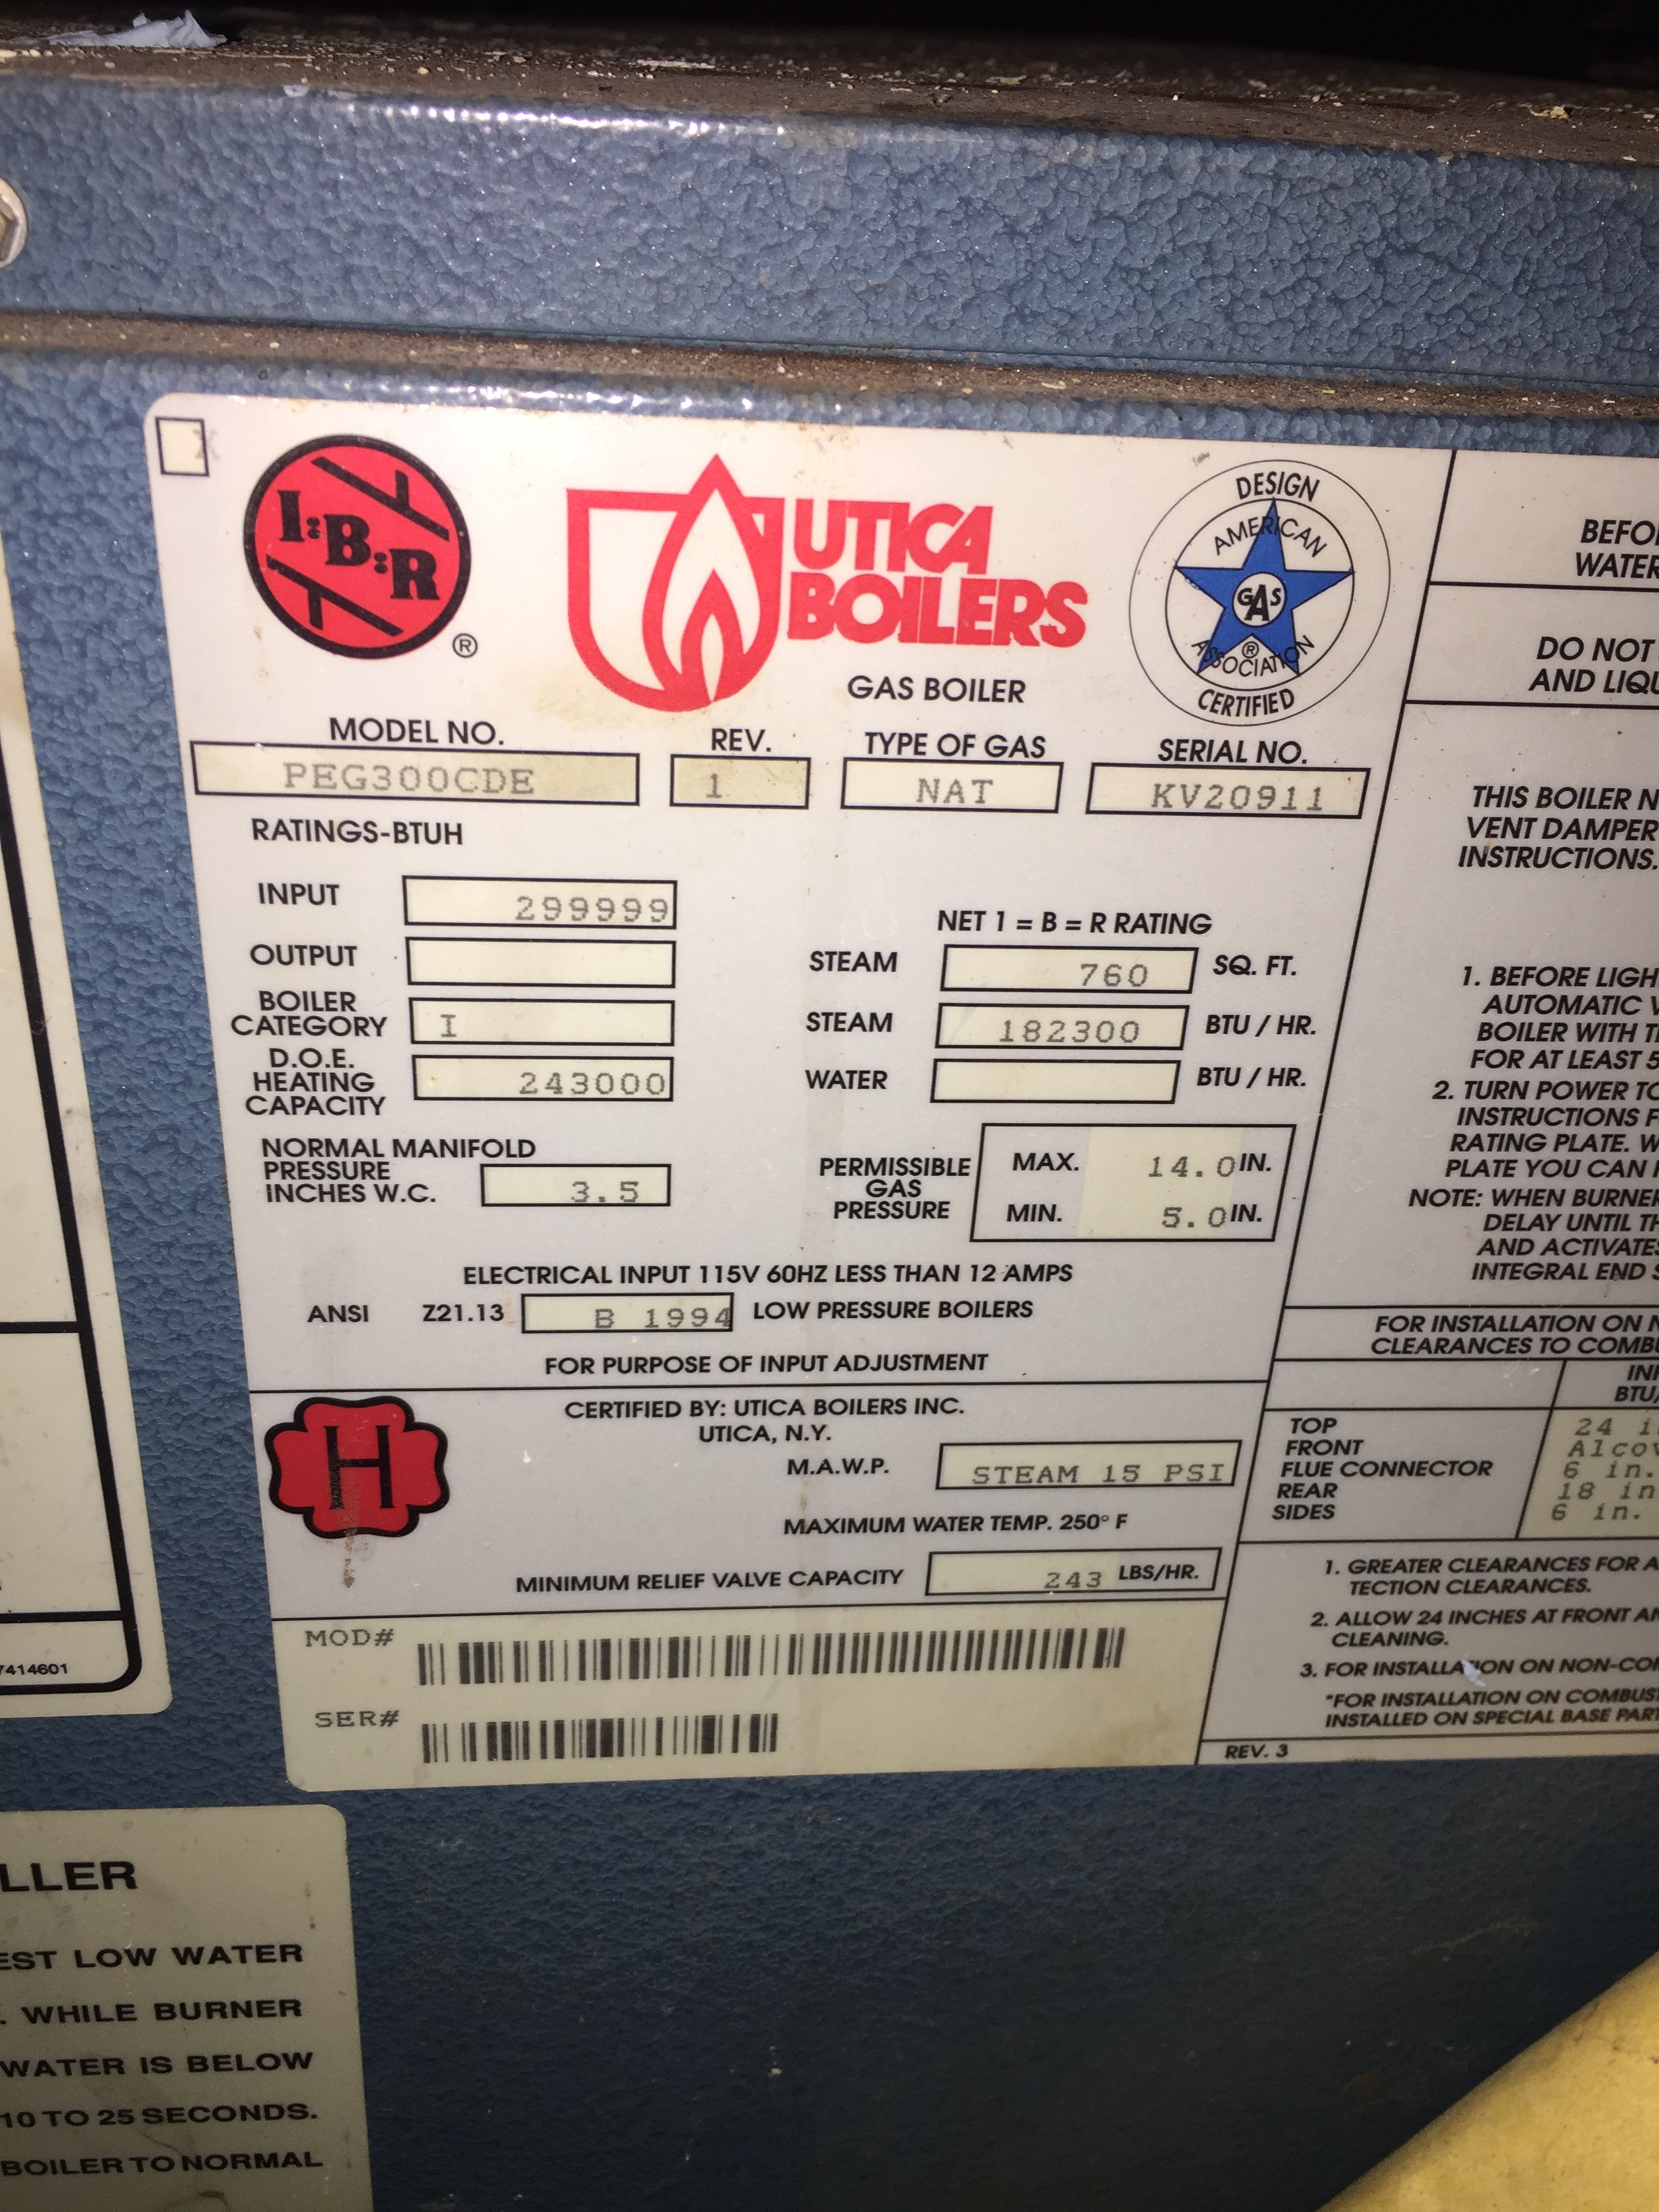
How long the boiler will last is, again, anyone's guess. That's the hard part about this boiler heating business for the home owner. That thing is 23 years old. Under optimal operating conditions it should last at least 20 years, so, it's outlived expectations. On the other hand, some people have boilers lasting much much longer, esp. older ones. This boiler is from 1994, at 81% efficiency going by sticker, which means it's the newer thinner casting sections, with pins on the fire side for increasing efficiency via greater heat-transfer surface. In combination with excess water use and water quality (which goes down as make-up water use increases due to accumulation of TDS - total dissolved solids -, and chlorides), thinner casting has a negative effect on boiler longevity. Your surface rust may not be an issue at all, but the issue is on the inside from all Ca and Mg deposit coming in with the make-up water. This will in essence - rot the boiler from inside. Also, as of last 20 years or so, water quality nation-wide is not that great for steam boilers. Water that's harder than 100 ppm or has over 30 ppm of chlorides is not good for steam boilers. This is virtually all the municipal water out there. Look at your city/county water report. Chlorides may not be listed, but hardness is for sure. Excess make-up water concentrates Mg and Ca inside your boiler, and rots the boiler from inside (it's not 'rot' rot, but actually graphitic corrosion).
You are not being taken for a ride. This boiler may last a while longer - and you'll only know how long if you keep it until it fails. If you get a contractor lined-up, ask them if they are willing to wait until current unit breaks. If so, great - just know you may have to wait too when it does break as you will be on the contractor's schedule when he can fit you, not the other way around. Also, prices may adjust some by then. Come think of it, you can always purchase a boiler, have the header piped and have it ready to 'swap' when the current one fails. That may not be a bad idea. So, how are your gambling nerves?
Back to current boiler -
From the pics, it's clear your rust is from a leaky sight glass. Water dripped down on the air intake grill, and with each burn cycle, draft would suck the droplets towards the burners and up that last section where your red arrow is. It's also clear it's been doing this for a while. As you don't have a water meter type auto feeder (for make-up water), it's anyone's guess how much fresh water you've been adding. As said, this would be a concern regarding the longevity of that boiler - inside condition of the sections - which is anyone's guess. You should add a water meter there in any case, either you or with the new install. New install can feature new auto water feeder with water meter on it - it's an option you can ask about.
If you install one your self, here's a good and inexpensive one on Amazon:
https://smile.amazon.com/Awakingdemi-Water-Meters-Garden-Fittings/dp/B01CZEMMBI/ref=sr_1_6?ie=UTF8&qid=1509472106&sr=8-6&keywords=water+meter&dpID=51mIQjdRD2L&preST=_SY300_QL70_&dpSrc=srch
It's good practice to have a water meter for make-up water.
Others will chime in too on other issues. Few more thoughts from me:
1. Your boiler is not piped to specs. There is a weird header, but it's not how it should be piped, and only one tapping is used. Also, equalizer is on the wrong side of the header you have (pipe coming back down into the boiler before the take-off for the heating main). If you are getting good heat on low pressure then it's doing it's business, but it's not piped as it should be and it's likely not doing what it should be doing. It was the same in 1994 as it is today. See page 6 here:
http://www.uticaboilers.com/sites/default/files/2310.pdf
When you get bids, insist installer pipes it per installation manual at a minimum, or use a drop header (search here for how that looks). Installer should use BOTH riser tappings from the boiler (get only a boiler with 2 tappings - most are like that but there are a few with only one and they are to be avoided). Installer should not use any bushings or reducers to reduce the pipes down from boiler openings, and should pipe a header using schedule 40 iron pipes, following minimum riser height per manual. It's obvious that who ever piped your current boiler can not read. Installation manual clearly states how to pipe near boiler piping and that ain't it.
It's also likely that boiler is oversized. I have a 1911 brick with 2,400 sq ft of finished heated space without the basement, and my EDR requirements on 0*F design is 450. Unless you are up in Alaska and into -20s on the regular basis, or you have some huge radiators, your system is very likely oversized. Search 'steam boiler sizing' to see how it's done. You need to identify radiators' 'equivalent direct radiation (EDR)' number, and add it all up. This gives you EDR direction to sizing the boiler. For steam, it's not heat-loss of the building that determines the size of the boiler, it's the attached radiator capacity. This will be key when replacing the boiler. If the contractor does not do this step, stay away from them as they are clueless. I'm attaching the sizing chart to make it easier.
2. Op. Pressure -- I doubt the pressure is set low - look at your gray box connected to the looped pipe to the right of the sight glass - it should be on 0.5 psi, and a wheel inside the cover should be set on 1. This is called a pressuretorl (pressure control). They can be notoriously inaccurate. It is supposed to 'see' pressure from the boiler and shut it off when the desired pressure is reached. Desired pressure on that particular type of trol is 1.5 psi - 0.5 on the outside, and inside wheel set to 1 = 1.5 psi cut-out pressure. To know the pressure at which this is happening, your regular 30 psi gauge you have will not even move to show 1.5 psi, so you need to get a 3 psi gauge and add to that branch. If you see psi at 5-6 - that's wayyy toooo high!! Report back and we can help recalibrate it.
This gauge will assure you have proper pressure. Here's the one I have:
https://smile.amazon.com/Kodiak-Controls-KC25-3-Pressure-Gauge/dp/B00H9ZWLZG/ref=sr_1_4?ie=UTF8&qid=1509475586&sr=8-4&keywords=3+psi+pressure+gauge&dpID=41tYyf%2BjNGL&preST=_SX342_QL70_&dpSrc=srch
You'll have to add some fittings to the existing branch to make this one fit.
All this being said, if that looped pipe (aka 'pigtail') is filled with gunk, this may be quite dangerous. Judging by how the leaky sight glass was left for some time, I guarantee that pigtail was not serviced ever. As you are replacing the sight glass, remove the pig tail and make sure it's clear and if not, clean it with a wire.
As you do all this, you'll have to drain the boiler at least to below the lower sight glass tapping. Good time to flush the boiler and clean it as described in the post above. Get some 8-way or steamaster tablets to condition the water after you fill it anew.
Next we can talk about venting - for now, the mains need new vents for sure - get 2 Big Mouths from Barnes and Jones. @Sailah makes them for the folks here on heatinghelp.com. It's a great vent!
Having a steam boiler makes you a custodian of a lost art. Welcome and enjoy your time travel to 1920s. You'll learn a lot, and once all is up to snuff, you'll have the best heat there is to have as nothing beats the heat of a 212*F radiator.0 -
piping the header that way must have been harder than doing it right. straight up to an elbow, tee into the main where the elbow is currently, then back down to the equalizer. **** were they thinking?0
-
Oh, I just saw that silicone. Let's hope it's to seal the draft cover and not a leak. If it's a hole in the boiler, that boiler is kaput.0
-
How did you do? Any issues with fixing this?0
-
That house isn't "big" for the steam era. 8 radiators is not very many. I'd guess it's quite a bit oversized for he connected load.
The story goes like this... the original boiler was coal, and was 60% effecient, but had small vents that allowed a vacuum to draw so everything was balanced and it was low and even. They add a oil burner because an fuel oil pump is way better than shoveling coal and oil was cheap.
Fast forward to 1994 and oil is not cheap, and that "one bedroom isn't getting hot, even after I crank up the pressure" (which makes is worse BTW). So the contractor looks at the oil burner, adds a little because the one room is cold, and a bigger boiler means more money for him, and installed something 50% bigger than the connected load.
That boiler is large enough for my 3800sqft victorian brick home with 16 radiators and full basement. Actually it's almost exactly the right size if my header was un-insulated.0 -
Instructions for installation of draft hood commonly call for it to be sealed with furnace cement, but high -temp silicone might have been used. I wouldn't suspect anything nefarious here at this point.New England SteamWorks
Service, Installation, & Restoration of Steam Heating Systems
newenglandsteamworks.com0


Categories
- All Categories
- 87.3K THE MAIN WALL
- 3.2K A-C, Heat Pumps & Refrigeration
- 61 Biomass
- 429 Carbon Monoxide Awareness
- 120 Chimneys & Flues
- 2.1K Domestic Hot Water
- 5.8K Gas Heating
- 115 Geothermal
- 166 Indoor-Air Quality
- 3.7K Oil Heating
- 77 Pipe Deterioration
- 1K Plumbing
- 6.5K Radiant Heating
- 395 Solar
- 15.7K Strictly Steam
- 3.4K Thermostats and Controls
- 56 Water Quality
- 51 Industry Classes
- 50 Job Opportunities
- 18 Recall Announcements