Welcome! Here are the website rules, as well as some tips for using this forum.
Need to contact us? Visit https://heatinghelp.com/contact-us/.
Click here to Find a Contractor in your area.
If our community has helped you, please consider making a contribution to support this website. Thanks!
balancing heat distribution
Options
eappleton
Member Posts: 111
Hi,
I'm on the board of a 24-unit coop building in Brooklyn and trying to get a handle on our heating. I'm new to boilers and heating and trying to catch up fast. I'm reading the Lost Art of Steam Heat as a primer.
I'm sure that I'll need to post photos and measurements to get more information, but I'd like some direction. The building suffers from major variation in heating. For example, it's currently about 80 degrees in our apartment now and 65 in an neighbors upstairs and across the hall. I had the heating control set lower a few weeks ago and the temperature dropped to the 50s in their apartment, so I had to bump it up. My guess is that we are also burning way too much oil. Our heating bills are huge (though I have nothing to compare them to).
I'm wondering how we can go about resolving the problem. Should we be going to the oil company (who also services the boiler), but my guess is that they only care about the boiler and have no incentive to help us reduce the amount of oil we burn. I'm wondering if we need to hire a plumber or an engineer to look at the whole system.
If this is something we can start to address ourselves, I'm wondering what information I need to collect to diagnose the problem. Here are a couple things I have noticed. I have been to two top (4th floor) apartments so far. Both apartments have normal radiator valves installed on the risers as vents. A couple of them don't even seem to be D valves. They are 3/8" and mounted directly to the risers. From what I gather from my reading, we should have air eliminators that would vent much more air, I assume. Do they also need to be mounted on 6" nipples off the risers? And if I replace these with 3/8" eliminators, they should be mounted vertically, correct? At this point, that's not possible.
It seems to me that the system is not being vented properly. Many of the owners are older and have probably not checked their radiators for ages. I'm trying to check all the radiators in the building, though this will take a while. I have replaced valves in a couple cold apartments and have had some success, but there seems to be a larger problem. A clue: the gauge on the boiler says 10psi. Shouldn't it be around 2? This seems like another clue that the system isn't vented properly and so the oil company just turned up the pressure as a bandaid.
I'm wondering what my strategy should be. Clearly, I don't know much about this. I'm willing to research and do some work, but in the end I will be dependent on the oil company for their service of the boiler and whatever expert we bring in. What can I do to educate myself and solve some problems before we bring in the big guns?
Thanks for your help,
Eric
Single-pipe steam | 24 apartment, self-managed coop | Federal FST-40 Scotch Marine boiler | Carlin 701CRD burner | Heat Timer EPU-CH | Honeywell pressuretrols | Heating oil #2 (20% bio)
0
Comments
-
First thing to look at
are your main vents. Follow the link below to see how we solved a similar problem.All Steamed Up, Inc.
Towson, MD, USA
Steam, Vapor & Hot-Water Heating Specialists
Oil & Gas Burner Service
Consulting0 -
24 units-over/under heating
you are a good steam student! that pressure seems much too high. possibly the pressure control is either not sensing pressure because of a clogged pigtail/syphon, or it has come to the end of its days! if you have to change it, consider replacing it with a vaporstat, with a good low-pressure gauge [gaugestore.com 0-15 ounces]
over-pressure will prevent the main and radiator vents from working properly, and may make them into paperweights.
next as steamhead points out the main air venting may not be adequate, or functional. you are probably right that the oil company may not have the right solution for correcting the deferred maintenance
don't be fooled by anyone who would try to cure this with some new radiator vents, but instead increase the main vents.
use the find a professional button here to see who you may call for a second opinion. ask him if he can perform a combustion proper analysis, as this too may be out of adjustment. many boilers of your apparent size have hi-lo firing, and you may have such a setup which has never been set up, or has fallen into disrepair.
if the budget is really tight, or you can't find a pro soon enough, you can do much yourself.
why not post some pictures of the boiler piping, and controls, so we can further advise. include some pertinent information on the boiler model, and the approx height of the top floor radiators from the basement.
in this case the cost of correcting these faults may be paid back in reduced consumption in a couple of months.--nbc0 -
1-pipe or 2?
how many pipes per radiator? I just finished assisting with correcting similar problems in a queens coop with over 600 2-pipe rads...6 floors A-R units...they expect to reap the benefits of both comfort immediately and savings quite short term..they had a fuel bil around $100k last year...we are anxiously waiting on this years projections. I'll contact you directly and we can do a walk-through one day soon.1-pipe Homeowner - Queens, NYC
NEW: SlantFin Intrepid TR-30 + Tankless + Riello 40-F5 @ 0.85gph | OLD: Fitzgibbons 402 boiler + Beckett "SR" Oil Gun @ 1.75gph
installed: 0-20oz/si gauge | vaporstat | hour-meter | gortons on all rads | 1pc G#2 + 1pc G#1 on each of 2 mains
Connected EDR load: 371 sf venting load: 2.95cfm vent capacity: 4.62cfm
my NEW system pics | my OLD system pics0 -
heat distribution
I've been going through a similar exercise at my building (25 unit co-op in Prospect Heights). Steps taken so far.
-Insulate all basement steam mains with 1" fiberglass pipe insulation
-Install main vents in basement mains (entire system was previously vented through one measly radiator vent in basement main)
-Install blown in R-38 roof insulation to uninsulated roof cavity
-Install vaporstat and utilize low-high-low burner feature (was previously running on high at all times) triggered by vaporstat. System now reverts to low fire (50% reduction in fuel supply rate) whenever pressure reaches 10 ounces.
So far our oil usage is down 30.3% (in gallon terms), but the roof insulation was a recent project, so I'm hoping to get some further improvements as we get more usage data. I don't consider the project "complete" but we are definitely making progress.
Whereabouts in Brooklyn are you?0 -
bravo arches!!
was it hard to convince the others to spend any money on the system. do you have any advice as to how to deal with a condo board in a separate posting?
good job, and sometimes in that situation very difficult!--nbc0 -
board
With the exception of the blown-in roof insulation, the improvements were mostly of the less than $500 variety (just parts and free labor, from me) so they were an easy sell. Did the other board members really stop to think of the worst case scenario from a drilling and tapping job gone wrong...hmm, probably not, but I guess they trust me.
Two of the board members live on the (previously cold) top floor, so that made the insulation project an easy sell, as well. It helps, of course, that we have a pretty friendly/casual board.
I maintain a chart of oil usage for given outdoor temps, so the improvements can be fairly easily quantified..."proof" that the projects are paying off.0 -
more info
HI everyone,
Thank you for your help and advice. We are still trying to balance the heat in our coop building. There is still a difference of 10-15 degrees between apartments. I'm also concerned that we're running the system at an unnecessarily high pressure and wasting fuel. My guess is that we spent about $45K on heating oil this year. I can get a more exact number if anyone is interested. We expect to bring in a professional to help us with the system, but I would like to see what we can do in preparation. It's heartening to hear about the savings that others have created in their buildings. I'm a novice and appreciate everyone's help.
In the last week, we have replaced a few radiator valves in 4th floor apartments that were cold. We installed Gorton's Ds. They replaced Heat-Timer and Jacobus adjustables and a valve that looks like the Empire State Building. We also replaced a valve that was bad on a riser.
Here is some more information about our system:
boiler: A. L. Eastwood, model FST-40, installed in 2001, one-pipe system
building: built in 1928, 4 stories, 24 apartments, 6 apartments per floor, two steam risers in each apartment, risers vented in 4th floor apartments with a variety of 3/8" radiator valves tapping directly into the risers, roof is uninsulated
radiators: 50-60
pressuretrol: set at 10 psi
cut in 1 ("open" handwritten on gauge): 3 psi? just above 2
cut in 2 ("mod" handwritten on gauge): 2 psi
cut out ("HT" handwritten on gauge): 2 psi
Things that trouble me:
- I don't see vents on any of the mains leaving the boiler. I looked at all the pipes in the boiler room and then followed them into other rooms in our basement. (There is only
one vent in the basement. It is on a pipe adjacent to our super's apartment. He told me that the vents for his radiators are near the ceiling. I guess that's because he is on the same level as the boiler.) Should the main vents be on the mains leading to the risers or should they be on the return pipes?
- The steam risers in top floor apartments are vented directly off the pipes with a variety of radiator valves, some that are very old and clearly haven't been changed in years. They all have 3/8" connections. Is it possible to vent these pipes adequately with radiator valves or do they need Gorton's #1s?
In my last post, I wrote that the system was operating at 10psi. I now realize that I don't know if that's true. The pressuretrol is set at 10psi, but does that mean the system is running at that pressure? Or does it just mean that it will cut off if it rises that high? When I watched the boiler start up, the pressure gauge on the far left didn't budge from 0.
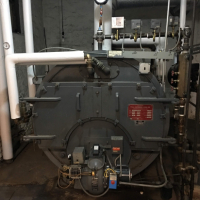
I took pictures of the boiler and some of the mains. I'm not sure if you can get a picture of the arrangement from these pictures. If not, I will take more. I'm also wondering if I need to measure the height and diameter of the header and mains.
Thanks for the help,
EricSingle-pipe steam | 24 apartment, self-managed coop | Federal FST-40 Scotch Marine boiler | Carlin 701CRD burner | Heat Timer EPU-CH | Honeywell pressuretrols | Heating oil #2 (20% bio)0 -
photos of the boiler, pipes and valves
Here are the photos.Single-pipe steam | 24 apartment, self-managed coop | Federal FST-40 Scotch Marine boiler | Carlin 701CRD burner | Heat Timer EPU-CH | Honeywell pressuretrols | Heating oil #2 (20% bio)0 -
coop
This is heartening news! We are in Sunset Park. The building was managed for years by a retired Merchant Marine and is in great shape, but he died a couple years ago and no one else has his knowledge of the heating system. We have talked about insulating the roof, which we have to replace anyway. It sounds like it's well worth the expense.
Thanks for your comments. I may ask for more advice as we move along.
EricSingle-pipe steam | 24 apartment, self-managed coop | Federal FST-40 Scotch Marine boiler | Carlin 701CRD burner | Heat Timer EPU-CH | Honeywell pressuretrols | Heating oil #2 (20% bio)0 -
is it really 10 psi
a good low pressure gauge would tell you exactly what your pressure was-especially the back-pressure of the system as the air is escaping. it should be put on the same pigtail as the pressure control, while leaving the useless, but code-required 0-30 psi gauge.
have you checked those valves on the run-outs for being fully open? they are probably gate valves, and sometimes the gates can become unhooked from the stem, causing them to be partly closed. while you are at, it the packing nut can be tightened to enable the retirement of that bucket!
maybe the risers could be vented at the top, but the gorton "d's may be a little light in capacity for that volume of pipe. you could put a gauge on the riser temporarily as you add more vents at the top to get the pressure down.
as i said before, my pressure is about 2 ounces while the main vents are letting the air out, and when they close, the pressure rises up to 8 oz, and on a very long run will get up to the cutout point of 12 ounces. my 1,050,000 btu , 55 rad system has 18 gorton #2's.
do you know if your burner has a hi-lo-hi feature? if so some economy could be realized from enabling that.--nbc0 -
4 pressuretrols
I think NYC boiler code for large boilers must require two high pressure cutouts. Our boiler also had two - one which I consider the "operating" control, and a second, set very high (5-10psi) that I consider to be the "runaway" control in case the operating control fails. Of course, there's also a 30 psi (if memory serves) steam pressure blowoff valve (two, in fact) in case both pressuretrols fail. Not that I'd want to be anywhere near our boiler at 30 psi!
Anyway, it would seem this boiler is set to cutout at 2psi under normal circumstances, but also has a secondary cutout at 10 psi.
The other controls here seems to be to modulate the low-high-low Carlin burner (ours is a Carlin too). I can't tell how this one is set up exactly, but I set ours to work as follows:
-starts with low fire prove (approx 10-20 seconds)
-high fire (with automated mechanical opening of air damper to allow more air intake)
-at 10 oz pressure trigger (via vaporstat) revert to low fire
-if low fire can't maintain pressure, reverts to high fire when pressure falls to 3 oz.
-Then cycles back and forth btwn low and high fire until heat timer cycle is satisfied.
By the end of any decent length cycle, it's basically running on low fire only. Theoretically it would cut out (burner off) at 1.5 psi, but we never reach that pressure on low fire.0 -
spec sheet
Here's the Spec sheet for your boiler (your model is 40 HP/1.3 million BTUs).
http://www.easco.com/FST/FST2060.pdf
Max firing rate seems to be 12 gallons per hour light fuel oil (#2), so the more you can get that thing to run in low fire mode (probably 6 gallons per hour) the greater your opportunity for savings.0 -
vaporstat, low pressure gauge, vents
The low-high-low feature makes sense to me. Am I right in assuming that we wouldn't be able to use it optimally without a vaporstat? And is a vaporstat a kind of low pressure gauge or something else?
Am I also right in assuming that we can't know the actual pressure the system is running at without a low-pressure gauge, either on the boiler or on a riser or on a return pipe?
I'm reading the Balancing Steam Systems pamphlet by Gill and Pajek. I can't say I understand all of it, but I'm wondering if this is the method we should be using to determine the proper venting on the mains and the vents. First make sure the mains are vented (and I can't see that ours are at all!), then vent the risers in the same way. The vents should allow out as much air as an open pipe would be at the speed we want the steam to arrive, since once steams hits the valves, the system will close. The method is to remove the valve at the riser, turn on the boiler, wait for heat at the header and then time the steam's arrival at the hole where the valve was, right? It isn't dangerous to have a hole with steam pouring out?
Is this method we can do on one of the risers to determine the number of eliminators to use and then vent all the risers the same? This would keep us from having to go into each apartment on the top floor to do the tests.
Thanks for the boiler specs. If it's a FST40, that means it has 40 horsepower, right?
Also reading this document from Minnesota, 1985 (attached). . .
EricSingle-pipe steam | 24 apartment, self-managed coop | Federal FST-40 Scotch Marine boiler | Carlin 701CRD burner | Heat Timer EPU-CH | Honeywell pressuretrols | Heating oil #2 (20% bio)0 -
vaporstat needed?
yes the 2nd vaporstat will control the firing rate of the variable burner. when first firing from cold the burner is on "hi". as the steam begins to fill the mains, the pressure rises to perhaps 8 ounces, and then the burner drops to "lo". when it is very cold, the amount of steam condensing will drop the pressure to the point set on the vaporstat, and the burner will revert to "hi" to match the condensing load.
the minnesota study is interesting, but they were ignorant of the real venting needs of the building. if they had had a good low-pressure gauge, they could have seen from the back-pressure the lack of completely adequate venting, which in a large building could be considerable.--nbc.0 -
vaporstat
A vaporstat will generally be more effective in the low pressure range than a pressuretrol. To get the burner to reliably enter low-fire mode at some reasonable cutoff pressure (generally less than 16 oz), a vaporstat would be best. I think I paid about $150 for our vaporstat - with NYC fuel oil pushing toward $2.80/gal, you only need to save ~55 gallons of oil to pay off that investment. Payback is probably measured in weeks, if not days.
Do you know if the boiler ever enters low fire mode, as configured? If you watch/listen through a full cycle, the switch to low fire would be fairly obvious...the burner sounds significantly quieter. If you want to confirm what low fire sounds like, there's a toggle switch on the back of the electrical junction box to the left of the burner...it's in your picture with the label "low fire only". Switch that to force the boiler into low fire only. Switch it back after the experiment is complete.
And yes, FST-40 appears to be a 40 horsepower output.0 -
low fire
I will take a listen to see if the boiler uses low fire. Thanks so much.Single-pipe steam | 24 apartment, self-managed coop | Federal FST-40 Scotch Marine boiler | Carlin 701CRD burner | Heat Timer EPU-CH | Honeywell pressuretrols | Heating oil #2 (20% bio)0 -
minnesota study
Actually, I was interested in what you thought of this, especially since I just read on page 8 and 9 their opinion that the low speed of heating a system is not due to inadequate venting. I guess I'll read the document with a grain of salt. See the quotes below.Single-pipe steam | 24 apartment, self-managed coop | Federal FST-40 Scotch Marine boiler | Carlin 701CRD burner | Heat Timer EPU-CH | Honeywell pressuretrols | Heating oil #2 (20% bio)0 -
quotes
quotes from page 8 and 9 (sorry, couldn't post the quotes. they are in the document above.)Single-pipe steam | 24 apartment, self-managed coop | Federal FST-40 Scotch Marine boiler | Carlin 701CRD burner | Heat Timer EPU-CH | Honeywell pressuretrols | Heating oil #2 (20% bio)0 -
low fire
Lowfire seems to be working. There is a big difference in volume between the roar of the boiler when it first comes on and a few minutes later when it drops down.
Does anyone know why I'm not seeing any vents on the mains? Is it possible they aren't there?Single-pipe steam | 24 apartment, self-managed coop | Federal FST-40 Scotch Marine boiler | Carlin 701CRD burner | Heat Timer EPU-CH | Honeywell pressuretrols | Heating oil #2 (20% bio)0 -
venting mains
Hi everyone,
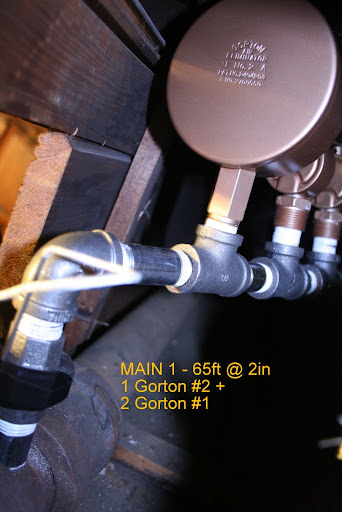
I have still only found one vent on the two mains that come out of our boiler. There is a vent on a return pipe (see pictures below). As you can see, pipe has been reduced to 3/8" off of what seems to be a 3/4" tapped hole. I'm planning on replacing this arrangement.
Should I replace it with a 6" nipple of 3/4" pipe with a Gorton #1? (I have two Gorton #1's that I already purchased). I'm wondering if this is possibly not enough and that I should install an antler with a few #1s and possibly #2's.
Should I measure the diameter of the mains in order to estimate the amount of air that should be vented? Dumb question: How do you measure the diameter of the mains when they are covered with insulation?
By the way, this is work I can do myself in between heat cycles, right? I can create the nipple or antler and switch it out quickly when the heat is down?
Thanks,
EricSingle-pipe steam | 24 apartment, self-managed coop | Federal FST-40 Scotch Marine boiler | Carlin 701CRD burner | Heat Timer EPU-CH | Honeywell pressuretrols | Heating oil #2 (20% bio)0 -
Venting Capacity
I am not an expert but an avid enthusiast of this Forum and steam heat. It seems to me from what I have read here that you will need significantly more venting than you realize. If indeed that pic of the vent is the only location you can find then you will need to set up an 'antler' with numerous Gorton #2's on it. Because of the closeness' to the wall I would put the whole thing together before you mount it using a union. And use piping as large as that original taping. Here is a link with pics to give you an idea of what I am talking about. Gill is not in your area buy he knows his stuff.
I do not know how many vents you will need but I bet it will be more than a few. BTW a Gorton #2 has the same venting as 3 Gorton#1s' and is cheaper than buying three #1's
http://www.gwgillplumbingandheating.com/webapp/GetPage?pid=4140 -
sizing vents for mains
Thanks, Steve. Gill's photos are really helpful. I'm still wondering exactly how many air eliminators I should install.
I will make sure to use at least a few Gorton's 2's on an antler. In order to determine the appropriate number of vents, I believe should measure the diameter of the return pipe and see if I can match the maximum air flow. Can anyone walk me through this calculation?
The return pipe seems to be 2" in diameter under the insulation. The joint where the vent is connected seems to be 1 1/4".
I'm wondering if I should use the method from the Balancing Steam Systems pamphlet: "Take the vent off the end of the main and fire the boiler. Once the header pipe gets hot, time how long it takes for steam to get to the open pipe where you removed the vent. Let’s say it takes three minutes, for example. If it takes three minutes to get steam from the header to the open pipe, then you would need to install as many main air vents as it takes, to get steam to the same point (the open pipe), in as close to three minutes as possible, but with the air vents installed." -- I think I could manage this, but I don't know how to fire the boiler manually. It uses a Heat Timer.
OR
if I should making the decision based on pressure and the size of the pipe like this: "A ¾’’ pipe at 3 ounces pressure from the boiler will pass 9.5 cfm. A Gorton #2 air vent at 3 ounces of pressure will pass 2.2 cfm. So 9.5 divided by 2.2 = 4.31 Gorton #2 vents."
-- This method seems easier to me, but my pipe measurements are larger than the ones listed, which makes me think I did something wrong. The largest pipe in the chart I'm using is 1" and gives 11 cfm. I would need at least 5 Gorton #2s to vent this much air, correct? (I'm guessing this is more than a thousand times more venting than we're currently getting.)
Is this 1" pipe and 1/2" connectors to the Gorton #2s in the photo below?
(http://www.gwgillplumbingandheating.com/wahelper/GetImage?id=57869)
I guess we will need to reduce from 1 1/4" to 1" to make the antler.
By the way, this is a valve on only one of three possible main returns that I found. I don't see vents on the other two. My guess is that we need a professional to come out and add these vents, right?
Eric
Single-pipe steam | 24 apartment, self-managed coop | Federal FST-40 Scotch Marine boiler | Carlin 701CRD burner | Heat Timer EPU-CH | Honeywell pressuretrols | Heating oil #2 (20% bio)0 -
24 units and bad main vents
your present main venting is in need of more capacity. those dry returns would be the best place for them, on an antler, which you can probably do yourself. start out with a couple of gorton #2's on each dry return, and leave provision for more to be added later. this would be a perfect use for a good low-pressure gauge, as you can see from the back pressure during air removal, when you have enough venting on the mains. in cases like yours, i think the cost of correcting the venting could be paid back in a month or so of reduced gas bills!
your risers may also benefit from more venting, and it may be possible to do that by putting one large radiator vent on one of the radiators served by each riser.
try getting the mains up to speed first, and then see how evenly the steam arrives all through the radiators on top floor, before adding anything at the top.
i see that a couple of the returns appear to be joined together at a point.above the floor, and i hope below the waterline.--nbc0 -
My rule of thumb
The calculations for 2" pipe comes to just over 12 feet. So I figure a Gorton #1 per 12 feet of 2" main. The out side of an average asbestosis wrapped main will be approximately 4 inches. That will give you a good guesstimate to start with.
Is that a full sized tee coming out to the vent? Looks like it might be 1-1/2" there. Is the main pipe the same size?0 -
size
Yes, I think it is 1 1/2" coming out to the vent. The pipe seems to be 2".Single-pipe steam | 24 apartment, self-managed coop | Federal FST-40 Scotch Marine boiler | Carlin 701CRD burner | Heat Timer EPU-CH | Honeywell pressuretrols | Heating oil #2 (20% bio)0 -
ck the vents on apt radiators also
hey eric: not sure if anyone mentioned or not - i know the topic is mostly near the boiler - but radiators on the upper floors should have larger vents than radiators on lower floors.
http://www.gorton-valves.com/specify.htm
/Avi
ps: you still playing saturday basketball") ? 0
? 0 -
joined mains
Thanks for the advice. Would I put the low pressure gauge at the end of the antler?
You're right about the joined mains, I think. They are joined and are not above the waterline. The waterline is at about 5' and this is at about 2'.
The two other returns don't have vents and don't appear to be tapped for a vent. How would I determine where to add the vents? 6" below where they go from horizontal to vertical. Maybe this is something I should leave to a professional: choosing location and tapping a hole?
EricSingle-pipe steam | 24 apartment, self-managed coop | Federal FST-40 Scotch Marine boiler | Carlin 701CRD burner | Heat Timer EPU-CH | Honeywell pressuretrols | Heating oil #2 (20% bio)0 -
radiators
Yeah, we're in the process of checking all the apartment valves and following the Gorton's charts. Thanks.
(Haven't been playing bball too much. Email me at ecappleton@gmail.com)Single-pipe steam | 24 apartment, self-managed coop | Federal FST-40 Scotch Marine boiler | Carlin 701CRD burner | Heat Timer EPU-CH | Honeywell pressuretrols | Heating oil #2 (20% bio)0 -
how many things to change at one time
the answer is to change one thing at a time, starting with mains. when that main venting is proper, then start on the radiator vents. otherwise, you wont know what has improved what, without following these one-at-a-time steps.--nbc0 -
Understood
That makes sense. I'll slow down.Single-pipe steam | 24 apartment, self-managed coop | Federal FST-40 Scotch Marine boiler | Carlin 701CRD burner | Heat Timer EPU-CH | Honeywell pressuretrols | Heating oil #2 (20% bio)0 -
Same building as mine
I have been following this forum closely and came up upon your post. I realize our building has almost identical configuration in terms of FST 40 model and 24 apt 4 stories and also has some of the same problems. I found only one non-working Gorton #2 in the whole basement. I have learned alot from everyone's responses and will be brining someone in to take a look and help me get properly vented. Let me know how your situation works out.
Have you looked into the controller/ Thermostat you are using? I have a 20+ year old Heat-timer that although has been great in the past desperatly needs an upgrade. It should help reduce your bill0 -
heat-timer savings
these controls are very important whether they be good thermostats, or more complicated controls with outdoor/steam sensors.
one thing is certain, no control can save as much as good venting, good low pressure, and constant temperature settings. they can only work properly after all the deferred maintenance has been corrected.
save your control replacement until the end, after you have got all the other ducks in a row. if your present control is non-functional, then a suitable short/long term replacement would be a honeywell visionpro with an extra sensor located in the top floor north corner, but not on an outside wall. when it is time to select one, then select the installer first and go with one he is familiar with.--nbc0 -
low-fire, high-fire
The oil company came out today. The high fire setting wasn't working. The tech checked the wires and got it working. I'm not sure how long it hasn't been working. I was pretty sure I heard the high fire a week ago.
Also, he showed us the correct water level. It had been been a couple inches too high.
The super also told me that he was told by a tech a while ago that the water is dirty and should have been fully flushed before the winter season. Said it's okay the way it is, but he can't add all the chemicals, something like that. It didn't really make sense to me.
EricSingle-pipe steam | 24 apartment, self-managed coop | Federal FST-40 Scotch Marine boiler | Carlin 701CRD burner | Heat Timer EPU-CH | Honeywell pressuretrols | Heating oil #2 (20% bio)0 -
Heat Timer settings
I hope to be adding new vents to our mains very soon. In the meantime, I'm trying to manage the heat for our building. Some of our apartments (on the 4th floor) have been as low as 55 degrees. At the same time, our apartment is never below 75.
Since the tech fixed our high fire, the heat has gone up across the building. I also turned up the heat system sensor a bit, thinking that a longer steam cycle might warm the fourth floor. That night the cold apartment went to 72 degrees and we went to 87!
I'm wondering if my understanding of these controls is correct. There are two controls. One, called Heat Adjustment (A, B, C, D, ...), can be set for day and separately for evening. This controls the number of steam cycles in an hour - variable depending on outside temperature. The other, called Heat System Sensor (X, Y, Z -- with space for adjustment in between) in effect controls the length of a steam cycle. It sets the threshold for the heat sensor that is on the return pipe. This tells the boiler when the steam cycle is complete. We had the sensor set pretty low, which (and this is conjecture) stopped the cycle before letting the steam fully heat all radiators in the system. My guess is that at a low sensor setting the steam circulates through the system and satisfies the heat sensor, shutting off the boiler before all radiators have gotten fully hot.
So, what I'm doing is trying to find the right balance between the length of the cycle (heat sensor) and the number of cycles (heat adjustment). I think we would prefer longer cycles that come less frequently, since it is cheaper to keep the boiler running once it is up to steam than it is to keep bringing it back up from cold, but this is a balance as well, since the longer cycle could bring the temps way up in most of the apartments. And if the gaps between cycles are too long, the heat would fluctuate a lot.
I have turned the heat adjustment down to night - A and day - B. The heat sensor is between X and Y, at about 10am on a clock face. It is still too hot, and I plan to turn down the sensor a bit today.
Thoughts?Single-pipe steam | 24 apartment, self-managed coop | Federal FST-40 Scotch Marine boiler | Carlin 701CRD burner | Heat Timer EPU-CH | Honeywell pressuretrols | Heating oil #2 (20% bio)0 -
did you read the manual?
it's here...http://is.gd/2MAQN0
if that manual doesn't explain things well look up manual for MPC, Gold..manual obsolete...the detail everything pretty well in the mpc manual1-pipe Homeowner - Queens, NYC
NEW: SlantFin Intrepid TR-30 + Tankless + Riello 40-F5 @ 0.85gph | OLD: Fitzgibbons 402 boiler + Beckett "SR" Oil Gun @ 1.75gph
installed: 0-20oz/si gauge | vaporstat | hour-meter | gortons on all rads | 1pc G#2 + 1pc G#1 on each of 2 mains
Connected EDR load: 371 sf venting load: 2.95cfm vent capacity: 4.62cfm
my NEW system pics | my OLD system pics0 -
misunderstanding
Thanks for the manual. I think I understand the Heat Temperature setting better now. It's not the number of cycles per hour. It's the amount of minutes in a 60 minute cycle when the heat will be on, once the heat sensor is satisfied.Single-pipe steam | 24 apartment, self-managed coop | Federal FST-40 Scotch Marine boiler | Carlin 701CRD burner | Heat Timer EPU-CH | Honeywell pressuretrols | Heating oil #2 (20% bio)0 -
cycle clock..
the 60 cycle begins from time last firing...it doesn't call for heat every 60 mins..it could be longer.
if you have cast iron rads..run a 60 min clock..convector rads might require a 20 min clock1-pipe Homeowner - Queens, NYC
NEW: SlantFin Intrepid TR-30 + Tankless + Riello 40-F5 @ 0.85gph | OLD: Fitzgibbons 402 boiler + Beckett "SR" Oil Gun @ 1.75gph
installed: 0-20oz/si gauge | vaporstat | hour-meter | gortons on all rads | 1pc G#2 + 1pc G#1 on each of 2 mains
Connected EDR load: 371 sf venting load: 2.95cfm vent capacity: 4.62cfm
my NEW system pics | my OLD system pics0 -
60 min cycle
That makes sense. I think the cycle actually starts when the return pipe with the heat sensor drops 28 degrees below the heat sensor setting, or something like that. Then the timed cycle of heat (20 min. for setting B at 25 degrees outside)...
If this is still too much heat for the building, I lower the heat sensor setting.Single-pipe steam | 24 apartment, self-managed coop | Federal FST-40 Scotch Marine boiler | Carlin 701CRD burner | Heat Timer EPU-CH | Honeywell pressuretrols | Heating oil #2 (20% bio)0 -
read this manual....
I finally looked at the manual I sent previously...it's not very good..definitely read this one as well.. http://is.gd/PslRAY .. for a different model..but much more explanatory when it comes to the actual operation of a heat timer..
in this manual..it explains that a cycle begins once heat established and the letter setting is in effect..there is a nice little chart at the bottom of page 5 that explains this exactly.1-pipe Homeowner - Queens, NYC
NEW: SlantFin Intrepid TR-30 + Tankless + Riello 40-F5 @ 0.85gph | OLD: Fitzgibbons 402 boiler + Beckett "SR" Oil Gun @ 1.75gph
installed: 0-20oz/si gauge | vaporstat | hour-meter | gortons on all rads | 1pc G#2 + 1pc G#1 on each of 2 mains
Connected EDR load: 371 sf venting load: 2.95cfm vent capacity: 4.62cfm
my NEW system pics | my OLD system pics0


This discussion has been closed.
Categories
- All Categories
- 87.5K THE MAIN WALL
- 3.3K A-C, Heat Pumps & Refrigeration
- 61 Biomass
- 430 Carbon Monoxide Awareness
- 122 Chimneys & Flues
- 2.1K Domestic Hot Water
- 5.9K Gas Heating
- 116 Geothermal
- 169 Indoor-Air Quality
- 3.8K Oil Heating
- 78 Pipe Deterioration
- 1K Plumbing
- 6.6K Radiant Heating
- 395 Solar
- 15.9K Strictly Steam
- 3.5K Thermostats and Controls
- 57 Water Quality
- 51 Industry Classes
- 51 Job Opportunities
- 18 Recall Announcements