Welcome! Here are the website rules, as well as some tips for using this forum.
Need to contact us? Visit https://heatinghelp.com/contact-us/.
Click here to Find a Contractor in your area.
If our community has helped you, please consider making a contribution to support this website. Thanks!
Steam Main Venting (Residential)
Options

felzani
Member Posts: 18
Hello! I was wondering if I could get some help determining if I should upgrade my main vents. I've attached three pictures below. The first picture is a graphic of the system itself; it also has measurements, etc, about the system. The second picture is the main vent on the orange line. The third picture is the main vent on the purple line.
Basically the house heats up fine, but I'm convinced that those vents don't work at all. Also even if they do work, I'm convinced that they're the wrong vents for the job. My question is would spending the money to pipe and vent them correctly make a significant difference in our heating costs (we live in New England) for this year? Last year we spent approximately $2000 on heating costs (i.e. - Natural Gas bill).
As a postscript, I put similar questions out on the web sometime last year, but then didn't have the time or money to actually implement any suggestions. I can't find the post anymore (it wasn't on heatinghelp.com, I know that) so if there's someone out there to which this stuff looks familiar then I apologize!
Thanks in advance!
-Matt
0
Comments
-
More information
We need a little more information.
What are the vents you have now? there sb a manufacturers name and number on them.
What are the diameters of your mains? An outside circumference will do.
Do the pipes that the vents come off the mains and feed the vents get steam hot? Do they get hot at about the same time? How long does it take for them to get hot when starting from a cold start?
What pressure does the gauge read when the system shuts down? Do you know what the pressuretrol is set to for cutout and cut in pressure? Is the near boiler piping done per the manufacturers specifications?
Is there any surging inn the sight glass when the system is under pressure? A little is normal but over 3/4" of up and down motion is a concern.
Do all the radiators get hot about the same time? how long, from a cold start does that take?
The header and all the steam pipes should have a minimum of 1" of pipe insulation on them. All that piping acts as a radiator without insulation and contributes to poor system operation.
Please post some pictures of your boiler, the near boiler piping (header, connection to mains, hartford loop). Don;t get too close, we need to see the relationships of these elements to each other.
BobSmith G8-3 with EZ Gas @ 90,000 BTU, Single pipe steam
Vaporstat with a 12oz cut-out and 4oz cut-in
3PSI gauge0 -
Well, now...
BobC has put some good questions to you. The answers would help. Pending the answers, though... it is unlikely that those vents are big enough -- or anywhere near big enough. Replacing them with bigger ones would help the system heat more uniformly, and probably get heat to the various radiators more quickly. Incidendtaly, they have to be working; if they weren't, the air couldn't get out and the steam couldn't go anywhere, and you'd have very uneven heat if you had heat at all. So given that the house heats OK, they're working -- just not big enough.
However, there are other things to do, too. BobC notes that insulating the steam mains will help, to which I say indeed so. In fact, it may be the most important single thing you can do to help lower heating costs (the venting won't change that all that much, although it may make things more comfortable). Also, make sure that your pressure settings are correct; a residential system should never run at more than 2 psi, and a lot of folks make do with less (the building I supervise has a vapour system, and runs at 7 ounces per square inch maximum). If your pressure setting is too high, again you are wasting fuel.Br. Jamie, osb
Building superintendent/caretaker, 7200 sq. ft. historic house museum with dependencies in New England0 -
re: More information
Hi Bob & Jamie (and others)!
First off thanks for engaging and trying to help me with this one. After that, sorry I haven't written back sooner. Seemed every time I thought to write back I was away from my computer.
Anyway, I've got some additional info for you. Hopefully it will help!
The vent in the first vent picture says "DOLE No. 3A"; the vent in the second picture just has "USAV-881" stamped on it. Also, Jamie you're right that they probably are working -- when I removed them to get the info off them I was able to blow air through them. Good call!
As far as the diameters go, it's probably easiest to do that and refer back to the diagram I drew. Basically the piece of the purple colored pipe that runs from the boiler to the start of the orange line is 9.25 inches in circumference (3 inches in diameter I think) and the rest of the piping is just under 8 inches in circumference (2.5 inches in diameter I think). That info belongs on the diagram so I'll try and add it in later.
The main vent piping and vents themselves do get very hot. As far as how long it takes, I'm not sure. It's been warm around here lately and we have the heat set low so it hasn't fired on in a couple days. I can try and capture that next time I hear it kick on.
The pressure gauge is actually amusing. I do remember this part from the other time I asked ... when the system shuts down the gauge typically reads between 10-15 PSI. I'm sure the gauge is broken and I'll tell you why. The trol (it's a Honeywell PA404A) has the cut-in set at .5 and the cut-out differential (the white wheel on the inside) at 1.5. Also, last year I took that apart ... I wired out the pigtail as well as when I blew into the trol I could hear clicking so I'm reasonably sure that piece of the system functions correctly. I'm hesitant to replace the manometer just because it seems cosmetic to me -- like a glorified endcap. Plus I think it runs about $20. With regards to the near boiler piping, I'm not sure. We had a company come in and install the system in 2005 I believe. My hope is that they followed the spec, but I'm not qualified to say one way or the other. I'm attaching a picture of said piping ... maybe it will help?
With regard to surging, no I don't think it moves that much. The water is always murky though ... very rusty looking. Does that matter at all?
The flute frequently does empty causing the low water cutoff to shut the system down -- this is usually at the beginning of when the system comes on. As a side question, is there a gas throttle? Part of me thinks that - as a separate issue - the system is making steam way too quickly.
The radiators all do get hot at about the same time. If I had to guess, I'd say that's usually 15 minutes after the system kicks on. Also, it's rare - even on the coldest days - for any of the cast iron-style (versus tube-style) radiators to get hot all the way from left to right. The vent on the radiators is always hot so I think that all of them vent fine, but this is back to my earlier note that I think that because (a) the main vents are too small and/or (b) the system makes steam too fast that we're losing out on potential surface area of radiators getting hot. I will also mention that in the colder parts of the winter it's usually 1 - 1.5 hours (if not longer) from when the thermostat turns the system on to when the house has heated up enough such that the thermostat turns the system off. We keep the temp usually around 66-67 degrees (it's down at 63 degrees now since it's been a nice fall so far).
With regards to insulation I think that's pretty well covered. I went poor-man's style and just wrapped everything in insulation batting and covered that with plastic wrap. Once I did that it did make a difference on the gas bill certainly. There are some pieces that are still covered in the old asbestos insulation, but I don't dare go near those.
Thanks again for your help! Let me know what other information I can provide.0 -
mains venting is not adequate
Your 881 and dole 3a's are probably radiator vents that are woefully inadequate for venting the mains. I believe they are rated for about 0.18 CFM - ANYBODY PLEASE JUMP IN IF THIS IS NOT CORRECT. Worse than that they are probably on 1/8" tappings, you need a 1/2" or 3/4" tapping to vent the kind of air you have to.
The 56 ft of 2-1/2" ID pipe has about 3,300 cu in so that needs a gorton #2 air vent (1/2" or 3/4' tapping). the 34 ft of 2" pipe has about 1,00 cu in so you would need a Hoffman 75 on that (1/2" or 3/4' tapping). If those vents are 1/8*' then there is probably a 3/4 to 1/8" reducer in the pipe that you will have to remove. If it is a 1/8 to 1/2 reducer than you will need a 1/2' nipple to mount the vent on. AGAIN JUMP IN IF YOU SEE AN ERROR HERE.
It sounds like the vents are working but they are much to slow. You are burning fuel to compress air.
i don't see a proper Hartford loop on the boiler and it really should have one, that can cause all sorts of problems. The fact your sight glass is bottoming out and engaging the LWCO indicates you either are not getting the condensed steam back to the boiler in good time (clogged return pipe) or the water in the boiler is too dirty which causes other sets of problems. When the boiler is cool, you might want to drain it and fill it with clean water. You may have to do this a few times to get all the crud out. AFTER REFILLING IT RUN THE BOILER TO CREATE STEAM SO YOU DRIVE OFF THE OXYGEN IN THE WATER. Oxygen in the water causes the boiler to corrode.
BobSmith G8-3 with EZ Gas @ 90,000 BTU, Single pipe steam
Vaporstat with a 12oz cut-out and 4oz cut-in
3PSI gauge0 -
re:mains venting is not adequate
Hi Bob!
Thanks again for taking a look at everything for me.
With regards to the tappings, I think I'll get lucky on main in the picture on the right ... looks like the tapping that comes off the 2.5 inch pipe gets reduced a couple times before it actually gets to the vent. The other one (i.e. - middle picture) I think I'm out of luck on. That one looks like it's very small pipe that actually goes into the 2.5 inch main. 1/8" may be as large as I have to work with there. If so, is the Hoffman 75 still the right vent to use?
Thanks for the advice on going with Gorton #2 on the 56' main. I was searching this site for that and I found a few posts from earlier this year I think which said they were having some issues with that vent? Do you know if that's resolved? I found those vents online and they look to price around $50 + s/h.
I found the Hoffman 75 as well online and I was surprised to see that one's even more expensive than the Gorton. I guess this brings me to my next question and also your "You are burning fuel to compress air" comment -- if I replace those vents do you think I'll see a noticeable difference in the monthly gas bill? Are there cheaper alternatives to the two vents you mentioned?
On the near boiler piping I'm attaching a couple of additional photos. I think the original one probably shows a distorted perspective. Let me know if these two help.
Thanks!
-Matt0 -
Tapping size
If you dig down below the insulation on that small pipe hopefully you will find a reducer and a larger tapping. If that is really a 1/8" tapping into the main look further along the pipe to see if there is any other tapping nearby. Is that tapping the small pipe comes off just drilled and tapped into the running pipe? You could try CAREFULLY enlarging that hole and tapping it for 1/2" but if something goes wrong you'll have to replace that section of main.
If all else fails a couple of straight pattern Gorton C's on a 1/8" antler might be ok but you would be better off with at least a 1/2" tapping and then a mains vent. The mains vents have 3/4 external threads and a 1/2 internal thread.
There were some bad Gorton #2's around last year but I believe those have been flushed out of the system now.
As to how much fuel you are wasting compressing air, that's hard to tell without some detailed measurements. My system gets steam up into the header in about 6 minutes (boiler was ice cold) and to the end of the main in 3 more minutes; I am planning on doubling the venting in that main. Every minute you burn fuel costs money and the vents are a one time cost. Don't try to just vent a single main or the system will end up wildly imbalanced.
I can see the hartford and it looks ok in the new pics you posted.Smith G8-3 with EZ Gas @ 90,000 BTU, Single pipe steam
Vaporstat with a 12oz cut-out and 4oz cut-in
3PSI gauge0 -
cost of not venting
one way to calculate what the savings would be for correcting your venting would be to do nothing this winter, and log your fuel costs, corrected for the degree days, and then next winter, make those few simple changes recommended here, and recalculate how much money you have saved!
or you could save that money now.--nbc0 -
re: Tapping size
I think 1/8" is all i have to work with (picture below). Also it looks like it was just drilled into one of the 90s in the piping. I looked around and I didn't see anything else that looked like a tap. Given that - and given my lack of tools / skills - I'd probably shy away from having to drill a bigger hole. However, as you can see from the original diagram there is a union (the star-shaped thing right before where the purple and blue lines meet) very close to the tapping so it's only a very small section of pipe that would be in play to be rebuilt. Are there 90s that have 1/2" tappings on them already? Or even straight lengths that Home Depot would be able to cut? If you want, I can cut away some of the insulation and give you a better look at what I have to work with.
For the other main I think the pipe that comes off is actually 3/4" (it measures ~2 3/8" in circumference) so the world's my oyster there.0 -
re: cost of not venting
LOL.
Well put. I guess my struggle is that parts for this project are going to run about $150. If my "waste" is only $10/yr with the current set-up it's going to take me 15 years to make that money back. Plus with the main that's already 3/4" the work is simple and there's low risk of making things worse. With the smaller vent the risk is much higher. If I break something and then have to pay a plumber to come in and clean up my mess - not to mention have the heat off with my wife and three small kids around - the cost becomes much higher and thus the period of return gets pushed out much further.") 0
0 -
return on investment
is not comfort and reliability part of the return on investment? ask your wife and children how much they are worth! you will find yourself able to make much of these repairs, or at least diagnosis yourself.
i would guess your bill might be cut in half if all the parts of the system are in perfect maintainance. if you have a neighbor, with the same size of house, using forced air heat, ask them what their heating costs are. steam should be about 3/4 of that.--nbc0 -
Placing vent
The vent should be about 15" back from the end of the main or you can come off the main and then through an elbow and pipe get to a spot 15" from the end of the main and then go up to a vent. Make sure the vent is as high as the others on the system, if it's to low it will just fill with water.
I assume that existing union is on a vertical pipe and if it's high up that would probably work as long as you get the vent up where it belongs. I don't know what home Depot has beyond pipe and pipe nipples but Pex supply has T's and reducers; with those and couple of nipples you could probably build up what you need to make up a short length to replace the pipe and then get whatever you need to get the vent up where you need it. http://www.pexsupply.com/Cast-Iron-Fittings-156000 Be warned that union might not be easy to get apart, or reusable if it's been there for decades.
Being that the cold weather is about to hit it might be simpler to just put a couple of Gorton C's on that existing 1/8" pipe and tackle this project in the spring.
BobSmith G8-3 with EZ Gas @ 90,000 BTU, Single pipe steam
Vaporstat with a 12oz cut-out and 4oz cut-in
3PSI gauge0 -
re: Placing vent
The union is actually on a horizontal piece of pipe and I think it's pretty new. We had them install the new boiler in a different spot than the old boiler was in so I think the union got added as part of making that happen. I didn't cut away the insulation, but I marked up the attached image to give you a sense for where things are.
Also, when you say "as high as the others in the system" -- in my case that's just the two spots right? Or is there something else I should be aligning the height with?
As I replace the "Orange" main am I okay so long as I get up to the right height? My thought is that I'd start building from the second small elbow in the picture. However, in order to preserve the height I'm going to need to 45 it over then 45 it back as the antler/vents won't fit by just going straight up (as you can see there's a couple joists in the area as well as some copper piping [not part of the heating system]).
Lastly, what's the right way to add a main vent? I mean are there pipes that you buy that already have the tappings in them, or do you always just drill your own? I do have a plumber friend who may be able to help and if he can just add the threaded hole for me it would probably just make sense to cap the old one and build it right out of the gate.0 -
Not an Elegant Solution, But it Might Work
The 'proper" way would be to get the proper main vents . . . however ;
As a cheap alternative to upsizing the main vent, you could try venting the main through the furthest radiator. First, figure out which radiator on each loop is connected furthest down the main from the boiler. Then install adjustable Heat Timer VariValve vents on those. Wide open, they vent almost as fast as a big Gorton #2, and you can probably buy one online for twenty bucks or so. Depending on the radiator, it might spit some water if you have it set wide open, or it might not. All you can do is try. If it spits, you could always throttle it back a little. I did that at my house for the first heating season, until I could upsize my main vents. You could also use VariValves in place of the main vents you have now. They are 1/8" NPT.
You could also try a Gorton or Maid-O-Mist "D" sized radiator vent. They aren't as fast as the VariValves, though.0 -
re: Not an Elegant Solution, But it Might Work
Thanks Al!
At this point I think I've resolved that I'll focus on the mains themselves, but I appreciate your alternate solution.
I think I've got the details I need at this point and am really just debating reusing the 1/8" tap or creating a proper 3/4" in one. I'm not sure if one "creates" taps or buys lengths of pipe (or connectors) that already have taps in them so that's really one of my last questions.
I'll keep updating the thread as I get parts and go forward. Should definitely help out the comfort factor this winter.
Thanks again for your notes!0 -
"The fix is in"
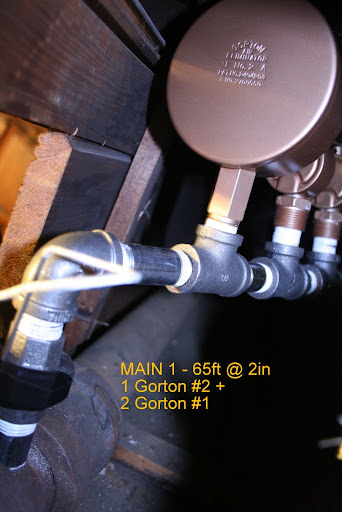
The other day I made the changes that folks suggested (with some help). Here are the mains' new look.
Can folks comment, is there anything I should be looking for as a result of the new vents?
Also, when I get my next gas bill (should be towards the end of the month) I'll post the BTU split of gas consumption before the new vents and after the new vents.0 -
new vents
That looks good, it should be a big improvement from what you had. You may now have to adjust the venting on the radiators to get it all balanced but that should be easier now that your main vents have the ability to do most of the work.
Now you just have to get the bare pipe wrapped and you should be set.
BobSmith G8-3 with EZ Gas @ 90,000 BTU, Single pipe steam
Vaporstat with a 12oz cut-out and 4oz cut-in
3PSI gauge0 -
Your new vents look real nice.
I am sure you will be happy with the improved heating comfort and fuel cost savings. I have a couple Hoffman 75's and I like the re-assuring clink they make when the steam arrives there, and they also the clink when the steam leaves. The clink lets me know they are doing something.0 -
Results
So after the fixes I'm not sure what to think. The vents were replaced on January 2d. From the period of December 21st to January 2d we used 119 therms (13 days). From the period January 3d to January 20th we used 195 therms (18 days). I don't really know the average temps for that period to "level" the usage, so I could use help there if anyone knows a site with that info. We live in the metro-Boston area.
After that, I haven't really noticed a "comfort" difference after adding the vents like folks said I would.
Maybe this info helps as well. Our thermostat is set at 65 degrees. This morning at 9.17 am the temp in the house dropped to 64 degrees and the system kicked on. The house didn't get up to 66 degrees (i.e. - to turn the system off) until 10.07am -- 50 minutes later. At the time, the outside temperature was about 24 degrees.
The other aspect of the system that I don't think is tuned perfectly is the gas throttle. Basically, I think we're boiling the water too fast. We have a Burnham Boiler (model PIN5PVNS1-M2) -- can anyone tell me where that setting is, and what they expect it to be? Also, I'm happy to ask that question in a separate thread since it is definitely separate from the vent configuration.0 -
degree days, radiator venting, tstat
Here's a link to Boston degree day data - http://www.massoilheat.org/boston/
Now that the mains venting has been addressed it's time to see how well the reast of the system is balanced. The goal is to have all the radiators start to heat at about the same time and for that to happen the venting on the radiators has to be proportionate to its EDR (square footage of radiation). larger radiators require more venting than small ones do. Just putting huge vents on all the radiators does not work.
Print and fill out this form for all your radiators and note the type of air vent and if it is 100, 50, 25, or 10% open. there are pictures and charts that should enable you to figure the EDR of each radiator. http://www.usboiler.burnham.com/contractors/tool-box-sizing.
Also what kind of thermostat do you have and is it set up for steam?
BobSmith G8-3 with EZ Gas @ 90,000 BTU, Single pipe steam
Vaporstat with a 12oz cut-out and 4oz cut-in
3PSI gauge0 -
Thermostat
regarding the temps link, that looks like a pretty cool site but i think i'm going to need to spend some time with it to understand how to use it.
regarding the EDRs, i have part of that info in the image below. i'll double check how much each rad's vent is opened though. as an FYI, the abbreviations in the image (i.e. - stuff in column 'A') below correspond to the notations on the original diagram from the first post.
i have the thermostat info handy (it's just across the room) so i figured i'd post that and then post the rest of the info as i get it. the thermostat is just a general one i think. it's basically this one:
http://www.5minutesforgoinggreen.com/wp-content/uploads/2008/11/rite-temp-7-day-programmable-thermostatsm.jpg
we don't use the set-back feature at all. it's set at a constant 65 degrees.0 -
Thermostat, Radiator Venting
Okay, this is the thermostat we have:
http://www.5minutesforgoinggreen.com/wp-content/uploads/2008/11/rite-temp-7-day-programmable-thermostatsm.jpg
And I posted a new image that has the vent setting for each radiator (far right column).0 -
Rad Vents
Also, if it helps, this is the vent we're using in all the radiators:
http://images.meredith.com/diy/images/2009/02/p_SCP_235_08.jpg0 -
Adjut vents by size of radiators
Matt,
make sure that thermostat has a setting for steam or set it to 1 CPH (cycles per hour). Most thermostats come factory set for hot air which is 5 CPH.
Those vents are not known for their reliability; I've tried them and I eventually replaced them with Hoffman #1's.
In any case start by turning down the vents that get hot quickly and see if you can force the steam into the other radiators. Don't just set them all wide open, that doesn't work. In general Large radiators get faster venting. One exception is keep the vent rate on the radiator in the room with the thermostat a little low so the boiler runs a bit longer.
BobSmith G8-3 with EZ Gas @ 90,000 BTU, Single pipe steam
Vaporstat with a 12oz cut-out and 4oz cut-in
3PSI gauge0 -
Thermostat
Thanks, Bob, and I'll play with the vents more.
I found the manual for my thermostat (RiteTemp 8022C):
http://www.ritetemp-thermostats.com/80XX/images/8022C_operation_guide.pdf
But I don't think it has a setting for steam/air. Would something like that make a huge difference? I unmounted the thermostat and there's no jumpers or anything which look like they match, or even a raw CPH setting (i don't think).
Also, I'm going to start a new thread for the gas rate through the boiler. I found a lot of info about it online in the specs for our gas feeder as well as in the boiler's paperwork. Looks like there's a way to measure it by using the gas meter's dial over a span of 30 seconds. I know I keep coming back to that one, but for me I'm still just shocked that the flute can be 2/3 filled when the boiler's at rest and then almost empty when it's running.0 -
Radiator Vent Settings
I tweaked the radiator vents tonight and attached the new settings in the image below. I'll continue to tweak them if they stop getting hot, but probably won't post again about it.
Regarding the massoilheat.org link, is there an easy way to read that? I looked on the site and I did any kind of "how to read this"-type link.0 -
I have a RiteTemp ..
It's actually a Home Depot Exclusive Brand .. anyway .. I set the Swing to 0.5 and leave the temp constant 24hrs/7days .. it works for me.1-pipe Homeowner - Queens, NYC
NEW: SlantFin Intrepid TR-30 + Tankless + Riello 40-F5 @ 0.85gph | OLD: Fitzgibbons 402 boiler + Beckett "SR" Oil Gun @ 1.75gph
installed: 0-20oz/si gauge | vaporstat | hour-meter | gortons on all rads | 1pc G#2 + 1pc G#1 on each of 2 mains
Connected EDR load: 371 sf venting load: 2.95cfm vent capacity: 4.62cfm
my NEW system pics | my OLD system pics0


This discussion has been closed.
Categories
- All Categories
- 87.6K THE MAIN WALL
- 3.3K A-C, Heat Pumps & Refrigeration
- 59 Biomass
- 430 Carbon Monoxide Awareness
- 125 Chimneys & Flues
- 2.2K Domestic Hot Water
- 5.9K Gas Heating
- 120 Geothermal
- 169 Indoor-Air Quality
- 3.8K Oil Heating
- 78 Pipe Deterioration
- 1K Plumbing
- 6.6K Radiant Heating
- 396 Solar
- 16K Strictly Steam
- 3.5K Thermostats and Controls
- 56 Water Quality
- 51 Industry Classes
- 51 Job Opportunities
- 18 Recall Announcements