Replacing hydronic system air vent valves

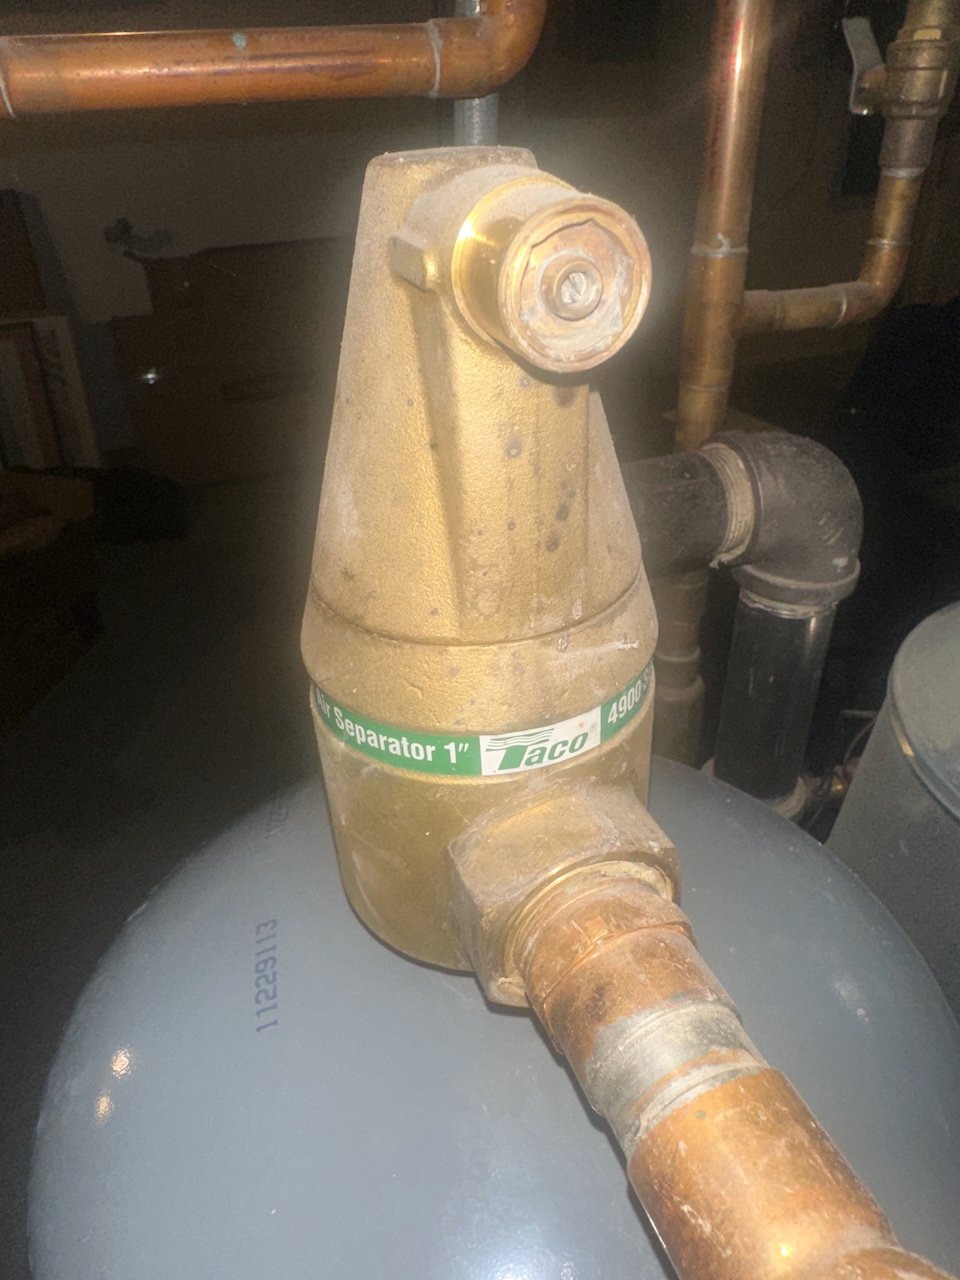
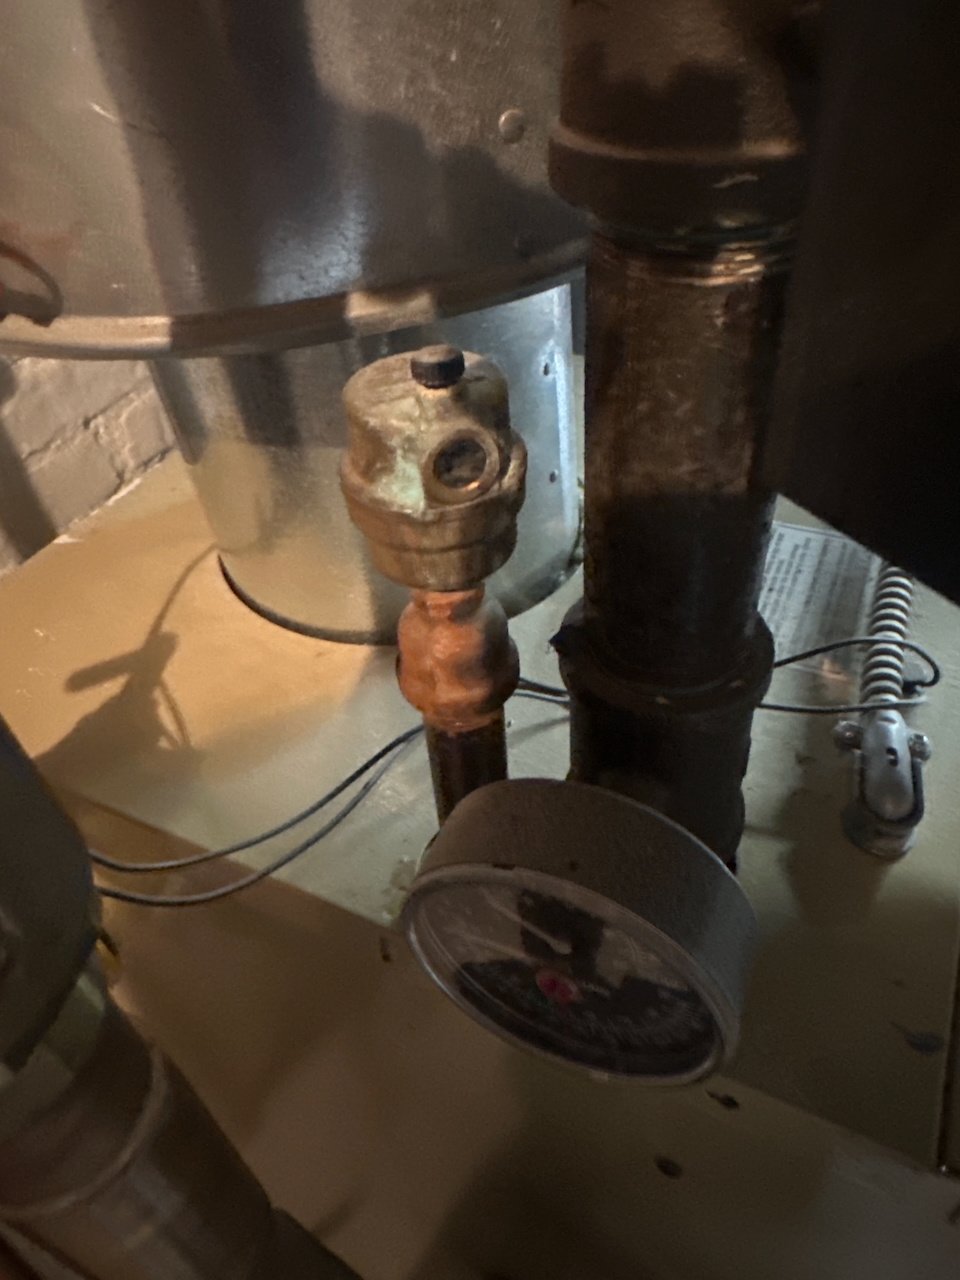
Hi everyone — my heating system seems to have two air valves near the boiler, a tiny one sticking out from the boiler itself and a Taco 4900 attached to the expansion tank. I think both are stuck and need to be replaced, the pipes gurgle like crazy whenever the heat is on so I assume there's a ton of air in the system. I loosened the little screws on the valves and a ton of air hissed out, followed by constantly leaking water until I tightened 'em back up. Our water is pretty hard and I've had to replace almost all the faucet cartridges since moving in, so it wouldn't be surprising.
ChatGPT (who is sometimes right and sometimes psychotic) says I should replace the head of the Taco valve (with this I guess?) and either replace the little valve entirely (this or this I suppose) or just cap that pipe.
Does that make sense to the real experts here? Can I just shut off all the ball valves in sight, drain the pipes from the valve below the circulator, unscrew & replace those parts, then open the ball valves and refill to the same PSI (approx ~12 psi/30 ft)?
Anything else I should consider before it starts getting cold out? Should I try to flush air out of each zone manually as well, or just let the new air vents do their job? (I don't have bleed valves at the baseboard radiators themselves.)
Thank you in advance!

Comments
-
You can split open that 4900 and see if the float is stuck or the needle valve gunked up. If you hear air in the system but never any coming out of the 4900, something is plugged or stuck. Chronic air problems can be expansion tank related.
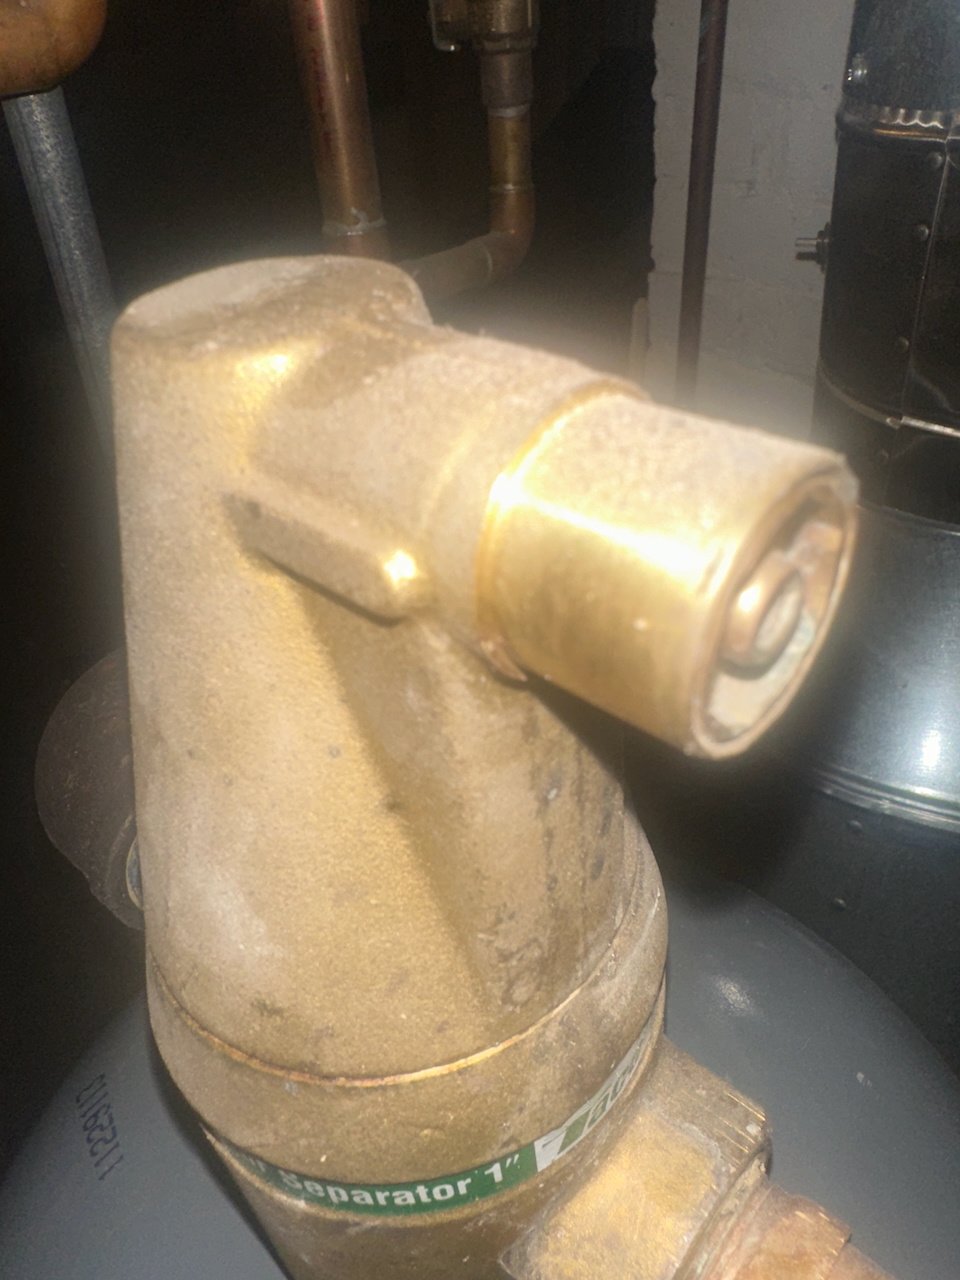
I don't know if that top head is serviceable, but you could swap out a new top without removing the entire purger.
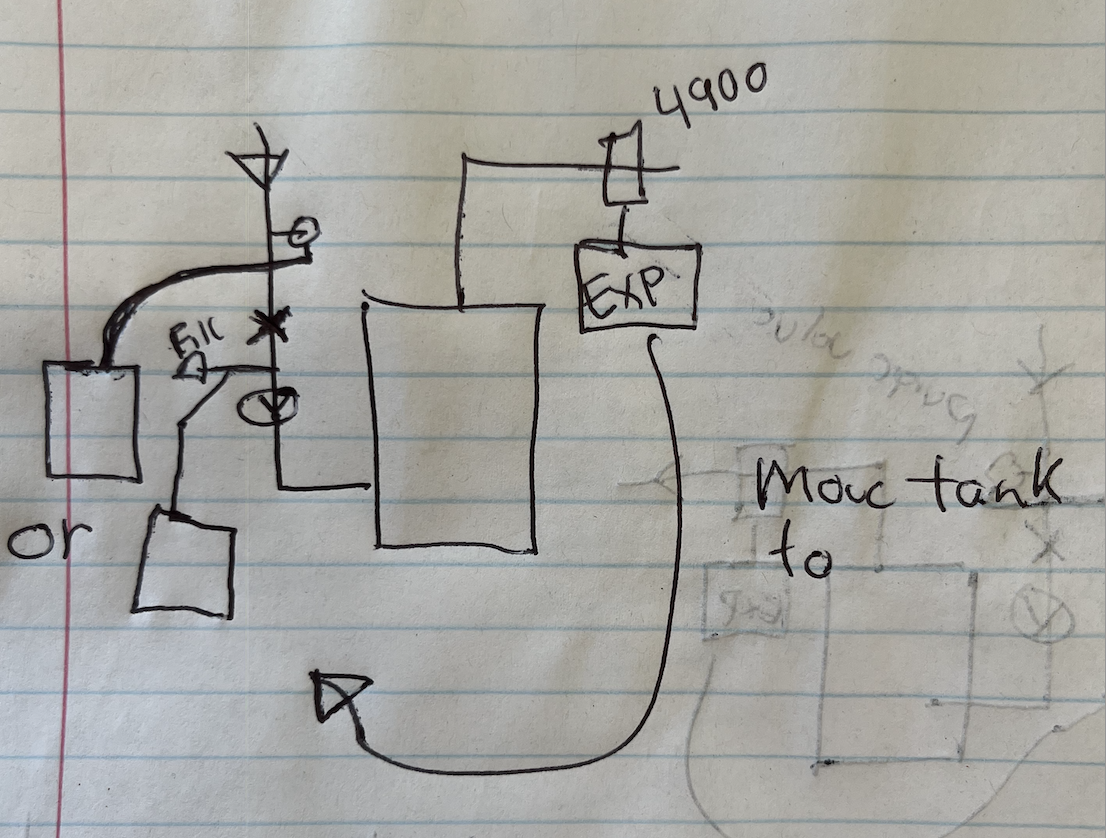
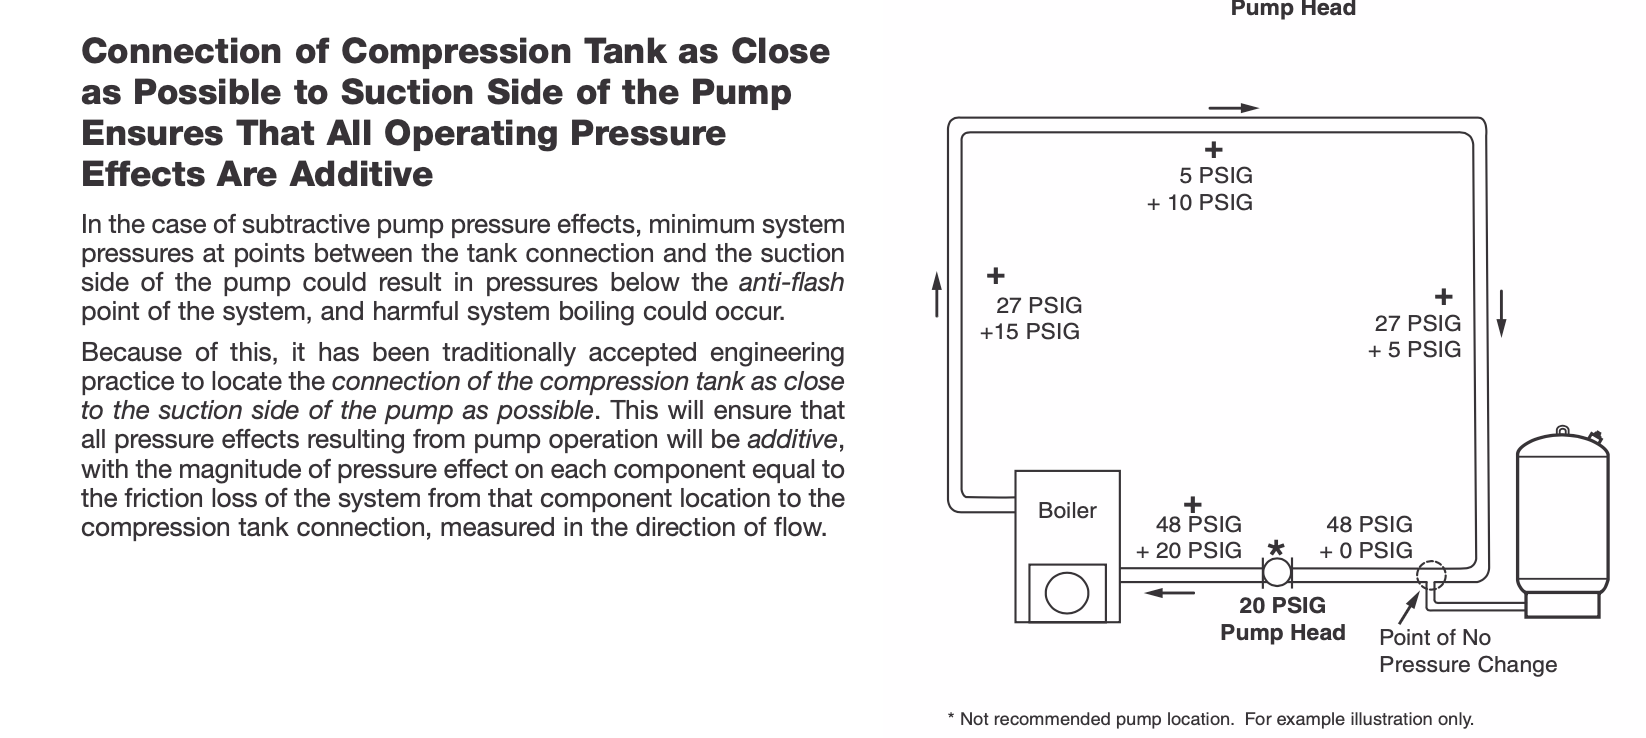
Unfortunately you are pumping towards the PONPC with the circulator on the return.
As an experiment attach a washer hose to the valve above the circulator. Remove the expansion tank from the purger, connect it to that boiler drain. now you are pumping away, adding pumps pressure differential to the system piping.
Better yet the tank connected at the fill valve, then it is below that yellow ball valve for service.
The expansion tank, contrary to rumors does not need to be at the air purgers location.
Zone valves off and two valves above the circulator should isolate the fill system, to replace or service. Turn the fill valve off of course :)
The air vent on the boiler certainly does some work, but it does not grab microbubbles from the moving flow like the microbubble purger does. Air purgers and air vents are different animals, different uses.
 Bob "hot rod" Rohr
trainer for Caleffi NA
Living the hydronic dream 1
1 -
Wow — thank you so much!
It will be an adventure for me to try to move the tank. I've never cut or joined pipes before…what could possibly go wrong 😅?
 1
1 -
If the system has a lot of chroic air noise I would first check or replace the air purger. Even with the pump pumping at the expansion tank, it is possible to have a quiet, air free system.
That 4900 must come apart at the belly seam, someone put the pall rings inside it :)
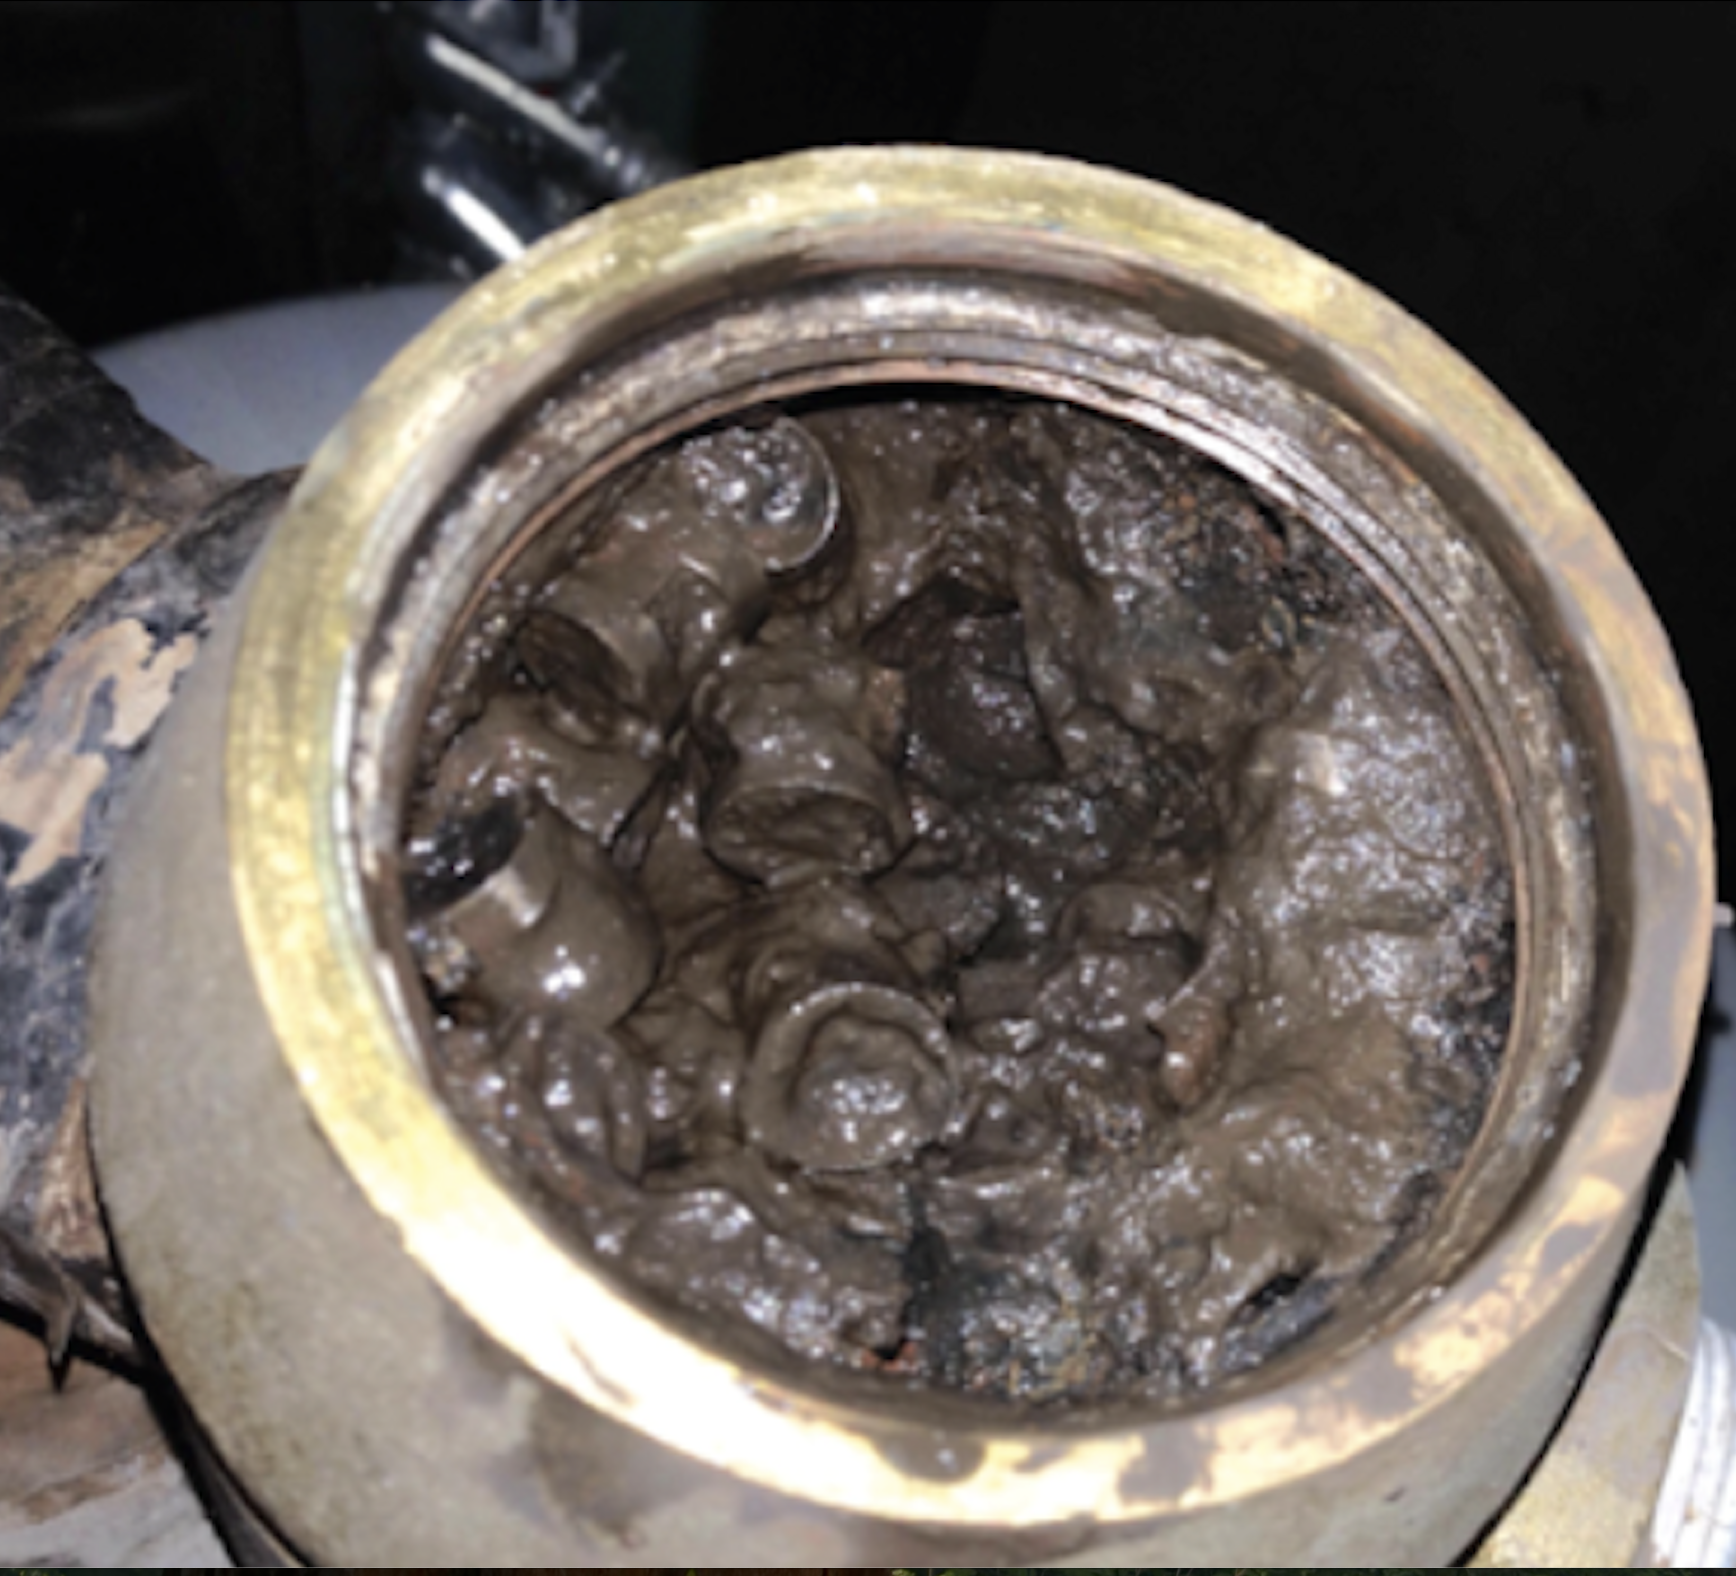
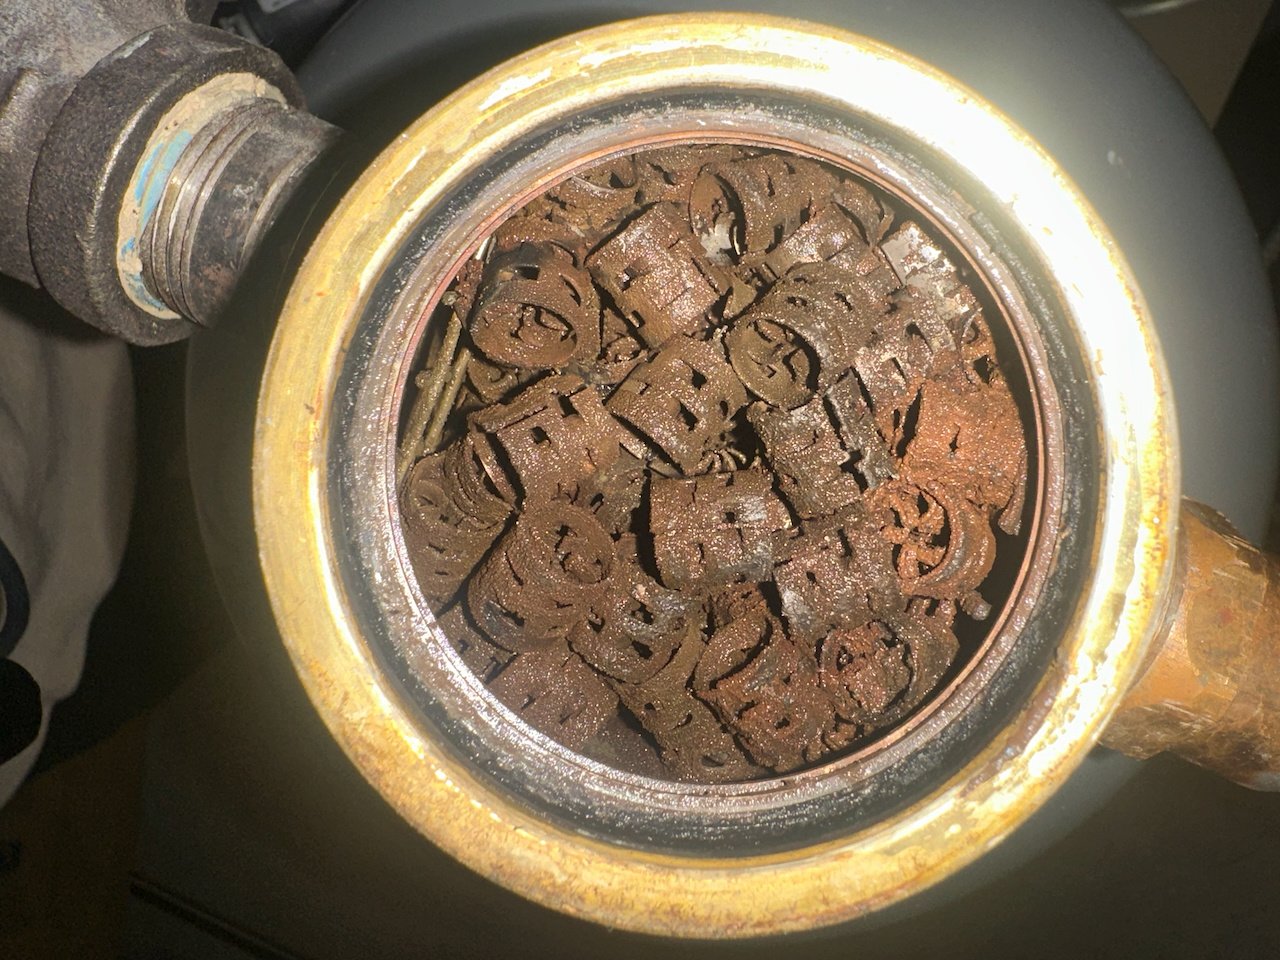
If it looks like this inside, that is generally caused by a lot of air (oxygen) getting into the system and causing hemitite (rust). With a chronic air problem you could have air or O2 entering.
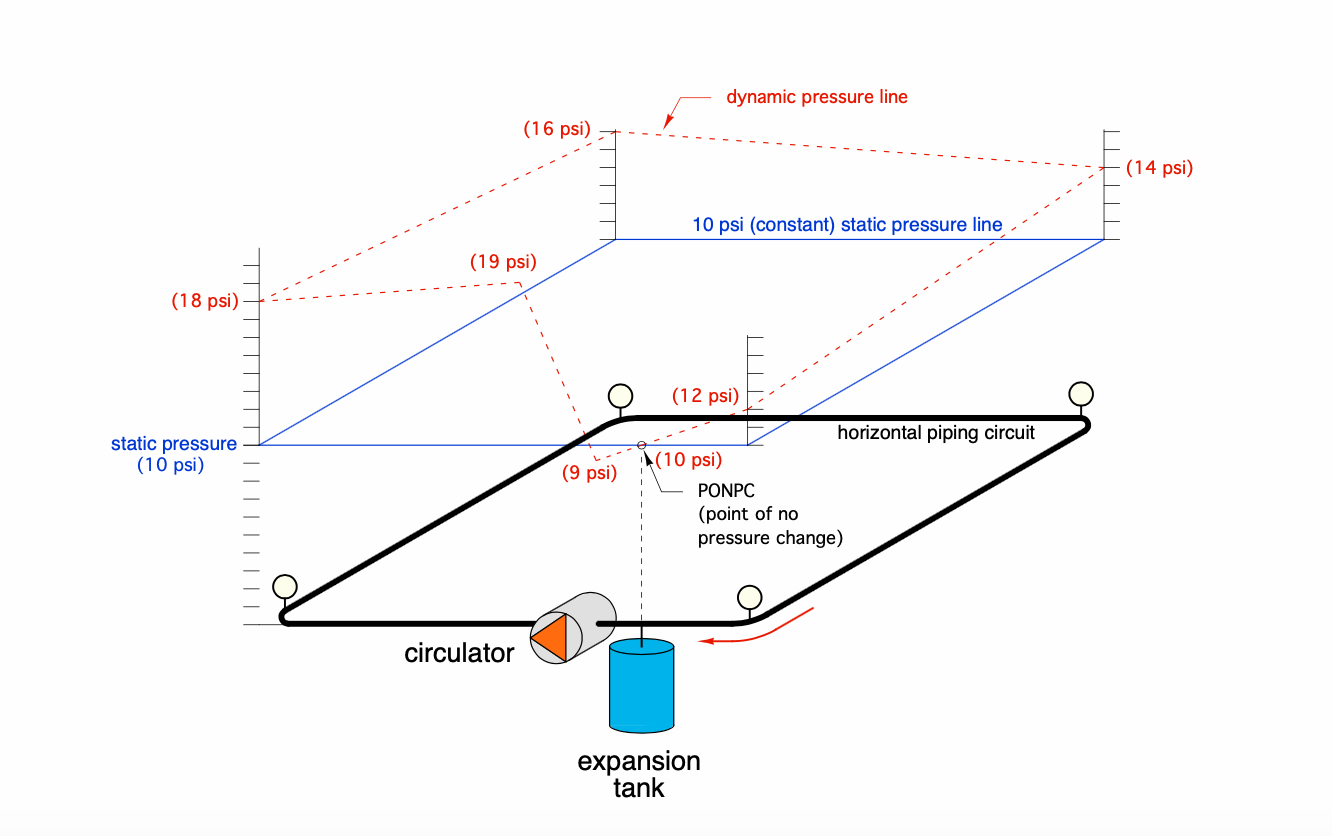
Are there any float/ auto air vents up high in the system? That is one area air can enter when you are pumping at the expansion tank. Note the negative pressure in the second example. Low fill pressure and an air vent anywhere below the 0 psi point would allow air in!e
What is the boiler fill pressure? Checked with an accurate gauge. Bumping fill pressure up a few psi can solve air problems and assure all vents seal tightly.
 Bob "hot rod" Rohr
trainer for Caleffi NA
Living the hydronic dream0 -
Thanks! That diagram is extremely helpful — was very hard to understand the significance of the PONPC without it.
I don't think there are any vents higher in the system, I checked around the 1st/2nd floor baseboards in the past and didn't see anything.
If the 4900 looks like the one in your picture, should I just replace it entirely? Or am I better off replacing it in regardless, since a replacement head is apparently only $10 less than the entire thing?
I do intend to try to move the expansion tank — both my wife and my in-laws don't think that I can or that I should, so I pretty much have to at this point.
I'm not sure how best to support the tank if I move it though. Options I can think of are:
- Hang it from one of these drop ear elbows screwed to the bottom of a joist.
- Drop a 2x4 down from a joist and attach a tank mounting bracket to that.
- Attach a tank mounting bracket to the chimney (or maybe to a 2x4 mounted to the chimney). Assuming it's safe to drill ~1.5" into that brick for a tapcon.
- Just loop some steel hanger strap under the tank.
What would be the professional way to handle this?
 0
0 -
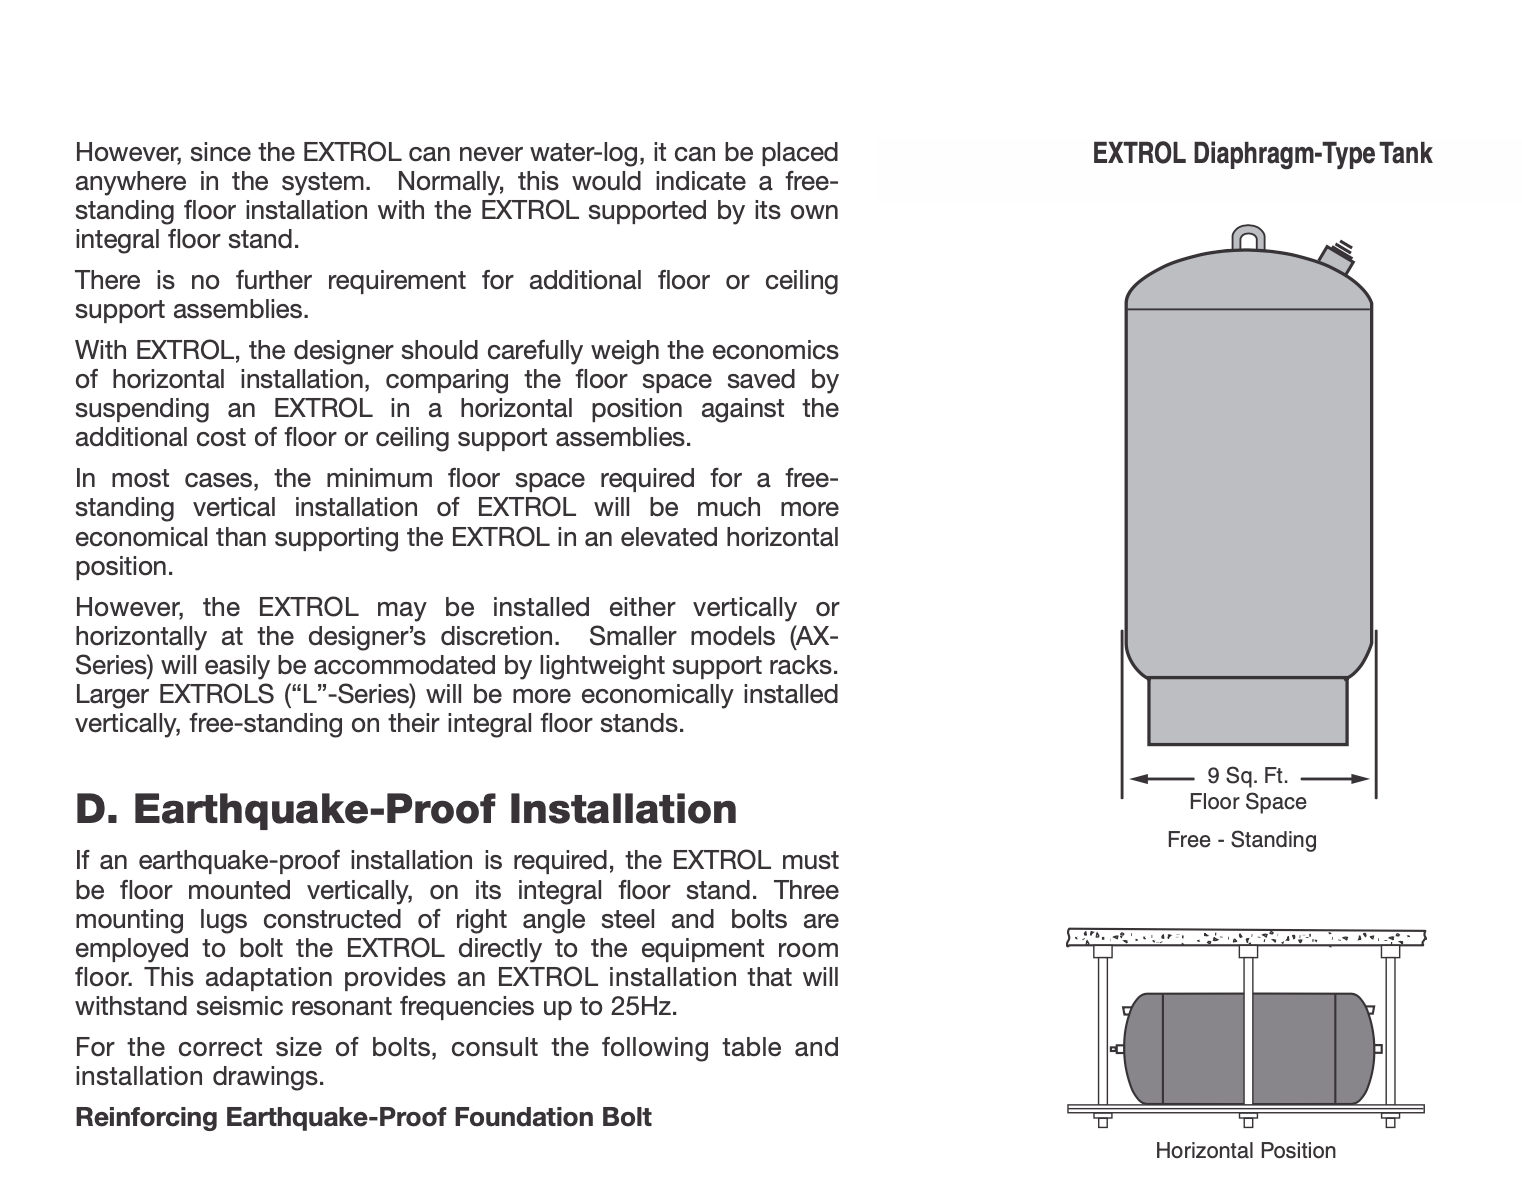
Conflicting installation info from Amtrol.
Their engineering handbook indicates and shows expansion tanks mounted horizontal and at the end of a remote piping line.
More info on PONPC.
Current installation manual indicated the tank right at the air purger connection?
If the piping is well supported, hanging it under the air purger should be plenty adequate.
See what you find when you split open the 4900, that will help determine the next step, cleaning or replacing.
Bob "hot rod" Rohr
trainer for Caleffi NA
Living the hydronic dream0 -
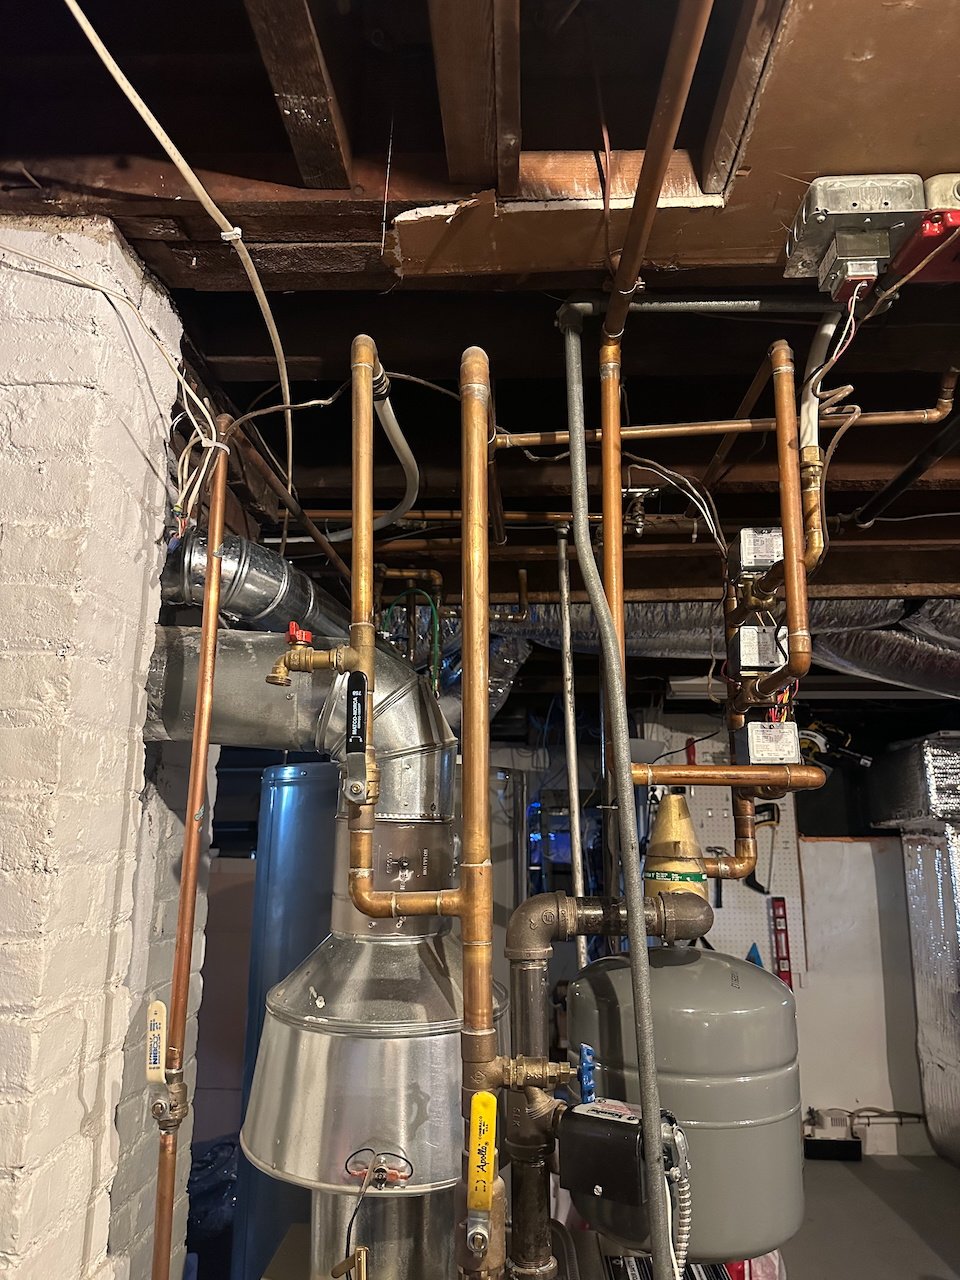
Opened the 4900 — I think it doesn't look too bad? Definitely not all clogged up like your picture.
The fill pressure is 12psi, according to both the existing gauge on the boiler and a new one I attached to one of the drain valves.
So I'm thinking I'll:
- Replace the vent head on the 4900
- Replace the air vent on the boiler, for good measure
- Move the expansion tank to the suction side of the circulator (and plug the bottom of the 4900)
Then I'll still have the 4900 on the boiler's supply side (per its instructions) and the expansion tank on the suction side of the circulator.
It is tough to follow the EX-30's manual exactly; it says:
- "Install the EXTROL on the supply side of the boiler, on the suction-side of the heating circulator." But I can't do without moving the circulator.
- "Do not place the EXTROL on a dead-end pipe. Air can collect in the EXTROL, causing internal corrosion and possible leakage." But presumably putting a vent directly above the tank prevents that (e.g. I'll attach the tank under one of these baseboard tees and screw in a vent on top).
 0
0 -
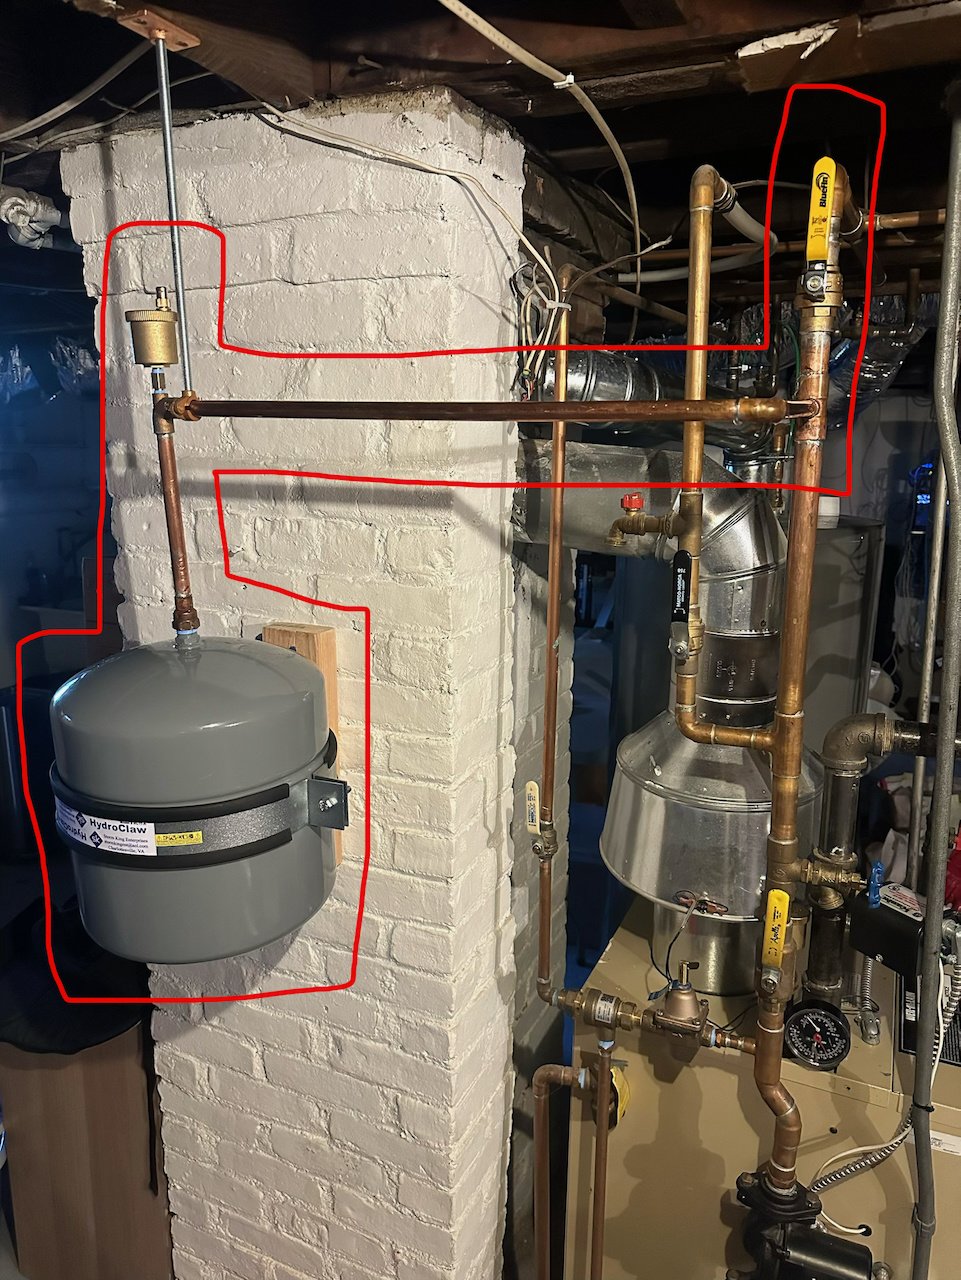
Just to close this out — mission accomplished, I think!
I replaced the vent head on the 4900 and the air vent on top of the boiler. Added a tee for the expansion tank on the suction side of the circulator, with a new ball valve to isolate it. The old tank had failed (was a remarkably heavy surprise when I unscrewed it from the bottom of the 4900!) so I replaced that too.
Not pretty with the solder (and the ball valve took me two tries — leaked a few mins after the first time I ran the heat), but now…
- Nothing leaks.
- The new air vents all hissed air instead of spitting water when I opened them after refilling.
- Pressure is steady at 12 PSIG on the suction side when the circulator runs (jumps to around 20 on the boiler's gauge).
- The system seems much quieter already — after running it a bit, there's no gurgling, just the gentle creaking of expanding metal.
- Most important of all, I learned a bunch of new things!
@hot_rod thank you so much for pointing me in the right direction here!!
 0
0 -
UM, why didn't you install a ball valve between air vent and the bladder tank??????
0 -
You have expansion tank isolation by closing two yellow handle valves ad the black handle one.
A service valve is nice for draining off the pressure to check or replace, but a tank should last 10, 15 or more years, properly sized and pre-charged.
The air vent above the tank has a service check also for service or replacement. It also has a hydroscopic cap for additional leak protection.
Tiny solder leaks can go away as the tube heats and expands. It may return when the piping cools and contracts. :(
Any idea what failed on the purger head ?
Bob "hot rod" Rohr
trainer for Caleffi NA
Living the hydronic dream0 -
Nicely done. I think you are well covered. Finding the failed expansion tank was "the cherry on the top."
0 -
Thanks everyone.
@hot_rod No idea what was wrong with the purger head. Before doing any of this, I isolated that segment and tried cleaning it twice — first by just rinsing it out aggressively and shakihgn it a bit, and the second time by soaking it in vinegar for a while before rinsing it out. Tons of sediment came out, but after each try I replaced the head and refilled the system, and it still leaked as soon as I cracked the screw on it even a tiny bit.
I think I fully fixed the leaky ball valve; when I found it leaking I cooled and redrained the system, unsoldered the valve, cleaned and fluxed the valve & the pipe again, then resoldered it more carefully and deliberately. Think I just wussed out and didn't heat the brass hot enough or evenly enough the first time.
@leonz I don't think I need a ball valve by the tank? The air vent has a check valve on it (so should be easy to replace if ever necessary), and if I had to replace the tank I would just shut off the three ball valves (black one and two yellow ones) as hot_rod suggested, screw down the top of that air vent, then relieve pressure from the drain between the two yellow valves. Some water would drip out, but I think no more than a bucket on the floor could handle.
0


Categories
- All Categories
- 87.6K THE MAIN WALL
- 3.3K A-C, Heat Pumps & Refrigeration
- 59 Biomass
- 429 Carbon Monoxide Awareness
- 124 Chimneys & Flues
- 2.2K Domestic Hot Water
- 5.9K Gas Heating
- 119 Geothermal
- 168 Indoor-Air Quality
- 3.8K Oil Heating
- 78 Pipe Deterioration
- 1K Plumbing
- 6.6K Radiant Heating
- 394 Solar
- 15.9K Strictly Steam
- 3.5K Thermostats and Controls
- 56 Water Quality
- 50 Industry Classes
- 50 Job Opportunities
- 18 Recall Announcements