Welcome! Here are the website rules, as well as some tips for using this forum.
Need to contact us? Visit https://heatinghelp.com/contact-us/.
Click here to Find a Contractor in your area.
If our community has helped you, please consider making a contribution to support this website. Thanks!
New Boiler Skimming
Options

PhilKulkarni
Member Posts: 118
Installed a a single pipe Peerless 63-03 last week and the installer doesn't know how to skim it, and won't follow the installation manual. He had brought some unknown boiler treatment liquid but I opted out of it and arranged for a credit and chose to skim myself.
As per Peerless, using washing soda I skimmed from the 1 1/4" port for 3 hrs in two sessions until the water was relatively clear and while doing so I kept smelling burning oil. This smell persists while the boiler is steaming with the soda in it. The previous boiler was also gas. I get quite a bit of rust as well as metal flakes when I drain it. I also see grey flakes floating on the surface. Is it dope? Could the rust and the metal flakes be coming from the pipes and not the boiler? When I drain the return, a cupful comes out rusty but then it runs clear. I also see no metal flakes. I have however, checked this only once.
After 3 rounds of boiling and draining, the water line bounces approx half an inch, a
significant improvement over the 3-3.5" when I first started. The water is still not clear, but I was wondering if I should continue to skim now or resume after using the boiler for 4-5 weeks?
My EDR load is 295 sq ft. This boiler is rated at 309 sq ft and my previous boiler which cycled excessively was rated at 357 sq ft, but would reach 1 PSI in 25 mins. This boiler takes much longer to generate steam and the pressure from a cold start reads 0 for the first 30 mins. Steam reaches the main vents in approx 18 mins including the Cyclegard interruption. The pressure stays at 0.5PSI for another 20 mins before going up. It eventually cuts out at 1.5PSI. The stat is set to 75 and ambient temp is 73. The radiators take longer to get hot but the vents have stopped gurgling and hissing; actually they have never been quieter. My pipes have 1" insulation. Is the pressure situation normal? I am concerned that when it gets really cold in NYC the boiler might not be able to keep up.
Thanks for your feedback.
0
Comments
-
The pressure sounds about right for a boiler that’s slightly oversized, but if there’s any room for improvement it would be in achieving the best possible radiator balancing to insure that they are all filling at about the same rate. If you have one of those remote IR thermometers you can run around the house and checking the progress of the steam at each radiator and changing the vents to make the slower ones faster and the faster ones slower.
I don’t expect the pressure behavior to change when it gets colder, because, unless your thermostat is set up wrong, the ambient temperature will still hover around 70 degrees. The thing that changes the most will be that the time between cycles will get shorter.You should probably skim the boiler again after you’ve run it for a month or so, but drain out all the washing soda before you start steaming. Sodium carbonate will raise the pH, and this will cause foaming. Foam in your boiler can put more water into your pipes than rough boiling.Just another DIYer | King of Prussia, PA
1983(?) Peerless G-561-W-S | 3" drop header, CG400-1090, VXT-240 -
Thanks. Peerless says to run the boiler with the washing soda for 24-48 hrs and then drain. I have run it with the soda 3X for a total of 3.5hrs and drained. But I will stop the soda routine going forward and skim it late next month.
 1
1 -
Can we see pictures of the installation?gwgillplumbingandheating.com
Serving Cleveland's eastern suburbs from Cleveland Heights down to Cuyahoga Falls.0 -
I think if the guy doesn't know how to clean out a brand new steam boiler he might not have been the best choice for installing or replacing a steam boiler . It is not to difficult a process and one i use on steam boilers i install and life is to short to waste alot of time on cleaning a steam boiler and not getting it done first time out , if a full port tee was install on the return inlet the boiler wanding out from the bottom as a initial block cleaning for starters is how i start and if the system has wet returns they should have had isolation valves installed so that they can be flushed out ,it not only make sense but it keeps all that junk out of your new boiler and it water . Aside from a bottom flush i usually throw some surge master in and let the whole system heat up a good heating cycle after which i will drain the boiler and re wand the boiler from the bottom section by section until the flush water coming out is clean , After that i would re flush the return to flush out any crude loosened by the new boiler w its dry steam . Then re fill the boiler and fire the boiler and skim out any oils that have survived and finally add a can of surge master not so much as for the names suggestion but as a corrosion inhibitor and over time it seems to keep down mud build up on the steam chest of the boiler just my observations. To be totally anal about it one should have there water tested and to aire to the manufactures specs possible fill the boiler w demineralized water and add a demineralizing filter to the boiler feed water a wise choice .Now to be clear just because you have the boiler clean and everything is beautiful don't blame the boiler or the installer for when all the crude in the system that may have collected returns to roost in the boiler ,i always figure that i will return after a few weeks and have to re flush everything and possible a quick skim before finally doing the whole demineralized water process . In areas w hard water it is a no brainer and if the system has leaks and takes on make up water its essential . This is why guys who include all the skimming and flushing and nonsense like replacing radiator vents and main venting are always more money because they know the whats . and whys of doing it correctly peace and good luck clammy
R.A. Calmbacher L.L.C. HVAC
NJ Master HVAC Lic.
Mahwah, NJ
Specializing in steam and hydronic heating0 -
This sounds like a problem. It should take no more than a few minutes for the steam to travel from the boiler to the main vent. 18 minutes from when the header (near boiler piping) starts to get too hot to touch to when you see/feel steam coming out the main vent? Or is it from cold start? Even if it's the latter, that's a long time...PhilKulkarni said:
Steam reaches the main vents in approx 18 mins including the Cyclegard interruption.
You may want to get rid of the Cyclegard and swap it out for a Safgard instead as well. That will eliminate the short-cycling annoyance. I'm not a pro, and I was able to do it on mine (oil megasteam).
I would like to see pictures as well.
0 -
Thanks for the skimming suggestions. The water is now clear but I see some rust when I drain about a cupful. As you indicated @Clammy, this may be from the piping rather than the boiler itself. I will add the steam master soon as I get it. Currently, the water level surges between 1/2”- 3/4” and it returns to the same level a couple of mins after the boiler shuts down.
I installed a new Safgard and cleaned out the 2 main vents with plain water. The time for the steam to reach the shorter run of the two mains dropped a bit to 16 mins from 18 mins from a cold start. The boiler reads 1/2 psi after running 45 mins. All the rads begin to get warm after 35 mins and hot after 45 except for the 6’ Sunrad which is the largest. it was always the slowest to heat up entirely. System raises the house temp by 1 degree after 53 mins. and shuts off on pressure. If I turn up the stat, subsequent heating cycles run for 6-7 mins after cut in, and cut out at 1.5PSI until the stat is satisfied.
This boiler is rated to output 97 thousand BTU/hr compared to 113 thousand for the Crown it replaced. The latter short cycled and had a 21% higher rated EDR than my EDR load. The current one Is only 5% oversized. So what might be causing the sluggish heating time?
I had a single 2” main that was split by a tee into two 2” mains feeding the front and back of the house. During installation, the tee was taken out and two ends were extended back to the boiler as two separate 2” mains connected with two take offs at the header. Both mains are also pitched in the same counterflow arrangement as the previous single main. The shorter main is counterflow for 13’ and then pitches downwards, into a wet return. It has a pitch of 4” in 13’. The longer main is counterflow for 22.5’ after which it too turns downwards ending in a wet return. This section has a pitch of 2.5” in 22’ overall, but there is a 16’ section with a 1.5” pitch, which is the same as before. As before, the pipes don’t bang. Could this modification have negatively affected the boiler performance? Is there a remedy or is the boiler somehow undersized?
Thanks in advance.
0 -
Pictures needed...Have you replaced the main vents and rad vents? https://heatinghelp.com/assets/documents/Balancing-Steam-Systems-Using-a-Vent-Capacity-Chart-1.pdf This will help you with understanding venting if you haven't already read it. I'm thinking your main vents may be too small, and your rad vents may be dirty/sealed up.0
-
@PhilKulkarni
Did anyone ever check the gas pressure and the combustion to see if the input is correct?
Are the counterflow pipes installed with drips as required or does the condensate come back into the header?0 -
The near boiler piping is very important in keeping the steam dry. I'd be very suspicious that it isn't piped right if the installer didn't know how to skim it. if the boiler is throwing water in the mains that water will collapse the steam and keep it from progressing in the main. That water will also cause the return to get very hot early in the cycle. Feel the return a couple minutes after it starts steaming. If it is very hot it is throwing liquid water in the mains. the return shouldn't get very hot until the radiators are hot and returning condensate.0
-
I have left the two main vents, both Big Mouths, unchanged. The shorter main has an adjustable nut on the vent which I used to balance the previous system. These don’t leak, but I will remove them one at a time and time how long it takes steam to arrive and adjust. I have one extra Big Mouth and a Hoffman 75 on hand that I could use to add more venting. I will have the installer put a tee and antlers on the longer main.
I checked the vents on the rads and changed one MOM that had some crud in it, the rest are a combination of MOM, Ventrite and Hoffman 40 based on the radiator size and distance from the boiler and they are working well. I have not changed the sizes based on the smaller boiler but will if you suggest.
I have attached some pictures of the boiler and piping as well as the main vents. The installer felt that since there were no drips before, no drips on this boiler too even though he added a net 7’ of additional 2” piping to the mains. So, the condensate goes back to the boiler. I have attached some pics before I insulated the pipes and in addition to the pitch I indicated earlier by measuring the heights, some of these pics also show the pitch of the counter flow pipes on a torpedo level and a 3’ level.
Please note that the pitch of the 16’ counter flow section is difficult to measure accurately as the inside of the crawl space where it turns downwards has a rocky floor and the main has been fully insulated for many years. It is ‘L’ shaped with the longer part in the crawl space. The installer was careful about maintaining the original pitch.
Thanks in advance


0 -
No drips on the counterflow mains is killing the steam coming out of the boiler. That is why it takes 18 min to get steam to the end of the mains. And the Header I don't know what size it is but it looks small as does the equalizer.
As we mention on here 1000 times every winter. Just follow the MFG instructions and piping diagram.
WHATEVER PIPING EXISTED WITH THE OLD BOILER DOES NOT COUNT. If you take the easy way out it won't work.
And again have the gas pressure on the burner manifold checked and combustion tested 1
1 -
The manual says the riser and header should be 2" for a 63-03 so that looks right.EBEBRATT-Ed said:No drips on the counterflow mains is killing the steam coming out of the boiler. That is why it takes 18 min to get steam to the end of the mains. And the Header I don't know what size it is but it looks small as does the equalizer.
Are there radiators on the mains before it turns to parallel flow?
0 -
@EBEBRATT-Ed, The near boiler piping has 2" header and 1 1/4" equalizer as per the installation manual. Peerless shows a single 3" tapping reduced to 2" with a bushing then going into the swing joint. My riser uses the full 3" tapping and extends 24.5" above the boiler cover then connects to a 2" header with a reducing elbow. All other near boiler pipe dimensions are exactly as per the attached Peerless pic.
I have not done a combustion test, but will ask the installer to check the manifold pressure and verify combustion output. In the meantime I can see if the boiler input exceeds 300k BTU/hr by measuring the cu ft of gas used over a 3 min period with a stop watch. Boiler rated at 318kBTU/hr of input.
All risers are on the parallel portion of the two mains. The attached pic shows the risers on the shorter main on the section sloping down to the wet return which is entirely in the basement.
If the lack of the drips are the source of the problem, where should they be positioned? The wet return runs along the corner of the the floor below the two counter flow mains as you see in the pic.
@Mattamia2, the wet return at the boiler takes a long time to get hot, something like 45mins. Steam is reaching the rads very slowly.
Thanks all in advance.


0 -
If you have wet returns you have a parallel flow system which means the highest point on your mains should be right at the boiler and everything after that should be sloping down. If the installer pulled a tee and sloped those pipes back towards the boiler they may have made a mistake on the installation.
If you have counter flow and parallel flow and the counter flow is at the beginning then the boiler needs the drips. Basically as soon as the main goes up from the header there should be a tee in that run that drops down and joins the wet return piping. I attached a picture showing what should be there for counterflow.
18 minutes seems quite excessive, it wasn't clear exactly how long the mains are in your description, but in an average house I wouldn't expect more than 5 minutes from header hot, to steam at end of main. It could be that counterflow causing issues, it could be not enough main venting, combination of the two.
As far as your mention of the boiler being undersized, well you are building pressure which indicates excess capacity, not too small. Pressure is the enemy of steam heating, the more there is the worse it actually is. And when I say more, I mean anything over a few ounces.0 -
Drip tees need to be installed in each steam main close to where they come off the header (within 2' or so is fine). The branch of the tee needs to point down. These two drips need to be connected below the water line and tie into your other return piping at the boiler.
You need to find out which way those mains pitch. The picture looks like they are pitching back to the boiler.
Is you 18 min steam time from a cold start? You should start timing when the weather gets hot as @KC_Jones mentioned0 -
Thanks @KC_Jones. The counter flow is at the beginning of each mains and it has been that way since I have lived here. The house was built in the 1920s. The two previous boilers had a single counter flow main split with the bullhead tee which I replaced.
The counter flow portion of the longer mains is 23.5' and the shorter one is 10.5'. Should each drip go all the way down to the wet return on the floor or can it connect to the boiler return where there currently is a 1 1/4" ball valve? Please see third pic from the bottom.
As I understand, the drips send the condensate in the mains directly to the wet return,
bypassing the equalizer. How does this reduce the collapse of steam in the mains that @EBEBRATT-Ed ascribes as a potential cause of the problem, since the condensate still traverses pretty much the entire length of counter flow on each mains?0 -
I think what I would do is look at the counterflow mains the 23' and the 10'. Are there any radiator takeoffs on the counterflow portion of the mains? If you have takeoffs where the mains are counterflow you need the drips. If there are no takeoffs on the counterflow sections, you don't because you will have little condensate coming back counterflow with no radiator take offs
With counterflow the water runs back in the header and kills the steam which could be your problem getting steam to the ends of the mains quickly. I am surprised Peerless does not show the drips required with counterflow piping. If you had to add the drips just connect them below the ball valve. There are plenty of drawings showing counterflow piping just can't get my fingers on one now. I am sure it is in the LAOSH0 -
@EBEBRATT-Ed, I have attached more pics of the shorter counter flow + parallel flow mains. The counter flow section is 10.5' from the boiler take off. The first pic shows an additional 11.4' of the header pitched downwards ending in the vertical wet return. This section has the risers. The level shows a downward pitch, away from the boiler. The longer mains with the 23.5' of counter flow has a longer length of parallel flow ending in a wet return. There are 4 risers on this section of the mains in the crawl space. The two 1 1/4" wet returns from each mains are tied together under the crawl space access door you see in the 3rd pic from the bottom, and go back to the boiler through the Hartford.
The installer is coming back Monday to give an estimate of the cost to insert the drips. I am thinking this is
major surgery after this install which undoubtedly is incomplete.


0 -
Can you tell if the steam gets to a certain point then takes a long time to get past that point? If you have any sags or improper reductions such that the main holds water the steam will have to heat that water before it can progress.
If you remove the vent and leave the pipe open does it take just as long for steam to get to the end of the main?
You are timing from when the header gets hot, right? If the boiler is full of cold water it is going to take a while to heat that to boiling.
What is that big uninsulated threaded iron pipe?0 -
@mattmia2, no sags that I can see. There are reductions from 2” mains to 1 1/4” dry return a short distance from the last riser on the parallel flow sections of both mains.
The 18 mins to reach the vent on the shorter mains is from a cold start. I have not timed it on the longer main but it will be likely longer since there is more air to be vented. Besides the Big Mouth at the end of that main you see in the crawl space, pic #5 from the top, I have another vent installed on the only 3/4” riser, which is the last one on this mains. It likely accelerates the overall venting rate for this large mains. I will check if removing the vent changes the time for the steam to reach the nipple it is on.
What I am not clear about is how this piping worked without a drip before even though the boilers were larger.
@EBEBRATT-Ed, I have two things on my to do list: install the drips and check burner manifold pressure and combustion in that order. I will have the drips connected to the boiler return where the ball valve is. Should the tees for the dripping have the 2” ends facing down and reduced to 1 1/4” for connecting to the boiler return or should they be reducing tees with the 1 1/4” ends facing down?
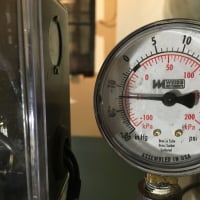
During a 3 degree heating cycle, the boiler cuts in at 0.5 psi, but by the time the LWCO checks the level and burner is lit, the pressure drops to 0.2 psi. It takes about 5.5 mins to go from there to 1.5psi again before cutting out on pressure. I am using a 5psi gauge. Is this normal?
Thanks in advance.0 -
The drips don't have to be very big I would use 3/4 " or 1" for the drips
That sounds like normal operation. How long for steam to get to the end of the mains? Try this. From a cold start run the boiler when it gets to the point where you can't hold your hand on the header start timing and see how long for steam to get to the end of the mains0 -
Thanks again @EBEBRATT-Ed. For this test I added the spare Hoffman 75 to the shorter main as shown in the pic. From cold start to header too hot to touch- 10 mins and 32 sec. From that point to steam reaching the antler- 3 mins and 26 sec. Both vents closed 3 secs later. The additional vent shaved 4 mins but the pressure is still 0. Will repeat the test tomorrow with vents removed. Will also test input BTUs/hr at the same time.

0 -
@EBEBRATT-Ed, the avg of 2 input readings at the gas meter shows 115.85k BTUs/Hr which is close to the rated input of 118k BTUs/Hr. With the air vents removed time for steam to reach the 1” exposed nipple when the header is too hot to touch is 3 mins and 09 sec. Vs 3 mins and 26 sec with the vents. Pressure reads zero. The venting of this mains appears to be good.0
-
Agree. I think you're ok. If you're not getting any banging in the counterflow portion of the pipe your probably ok.
Don't worry about the lack of pressure that is a good thing. Your heating the radiation and the piping. That stays pretty much the same summer or winter. In cold weather you will get longer cycles0 -
You basically want zero pressure, please stop concerning yourself with lack of pressure. If you see a gauge reading that is "bad" in the sense that you are burning fuel to not heat the house. To build pressure you have to slow down or even stop the steam flow. With close to zero pressure you know the steam is always moving at maximum speed.
The times you are getting make a lot more sense now with timing from header hot to steam at end of main.1 -
have you checked the thermostatic trap or removed it for a correct air vent that is in what looks like your crawl space? the element could be failed and blowing steam past it.0
-
That's just a big mouth. It appears they have rebranded a radiator trap as a main vent.pedmec said:have you checked the thermostatic trap or removed it for a correct air vent that is in what looks like your crawl space? the element could be failed and blowing steam past it.
0 -
@pedmec, the vent in the crawl space is a Big Mouth air vent. It is working fine, but it alone is insufficient as it takes steam approx 5 mins and 40 secs longer to reach it as compared to the shorter mains. Need more more venting there. The fact that it has a longer counter flow section sans a drip line could also be a contributing factor for the longer delay.
On a positive note, all rads run very hot top to bottom and left to right. All rad vents and all pipes are quiet.0 -
@EBEBRATT-Ed and @KC_Jones, per your suggestion, I had a boiler guy install a 1” drip from my 2” mains to the boiler return of my new Peerless. The drip is on the 26’ long counterflow main which is the longer of the two mains. This mains, part counter and part parallel flow is the one that is giving me the most problem. It feeds the front of the house and the rads on that main do not stop venting and the boiler shuts off on temp.
I replaced the Gorton Cs I had on the larger rads with new Heat timer Varivalves fully open and the rads heat up only a little faster- 45 mins to heat the rads 3/4 of the length with the Gortons (still venting )and it takes now about 37 mins to do the same with the Varivalves. I had a single big mouth at the end of this long main to which I have added another B&G Varivent on an antler. The antler sits on a 3/4” x6” nipple. Both vents close after the boiler runs for approx 28 mins from a warm start which is a lot longer than the time it took in October when there was no drip. It is also colder. My gas bill has hit the roof.
When I increase the stat for a 2 degree temp rise, the boiler runs longer, all the rads in the front heat up uniformly and the vents on them close.
To achieve faster venting on this mains, should I replace the 1 1/4” x 3/4” tee with a 1 1/4” X 1” and put the antler on a 1” nipple to vent faster? The boiler runs at a little under 0.5 psi. for better part of its run.
On the shorter main, without the drip, all rads heat up in 25-28min. and the rooms on this loop are about 4 degrees warmer than the front. I have adjustable Ventrites on these rads and I will slow them down. Adding a drip to this section is a bit difficult as the two mains are very close together but the length of this counterflow section is a lot shorter and I plan to go through this winter without it to see if the current heating cadence continues.
Thanks for your assistance in advance.

0


Categories
- All Categories
- 87.7K THE MAIN WALL
- 3.3K A-C, Heat Pumps & Refrigeration
- 59 Biomass
- 430 Carbon Monoxide Awareness
- 128 Chimneys & Flues
- 2.2K Domestic Hot Water
- 5.9K Gas Heating
- 121 Geothermal
- 170 Indoor-Air Quality
- 3.8K Oil Heating
- 79 Pipe Deterioration
- 1.1K Plumbing
- 6.6K Radiant Heating
- 396 Solar
- 16K Strictly Steam
- 3.5K Thermostats and Controls
- 56 Water Quality
- 51 Industry Classes
- 51 Job Opportunities
- 17 Recall Announcements