Welcome! Here are the website rules, as well as some tips for using this forum.
Need to contact us? Visit https://heatinghelp.com/contact-us/.
Click here to Find a Contractor in your area.
If our community has helped you, please consider making a contribution to support this website. Thanks!
Boiler re-pipe question
Options

crash2009
Member Posts: 1,478
Winter is over and I am finally in the planning stage of re-piping. In the scan 403piping1, this is the layout of our existing system. The boiler is right in the middle of what I would call a figure 8 configuration. I want to break up the T of the system riser to main, and form 2 separate loops. Is this a good or bad idea?
In scan 403piping2 is a sketch of existing near boiler piping and proposed. In my proposed sketch there are a few things I am unsure of and I need your advice.
1- the boiler manufacturer recomends 3 inch boiler riser and header. Is there any advantage in using 4 inch header?
2- I am unsure how the 2 wet returns would tie in to the Hartford. What is the best way to tie those in?
0
Comments
-
You've almost got it
bring the ends of both mains down to floor level, THEN tie them together before going into the H-loop. This will keep steam from jumping from one main to the other.
A 3-inch header is fine for most residential boilers. But before I commit myself to that, what make and model is yours?Baltimore, MD, USA
Steam, Vapor & Hot-Water Heating Specialists
Oil & Gas Burner Service
Consulting0 -
Make and Model
is Weil Mclain EG-550 -
3 vs 4
3in is good
4in is better .. allows for drier steam, slower near boiler velocity allows for better steam-water separation.
but 4in also costs more $$$ for all parts (but it is a 1time cost)
4in also looks cooler
for my new system, after much thought and contemplation, i am probably going to "reuse"/"pipe-into" my existing 3in header although i was well headed down the 4in path.1-pipe Homeowner - Queens, NYC
NEW: SlantFin Intrepid TR-30 + Tankless + Riello 40-F5 @ 0.85gph | OLD: Fitzgibbons 402 boiler + Beckett "SR" Oil Gun @ 1.75gph
installed: 0-20oz/si gauge | vaporstat | hour-meter | gortons on all rads | 1pc G#2 + 1pc G#1 on each of 2 mains
Connected EDR load: 371 sf venting load: 2.95cfm vent capacity: 4.62cfm
my NEW system pics | my OLD system pics0 -
Any thoughts on
breaking up the figure 8 and going with 2 system risers, to form 2 separate loops?0 -
Piping Configuration
Hi - Yes, you want to get rid of the bullheaded tee and go with two system risers. One to Branch "A" and one to Branch "B".
In looking at your system diagram, I had a question about what I labeled Branch "C" on your diagram. How does the condensate (water) on this branch return to the boiler? Does it go by way of Return "A" or does it just flow back to the boiler header? If it does go back to the header you'll want to install a drip. If it goes by way of Return "A" - no problem. I just couldn't tell by your diagram. Also be sure to use a dropheader as fitting the piping is much easier and it produces dryer steam.
- Rod0 -
Branch C
Ron, that is an impressive observation. When I first sketched this I missed it. After looking at it for awhile I added the pencil direction > < arrows. I thought nothing of it. I thought that's just the way they all are. But you have alerted me to go get a level and a tape and check the slope in that area. I suspect you are correct that Branch C drains back to the boiler. Here is a photo of how Branch C connects to Branch A, I will measure later today.0 -
Slope
From your picture it would appear that Branch "C" is just a big lateral and I suspect that the condensate from "C" drains back to the boiler by way of Branch "A" The Red Arrows represent the direction of the steam travel and the Blue Arrows represent the direction of the condensate travel.
Just check the slope of the Steam Main from above the boiler to Point "X". It should be sloped towards "X" as per the PInk Arrows.
- Rod0 -
Ron, the Slope
From the boiler T to point X is 3/8" in 24". Boiler T photo enclosed upper white pipe. Lower end of Branch A is just below. Also enclosed is a shot of Branch C from the other side of the room.
Does this mean that a drip is NOT nescesary?0 -
Rod
Sorry I keep getting your name wrong0 -
No Drip
If Branch "A" is all downhill from Boiler "T", then you shouldn't need a drip. - Rod0 -
Valves
http://www.youtube.com/watch?v=6BCCXW8lA1g
I am also planning to copy the valve section of this video to make the maintenance easier. Do I need to pipe the boilers mud valve into the area of the hartford?0 -
Clean Outs
It pays to have some method of cleaning out any area of low piping where "mud" will settle out. Areas of concern are usually the Boiler, the Hartford Loop and the Wet Return before it rises to join the Hartford Loop. This can be done by substituting a tee with a pipe plug for an elbow in the configuration and if you want make it easier to drain, a strategically placed full flow ball valve in place of the plug. If you are using a valve, I'd have a secondary method of sealing it with either a pipe plug or a nipple and cap for safety.
- Rod0 -
The plan
looks like this now. We are starting next week. Thanks for your help. Unable to post a .bmp. Will try .jpg0 -
Fire it up!
I hired a professional from the Detroit area. Pat is just a few hours away from firing it up. I found him on your website. Here are a few construction shots.0 -
That looks like some fine work!
How did it run when he fired it up?Baltimore, MD, USA
Steam, Vapor & Hot-Water Heating Specialists
Oil & Gas Burner Service
Consulting0 -
We just idled it for awhile
to make sure it was circulating good. It was a very hot day in Michigan yesterday around 90 F. The house was hot around 80 F. All we did was skim for a couple hours, flush this and that, and shut it down. I don't think we even burned the pipe dope.
I am going to take more pictures Sunday to show the Hartford and the flushing valves. We incorporated Dans suggestion to valve it so we can flush the mains and the boiler seperately. There was a little head scratchin to build it into this configuration.0 -
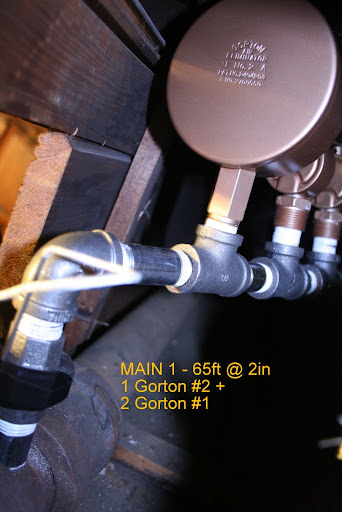
Pictures
are difficult to take when you cannot get far enough away to get it all in one shot.
#540 is my little cluster of main vents
#539 returns to hartford
#537 almost the whole system0 -
Insulation
Thank-you for all your help. I am nearly finished the insulation. I ended up using the Zeston 2000. I have never done any pipe insulating before. The 45's and 90's are easy. Valves and T's difficult, especially the reducing T's, I am still trying to come up with a way to do them right. Can anyone point me to a website that can show me how to do a reducing T and a valve?0 -
did you...
did you spray the whole room red .. i like it!1-pipe Homeowner - Queens, NYC
NEW: SlantFin Intrepid TR-30 + Tankless + Riello 40-F5 @ 0.85gph | OLD: Fitzgibbons 402 boiler + Beckett "SR" Oil Gun @ 1.75gph
installed: 0-20oz/si gauge | vaporstat | hour-meter | gortons on all rads | 1pc G#2 + 1pc G#1 on each of 2 mains
Connected EDR load: 371 sf venting load: 2.95cfm vent capacity: 4.62cfm
my NEW system pics | my OLD system pics0 -
Yes
the whole room is red. I didn't want spray all over, we brushed it. The paint is Valspar interior, flat finish, acrylic latex. Color is named Jekyll Club Cherokee Rust. Its not as red as in the picture. The color is the same as 100 year old condensate.
We took down the 1899 hot water tank from the ceiling, and unfortunately the drywall came with it. Had to paint the new drywall with something. I thought that the color of condensate would be appropriate for that room. We like it too.
OK, so now I have eliminated the near boiler piping and uninsulated mains as being the problem here. We will see sometime soon how all this performs.0


This discussion has been closed.
Categories
- All Categories
- 87.7K THE MAIN WALL
- 3.3K A-C, Heat Pumps & Refrigeration
- 59 Biomass
- 430 Carbon Monoxide Awareness
- 129 Chimneys & Flues
- 2.2K Domestic Hot Water
- 5.9K Gas Heating
- 121 Geothermal
- 170 Indoor-Air Quality
- 3.8K Oil Heating
- 79 Pipe Deterioration
- 1.1K Plumbing
- 6.6K Radiant Heating
- 396 Solar
- 16K Strictly Steam
- 3.5K Thermostats and Controls
- 56 Water Quality
- 51 Industry Classes
- 51 Job Opportunities
- 17 Recall Announcements