Toilet drain flange above the floor and uneven floor

Today's dilemma. Tenant contacts me and says there is water on the floor in the basement below her first floor toilet. Upon investigation, when the toilet is flushed, water trickles down along outside of the 4" cast iron elbow and from gaps in the plywood installed on the underside of the floor.
I removed the toilet. The top of the toilet flange stands between 3/4” and 15/16” above the uneven tile floor. On the bottom of the toilet, the space for any fittings (i.e., wax ring, etc.) is only 3/8”. Being a novice at the time, I grouted the toilet into place with the thickness being around 3/8” by measurement after removal. That was done in 1989.
The grout has cracked in places over the years and all I have had to do is patch/caulk it. There was never any indication of the toilet being loose.
The wax ring that was installed had a plastic horn that went from the 4” flange to the 3” OD of the drain on the toilet. When I removed the toilet, the wax ring was black and looks like it may have been squeezed too thin failing over time.
The flange is a simple 4” plastic toilet flange and has a 4” diameter piece of pipe attached. I don’t know if it came as one piece or was a short pipe section glued to the flange. No tapers like what is in the big box stores today.
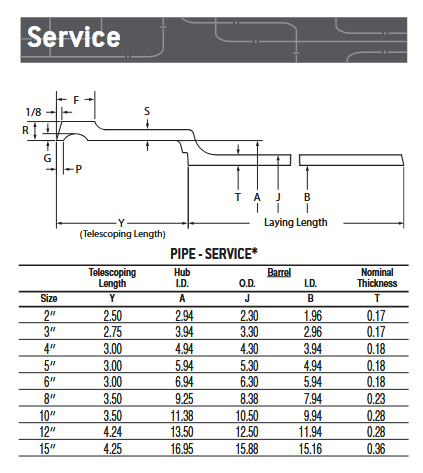
There are no indications of leakage from the flange to elbow connection, so I am unsure of doing a replacement. Further I do not know how deep the inside socket is in the elbow. If the bottom of the flange already sits at the end of the elbow, replacing it will not reduce the height and is a waste of time. Here are dimensions from the Charlotte Pipe web site. I’m guessing it is a service pipe, not no-hub and the depth is “Y” in the sketch. My most reliable local plumbing supply house is closed today.
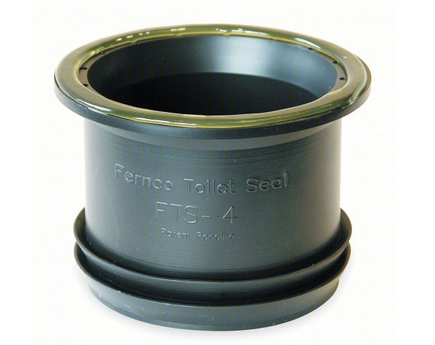
I am considering placing a spacer the shape of the toilet footprint to raise the entire toilet and provide additional stiffness, then grouting or caulking any gaps. Additionally, I came across a 4” Fernco flexible fitting (FTS-4) that adheres to the bottom of the toilet and has ridges.
Suggestions?
Comments
-
I guess unless you want to recipe things raising the toilet is the only option. Many don't realize that the flange is supposed to sit on top of the finished floor.
Your problem is a little unusual as most flanges are too low as flooring gets replaced on top of the existing raising the floor.
I suppose if the flange to pipe connection is good installing a new floor on top of the old floor would help.
Of course you may have time constraints and if there is not a second bathroom that can be an issue.
Maybe one of the newer gaskets that don't use wax is the answer. Never trusted them I always use wax but Fluid Master has some newer stuff. Some are almost like spring loaded and compressible.
0 -
Hi, It seems to me that stabilizing the toilet must come first. I'd be looking at making that support from some plastic wood, like Trex, so rot and cracking are not concerns. I'd also want to know that the bolts holding the toilet down are solid brass with brass or stainless nuts and washers. Also, check the condition of the flange to see if it might have any problem/weakness. Now, the toilet should not be able to move, and whatever seal you use between flange and toilet will hold up better. Is all of that too general? 🤔
Yours, Larry
 1
1 -
how is it thst the floor is uneven? It it a framed floor?
The flange should be on top of the finished floor, could be 1/2” or more above
3/4” above might be a bit much
Bob "hot rod" Rohr
trainer for Caleffi NA
Living the hydronic dream0 -
The flange to the cast iron is fine, no damage and not loose.
The unevenness of the floor is because of whatever happened from the 1920s to 1989. To eliminate the interference of the high flange (distances from the flange face to the tile are between 3/4" and 15/16") I used shims to raise and level the toilet, grouted all around, then removed the shims and grouted those gaps. I also tried to stiffen the floor with plywood on the underside. I don't remember the configuration of the arrangement back then before I started the work. No cell phone to take lots of pics.
It worked for almost 37 years. I think a combination of factors ultimately allowed water to leak out. Vertical shrink and swell between the seasons of the cast iron and wood structure, tenants leaning forward and backward and the latest tenant being rather large. I even guessed that the cold winter after so many years since I did the work might have made the situation worse. Maybe the cast iron drain line shifted as we came out of the winter.
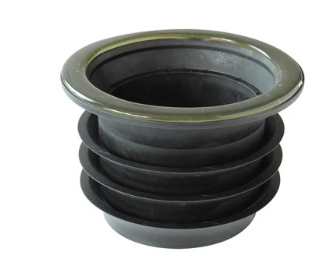
The wax vs non-wax solution is to use this FTS-4 Fernco, which does not have anything that reduces the opening at the bottom to 3". I want the entire diameter of the opening through the fitting, no taper/horn (like I used in 1989…obviously I didn't think to cut back on the horn then). Additionally, the flexibility of the fitting will accommodate some unevenness and possibly movement, so I am hoping it will prevent a future failure for a long, long time. Here's the actual one I was able to find locally at FW Webb. It is different from the one I first found. I snaked the line yesterday to make sure there is no obstruction.
I planned to use PVC beadboard for the raising of the toilet, but Trex may be a better choice. The downside is the beadboard would be a single piece around the entire footprint of the toilet compared to multiple pieces at the perimeter. The physical interface of the toilet to the floor is a narrow bottom edge, about 1/4", but more a line than a surface, so I think having a single piece might be more robust, even if there are two layers to get the needed height. It would certainly take less work. I'll give it a serious look this morning.
One thing I found is Fernco says to use rubbing alcohol to remove the wax residue from the toilet and flange. The wax was black and hardened and it took at least 2 hours to scrape the hard stuff and soften what was left. Tiny pores in the underside of the toilet where the new fitting attaches are nearly impossible to get totally clean. I am sure some is just discoloration weeping into the pores.
I don't mind overdoing some things to make as absolutely sure as possible I won't have to do the job again. This is one of those cases…the adhesion of the adhesive on the fitting to the toilet is critical. The mechanical ribs to the inside of the flange nipple to the cast iron should be as good as anything else, especially considering there will be no reduction to 3".
I'll check back later and follow up. Thanks for the comments.
Oh yeah, I am lucky that the tenant is a wonderful person. She had stayed at her sister's house after recent surgery and is back there for a couple of days. Saves me from paying for a local hotel those nights. I am blessed with some of the best tenants known to mankind…some are more like family than customers. They are what makes landlording worthwhile.
 1
1 -
If I use Trex, I might use 6 pieces because of the closeness of the bolt holes to the edge of the toilet. Additionally since Trex is tongue and groove, I would have to cut back the tongue (easier than cutting off the groove) so there is solid material below the perimeter of the toilet. Just something to think about, if I can't find just plain boards. Either way, I found a flexible 1/2" x 3/4 base cove molding in a light color, close to the color of the toilet that can hide whatever I do.
0 -
This should work. Although it looks like it is capped, but it is probably better than what I had been planning go use.

The width of the toilet is about 10", so I will use 4 pieces with some trimming on the inside to fit the width.
0 -
I am far from a toilet expert. But this type of product might work best.
https://www.homedepot.com/p/Veranda-3-4-in-x-48-in-x-8-ft-White-Reversible-PVC-Trim-Sheet-H190AWS13/206822526
0 -
I've come across dozens of soapstone or marble slabs that toilets sat on. They never matched the toilet footprint but were rectangular and didn't interfere with use while sitting or standing.
I've made platforms from pressure treated plywood when needed; usually two pieces of 3/4" with the raw edges finished with moulding. And primed & painted with quick dry spray paint.
0 -
@SteamingatMohawk Google up Sioux Chiefs twist and lock replacement flange. See if that will work to lower the flange . If not, I have used cedar wooden shingles under some toilets for situations like yours. They act as a great shim and offer a sturdy base. Caulk around the base when finished.
0 -
Plastic shims would be better than wood I'd imagine?
Toilet in my shop, they cut a spacer out of OSB. I've got to sort it out, somehow people need to sit to pee or something so you can imagine what that OSB is doing.
0 -
Not an unusual problem. Lots of good ideas. I looked up and found this product after reading the post. Looks like an AC pad in a way. It’s meant to solve ADA issues but I’d expect it may also take care of a high flange.
0 -
On second look it won’t work. I missed the underside image showing how it sits on the original flange. Sorry about that…
0 -
Actually, your idea is a very good one. Doing this would give room for other extension flanges to fit, eliminating the issue of not having the pipe length to install a new flange. Not to mention the ADA compliance this install would create. At my age, I like a taller seat. Toilet manufacturers like to call it "comfort height."
0


Categories
- All Categories
- 87.7K THE MAIN WALL
- 3.3K A-C, Heat Pumps & Refrigeration
- 59 Biomass
- 430 Carbon Monoxide Awareness
- 127 Chimneys & Flues
- 2.2K Domestic Hot Water
- 5.9K Gas Heating
- 121 Geothermal
- 170 Indoor-Air Quality
- 3.8K Oil Heating
- 79 Pipe Deterioration
- 1.1K Plumbing
- 6.6K Radiant Heating
- 396 Solar
- 16K Strictly Steam
- 3.5K Thermostats and Controls
- 56 Water Quality
- 51 Industry Classes
- 51 Job Opportunities
- 17 Recall Announcements