Plan Review: Basement Hydronic Convector Wall (DIY)

Hi everyone,
I'm a homeowner with a woodworking shop looking for a sanity check on a new heating plan. I have some related experience, as I recently installed an under-floor (joist bay) hydronic system for another part of my house, but I'm definitely not a pro. I got some vital help on that project in this forum from you helpful folks, so I've put together a detailed plan to add supplemental heat to a 100% below-grade basement bedroom and would appreciate your expert feedback before I start cutting.
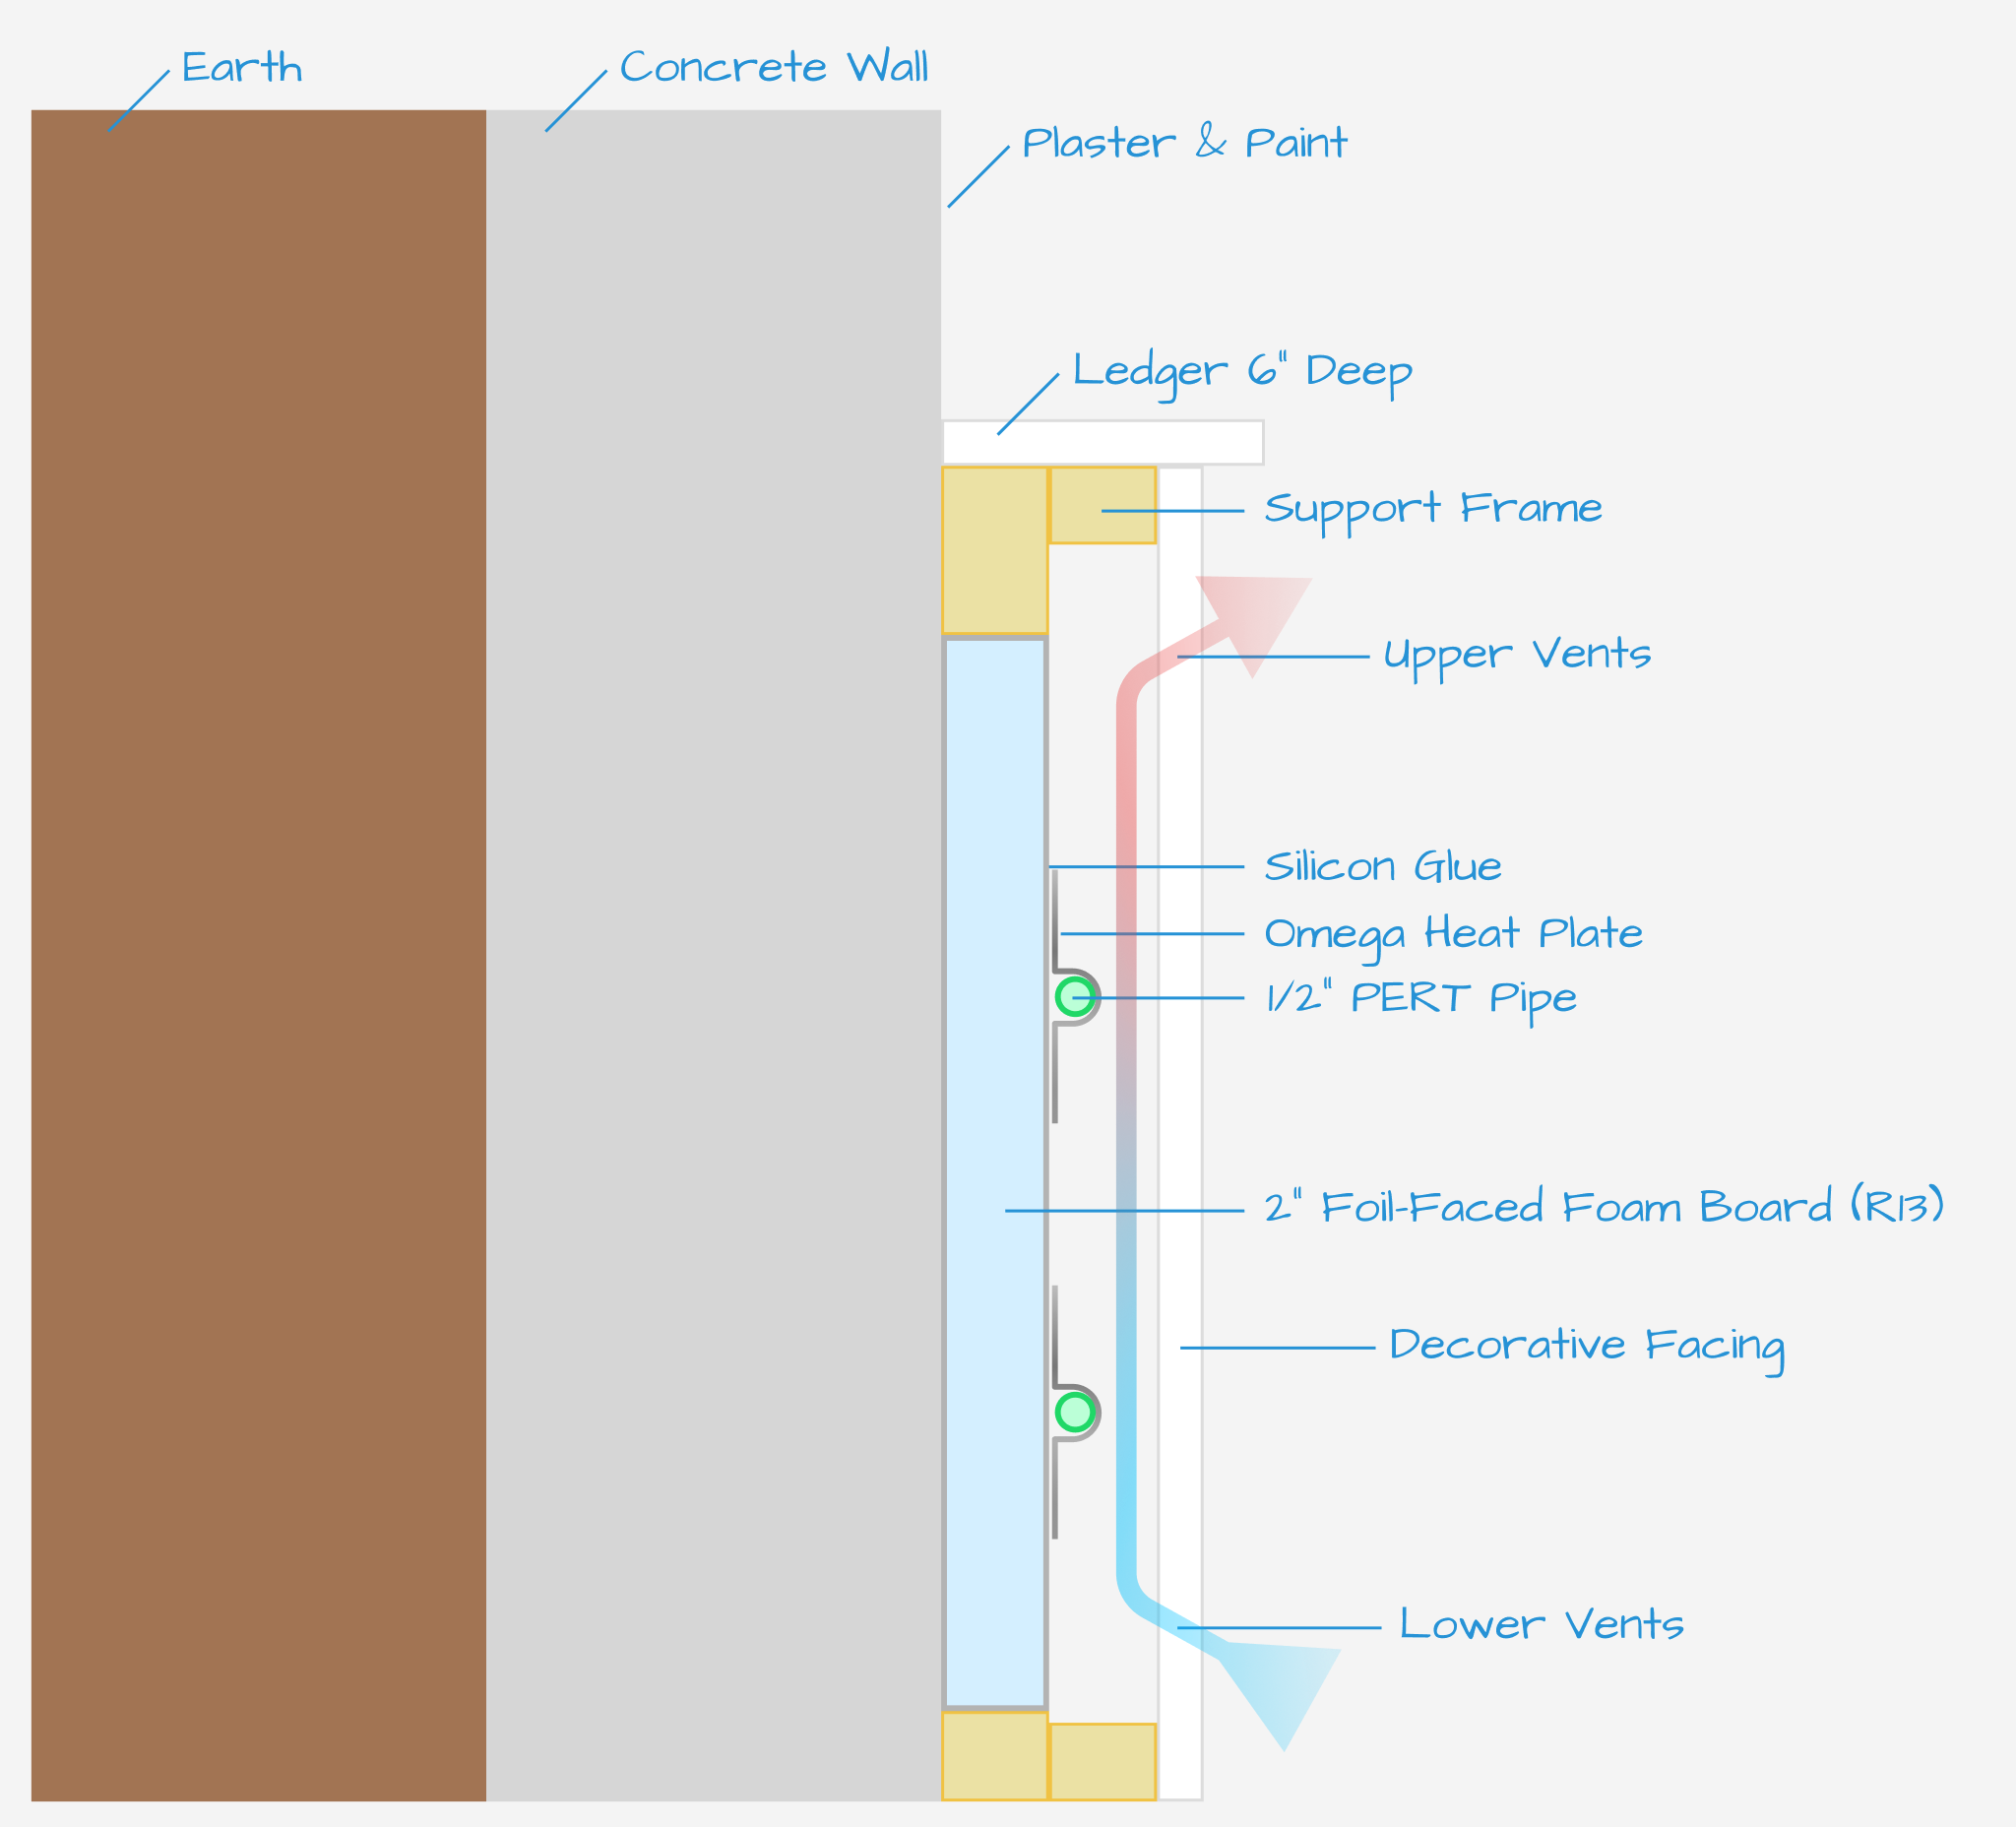
The Goal:Heat a ~124 sq ft basement room (plaster over concrete block). I can't raise the floor, so I'm planning a "radiant wall" system.
The Plan: Hydronic ConvectorI plan to mount heating elements on the lower 3 feet of the 3 exterior walls and conceal them with a custom, removable, modular wainscoting system. I understand this is a convector, not a true radiant panel, and requires airflow (vents at top and bottom) to function.
Existing System & Materials:
- Existing boiler feeding a 10-port manifold (CROSS 10 model) with individual flow controls and individual valves for each loop. I have one open port and plan to control this new loop with a dedicated thermostat in the room.
- On Hand: 1/2" Vipert (PERT) tubing, 2" R13 foil-faced polyiso foam, and 1/2" PEX Aluminum Omega plates.
Engineering & Key Questions:
- Heat Loss: I've calculated the room's heat loss at ~1,525 BTU/hr. (70°F target, 0°F outdoor, 45°F ground temp, R13 new wall insulation). Does this BTU load seem reasonable for a 124 sq ft, 100% below-grade room?
- Emitter Sizing: My plan is to run 2 horizontal rows of the Omega plates along the 31 linear feet of exterior wall.
- Total Emitter: 31 ft x 2 rows = 62 linear feet
- Total Output: At ~28 BTU/hr/ft, this gives me ~1,736 BTU/hr.
- Is this a proper size (15% oversized) for the 1,525 BTU/hr load?
- Piping: I plan to run one single continuous 1/2" Vipert (PEX-a) loop, snaking along the bottom row and returning along the top row. Is this the best approach for balancing with my existing manifold?
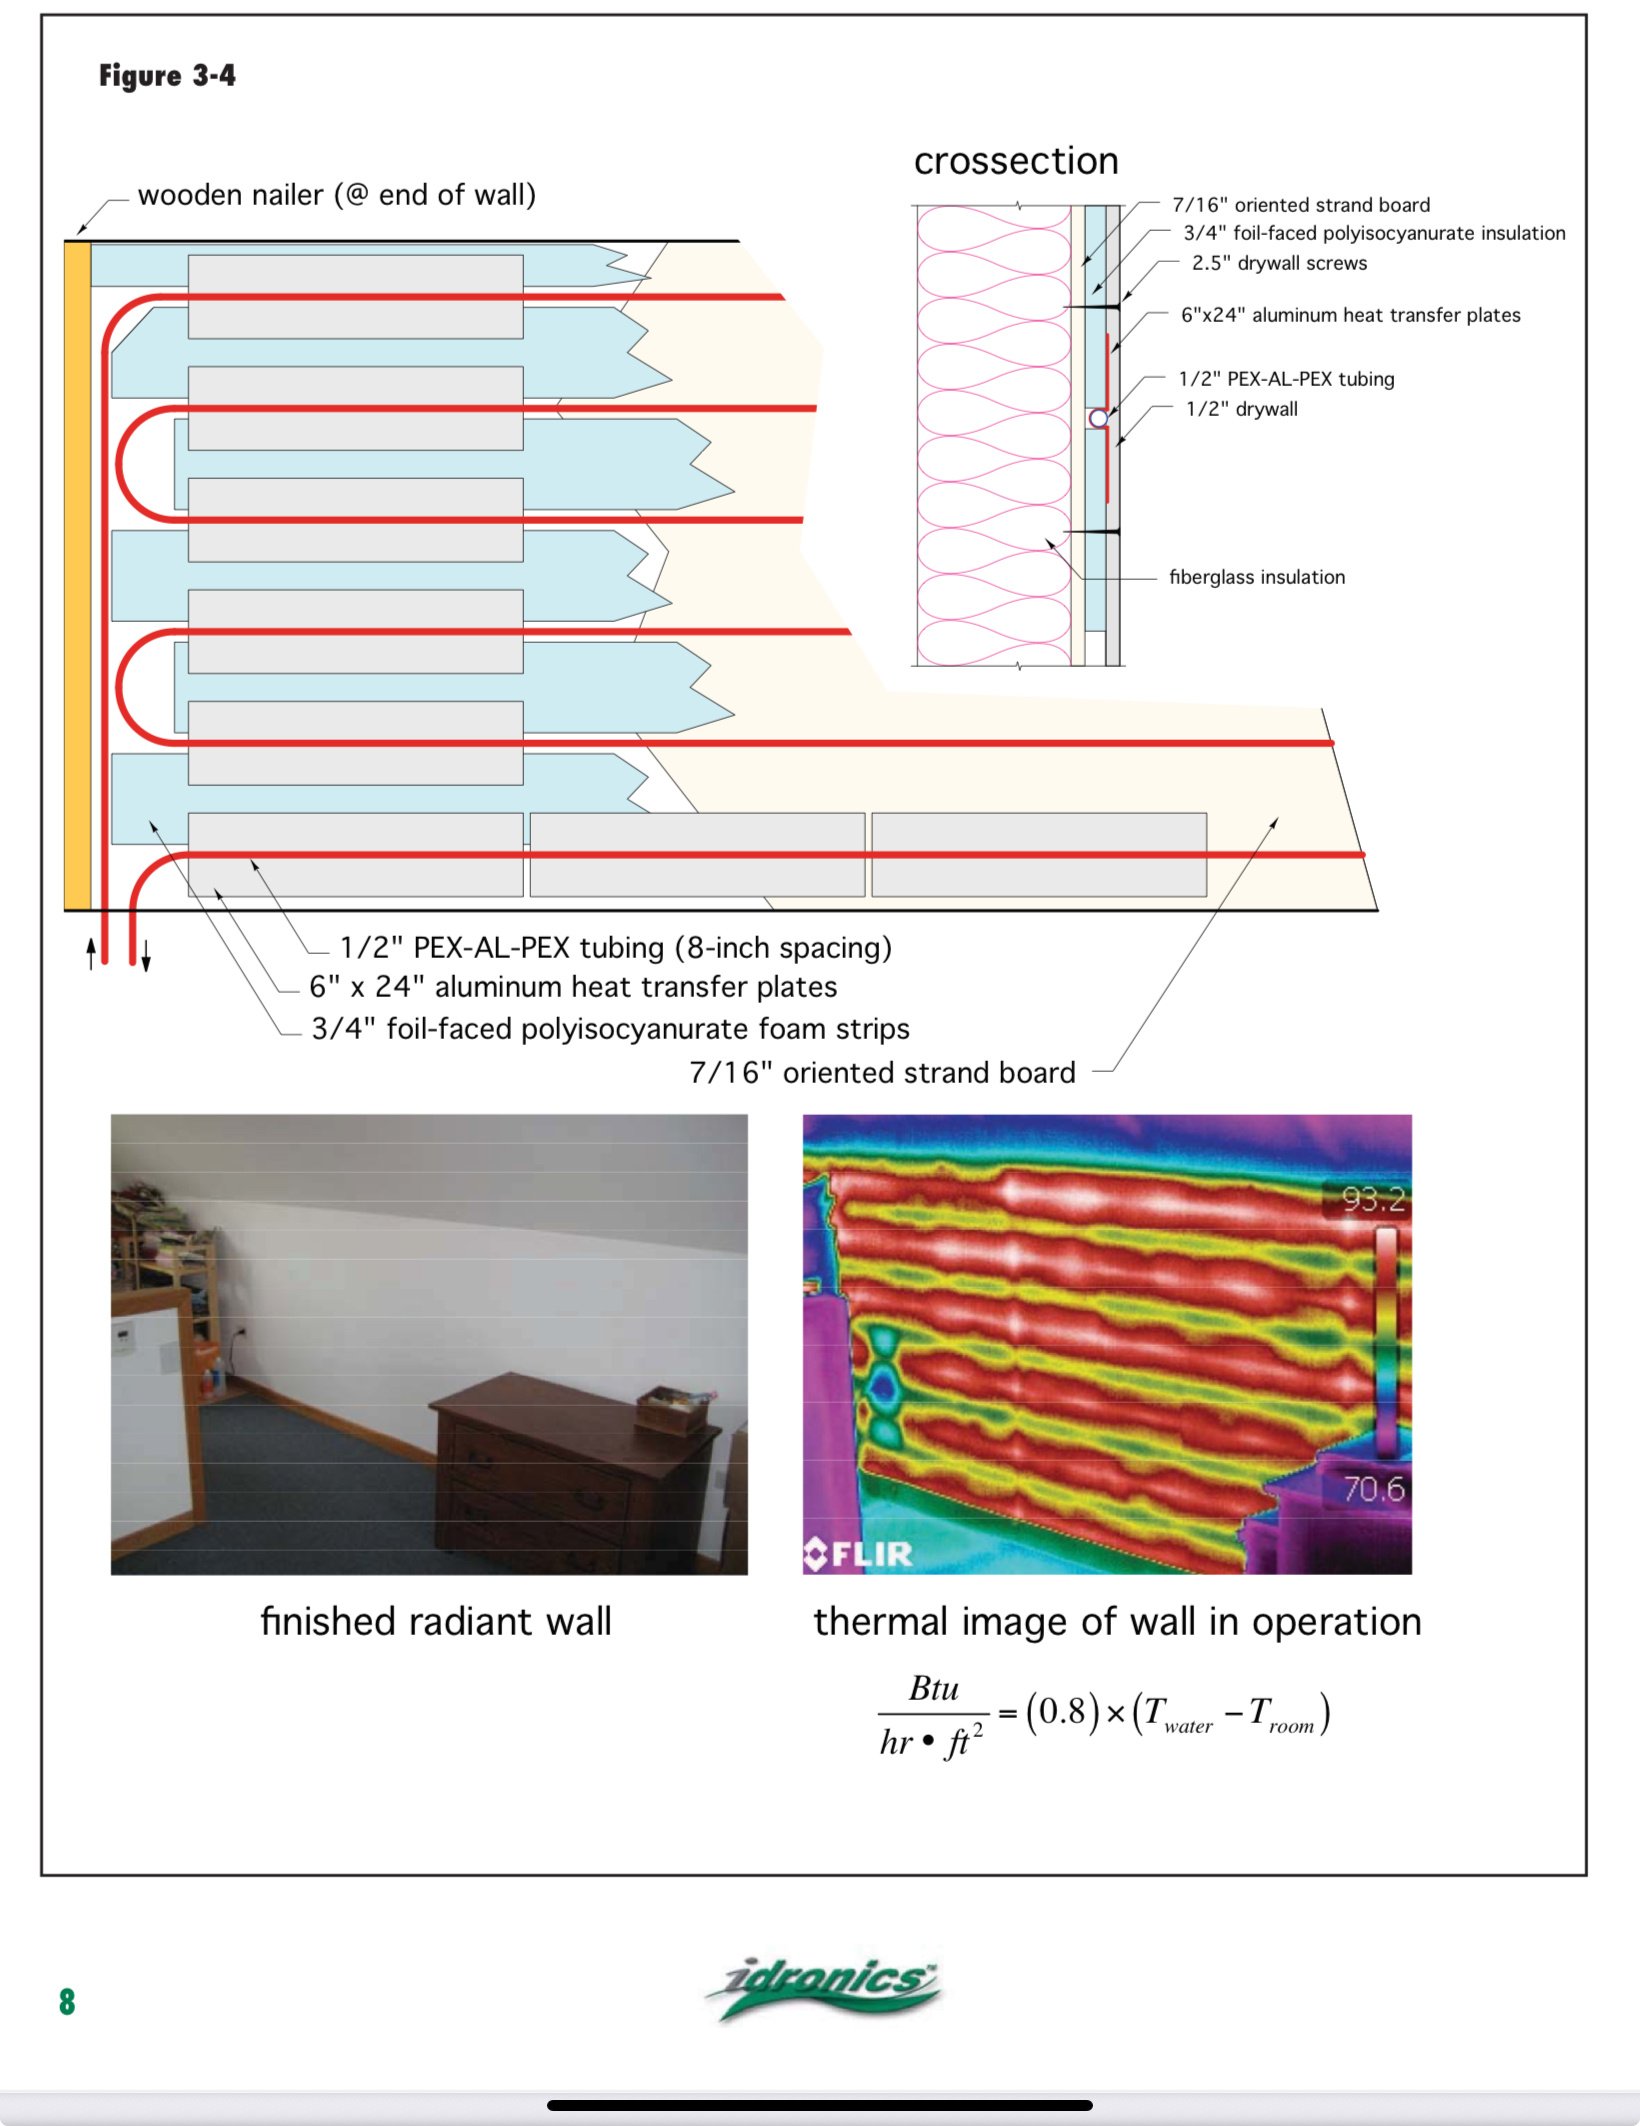
- Please see attached cross-section diagram
- Wainscoting Design Ideas: Finally, I'm looking for design ideas for the modular/removable panel itself. I need to maintain the top/bottom airflow gaps.
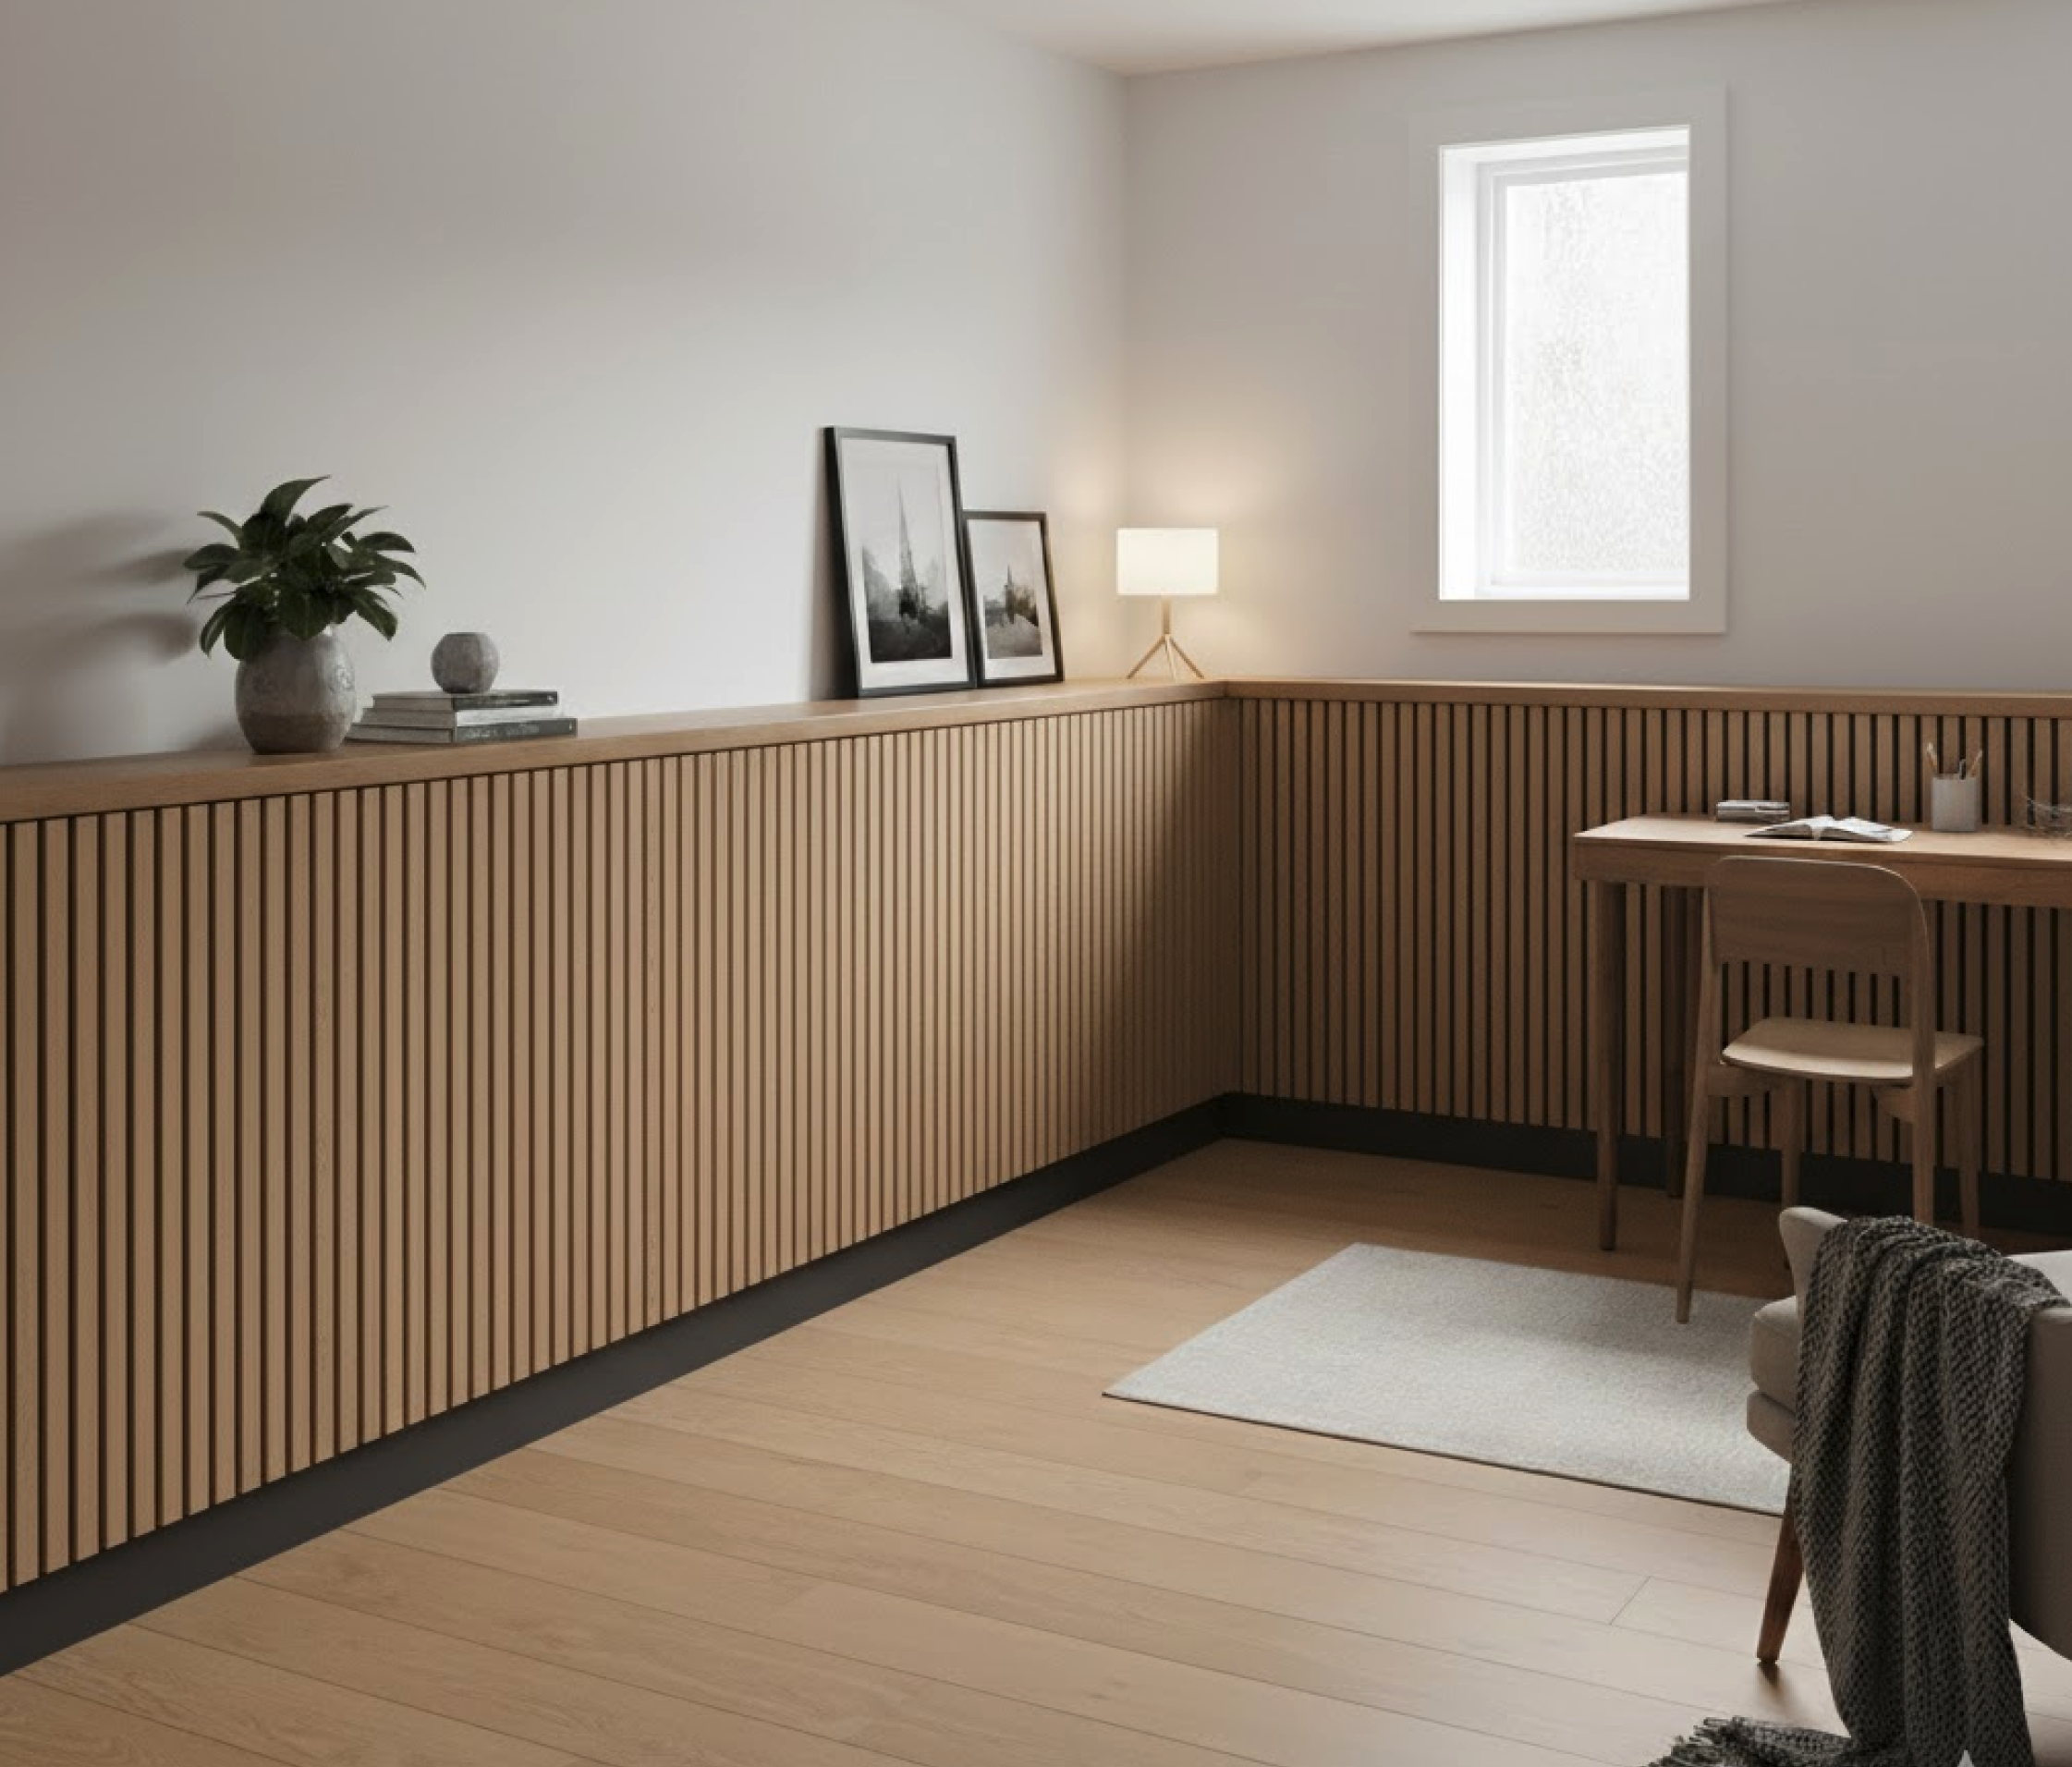
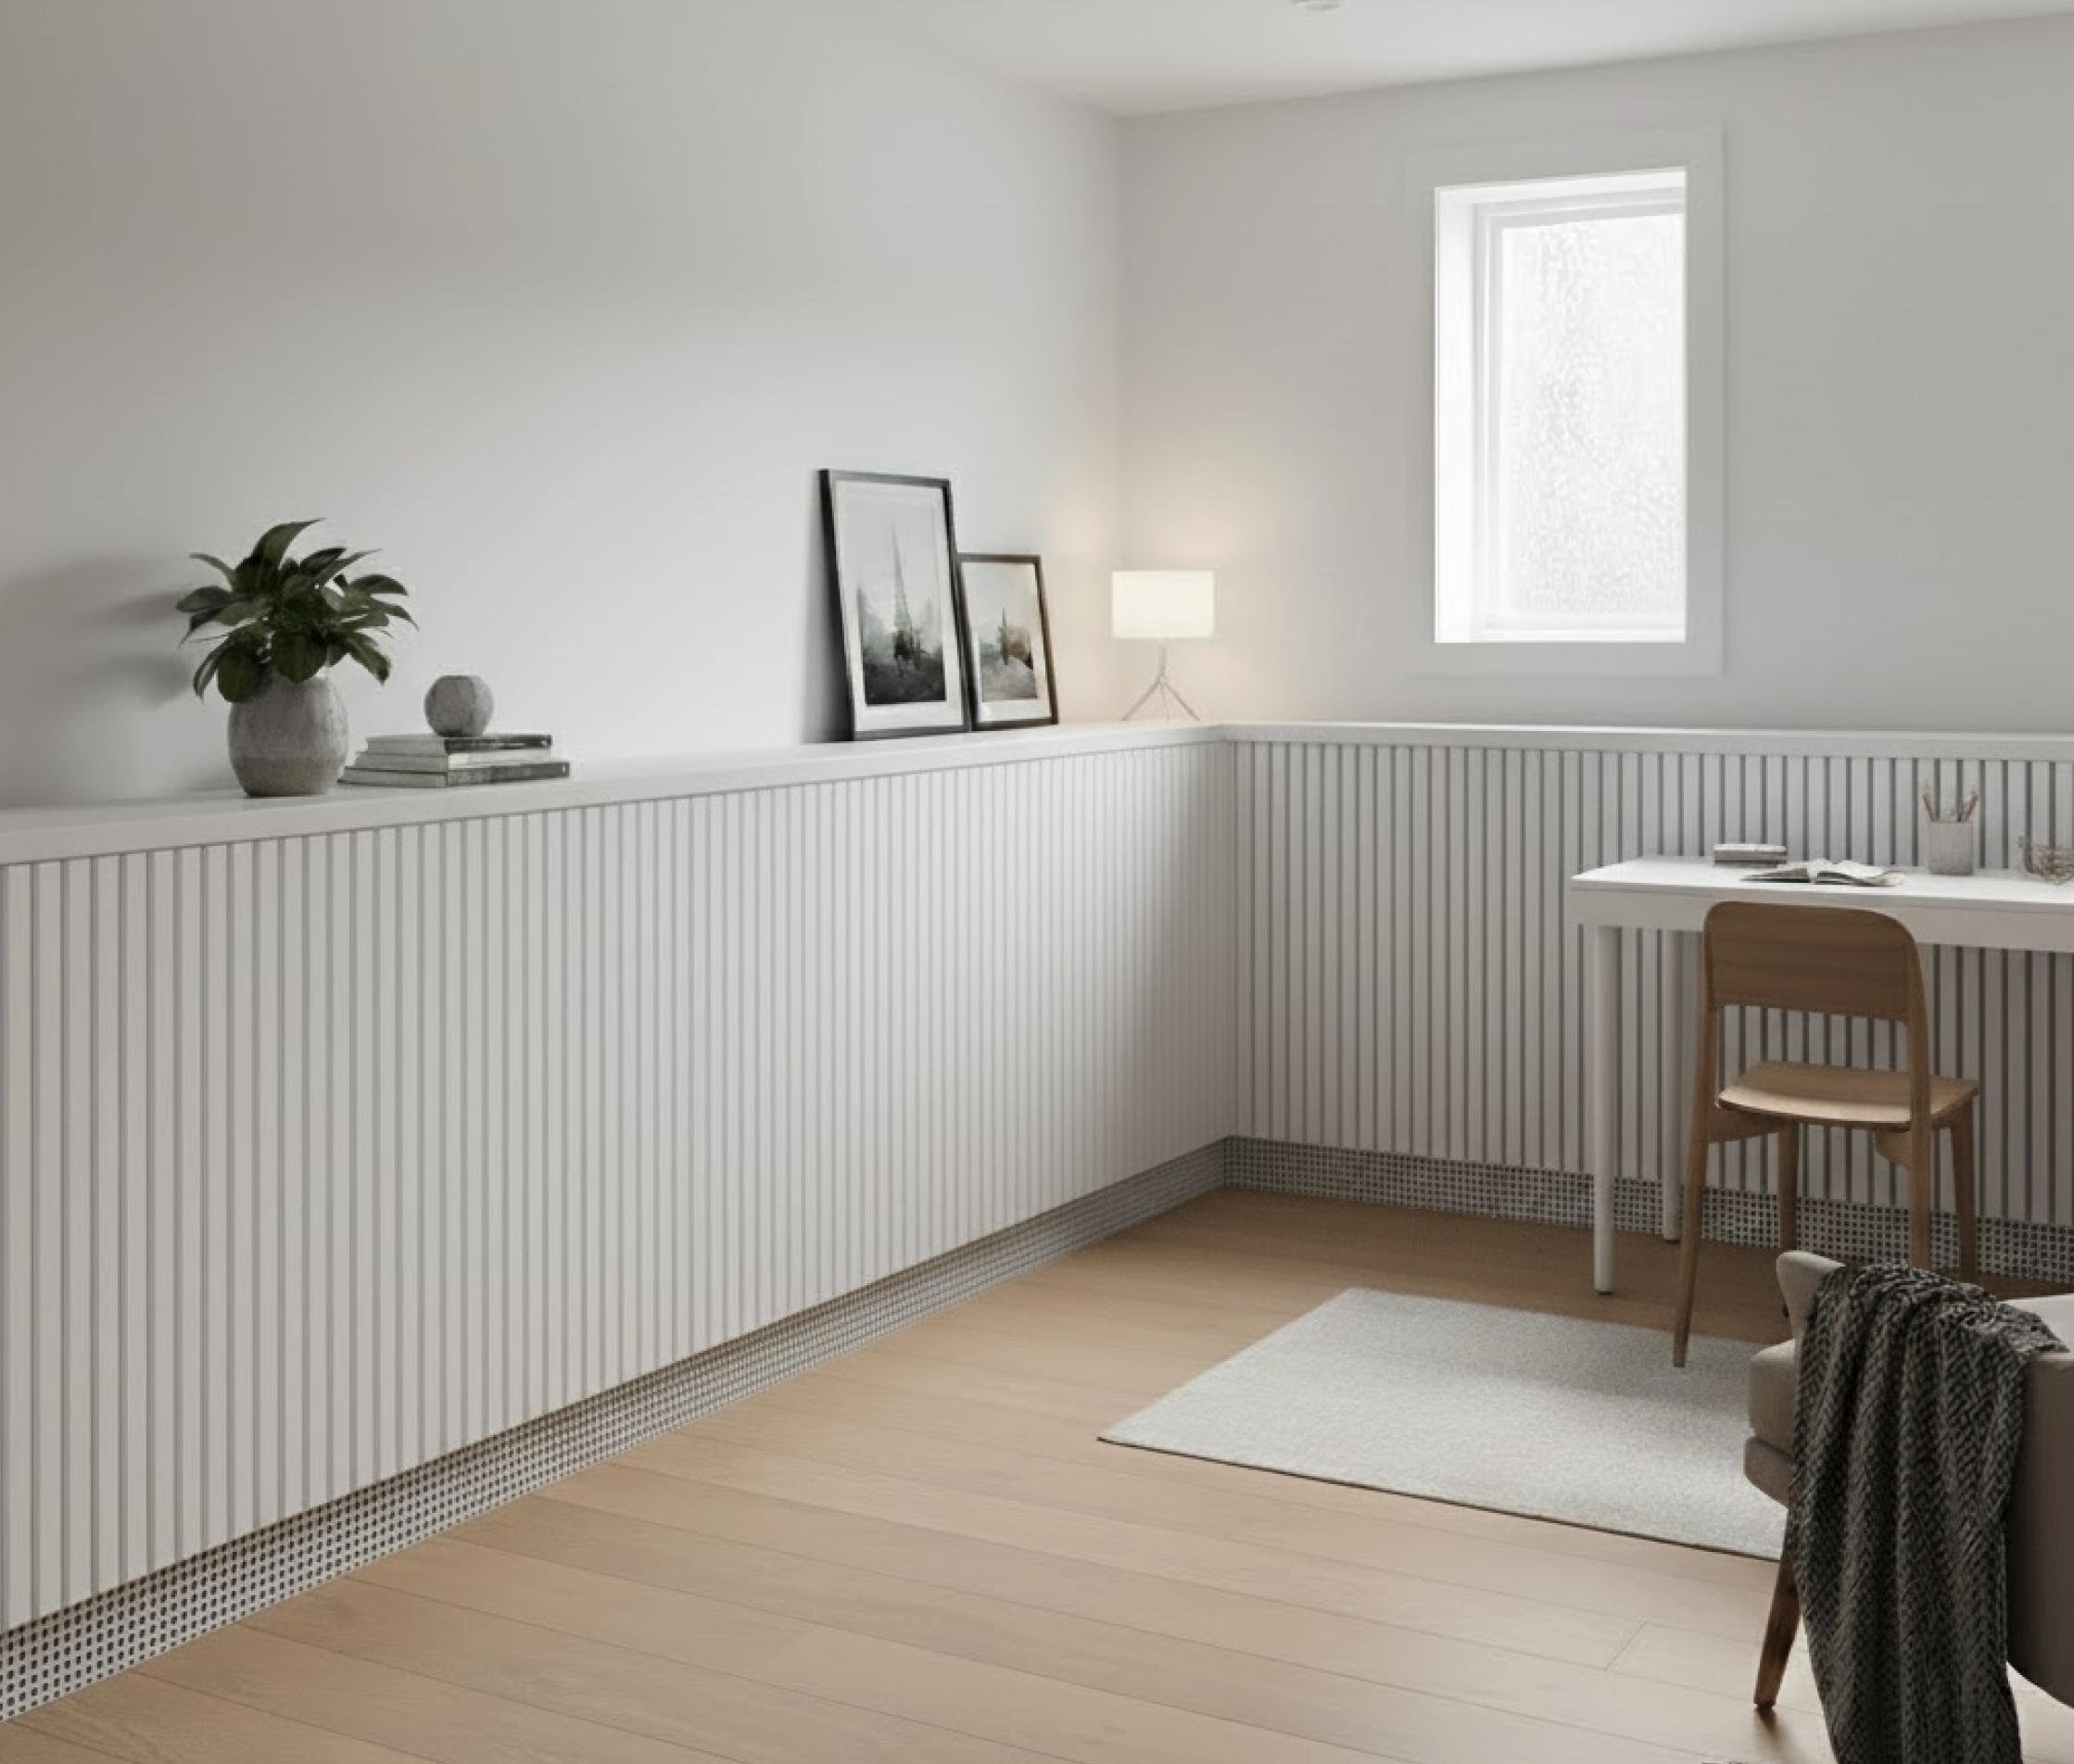
- I'm considering a classic board and batten look.
- I'm also considering a modern acoustic wood slat design. Does anyone have product recommendations for pre-made panels that would work for this? Or, any tips for building them from scratch in a way that's modular and handles the heat? (I have a full shop and rough ash lumber I can mill to dimension, so building from scratch is a strong option).
Does anyone see any major flaws in this logic, the calculations, or the build plan? Any recommendations would be hugely appreciated!
Thanks!
Comments
-
You kinda have a mix between a radiant wall and a convector wall.
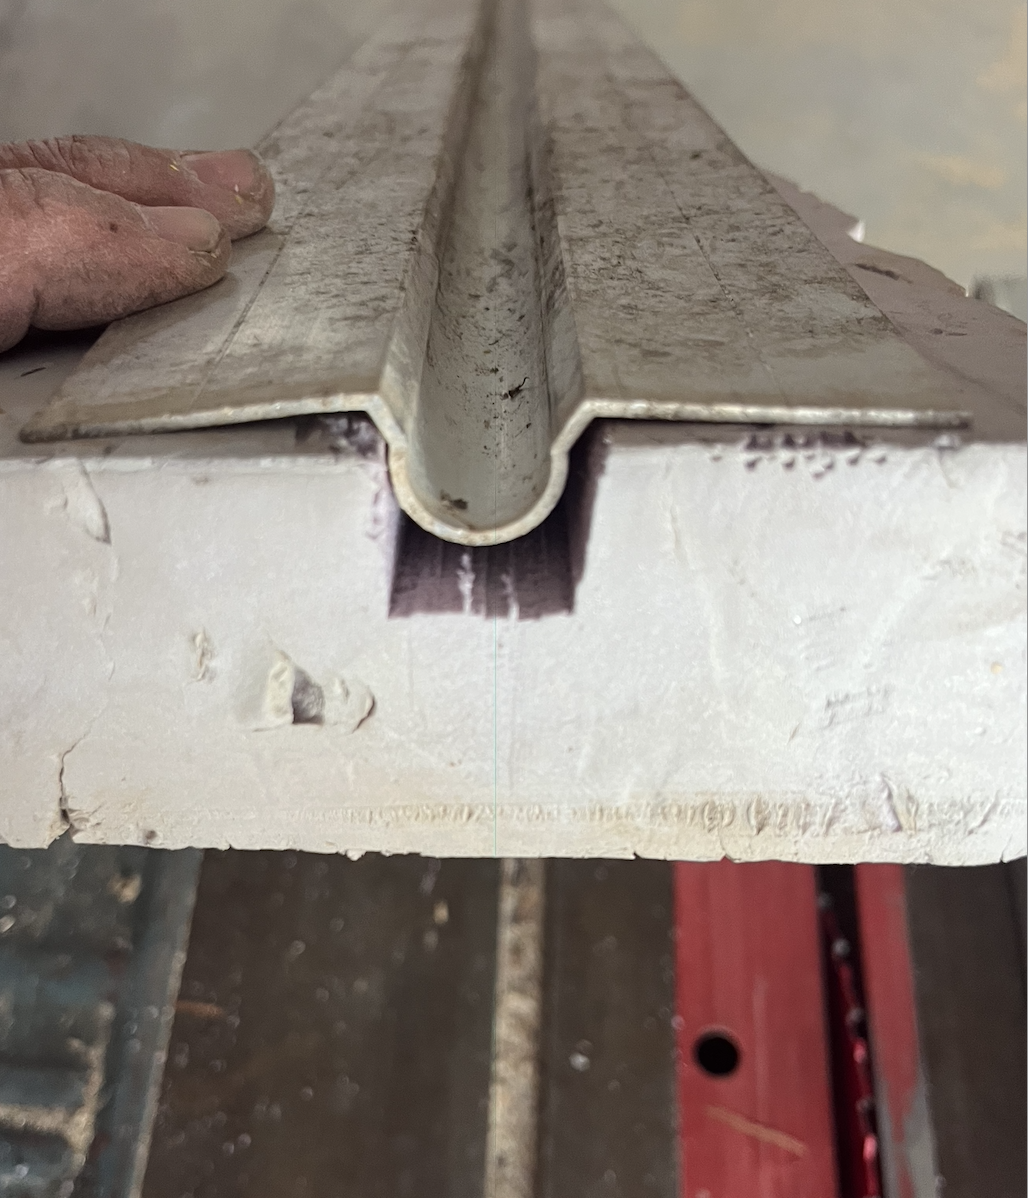
A radiant wall the fins touch the finished surface and warn it to 80- 90°. The wall becomes a radiant "panel" Generally we go up 3' with wainscoat and a chair rail at top. A radiant panel moves most of the heat by conduction. The warm tube needs to touch the final surface.
In this example the sheetrock is in contact with the transfer plates.
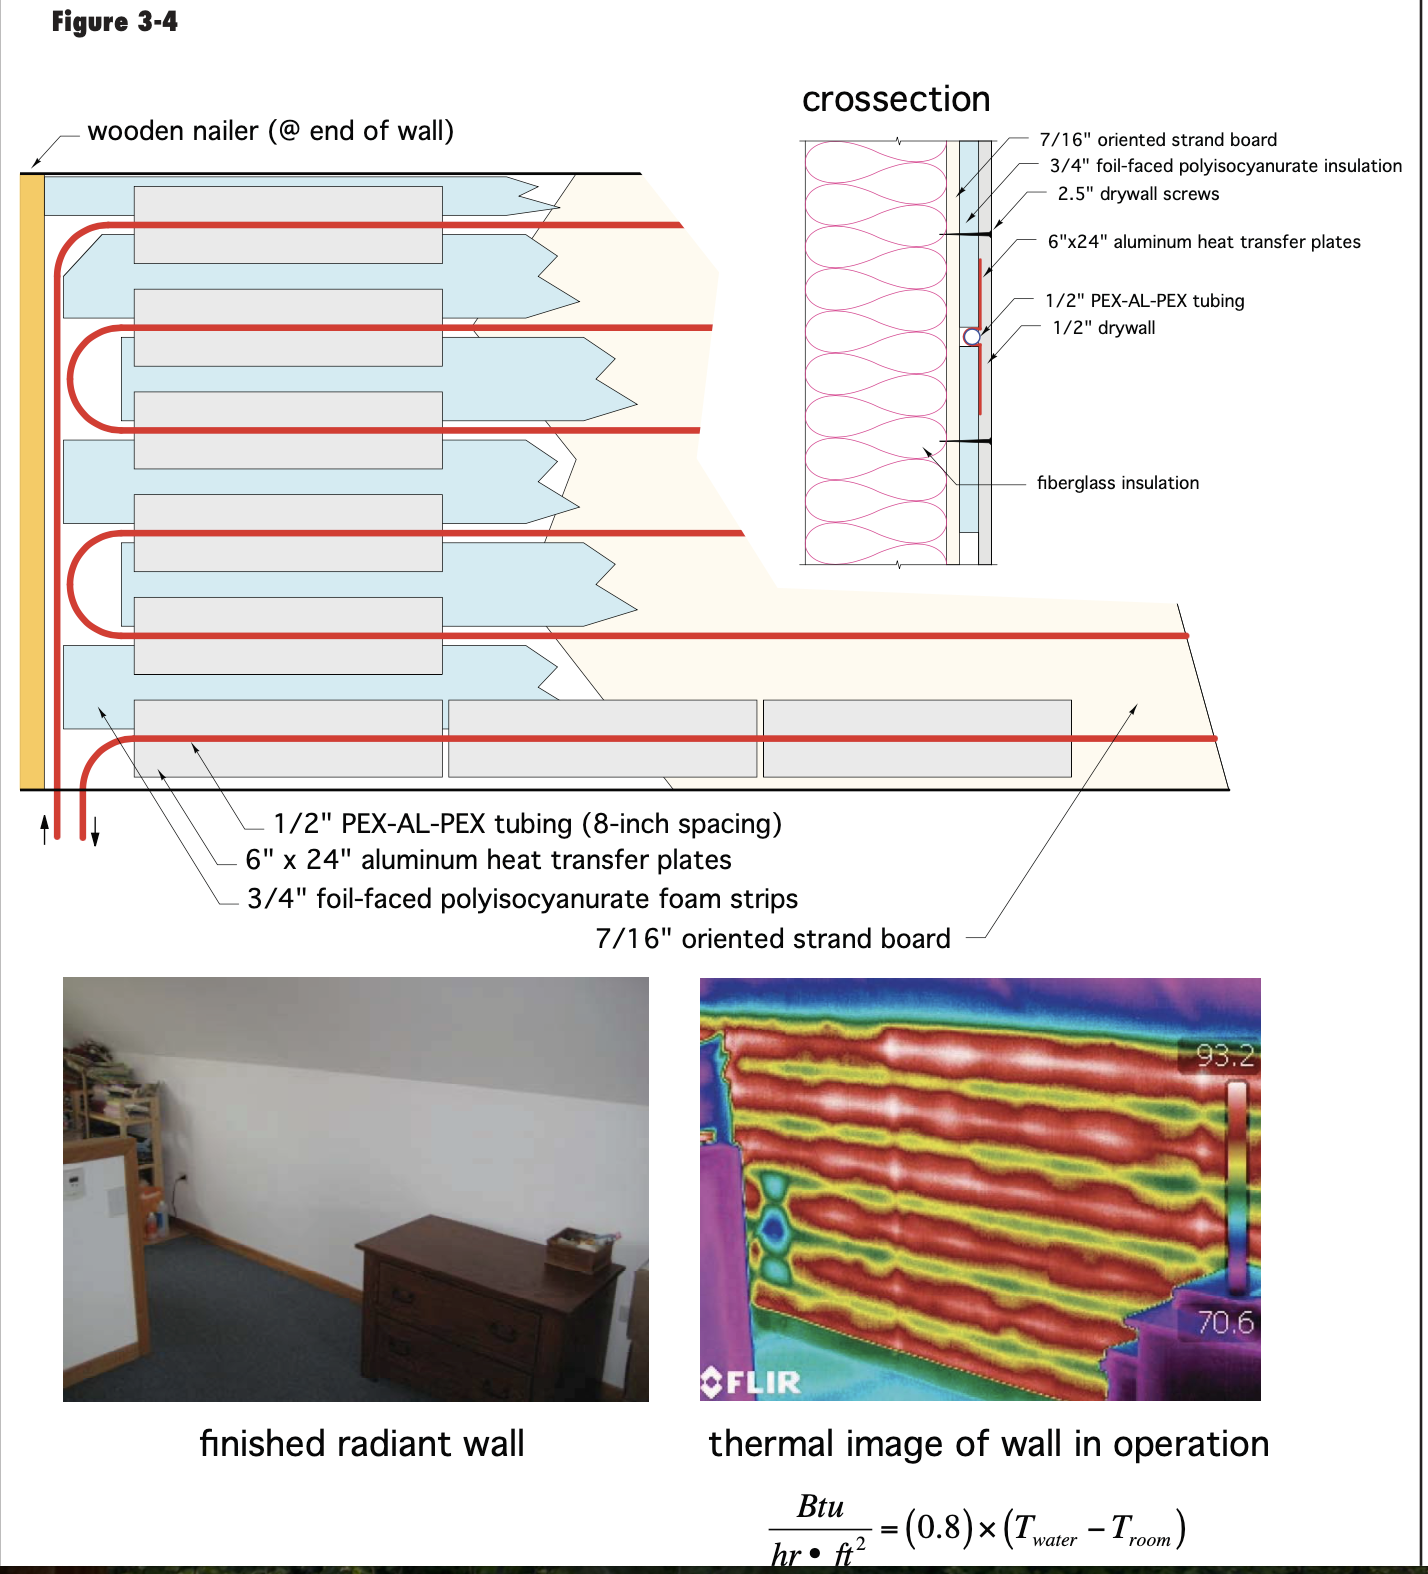
Your method depends on air currents to move the heat out of the space, so you need a lot of fin surface area and a much higher temperature.
If you look at a pieces of copper fin tube the design is many fins with a small air gap to start convection currents.
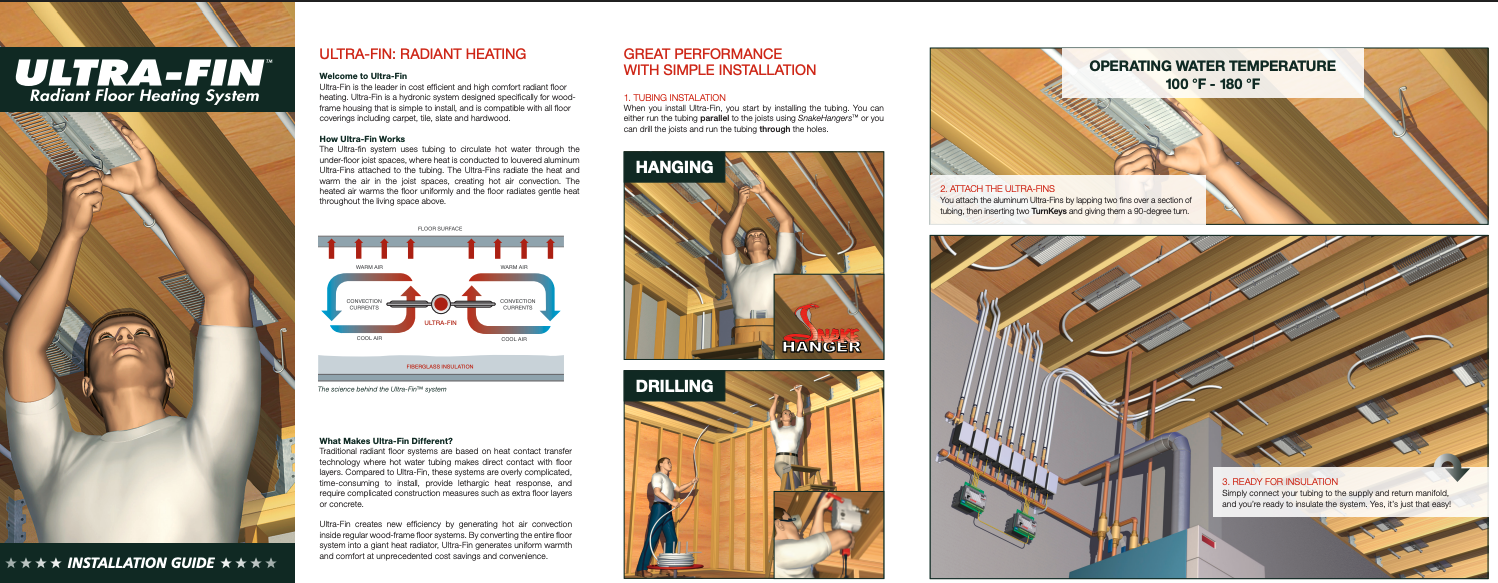
If you want to stick with that design I think you need more fin surface or a product like UltraFin that works on convection heat transfer. UltraFin from the same people that designed the Cross manifold.
If you want the convection system, just get some blank fin tube element
 Bob "hot rod" Rohr
trainer for Caleffi NA
Living the hydronic dream1 -
Oh this looks way better!
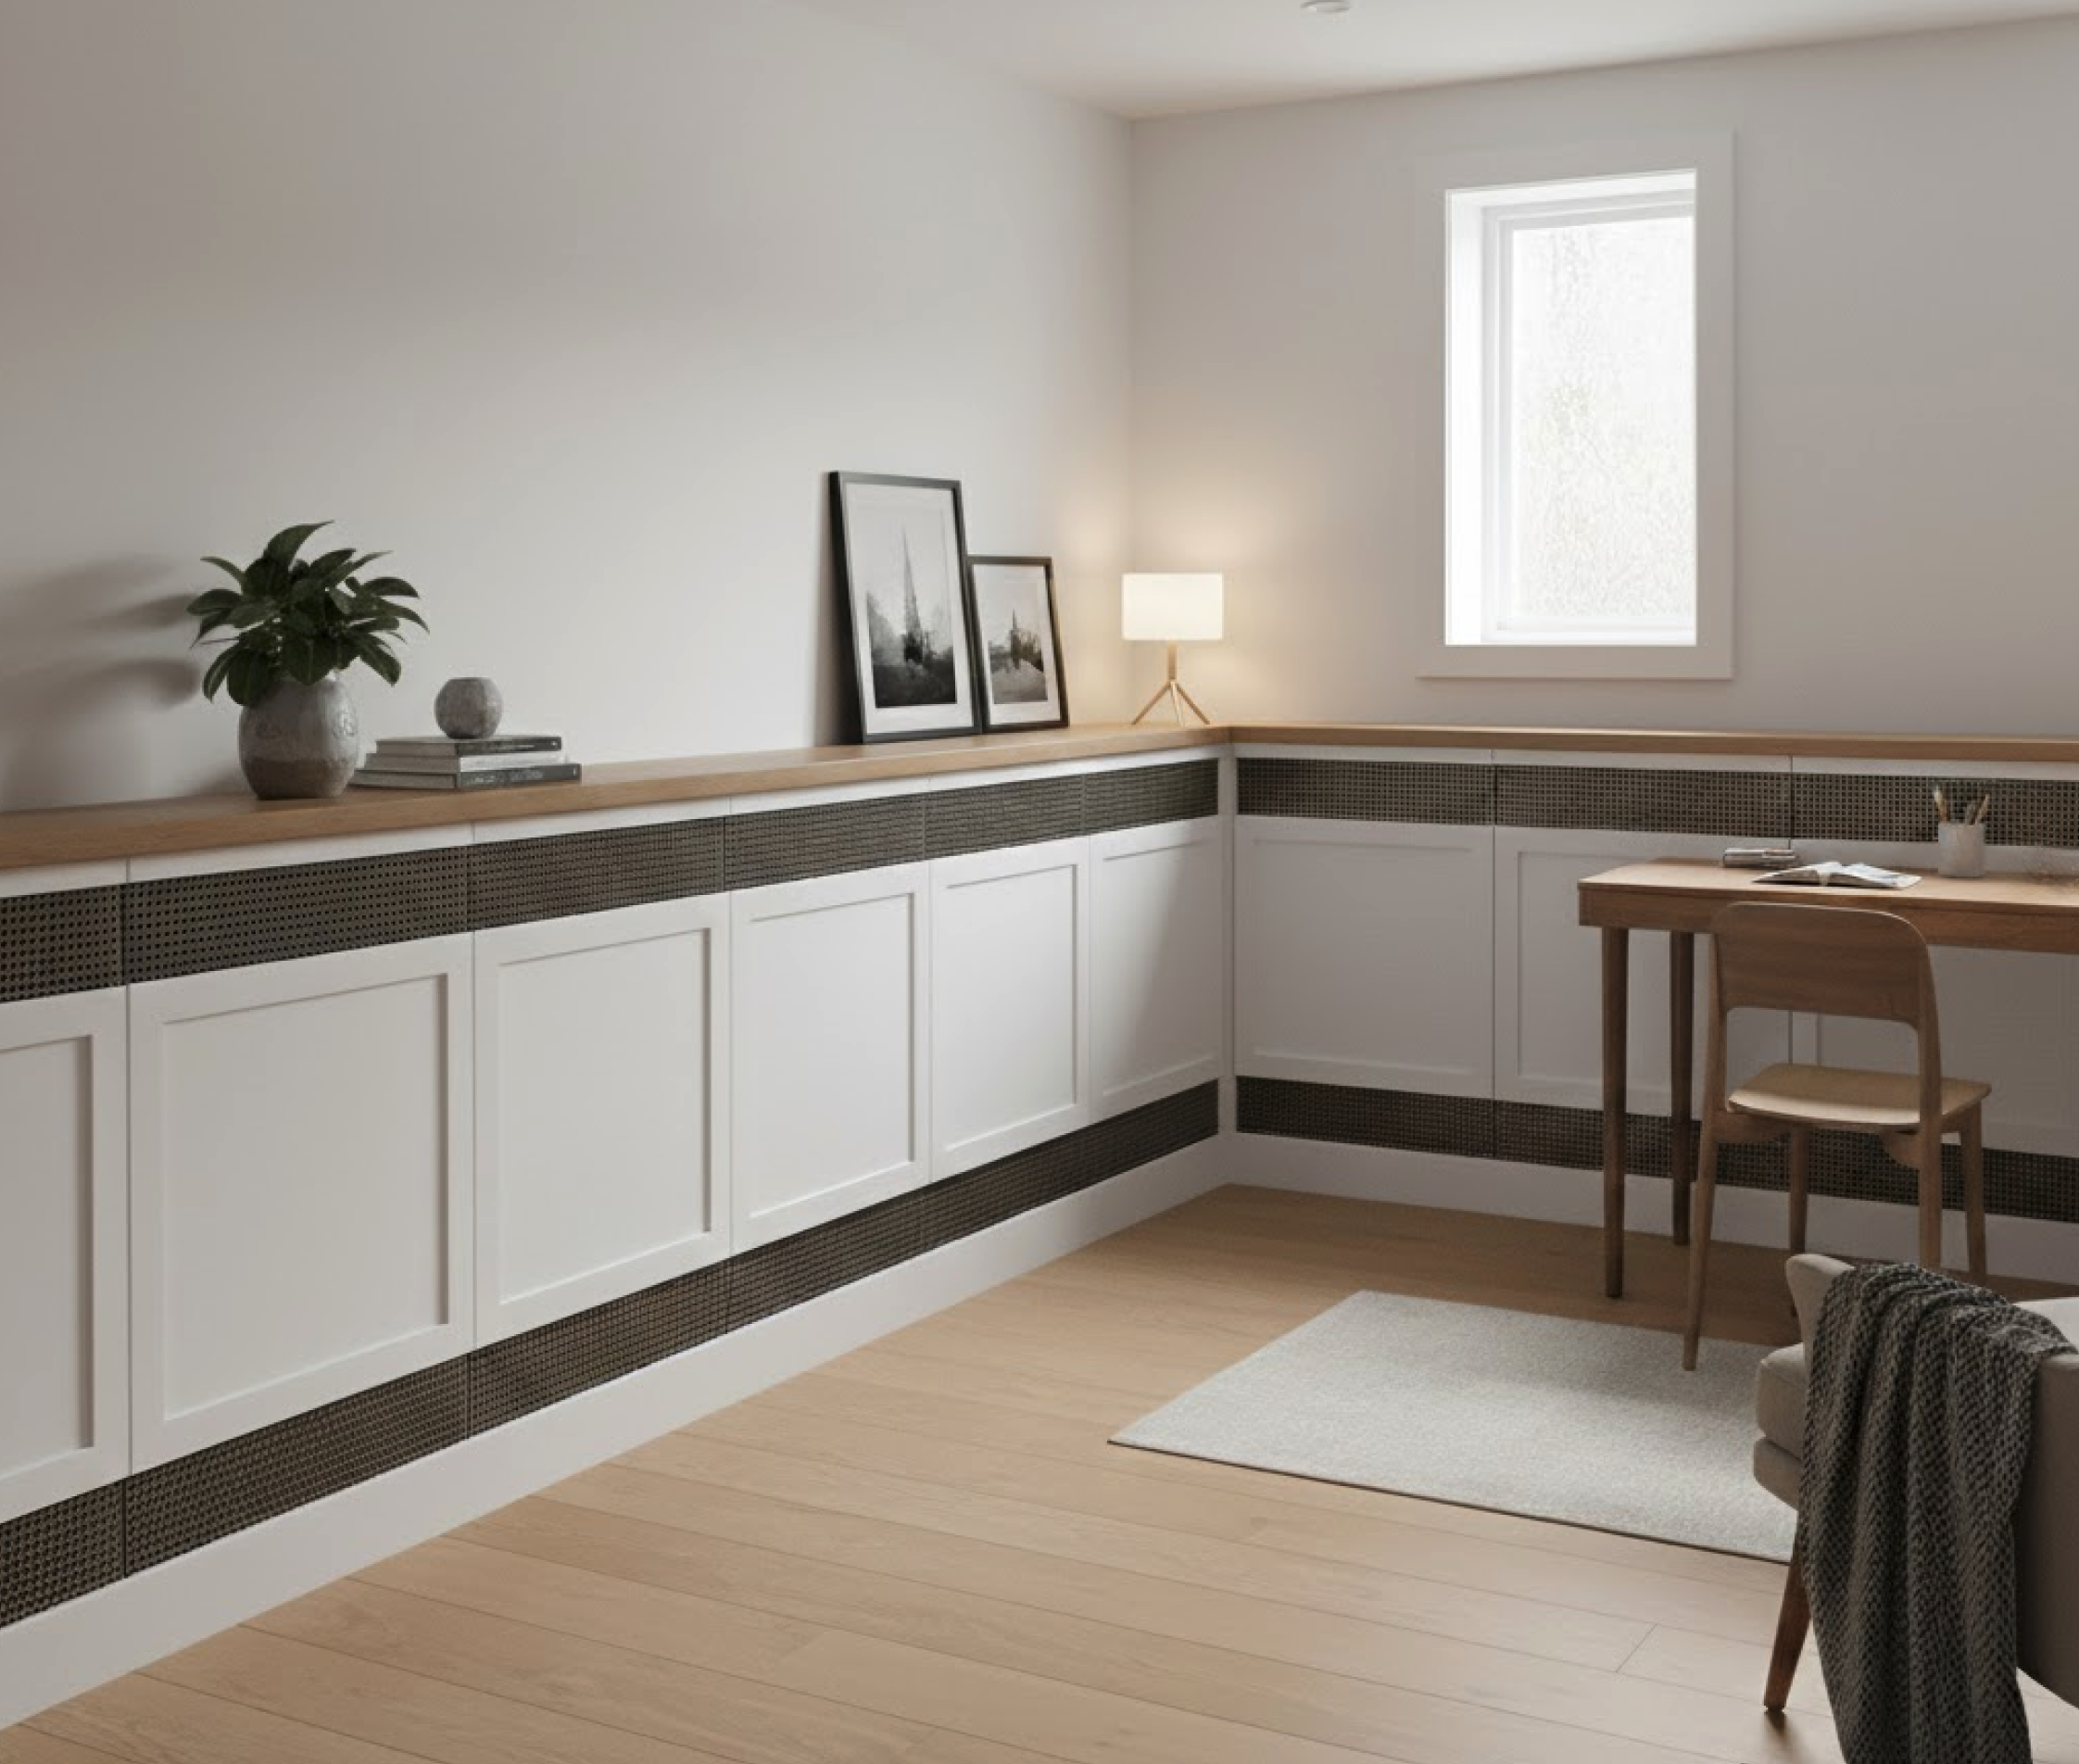
I like that it's totally radiant instead of convective. I moved away from baseboards partly because I don't like the dust smell and clinky noises, so the design you shared already seems way better to me.
Since I already have 2" thick foil foam boards, I wonder if there's a way to embed the o side of the omega fins into the face of that? Or would it make more sense to get more of the foam in the 3/4" thickness to stick to the face of the 2" stuff in order to have a mounting channel for my pipes and fins?
Since I'm attaching to concrete walls, would I just glue the thicker foam insulation board directly to that? Or should there be a gap?
I see this uses drywall as the final conductive covering. Would it also work to use any other materials, maybe like wood or something else?0 -
It's a messy job but you can router or use a saw and groove the foam for the plates to go into. I ran this 2" pink foam through the table saw a few times.
Wood could mount right onto the foam so the plates are tight against the back of the wood. No need for sheetrock and wood, it's just more to drive heat through.
Acclimate the wood on the job so it doesn't shrink too much when the heat hits it. T&G or lap wood works best to hide any movement. The key to keeping wood stable is maintaining humidity in the room. It's more about humidity that heat on the wood.
With tight, 6-8" tube spacing 90- 100 supply should be adequate.
Map it carefully so you don't nail into the tube!
3/8 tube is ideal, easy to bend. It can be done with 1/2" also, clip the tube loop ends so it doesn't try and pop out of the plates until the wood is on.
I prefer the thicker plates like this Radiant Design Omega plate (Bozeman, Montana) This one is bent a little on the end, they should lie flat in the foam channel
If the tube is not tight in the plate and the plate tight against the wood you may get some "oil canning" noise as it heats up. The thin plates are famous for that ticking noise.
Use hidden screws for the wood just in case you need to get back into the assembly. T&G with a blind screw in the tongue is ideal.
 Bob "hot rod" Rohr
trainer for Caleffi NA
Living the hydronic dream1 -
As a homeowner and do-it-yourselfer, you can count me in as a vote for radiant wall panels. This is my experience.
I have 6' x 6.5' entryway ( officially an artic entry as I live in Anchorage, Alaska) with three interior walls and an outside wall with a door. There was no heat in that room and retrofitting radiant heat in or under the raised floor wasn't possible without removing the ceramic tile and subfloor. It was not super cold, but for 24 years it was uncomfortably cool during the six month heating season.
I opened the back of a 2.5' wide section of wall which was the widest section I had with no doors in it, and in it I installed about 25' of 4" X .016" omega plates and 1/2" PEX from floor to ceiling. Plates were glued and stapled to the back side of the 5/8" drywall. There are 1" thick strips of of styrene foam between the tubes backed by r-14 fiberglass in the wall to keep the heat from bleeding into the adjacent interior room. (Although polyiso foam is frequently suggested, it isn't available here in the retail market and I don't expect to ever have the water temperature exceed the max allowed for styrene foam.) Temperature control is with a thermostatic radiator valve and thermostat which allows variable flow instead of the on/off of a zone valve.
You might consider drywall instead of wood. It would serve as a thermal mass and might help spread the heat slightly more evenly. The style of wainscotting in your third photo could be done with drywall and applied strips of wood.
My vote is for adding 1" foam strips rather than grooving the Styrofoam. Hot Rod is right, I've done a lot of it, and cutting foam with a table saw or router is really messy business.
I installed my radiant wall before the last heating season and I love it. Instead of a slightly uncomfortable cold area, it is comfortable and the bit of warmth that radiates from the wall is a sheer joy.
1 -
Ok thanks guys. I will plan to add strips of 1" foil faced foam board, on top of the 2" foam board, to act as the final backing and create grooves for the fins and piping.
I'm thinking I want to avoid the addition of furring. Instead I'll use construction adhesive to attach the 2" thick foam board layer to the concrete walls, followed by the 1" thick foam board strips (also glued on), with the aluminum fins glued on top of that. Finally the piping will go in, along with some 100% silicone.
Which glue and/or silicone product(s) would you recommend for each of these layers?0 -
no need to use foil backed insulation, either pink, blue board or the white bead board.
But I think the white breadboard may have foil on one side anyways?
You need to use foam adhesive, regular construction adhesive will eat into the foam and not hold. Unless it specifically states foam compatibility. I get this Loctite brand from Home Depot
Expanding spray foam cans work also, but messy to use and you need to keep pressure on the foam or it pushes off the wall
 Bob "hot rod" Rohr
trainer for Caleffi NA
Living the hydronic dream1 -
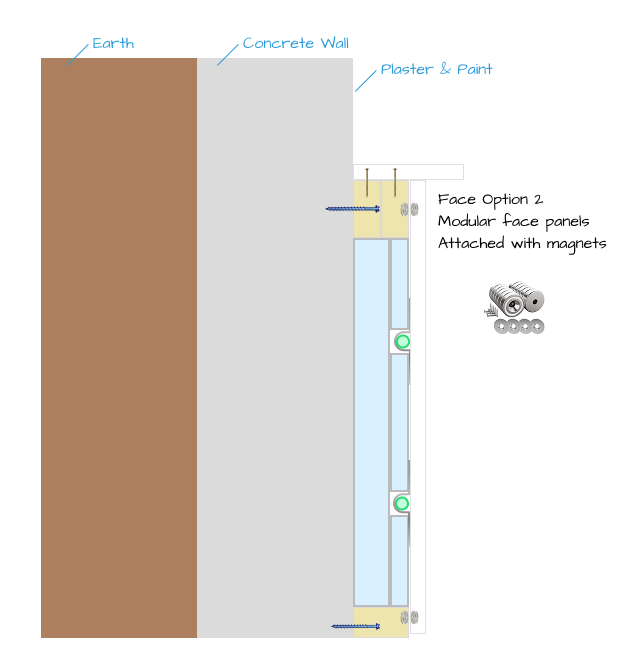
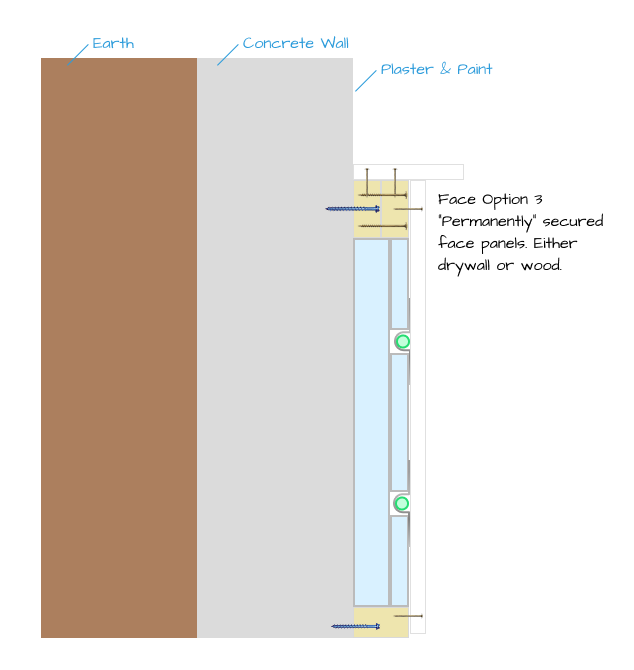
Ok, updated plan with 3 options for attaching the faces. Option 1 uses modular panels attached with french cleats. Option 2 is modular, attached with magnets. Option 3 is "fixed".

 0
0 -
it comes down to how much time, energy and $$ you want to throw at it.
All the wall and ceiling radiant I have installed or worked on is buried in Sheetrock, a tile set, or behind nailed on wood if some sort, option 3
Even nailed on wood or Sheetrock could be removed😗 Tiled surfaces are a bit more permanent
Bob "hot rod" Rohr
trainer for Caleffi NA
Living the hydronic dream0 -
A question: what does this get you that a panel radiator doesn't?
You can model something like this all you want, but at the end of the day you don't know how much heat it's going to produce until you turn it on. There's a real risk that it ends up not producing enough to meet your heating load.
With a panel radiator, the heat output has been tested.
0 -
it a surface area game with a radiant panel. The wall has a lot of sq ft, so it will run at a lower temperature than a panel radiator. And two, in this case the selling feature, it is invisible. No obstruction in the living space to furnish around.
The heat output of any radiant panel is predictable. In this case the formula is near identical to a panel radiator.
Although some panel radiators have a convection component. Space between the chambers with a finned metal partition. That will factor into the output.
It will also move dust around
The output from a radiant wall, ceiling, or floor are fairly close. The ceiling and walls can run higher surface temperatures= higher output compared to a floor panel.
The walls have a slight edge over a ceiling as you will get some temperature stratification with ceiling radiant, lowering it’s output a bit compared to a wall
Some of the old electric radiant ceilings ran pretty hot. Too warm to keep your hand in for a long period. Being tall, they make my head uncomfortably warm.
Bob "hot rod" Rohr
trainer for Caleffi NA
Living the hydronic dream 1
1 -
Couple of follow up questions:
Is there a faster-acting glue product than the pl300? My foam and walls aren't straight so I have to hold it in place while curing and it's not going great so far. Or maybe I could combine the pl300 with some spots of something faster?
What clips would you use to supplement the silicone to hold the pipe in place?How would you handle turning the corners of the room with the pipe?
0 -
I use tapcons and fender washers to hold foam against concrete.
If you are lucky and a good aim, concrete nails and fender washers.
For a tight turn you need to use an ell.
Clips to hold the pex in heat transfer plates?
Bob "hot rod" Rohr
trainer for Caleffi NA
Living the hydronic dream0


Categories
- All Categories
- 87.7K THE MAIN WALL
- 3.3K A-C, Heat Pumps & Refrigeration
- 59 Biomass
- 430 Carbon Monoxide Awareness
- 127 Chimneys & Flues
- 2.2K Domestic Hot Water
- 5.9K Gas Heating
- 121 Geothermal
- 170 Indoor-Air Quality
- 3.8K Oil Heating
- 79 Pipe Deterioration
- 1.1K Plumbing
- 6.6K Radiant Heating
- 396 Solar
- 16K Strictly Steam
- 3.5K Thermostats and Controls
- 56 Water Quality
- 51 Industry Classes
- 51 Job Opportunities
- 17 Recall Announcements