Low water cutoff not working after cleaning pigtail

Hi all,
I'm getting my home steam boiler ready for the winter. I haven't used it since last winter. A pigtail runs from the top of the LWCO through a pigtail to the pressuretrol. I removed the wires from the pressuretrol, unscrewed the pressuretrol, and removed the pigtail. I then cleaned the pigtail using hot water till the water ran clean through the pigtail. I then screwed in the pigtail and the pressuretrol and rewired the pressuretrol. I filled the boiler with clean water and fired it up. I then wanted to test the LWCO. It has always worked in the past. I opened the valve on the bottom of the LWCO and emptied it and the boiler didn't shut off. I let the boiler cool down, filled it again, fired it, and opened the valve on the LWCO. Again, the boiler wouldn't shut off. Any suggestions on what should I check? I guess it could be coincidence, but I'm not sure.
Thanks,
Gregg
Comments
-
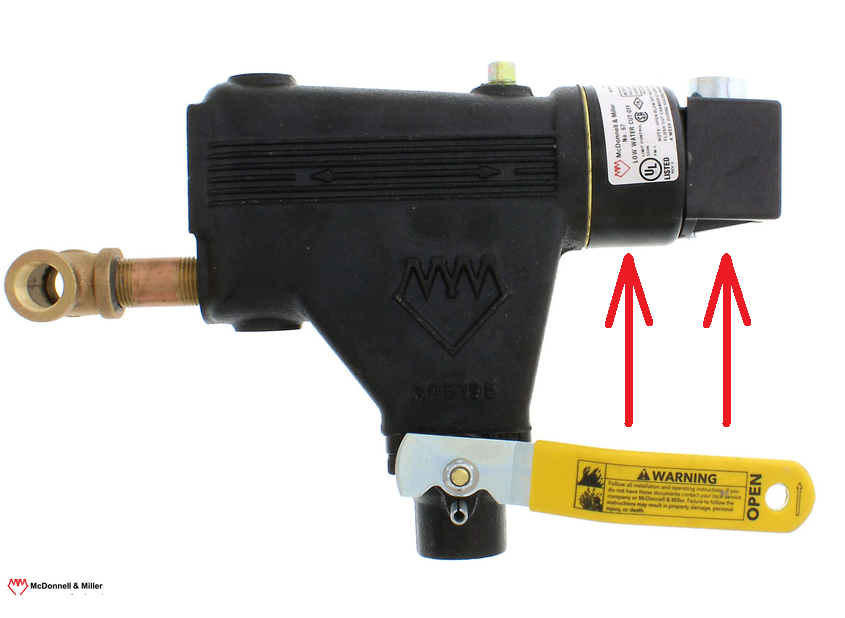
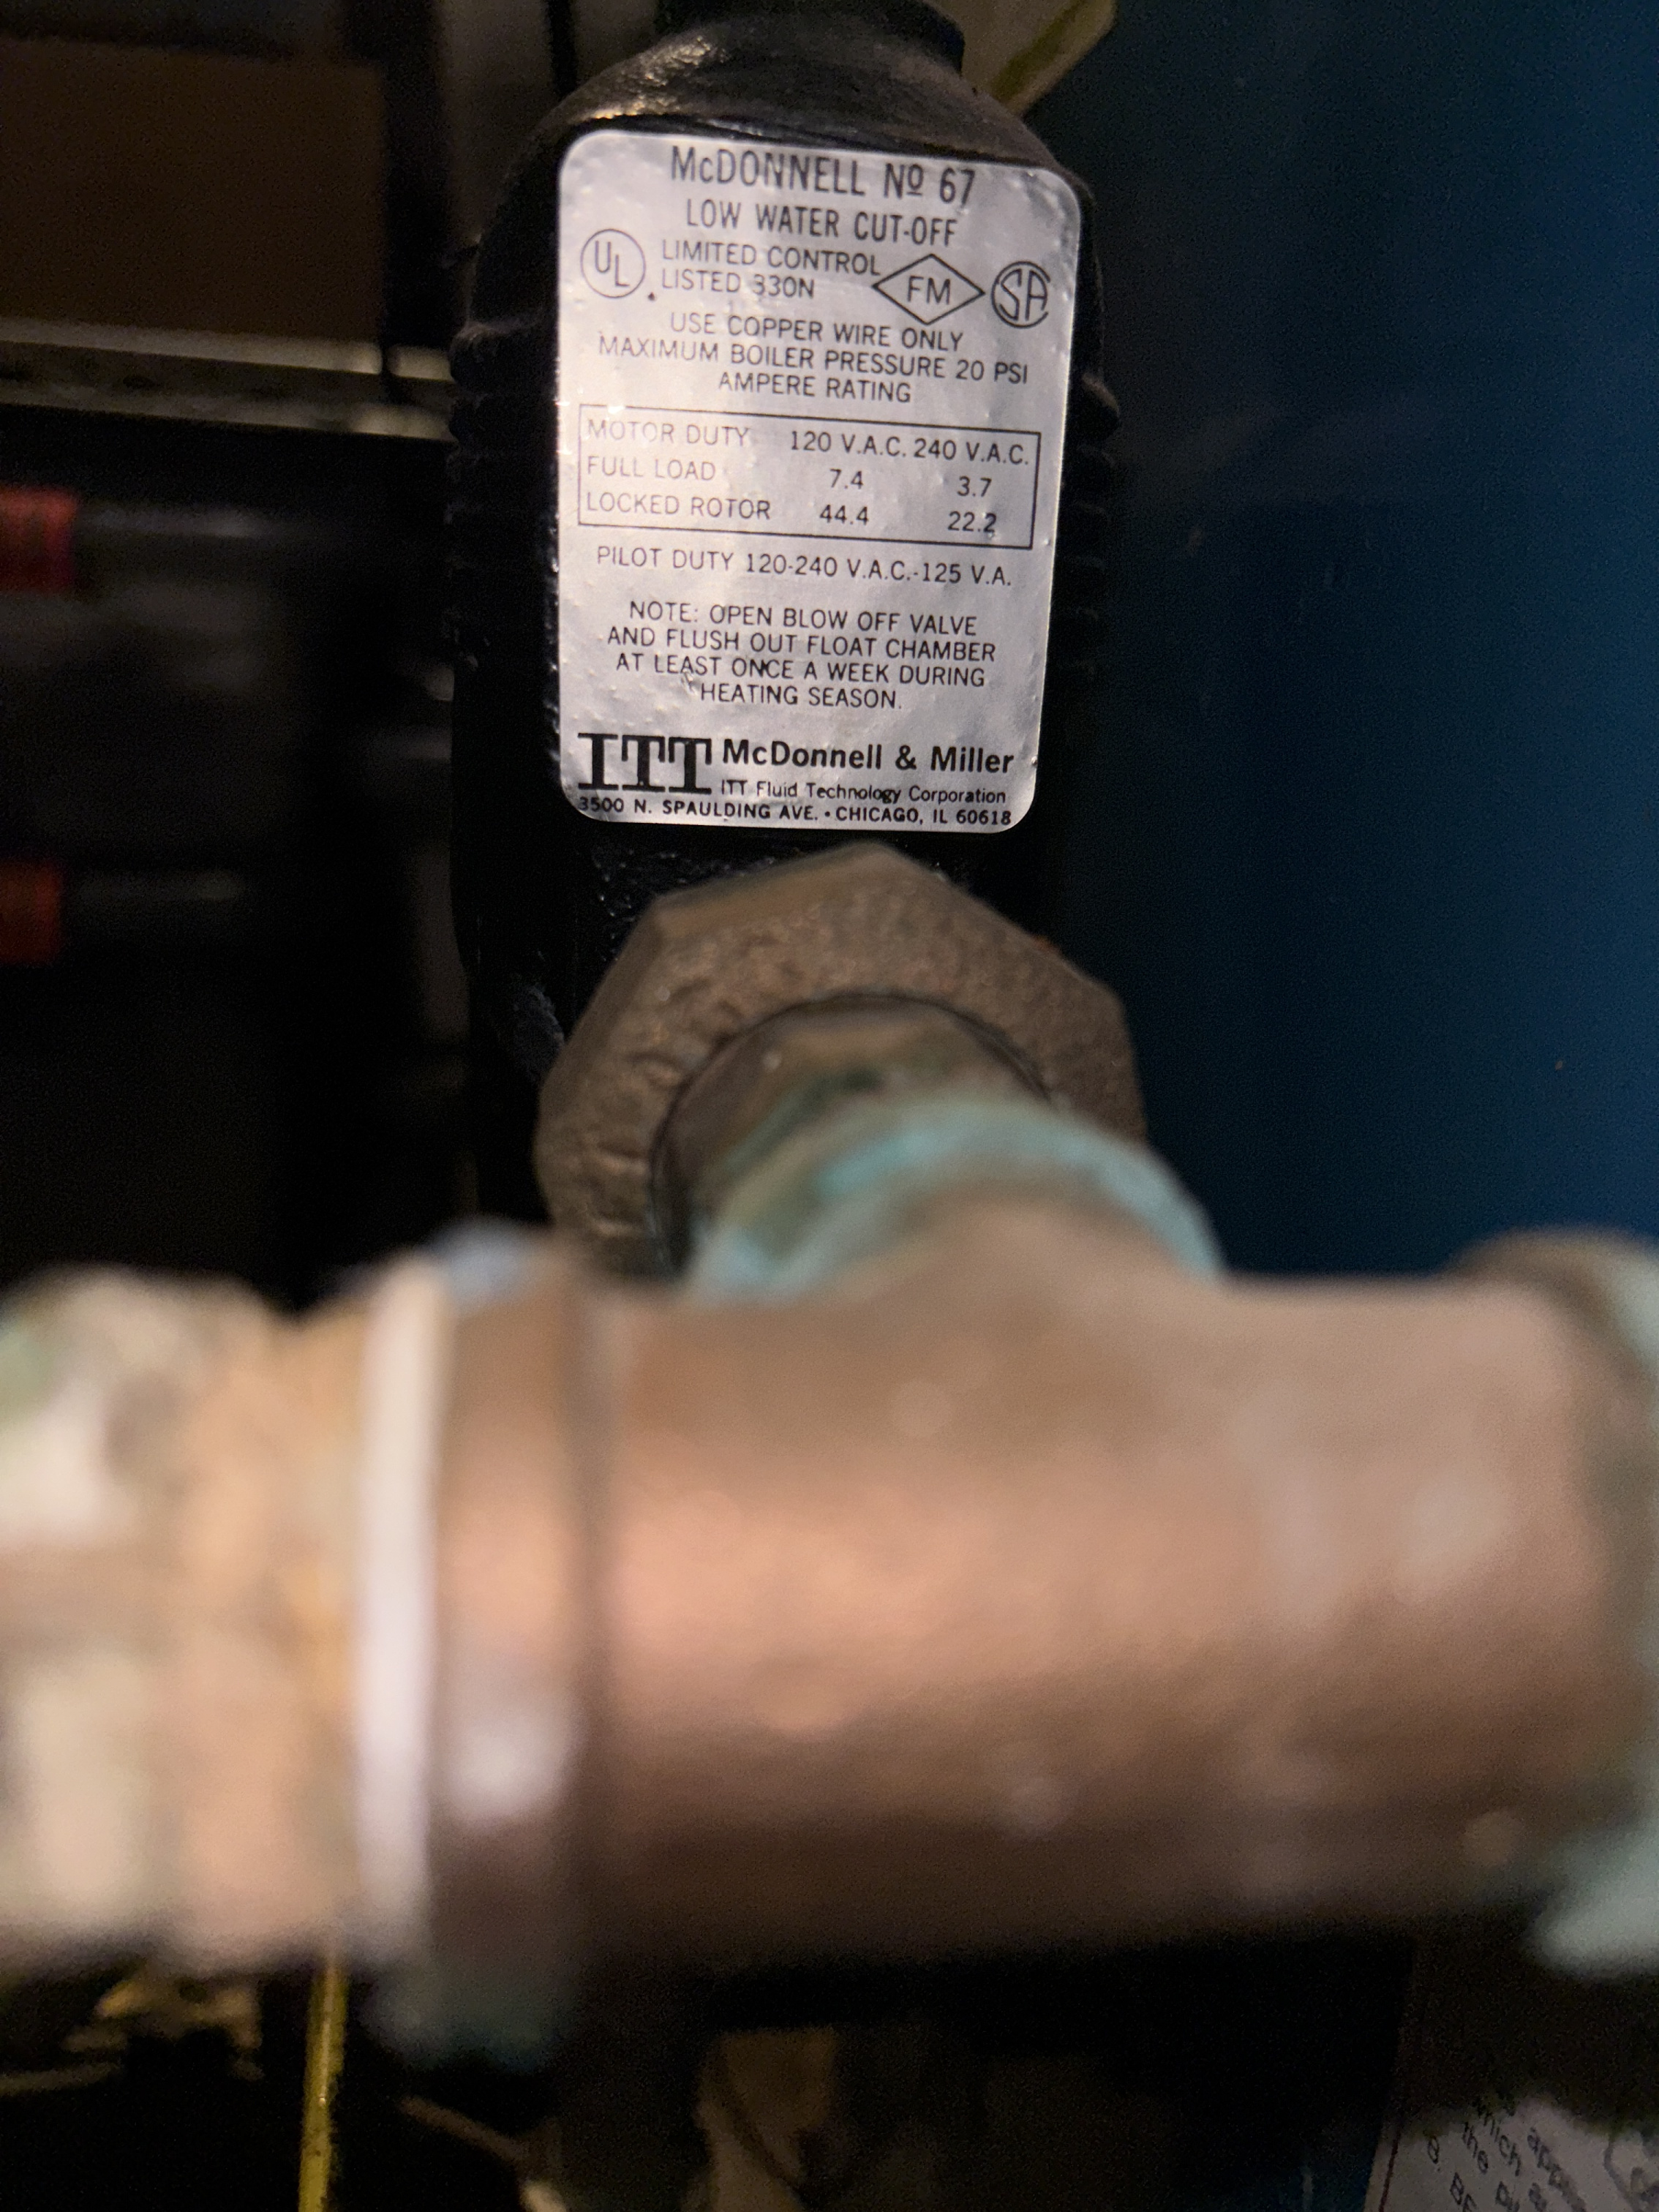
Assuming you have a number 67 low water cutoff. The black thing with the lever. The float might be stuck.
 1
1 -
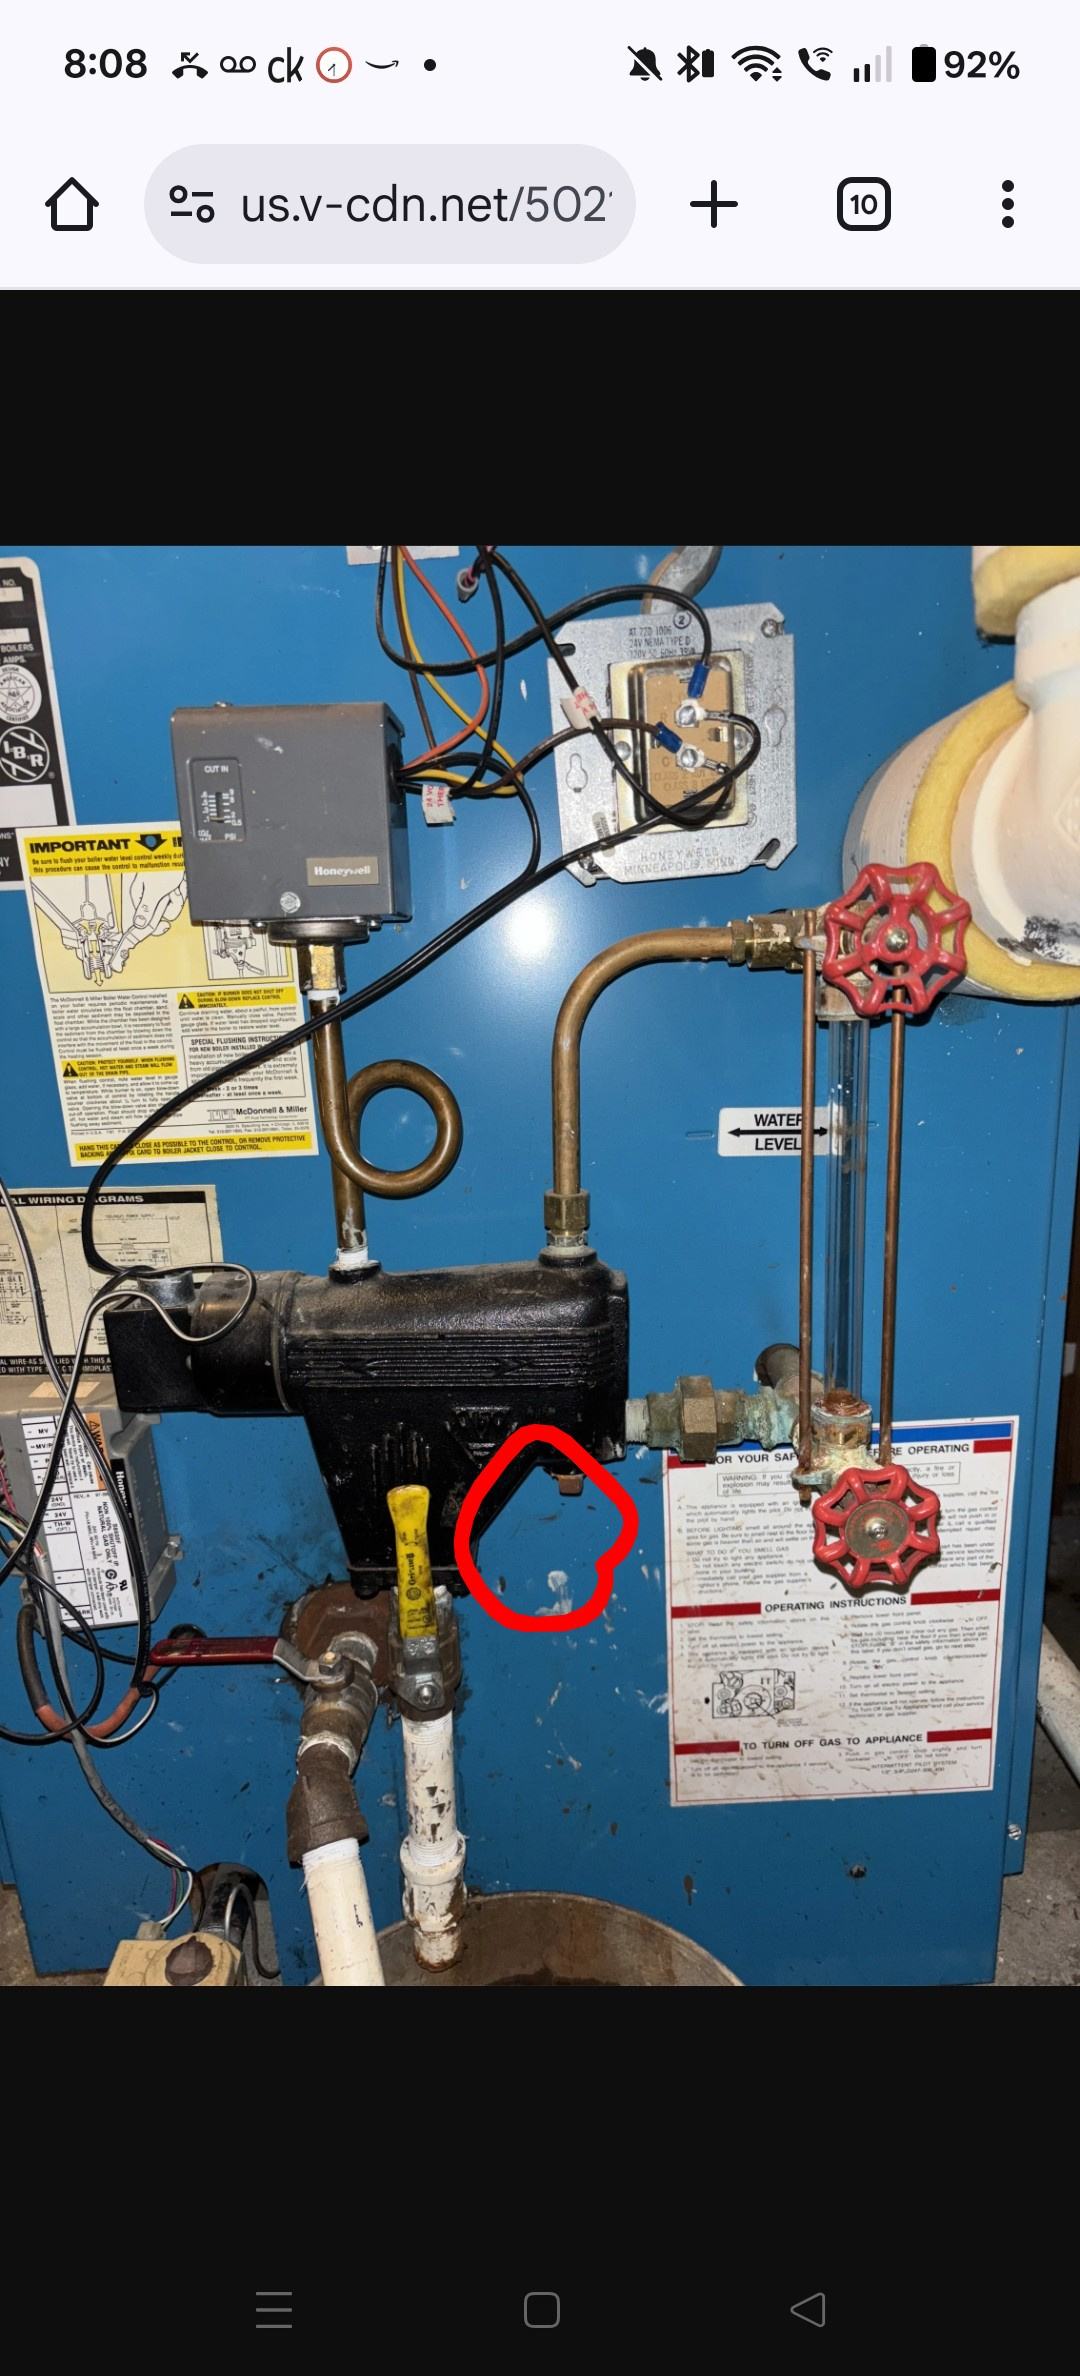
Here is a picture if that helps
 0
0 -
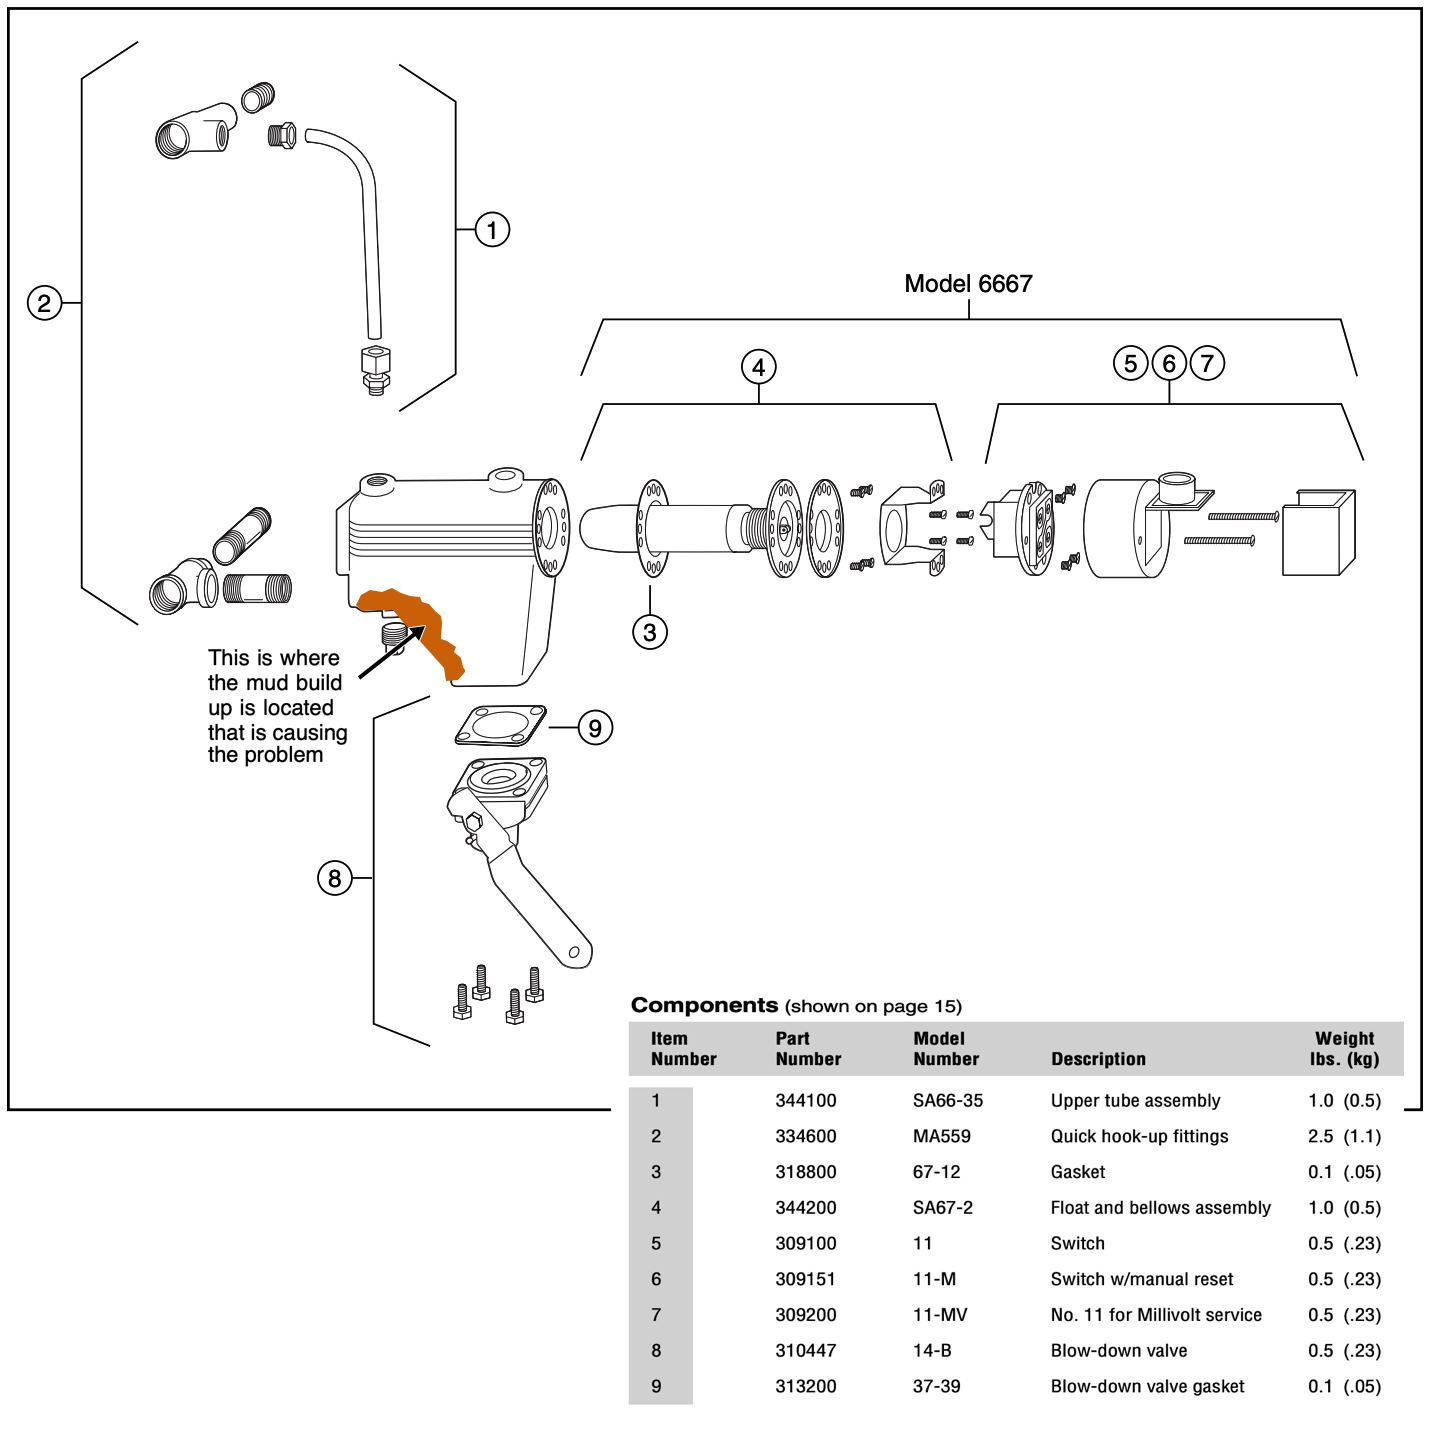
You might also have a #47-2 with the same problem. You can take them apart and look inside and scrape out all the mud that is caked on the inside the is blocking the float from dropping enough to let the switch shut of the burner. The worst case is that you will need a replacement LWCO. They are still available. You just need the proper model number and order the same one
I can't help but notice that the maintenance instructions call for complete disassembly annually and your maintenance only mentioned that you clean out the pigtail to the pressure switch. Also if it is 10 years old you should replace it. I believe you can get more than 10 years out of one of those on most residential boilers but there is that information so you might purchase more often than actually needed. McDonell & Miller make more when you replace and less when you repair. I have replaced many #47-2 and #67 LWCO on residential boilers over my years. Many times the one that I'm removing has been in service for 20+ years as a result of proper maintenance and good water quality.
Looks like you are about to learn how to open one up and maybe even replace one.
Edward Young Retired
After you make that expensive repair and you still have the same problem, What will you check next?
0 -
You need to take apart the #67 LWCO and clean it. It is also possible that the float has a pinhole in it and its full of water.
It has nothing to do with removing the pressure control.
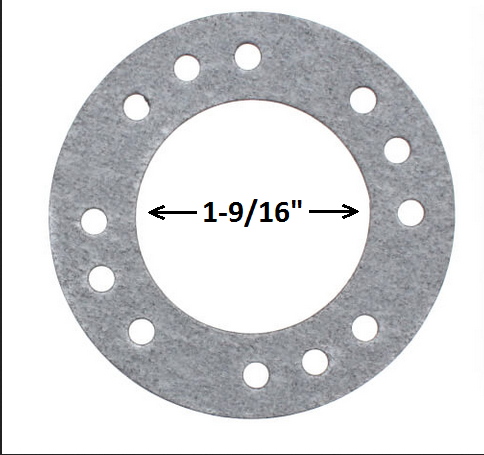
You need some McDonnell Miller gaskets to rebuild it. It can be done but is a messy job. MM says to replace it when it is over 10 years old but they cost big $$$$
It is an important safety control
 1
1 -
You can try to remove that plug. Stick something inside and try to move the float up and down. Don't do something Sharp. Should do the trick. Try to flush out a few more times, with the plug not installed. Put Humpty Dumpty back together and see what happens
0 -
If it is a McDonnell & Miller #67 LWCO the rust in the chamber will trap the float in the boilers operational position, so no LWCO safety. If you are handy, the Electrical part of the #67 can be removed and then the float can be removed and the float and the chamber can be cleaned up. Just a bunch of screws and a gasket, note where things go, take pictures, don't over-tighten the screws that secure the delicate switch assembly, clean the gasket surfaces and replace the gasket.
I made the gasket out of Silicone sheet material so I could clean it and reuse it, the paper gaskets are a pain.
If the pigtail is on a top tapping of the #67 you may be able to loosen the stuck float by removing the pigtail and gently push on the float to loosen it up from the rust's grip. Even if this works it should dissembled and cleaned (inexpensive) or replaced ($$$$). Many YouTube videos on the #67.
 National - U.S. Gas Boiler 45+ Years Old
Steam 300 SQ. FT. - EDR 347
One Pipe System0 -
Ok thanks. I’ll try that! Here is a picture of the actual LWCI label
 0
0 -
Also BTW mine is probably over 50 years old, only been disassembled and cleaned twice in recent years. If needed carefully clean the sylphon or bellows so it can flex freely. Dirty job, where gloves while cleaning. Drain the boiler down, don't get the other electrical stuff wet, I cover my gas valve with a plastic bag.
National - U.S. Gas Boiler 45+ Years Old
Steam 300 SQ. FT. - EDR 347
One Pipe System0 -
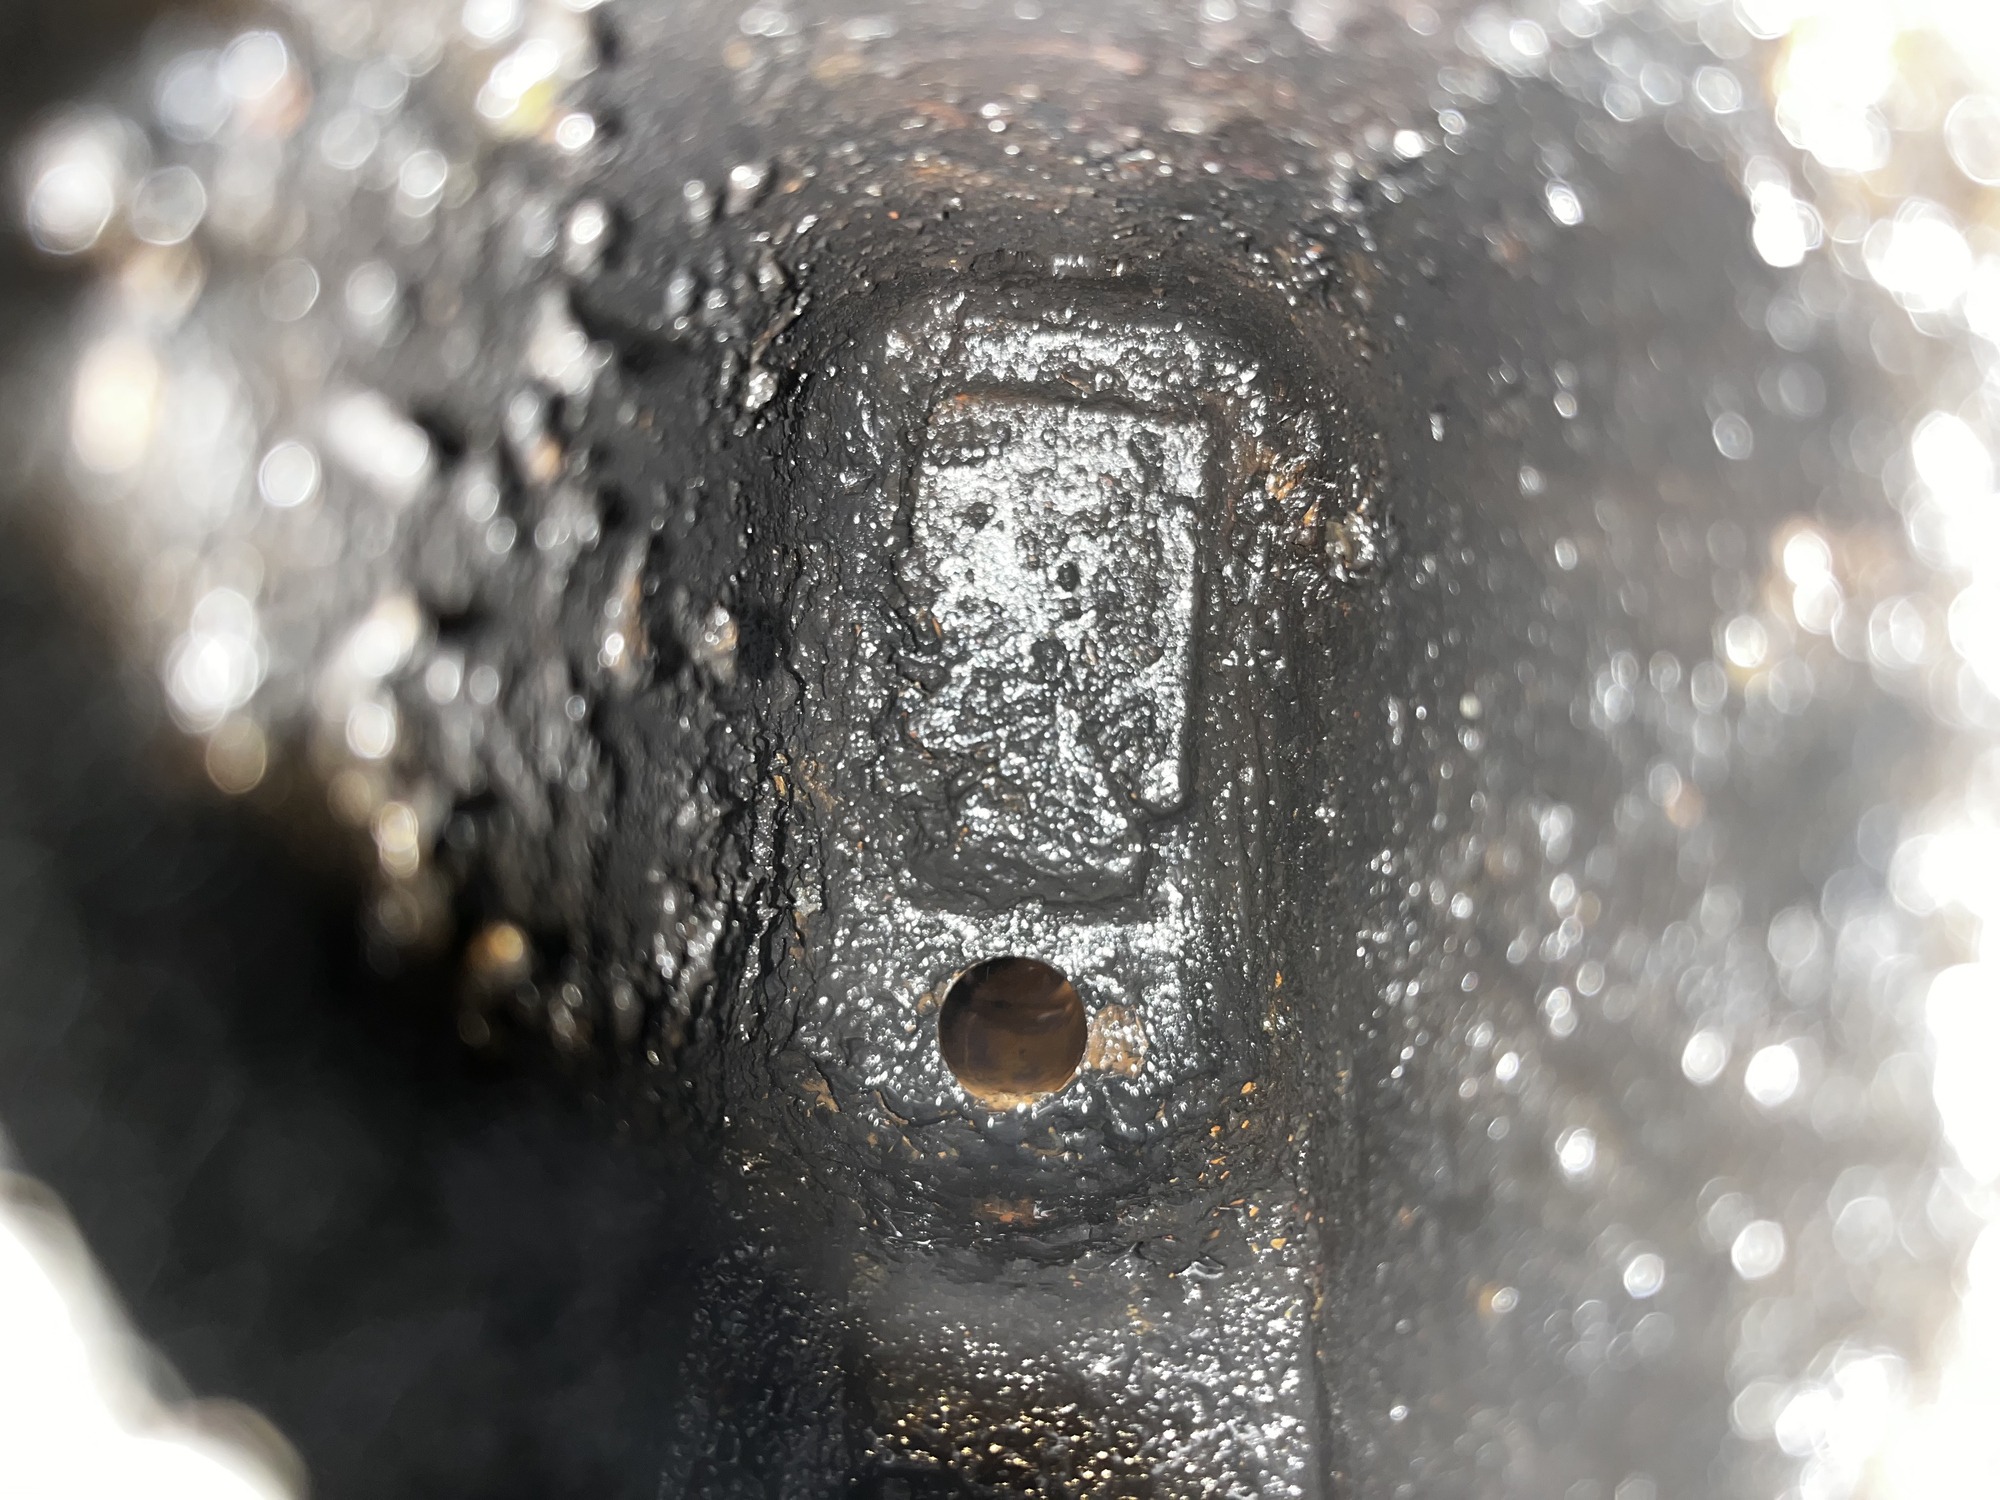
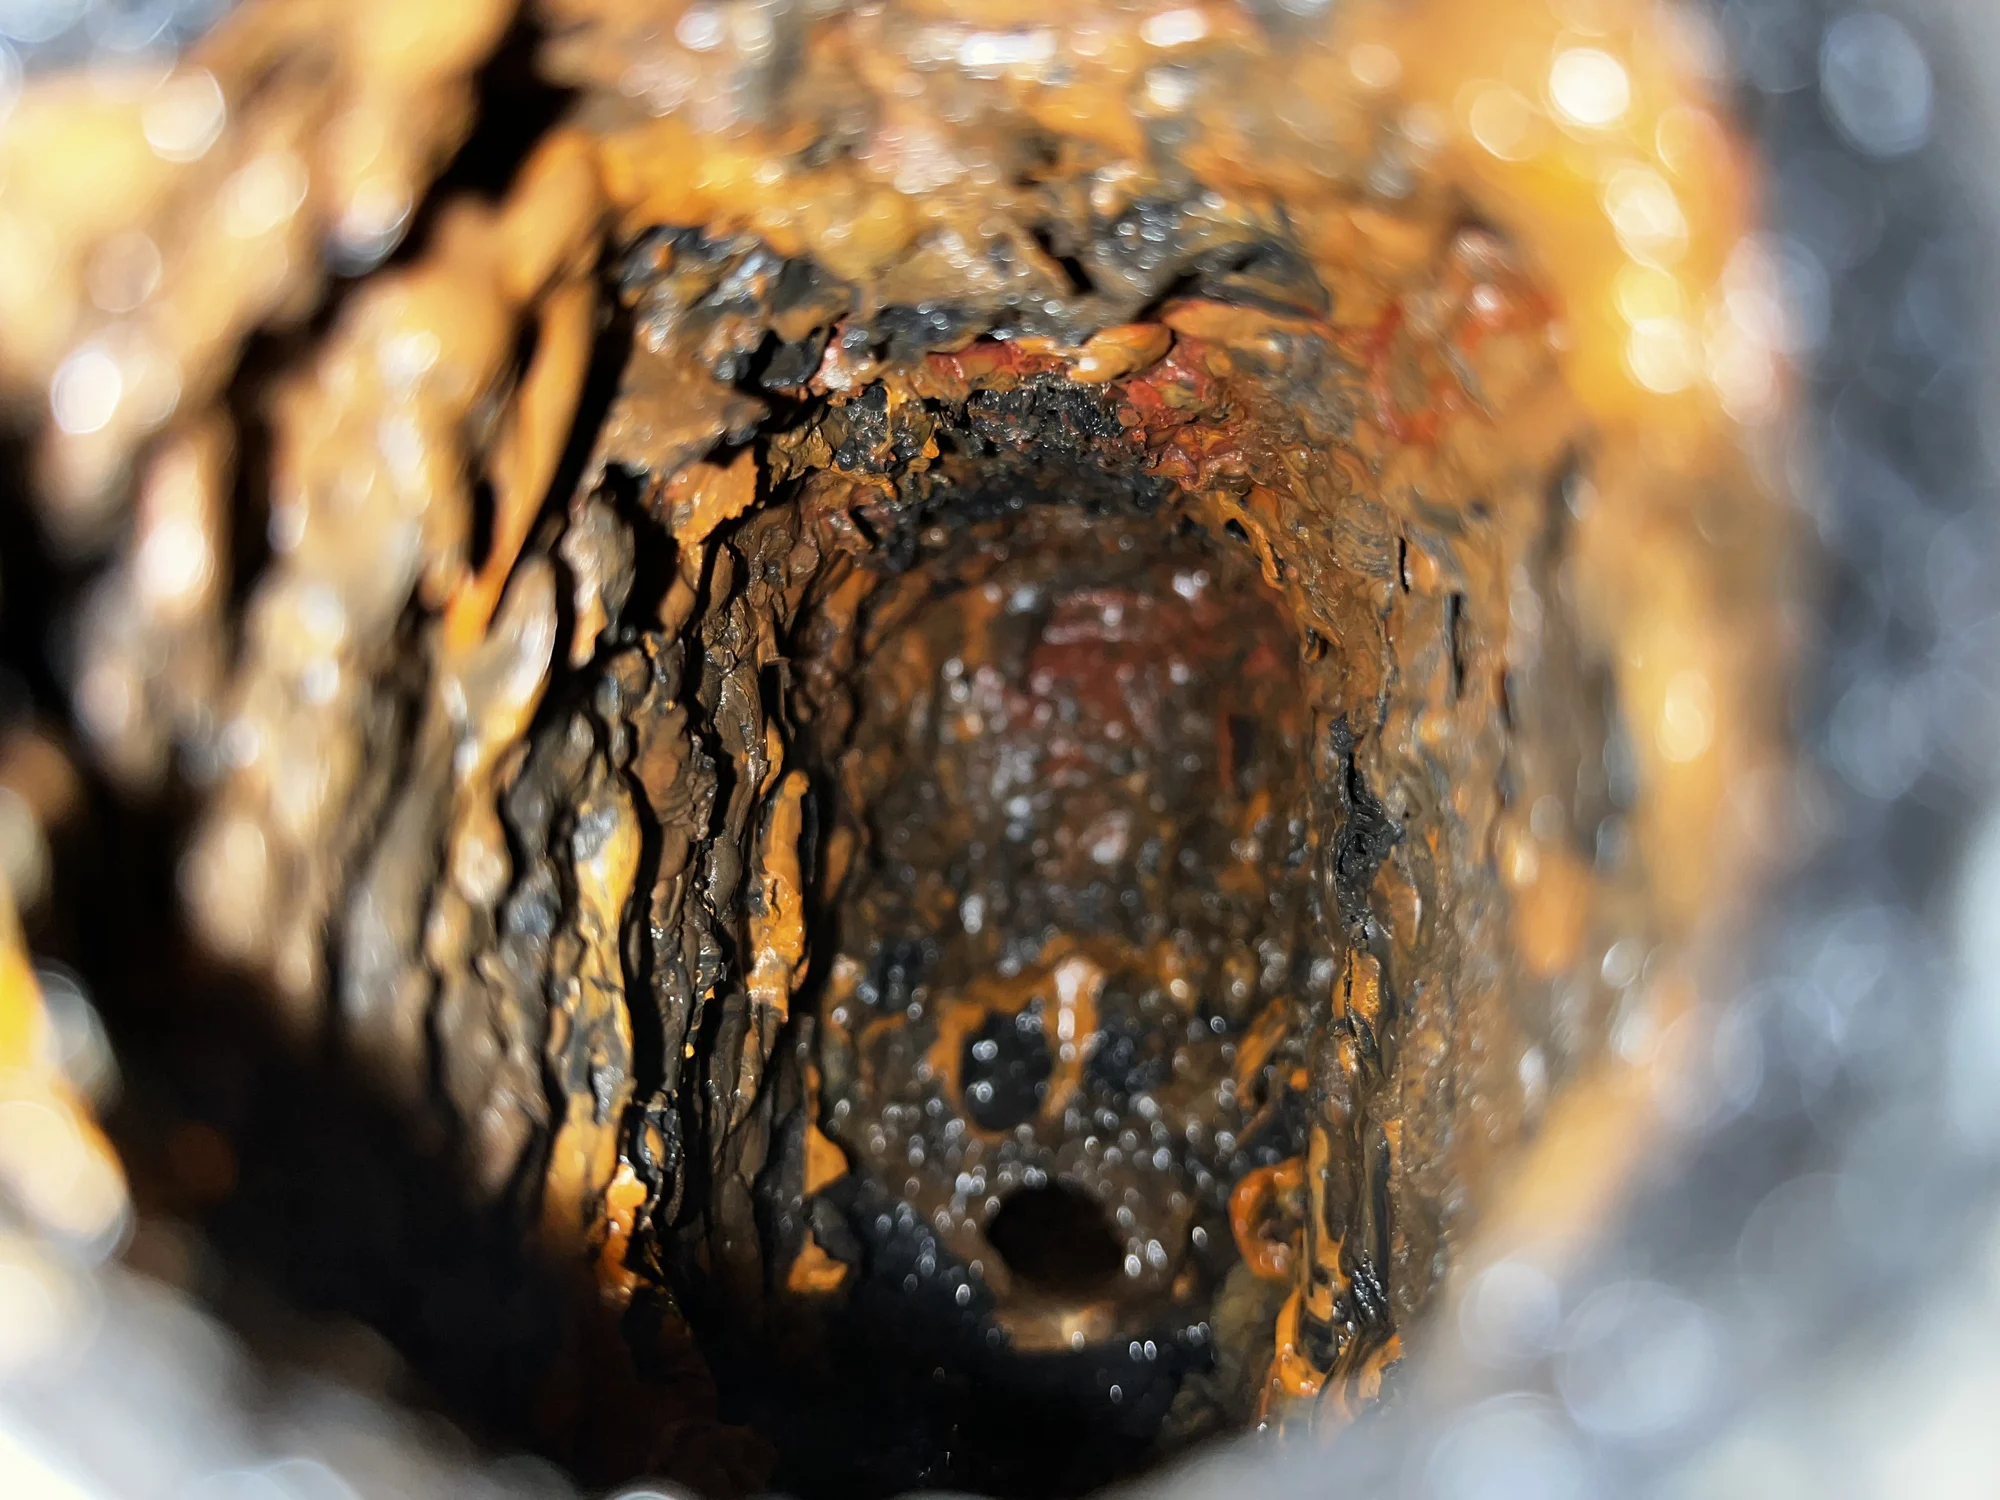
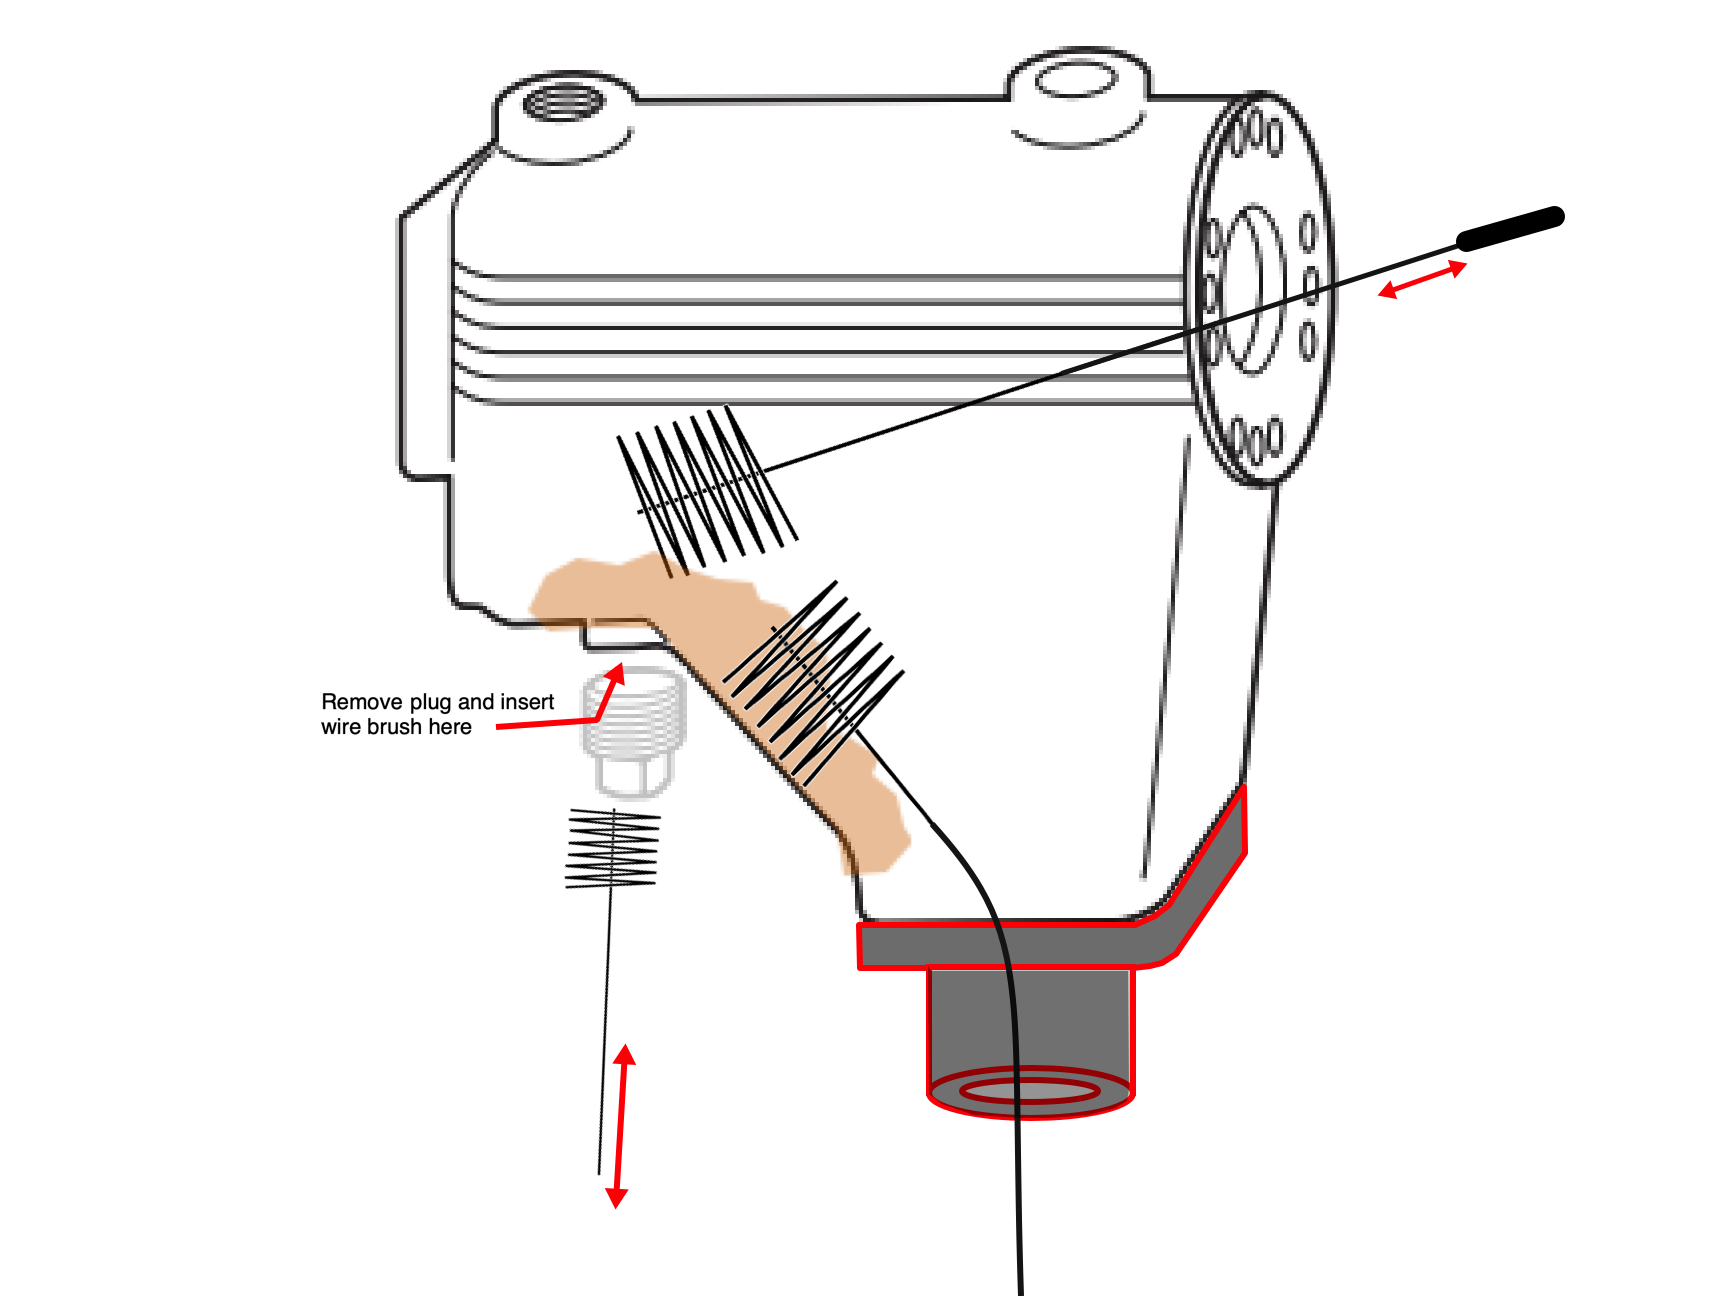
This is where your problem is located
This is how you clean it out using wire brushes
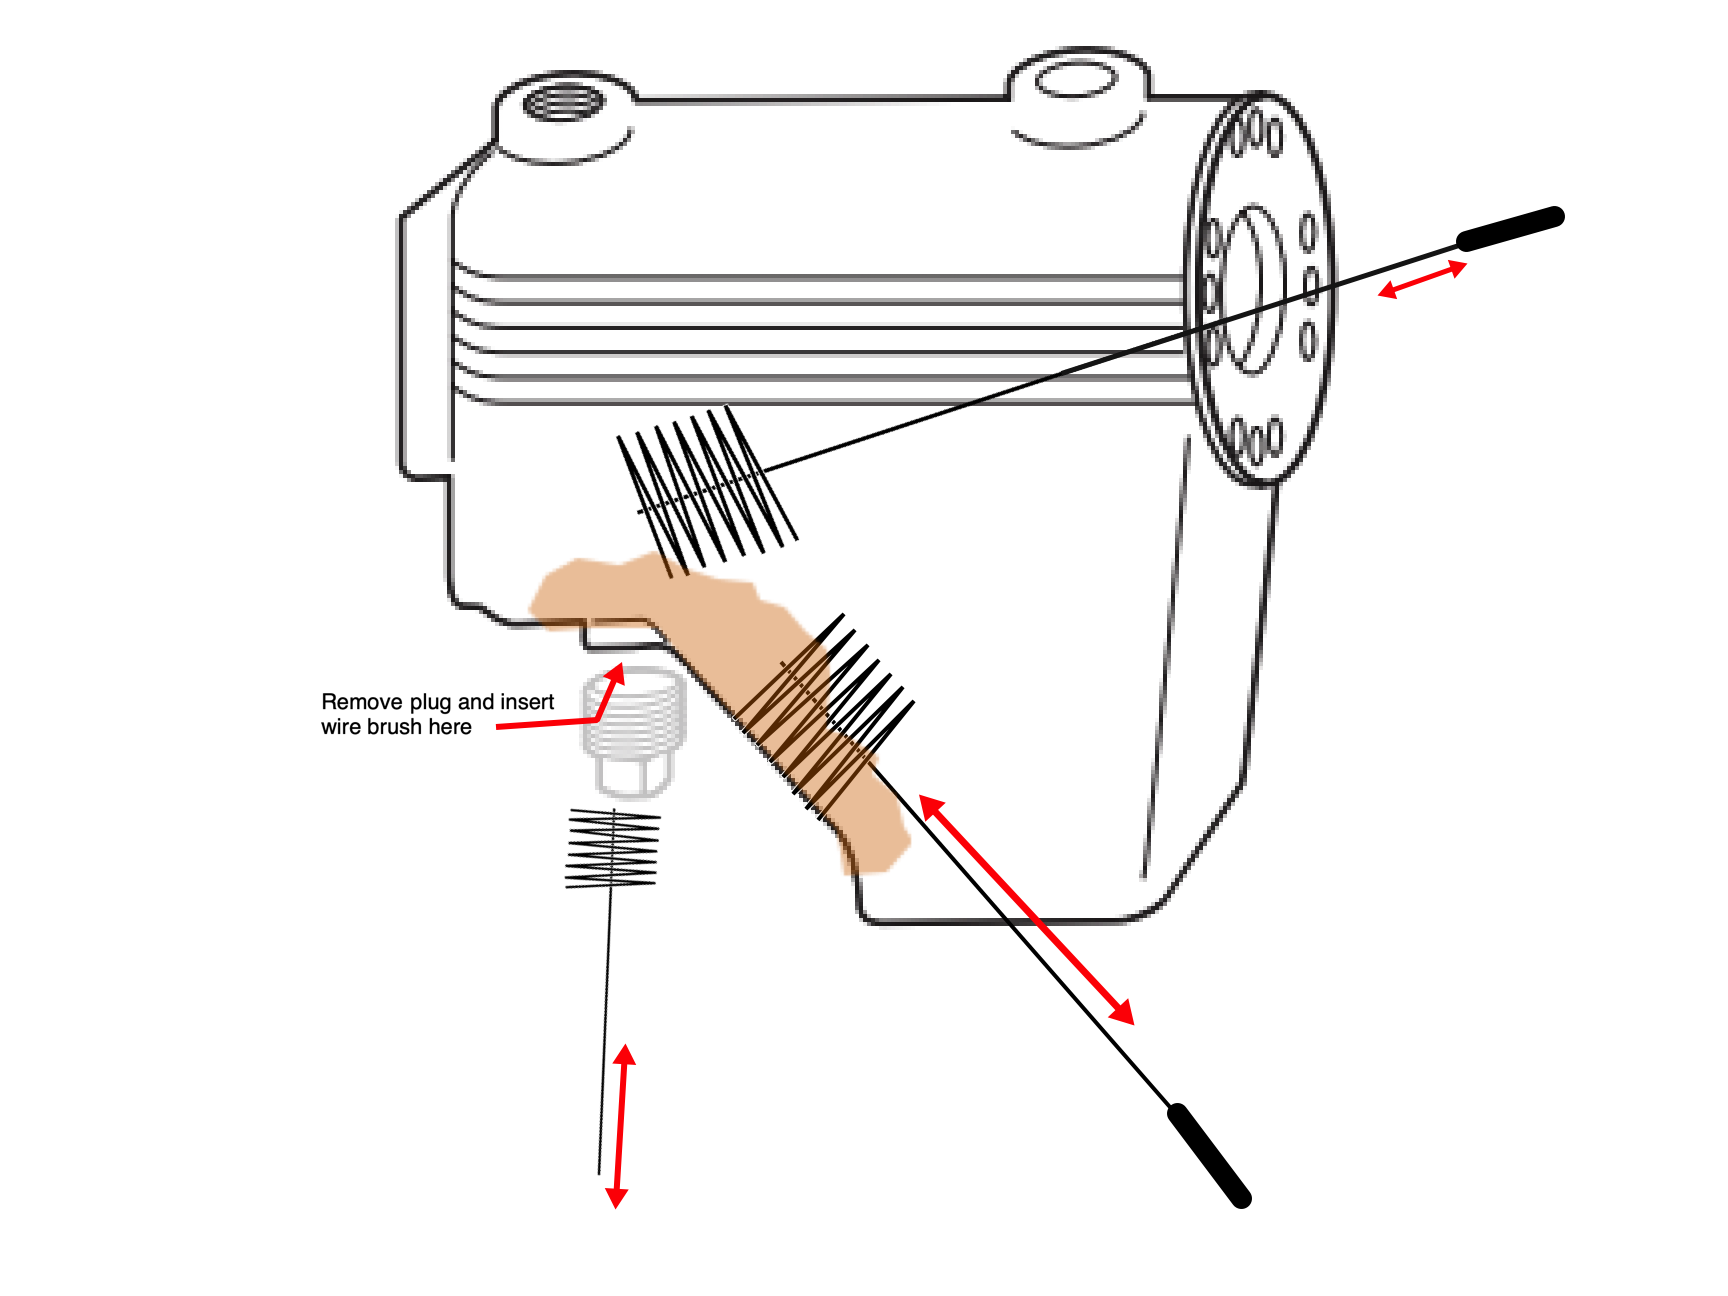
Should be all you need for the maintenance. If this goes well you can use the brushes every year and get a few more gaskets. You are going to need a large heavy duty flathead screwdriver to get the blowoff valve screws out. especially if they have not been removed in several years. Get one with a square shank so you can put an adjustable wrench on it to give you the torque needed to loosen those 4 screws.
Edward Young Retired
After you make that expensive repair and you still have the same problem, What will you check next?
1 -
Also BTW (again), a sight glass protection rod can be used to carefully nudge the float once the pigtail is removed.
National - U.S. Gas Boiler 45+ Years Old
Steam 300 SQ. FT. - EDR 347
One Pipe System1 -
" You are going to need a large heavy duty flathead screwdriver to get the blowoff valve screws out. "
The newer blow-down valves have cap screws, so a hex tool (Allen wrench) may be needed if you want to remove the valve. I've had good luck cleaning by just removing the float assembly.
 National - U.S. Gas Boiler 45+ Years Old
Steam 300 SQ. FT. - EDR 347
One Pipe System0 -
The float and bellows assembly is a brass bottle full of air with a brass bellows on the end near the switch. it is somewhat delicate so don't use the wire brushed with the float still inside the housing. Carefully remove the float switch assembly to properly clean it off in the basement laundry tub or with the garden hose outside. You don't want it in the bathroom sink because the stuff you clean off of it may stain the sink, and your significant other will not be happy (ask me how I know).
Once the housing is empty of the float then have at it with all the elbow grease you can muster. If you are lucky, the float will not be damaged and the muddy buildup can get removed completely and it will work as good as new. If the bellows on the float goes bad while you do this maintenance, steam will come out where the switch is located and you will need a new Float and bellows assembly. So be careful as you can.
Edward Young Retired
After you make that expensive repair and you still have the same problem, What will you check next?
0 -
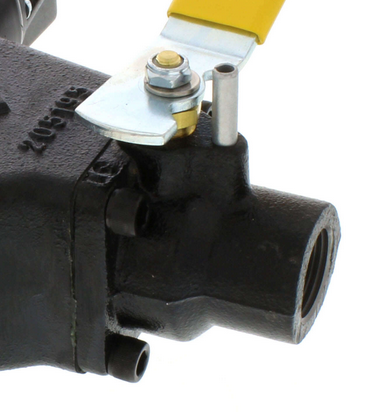
Actually reviewing your picture closer you have a 'Dirt Pocket Cap' (not the M&M Blow-down valve assembly) and an off the shelf ball valve. Your screws look like the older slotted type.
National - U.S. Gas Boiler 45+ Years Old
Steam 300 SQ. FT. - EDR 347
One Pipe System0 -
You could just replace it with a probe type lwco like a safgard too.
0 -
Personally I like the simplicity of a float type and ease of simple basic inexpensive maintenance.
The probe type still recommends annual maintenance and if the box or the probe fails it requires replacement, since most folks can't repair electronics or build a probe.
National - U.S. Gas Boiler 45+ Years Old
Steam 300 SQ. FT. - EDR 347
One Pipe System1 -
Thanks for all the help, guys. I'll take another look tonight after work.
1 -
If the screws that hold the blowoff valve are stubborn and won't come out with a screwdriver I found an 8" pipe wrench on the large screw heads will work.
In fact, that's about the only thing I ever used the 8" wrench for.
Sometimes sludge gets in the flutes on the float syphon.
0 -
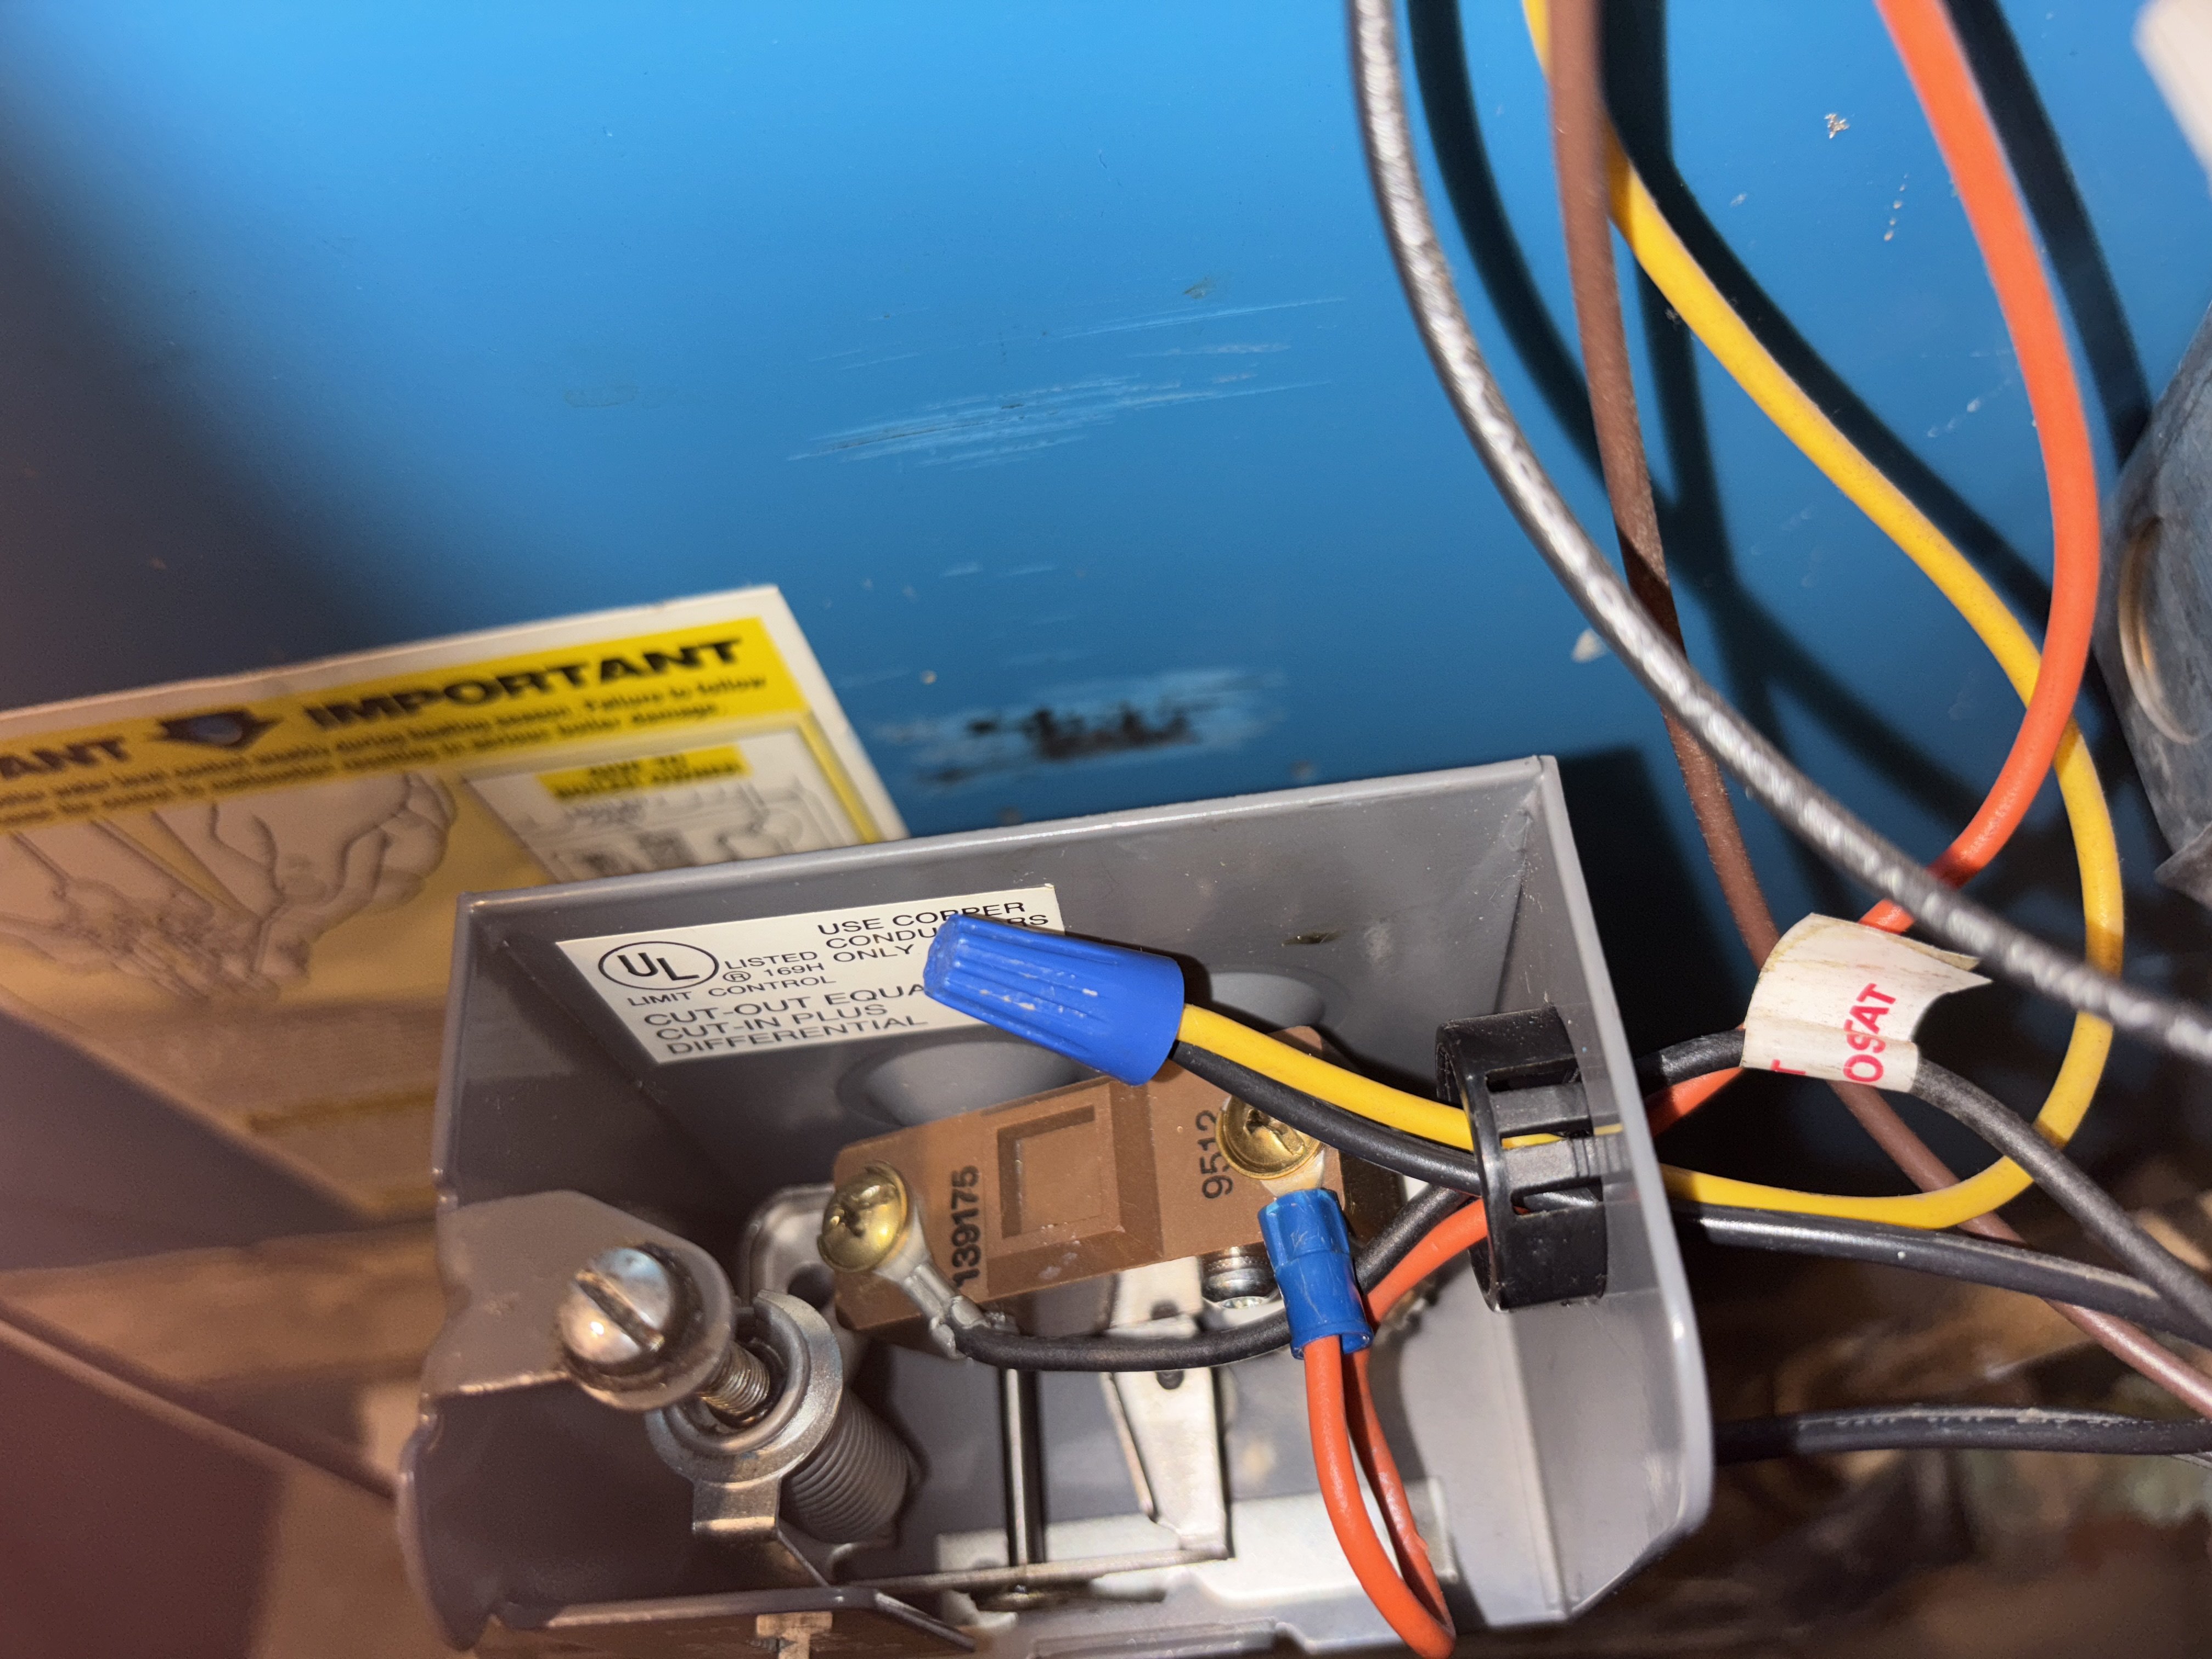
Another possibility; I can't see all the boiler's wiring but I do see a lot of wires going into the Pressuretrol, they must be using it for a junction box also. The Pressuretrol switch usually only needs two wires.
Since the Pressuretrol was recently removed could the wiring inside now be miss-wired actually bypassing the #67 LWCO ? Going by the wires on the transformer it may be hard to miss-wire but I am always suspicious of what was messed with last. When was the last time the LWCO operation was verified ?
 National - U.S. Gas Boiler 45+ Years Old
Steam 300 SQ. FT. - EDR 347
One Pipe System0 -
You can also use a hand type impact screwdriver, the type you hit with a hammer.
0 -
Thanks. I would say at the end of last winter.
0 -
I should have taken a photo before I disconnected it but I made a mental note that the orange wire was on the right and black on the left. Hope that is right. You’re right about using the pressuretrol as a junction box. The black wire from the Iwco and a yellow wire going to the damper are tied together using a wire nut.
 0
0 -
it isn't so much it is used as a junction box but that the end switch on the damper is tied in series with the pressuretrol
1 -
Quick update. Tonight after work I removed the pressuretrol and the pigtail. I then took a small wooden dowel and pushed on the float. It did move a little but if I understand correctly I’m near the bellows and the switch so it may be harder to get it to move there. I was hoping that I might be able to free up the float. I reassembled everything but the lwco still didn’t cut off when I opened the valve in the bottom of the lwco and drained the boiler. I’ll work on it more tomorrow. Thanks, all.
0 -
Yeah, that looks OK. Probably just rust or mud needs to be cleaned out of the #67.
National - U.S. Gas Boiler 45+ Years Old
Steam 300 SQ. FT. - EDR 347
One Pipe System0 -
If you do remove the float to do a thorough cleaning, note or take pictures where the wires go and which way is up for the switch assembly position, upon reassembly don't over-tighten the screws that secure the switch assembly. The old paper gasket will probably not survive, OEM versions are available from various sources on the internet or auto parts stores sell gasket paper and a new one can be made.
National - U.S. Gas Boiler 45+ Years Old
Steam 300 SQ. FT. - EDR 347
One Pipe System0 -
or just use Permatex
0 -
LWCO is a pretty important control to protect the boiler from failure due to low water. It needs to be 100% reliable as there is no other back up for a low water condition.
If it was me, I would remove the sight glass, sight glass valves and low water cutoff and put everything on the bench dissemble and clean it up.
If you called a heating contractor, they would probably replace it due to the liability of repairing an old control…..and they would not be wrong.
If you choose to clean it yourself that's up to you but also make sure the boiler sight glass tapping's are clean,
I for one do not agree with poking the float to get it to work or trying to poke the sludge out while it is on the boiler. If its not entirely clean it is libel to fail.
Either take it all apart and clean it right or replace it. JMHO
 2
2 -
Its pretty simple to clean, IMO (at least on my boiler) removing it from the boiler is so much more unnecessary work and risks damaging something else. It can be cleaned quite thoroughly just by removing the float for access and rinsing away the debris through the open Blow-down valve. @John Boyer's sight glass looks pretty clean an if the pipes into the boiler are thought to be an issue the valve stems can be removed for access to clean out those pipes.
Permatex or other gasket sealer should work but it still requires clean up next time. As mentioned above a gasket made from silicone rubber sheet material about 1/32 thick (same thickness as the original paper gasket) works good. Just rinse off and reuse.
If I cleaned mine this well I probably would have painted it too.
From @Steam42's thread.
https://forum.heatinghelp.com/discussion/comment/1723035#Comment_1723035
National - U.S. Gas Boiler 45+ Years Old
Steam 300 SQ. FT. - EDR 347
One Pipe System0 -
maybe even an old chisel or putty knife would work to clean that out.
0 -
I'm going to order the brushes that EdTheHeaterMan recommended. Fingers crossed.
0 -
Yes you do need a stiff wire brush and some type of scraper or large screwdriver. The type of wire brush is not too critical as long as you can get it into the housing to do the job. You probably don't need a 30 inch long one just long enough to reach the tapping on the far side and maybe go into the pipe. I suppose the longer one the handle could be bent for better ergonomics.
I suspect that with @Steam42's thorough cleaning job pictured above he may have cut the handle loop part off a wire handled wire brush and spun it in a drill motor. I also hope he used appropriate PPE.
National - U.S. Gas Boiler 45+ Years Old
Steam 300 SQ. FT. - EDR 347
One Pipe System0 -
Good point about PPE. Are latex gloves and a N95 mask sufficient?
0 -
Doubt you need a mask but it can't hurt. Gloves are a good idea.
1 -
Yes gloves, its a dirty job like cleaning gutters that have not been cleaned in a while.
Latex gloves or similar should be fine.
The PPE I was thinking of is eye / face protection if @Steam42 was spinning a wire brush with a drill motor.
National - U.S. Gas Boiler 45+ Years Old
Steam 300 SQ. FT. - EDR 347
One Pipe System0 -
Bear with me as I've never done this before. It looks like i do have the the 'Dirt Pocket Cap' instead of the integrated M&M Blow-down valve. Previous owner put a ball valve on below that. If I remove that ball valve and nipple, can i put a brush up through that dirt cap to scrape the rust (with float removed). Reason I ask is if I have to remove that dirt cap I'll need to buy a gasket. If not, I'll just buy the one gasket that is used with the float. Thanks.
0 -
Just removing the nipple will leave some restricted access. But you may be able to bend the brush to compensate
Edward Young Retired
After you make that expensive repair and you still have the same problem, What will you check next?
1 -
Personally, I'd buy a new dirt pocket cap, gasket and the gasket for the float to have spare parts in your own personal stock to have AFTER this repair is completely done.
There was a post here a while back that the nipple going into the dirt pocket cap fell out since the threads of the dirt pocket cap rusted away. For decades I have stocked all these parts (I have the integrated valve assembly) for my boiler since I consider them consumables and I don't want to have to deal with finding them on-line when it is zero degrees outside and something that is basically easy (for me) to repair fails. I use the paper gaskets as a template to make the gaskets out of the silicone rubber sheet material.
IMO to remedy the stuck float situation all you have to do is remove the float, nothing else. That gives you plenty of access to clean the rust and/or mud out of the chamber to restore full movement to the float (see pictures above). The floats major movement is at the far end of the chamber not at the switch end.
Once the float is removed, I open the manual fill water valve so there is a small trickle of water through the chamber to wash away the debris as I am cleaning it from the walls of the chamber. The trickle of water then drains through the Blow-down valve into a bucket. You could scrape and wire brush and then vacuum too, however it all starts out wet so I just flush it into a bucket.
And when doing the job DON'T be in a HURRY, the float sylphon or bellows is delicate and may need cleaning too. The hardest part maybe separating the float mounting plate from the casting (the paper gasket) mine was at least 40 years old, yours may be easier. Don't deform the float mounting plate.
I encourage you to watch some YouTube videos (there are many) to gain a better understanding of this situation, sometimes visual is better than text.
National - U.S. Gas Boiler 45+ Years Old
Steam 300 SQ. FT. - EDR 347
One Pipe System0 -
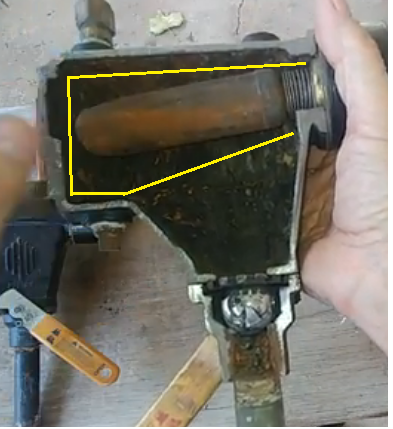
Basically the area of the Yellow lines (top, sides, far plateau area) need to the cleaned so the float can move freely. The rest should be cleaned too but not as critical to the floats movement and operation.
This is from one of @Gordo many Youtube videos .
McDonnell & Miller's Venerable #67 Low Water Cut Off For Steam Boilers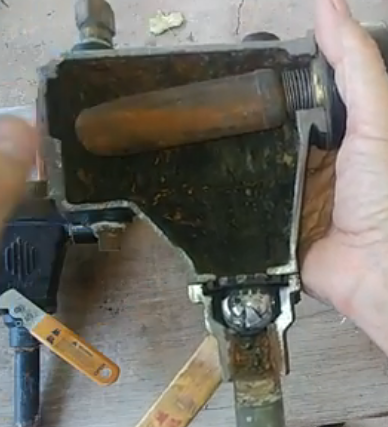
 National - U.S. Gas Boiler 45+ Years Old
Steam 300 SQ. FT. - EDR 347
One Pipe System0 -
Another video showing the disassembly process.
Change the float on a Mcdonnell & Miller Low water cut off switch! (plus bypass trick)National - U.S. Gas Boiler 45+ Years Old
Steam 300 SQ. FT. - EDR 347
One Pipe System0 -
Not a bad video. His wire connections are a little suspect. Also, with millivolt and the pilot burning you still have voltage at the LWCO.
I wouldn't advise anyone to bypass the LWCO but if you do you can't take your eyes off the sight glass.
0


Categories
- All Categories
- 87.7K THE MAIN WALL
- 3.3K A-C, Heat Pumps & Refrigeration
- 59 Biomass
- 430 Carbon Monoxide Awareness
- 127 Chimneys & Flues
- 2.2K Domestic Hot Water
- 5.9K Gas Heating
- 121 Geothermal
- 170 Indoor-Air Quality
- 3.8K Oil Heating
- 79 Pipe Deterioration
- 1.1K Plumbing
- 6.6K Radiant Heating
- 396 Solar
- 16K Strictly Steam
- 3.5K Thermostats and Controls
- 56 Water Quality
- 51 Industry Classes
- 51 Job Opportunities
- 17 Recall Announcements