Wirsbo return manifold leak

Hello,
I am very inexperienced and am hoping to learn how to fix this leak in my radiant floor heating system. I have attached photos for reference; Note that in the photos the return manifold is in the foreground and the supply manifold is slightly viewable to the left.


From what I have been able to put together from my research online, I believe the best description of my problem is the following:
The Wirsbo return manifold for my radiant heat system was gushing water early this morning. I was able to slow down the leak by finger tightening the white cap. Water continues to drop every few seconds from that general area of corrosion. I have not previously noticed any issues with the heating, although it's a large area of floor so easy to miss. There was some build up in that area that came off as I touched it. The 2 black valves(?) closest to the leak were loose, and the rest were tight; I wasn't sure if I should but I did tighten the loose ones. (EDIT: I was mistaken and none of the valves were closed, the 2 leftmost were just looser/easier to turn.)
I am not sure what I should do next in order to fully fix the leak. My thought was to try and find a replacement for the white cap/handle part, but I'm not sure. I am still trying to figure out how to stop water to this area so I can more fully examine.
Any advice or suggestions would be greatly appreciated. My apologies again if I've gotten any terminology incorrect. Thank you for your time.
Comments
-
it looks like a Dahl mini ball valve with an air bleeder
You can turn the silver handle 1/4 turn and replace the white air vent
Wire brush the assembly first to see were it threads apart.
That white vent is probably a hydroscopic type and they have a life expectancy
In all honesty I would just turn off the silver valve and forget about it. Unless the system has been opened up recently, it should be air free and the vent is no longer needed
It is more of a start up vent, when the system is first filled
Be aware old valves can easily break if they have corroded badly , it is a gamble
Bob "hot rod" Rohr
trainer for Caleffi NA
Living the hydronic dream 2
2 -
Those black caps adjust the flow. Screwed tight, it pushes down on a pin valve and you get full flow.
If those pin valves start to leak, Uponor (Wirsbo's new name) does not have replacements. You have to replace the entire manifold.
8.33 lbs./gal. x 60 min./hr. x 20°ΔT = 10,000 BTU's/hour
Two btu per sq ft for degree difference for a slab1 -
I think tightening the black caps, clockwise, turns flow down then off. It pushes the pin and washer, #2 & 5 against the bottom seat.
If you loosen or remove the black cap that valve port will be wide open.
The top of the cap is also a tool that fits over the stem when you remove them. It slides over the valve stem to either adjust, or maybe remove the packing to disassemble and clean the valve.
This is a different brand, but that are all similar insides.
 Bob "hot rod" Rohr
trainer for Caleffi NA
Living the hydronic dream2 -
Good catch, hot_rod. Especially, if the other 4 have been shut off!
1 -
Thank you all so much - this all already quite helpful. I will report back once my daughter goes to nap ( complicating this whole mess is a energized 15 month old who doesn't understand why dad is sleepy and distracted).
Much appreciated
 1
1 -
So sorry: I got that wrong. Brain addled.
8.33 lbs./gal. x 60 min./hr. x 20°ΔT = 10,000 BTU's/hour
Two btu per sq ft for degree difference for a slab1 -
Just a quick update with some more photos. I turned that silver valve, per hot_rod's suggestion, as close to a full 1/4 turn as I could. That did not seem to immediately slow or stop the leak, likely from the corrosion where the dahl valve attaches to the manifold. When I opened up the white air vent, water still seemed to flow out as strongly as before, with a classic water flowing sound to accompany it. (EDIT: I was mistaken, that silver valve did slow the flow down, but did not stop it fully. With the black valves closed as described below, it is more obvious the impact of the silver valve.)
I also decided to clockwise turn shut off all of the black valves; I was mistaken earlier in thinking that had all been shut tight to start, most were in fact open and allowing water flow (which makes sense given I had heat in my floor). My thought was if I closed all those return valves, water couldn't get into the manifold to leak. I got all of the black valves as tight as I could with my hands, and that did seem to have some impact; there is still drops of water every few seconds but opening up the white air vent does not noticeably increase the flow nor do I hear the classic flowing water sound.
(EDIT: Continuing from above, would like to report that in this state, the silver valve's impact is more obvious. With the silver and black valve's as tightly closed as I can manage by hand, I can unscrew the white air vent cap [although it does not come off] and unlike before, there is much less water flowing out, although still more than if I close the white air vent cap as tightly as I can.)
I'm thinking I'll need to replace the entire dahl valve, and I'm hoping the manifold can be retained, though I still need to actually open it up and inspect.


 0
0 -
Another suggestion. That vent looks similar to the Caleffi.
The Caleffi has a ball check built into it so you can easily remove and replace the top part. Removing the top completely shuts off that ball check.
Although deposits could cause it to leak also.
That looks to be a Dahl angle hose valve. I'm curious as to how the vent is actually installed into the valve. Maybe it can be removed and a hose cap screwed onto it, after the threads are cleaned up?
 Bob "hot rod" Rohr
trainer for Caleffi NA
Living the hydronic dream 2
2 -
those manifolds will eventually start to leak at union gaskets and return valve stem seals we have found. The valve/stem seal assemblies are hard to come by for those 20+ yr old manifolds. Gaskets not so hard to find. You might get lucky but good likelyhood when you open back up return valves the stem seal (s) may leak. Plan in not too distant future to replace manifolds.
1 -
This air vent assembly looks sort of homemade-ish. The manifold is typically a female 1-1/4" G thread. A straight thread.
I suspect a brass 1/1/4" by 1/2" bushing was screwed into that with a fiber gasket. A standard 1/2" NPT Dahl valve. Then another custom fitting on the outlet of the Dahl valve.
Looks like it has leaked at the 1-1/4" fiber washer.
I suppose it could all be carefully disassenbled and rebuilt. The easiest option is to plug or cap what you have.In some cases Loctite has been used along with the fiber washers. So disassembling may not be so easy and cause more harm than good.
Since you are not using actuators I would replace it with a copper manifold, with or without ball valves, depending on if you are balancing any of the loops? Buy a manifold with one extra port and that becomes a purge point.
 Bob "hot rod" Rohr
trainer for Caleffi NA
Living the hydronic dream1 -
Thank you again all for your time and knowledge. It's been a stressful day and this forum has made it not so.
I have been hesitant to try and remove the angle valve for fear of making anything worse, especially as the leak has slowed down substantially with the closing of the various valves. I can certainly live with no floor heat for a bit, though I am actively monitoring the temperature gauge to make sure I don't accidentally freeze anything.
I am going to try and find a plug or cap (or maybe even a replacement angle valve) at one of the big box stores. Nothing near that's open today has a big enough manifold in stock but I'll look towards that option as well if the plug/cap goes poorly. My current plan is to try and find something equivalent to what's on the supply manifold, photo attached for reference.

hot_rod, thanks for your in-depth research and advice. I think you figured this out already on your own, but that air vent top does not seem to come off; I opened it as much as I could (although I didn't go so far as trying to pull on it) and it stayed firmly attached.
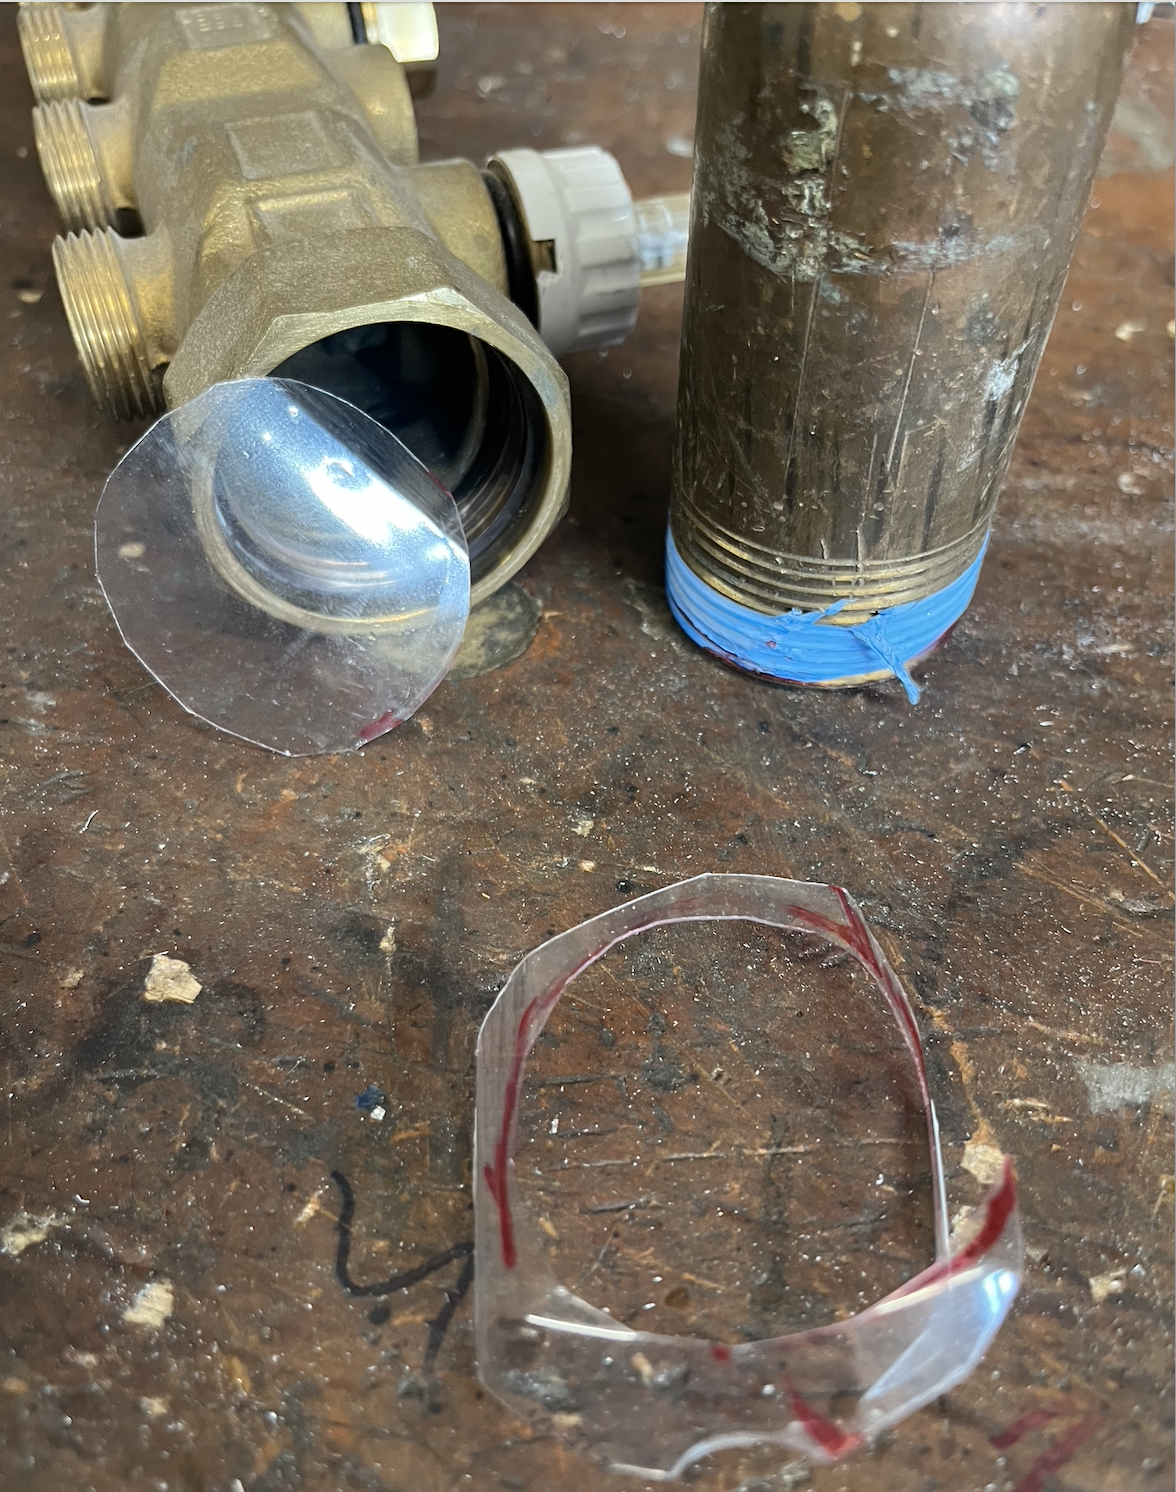
If I can work up the nerve and supplies to get this stuff disassembled, hopefully without flooding my floor, I'll take pictures of the cleaned up and separated parts.
0 -
I'm 90% sure that a 1-1/4" brass or galvanized plug will fit. Cut a gasket from a plastic bottle or milk jug. Wrap 5 or 6 trips of heavy gauge teflon tape and screw it together.
What you have will be sealed with a fiber washer or large O-ring as it is a straight thread in the manifold.
I don't have a plug, so this shows an 1-1/4" brass nipple.

 Bob "hot rod" Rohr
trainer for Caleffi NA
Living the hydronic dream2 -
Oh wow, will do! I didn't see this but actually happened to purchase (EDIT: thanks to hot_rods general suggestions previously) both a galvanized 1-1/4" plug and that exact tape. So I will definitely try this in the morning when I have light.
As an aside, wow is it hard to find a 1-1/4" sized anything that's graded for hot water.
Cheers and thank you again.
1 -
To anyone interested, quick update while I'm on break:
This morning I did try to separate the old angle valve from the manifold, but I could not do so successfully. I'm not sure if its just so gunked up/corroded together or if there's something like a sealant, but I stopped for fear of damaging something.
I think my mistake was trying to do so while the manifold was still attached to its support brackets (while trying to clamp it still with a wrench, using another plumbing wrench to try and turn the valve). My hope was to disassemble it in place so I wouldn't have to undo any of the piping.I'm going to see if I can find something like a vise to more securely hold the manifold, but its located in a bit of an awkward spot so I may just have to disassemble the manifold and move to my workbench.
My wife has also encouraged me to call our local trusted plumber, so I've set up an appointment with them for next week, but I'm hoping I can take care of this on my own before then.
0 -
A little bit if heat can help stubborn fittings come apart. Even a hairdryer can warm the brass enough to expand it
Bob "hot rod" Rohr
trainer for Caleffi NA
Living the hydronic dream0 -
Same manifolds that I have (25 yrs old in my case), discontinued and as stated you will need to swap the manifolds and valves out at some point.
On mine, the black caps are just.. caps. If you unscrew a cap, it exposes the top of the valve itself (inside the manifold). Flip the cap over , insert into the top of the valve, and use it as a tool to turn the valve more open or closed. You can leave the caps loose or tight, it makes no difference on flow or leaks. If you're getting leaks from under the cap area, then the upper seal of the valve has failed.
30+ yrs in telecom outside plant.
Currently in building maintenance.0


Categories
- All Categories
- 87.7K THE MAIN WALL
- 3.3K A-C, Heat Pumps & Refrigeration
- 59 Biomass
- 430 Carbon Monoxide Awareness
- 129 Chimneys & Flues
- 2.2K Domestic Hot Water
- 5.9K Gas Heating
- 122 Geothermal
- 170 Indoor-Air Quality
- 3.8K Oil Heating
- 79 Pipe Deterioration
- 1.1K Plumbing
- 6.6K Radiant Heating
- 396 Solar
- 16K Strictly Steam
- 3.5K Thermostats and Controls
- 56 Water Quality
- 51 Industry Classes
- 51 Job Opportunities
- 17 Recall Announcements