Welcome! Here are the website rules, as well as some tips for using this forum.
Need to contact us? Visit https://heatinghelp.com/contact-us/.
Click here to Find a Contractor in your area.
If our community has helped you, please consider making a contribution to support this website. Thanks!
new boiler questions
Options

JuliaV
Member Posts: 45
I am so glad I found this site. I own a 1950 cape cod style home in New England. Obviously heated by steam, our former boiler was a monster Utica which had been converted to gas from oil at some point (don't know when). We replaced this in November, due to it leaking carbon monoxide and being inefficienct.
Since then we have replaced it with a new more efficient model.
I am not too thrilled with this purchase and install. We have experienced a ton of noise and clanging. Enough that it keeps me up at night. When the building inspector came today he mentioned something about needing a 'hartford loop.' What is that?
Our gas bill also has not declined at all. I am shocked at this. Could there be something wrong with the boiler that is causing this? Certainly our 50 year old steam boiler couldn't possibly have had the same efficiency as this new one?!
0
Comments
-
Post some pictures
Hello:
Generally, the first request is that you post some pictures of your new boiler. If you have the same problem as I do, your new boiler is likely not piped correctly. My installers (albeit much before I owned the house) used the old piping and did not follow the installation instructions. You can normally find your boiler online and see what the piping is supposed to look like. There should be a .pdf file on the manufacturer's site of a piping diagram.
Newer boilers use the near piping as part of the steam chest, so if it is done incorrectly, the banging will commence.
It took me a long time to find someone reputable to install a new boiler for me. Many companies will purport to understand steam systems, but few actually do.
Hang tight, post some pictures asap (all angles of the boiler, and make sure you get wide enough shots that show all the piping around the boiler), and keep an eye out for some responses. There are some experts that will respond to you, but they work late!0 -
please post pictures
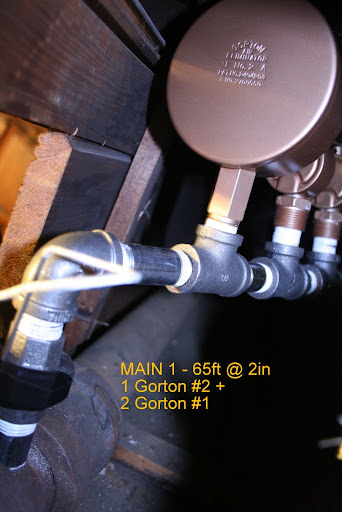
of all sides of the boiler and all piping from boiler to ceiling and boiler to floor. stand back far enough if you need to to get entire boiler and above boiler piping in same picture .. what brand/model boiler did you install?1-pipe Homeowner - Queens, NYC
NEW: SlantFin Intrepid TR-30 + Tankless + Riello 40-F5 @ 0.85gph | OLD: Fitzgibbons 402 boiler + Beckett "SR" Oil Gun @ 1.75gph
installed: 0-20oz/si gauge | vaporstat | hour-meter | gortons on all rads | 1pc G#2 + 1pc G#1 on each of 2 mains
Connected EDR load: 371 sf venting load: 2.95cfm vent capacity: 4.62cfm
my NEW system pics | my OLD system pics0 -
what, no hartford loop?
if the inspector notices no hartford loop, then that is a sign of an improper installation. best to get a copy of the installation manual, and compare the instructions with what you have now.
posting some pictures here will also reveal any shortcomings.--nbc0 -
plumber is coming by
THanks everyone for the responses. Our installer is coming by momentarily to do a quality check on the install and also check to see that all of our valves are working correctly. We have different types of radiators. Hard to explain, I don't know what they're all called. One valve needs to be replaced, the threading is stripped. It's mickey moused fixed now, held on with a clamp, but obviously it needs to be replaced sooner rather than later it is hissing loud.
Our upstairs radiators lag behind the downstairs ones. Not surprised, common physics will tell you that it is further from the heat source, hence them being slower to heat. However, I don't feel they get 'as hot' as the downstairs ones. Going to ask about this also. The upstairs feels cooler than the downstairs as a result. We added insulation to our attic last year, so this is not the issue. Probably could stand to add some to the knee walls, but this will have to wait until next year. It never ends.
I am going to mention that the building inspector mentioned the Hartford Loop and see what he says. THe building inspector said that if they don't fix it properly then he will call them and force them to do it.
I will upload some pics as soon as he leaves, he will be here within minutes. It may be a little hard to see some piping as I covered them with insulation last wk. It truly is amazing how much heat escapes from the pipes. People are crazy not to insulate the pipes. I will also add pics of the varying types of radiators we have. Maybe someone can educate me as to the difference.0 -
plumbers comments
He said they will come back and reconfigure piping and it shouldn't have been done that way it is to begin with. I'm assuming we won't be charged for it, we will see what the proposal says when he emails it to me.
He is going to change all the valves on the radiators, and fix a small leak in one of the upstairs ones.
I have attached some pictures. Comments are welcome!!0 -
Upstairs should heat up at about the same time
Julia,
I live just south of Boston in a six room cape that was built in 1918 (steam boiler replaced in 1996) and my upstairs radiators start to heat within a minute or two of the downstairs ones. One key to this is having a large enough main vent on the steam main(s) in the basement. Your pictures don't show any but they may be at the end of the main(s). Ask your installer to make sure the main vents are working and that they are large enough.
Also can you post a couple of pictures on the piping above the boiler so we can see how that is configured? This will let us see if that portion of the piping was done correctly.
good luck,
BobSmith G8-3 with EZ Gas @ 90,000 BTU, Single pipe steam
Vaporstat with a 12oz cut-out and 4oz cut-in
3PSI gauge0 -
Julia the boiler has a manual that came with it.
There is a diagram of how the boiler needs to be piped. It needs to be piped in Iron pipe above the water line, which is most of your system. The insulation alone makes me think it is a person not familiar with steam boilers, What type of pipe did they use, do you know?Cost is what you spend , value is what you get.
cell # 413-841-6726
https://heatinghelp.com/find-a-contractor/detail/charles-garrity-plumbing-and-heating0 -
new pics
Here are new pics.
I did the insulation myself hahahaah! Does it look awful???? Should I re-do it?0 -
one other thing
I asked about efficiency. This boiler has the same gas usage as our last ancient one which makes no sense to me. He said that correcting the piping will help with this. Does this make sense?0 -
Questions
Hi Julie- Thanks for posting the pictures as this really helps us.
I've attached a blow up of one of your pictures and labeled the main steam pipes as Main "A" and Main"B". Check the slope of these pipes. Is the lowest point of the pipe at the end over the boiler? That is, does the slope go in the same direction as the blue arrows? If so you have what is know as a "counterflow steam system".
Good Insulation is very important. For steam pipes it should be at least 1 inch thick.
Here's a link to a good article on the need for good insulation.
http://www.heatinghelp.com/article/11/Hot-Tech-Tips/300/Why-you-should-insulate-steam-pipes
However for now you need to get your near boiler piping straightened out. Insulation comes last so we'll cover that later.
Please give us the make and model numbers of your boiler. These are found on the manufacturer's plate mounted on the boiler. Charlie, who is a very experienced steam pro, can probably recognize it from the pictures but some of us I'm afraid aren't that experienced so need the mane and numbers.
Another question: Do you have main vents? These look like either like a silver bullet sticking up or a can of tuna on its side. and are located on the mains at the far end from the boiler. The pictures of your radiators will help a lot as they will give us a better overall idea of your steam system.
Efficiency- Piping improvements and proper insulation should make a big difference in this area. Another question: When the burner is running what is the highest pressure on the steam gauge? Sorry for all the questions but they help us formulate a solution for your system
- Rod0 -
more photos!
I attached the only thing I could find that resembles a tuna can. I do see vent mentioned in our original proposal. I have attached a photo.
The pipes slope in the direction you described. Our plumber commented they had a good slope to them.
I have attached new pictures. You will see all information requested. I have uploaded a sample of three of our radiators. The largest one is the only one in the house that has 2 pipes. It kicks off the most heat. Dog loves it. The cast iron one is the only of its kind, the other are the style of the 2 pipe and one with the blue paint behind.0 -
reading
waiting for it to kick on to read the gauge for you0 -
1 psi
is that what i'm supposed to be looking at?0 -
It should look more lik this with
a better insulation job, notice two risers instead of the one and a drop header to ensure dry steam to rads. Very quiet and fast heating.0 -
insulation
Thanks for the photo on proper insulation. I will add some more after they fix my pipes. I will prob opt for cheap batts and duct tape, as opposed to this expensive foil crap (10 bucks a roll for 25 feet which does not get you very far). Not looking forward to that.0 -
new boiler questions
Hello Julia V
I have looked at the pictures you have sent and as always the new installer does not understand steam heating. You have what is called a single pipe system and it is the oldest of the steam configurations -- but; installed correctly it will work very well indeed. The whole secret behind single pipe steam is to keep the steam away from the now relatively cool returning condensate. If the steam meets the condensate you will have what is called water hammer or steam shock --- I have in commercial jobs seen cast iron fittings broken from this meeting of steam and water. The old boys who installed your original boiler understood that the steam and the condensate were going to occupy the same pipe one on the top steam and one on the bottom condensate so they sized their piping so enough room was provided that the leaving steam did not meet the condensate. Your piping is done by someone who installs hot water heating. The piping should take advantage of all the tapping's the boiler has on top the more outlets the better: it allows the steam to leave more easily and will produce more "dry " steam to the system or the installer could have provided you with a steam chest. A steam chest is a piping arrangement where the supply pipes go over ninety degrees into another pipe and this pipe then delivers the steam to the house. The boiler system you have depended on static water pressure to push the condensate back into your boiler unlike today's dry returns, that use steam traps and condensate pumps, so the steam and condensate are effectively separated. A Hartford loop was " invented " by the Hartford Insurance Company many years ago to make sure in the event of a leak the boiler would not boil dry with all the nasty consequences. In today's age, they are no longer considered to be needed, due to modern steam installation criteria. What a Hartford loop would do for you on this job I do not know; I am assuming perhaps erroneously, your boiler is equipped with a non resetting low water cutoff, this would protect you and the boiler. The solution to your problem is not a difficult one if you get an experienced steam man on site. Enlarge the steam main -- if possible pipe it as a steam chest -- make sure the pipes coming back to the boiler have a good pitch to them towards the boiler --- enlarge the condensate return line, I am sure the pipe is causing a back up of condensate as it is too small to handle the volume it has coming back This will allow two things to occur for you, the condensate will leave the common supply pipe quicker making steam and condensate interaction less likely and supply much needed condensate back to the boiler proper much quicker. The otherabsolutely nessicary thing you can do for your system is insulate the piping, the exposed piping is causing the steam to condense before it can reach your rads and it also greatly compounds your water hammer problem as the amount of condensate formed it much larger than it should be. In the event the piping discription does not make allot of sense do this; simply pour water into a glass and then place it horizontally and look at it. The water is on the bottom of the glass and above there is clear space of course. The same thing is happening in your piping, the condensate is on the bottom of the "glass"the steam is in the clear area above the water; if 240 degree steam meets water, the water flashes to steam in an explosive manner making a hammering sound. Make the pipe big enough and the steam is too far away to reach the water so no sudden transformation from water to steam occurs--- silence! hope this helps, the best thing you could, do barring a good steam man is to buy Dan`s book on steam heating it is packed with information and even to the non trades person it is fun to read.All the best and a very Merry Xmas and quiet New Year -- steam wise. Jack Ennis Martin
Oh by the way, I live in Winnipeg .Manitoba Canada considered to be the coldest large city in the world --- we learn how to heat buildings out of frost bite, how many toques can you wear.0 -
Winterpeg, Manitoba
Usta live there when there was still a crosswalk at Portage & Main. Cold and windy.0 -
Counterflow System
Hi Julia- Attached are some diagrams and pictures of counterflow systems. On a counterflow system, the steam main is sloped back towards the boiler. The steam travels up the main (slope) to the radiators and the condensate (water) flows from the radiators, down slope, back to the boiler. Hence the name "Counterflow".
The big consideration with counterflow systems is to keep the condensate flow that runs in the bottom part of the main from interfering with the steam flow that runs in the top part of the main. If the two steams collide it produces what is called "wet steam" which isn't very efficient. If you look at the drip pipe(s) on the drawings /pictures you can see that they duct the returning condensate (water) away before it has a chance to drop into the steam stream coming up from the boiler header to the steam main.
Drop Header- I modified one of the drawings on Page 17 of your boiler's installation manual to fit your system. The lower boiler piping should be piped using the configurations, pipe size and dimensions as on the main drawing on page 17. Both steam exit porst on the boiler should be used as this lowers the velocity of the steam leaving the boiler and this means that less water is carried up into the piping. The dropheader configuration helps separate the water from the steam and the separated water returns to the boiler by way of the equalizer pipe.
Look over the drawings and pictures and let me know what questions you have. The very nice counterflow system shown in the pictures was done by Steve Gronski, a Rhode Island steam pro.
- Rod0 -
main vent?
All of the posts have been incredibly helpful.
I am not finding a 'main vent.' Do I need to have one?0 -
yes,
Air and steam cannot ocupy the same space.
As for efficiencies, your new boiler, (assuming it is installed correctly, Steam traps are working and main vent is working and large enough) should be a lot less expensive to operate.
Using myself for an example, my old boiler and system, which was put in in the 1930's and not maintained, cost me around $500/per month for natural gas before it died. My new boiler, steam traps, vents and proper pipe insulation all around and I have yet to exceed $200/mo. This is the coldest December in NC history so this will probably be the largest fuel bill I should ever expect. You should see lower bills if all is operating properly-and your boiler is sized correctly.0 -
Main Vents
Hi Julia- Yes, you need main vents! On a counterflow system they should be mounted on each main just after (towards the far end of the main) where the farthest radiator from the boiler has its lateral pipe (going from the steam main to the radiator) attached. The idea of the main vents is to allow the steam to push the air out of the steam main(s) quickly so that steam can reach the radiators. When the steam reached the main vents, they shut off and then steam enters the radiators. To this quickly the main vents need to have large venting capacity. Quite often you'll find that the main vents are missing as an earlier installer was taking a short cut and using the radiator vents to do both the venting of the radiators AND the mains. This isn't very efficient and leads to "noisy" radiators as the radiators are being vented too quickly to make up for lack of main vents. There is a steam adage "Vent your mains quickly and your radiators slowly!" If you can tell us the approximate size of your mains (length and pipe size) we can calculate how much main venting you need. With main vents the more venting the merrier though this doesn't hold so for radiator vents.
You might want to read this link on venting which is on Gerry Gill's website.
http://www.gwgillplumbingandheating.com/webapp/GetPage?pid=415
Gerry is a very experienced steam pro in the Cleveland area. While you are on his website take a look around as he has a lot of good information there on steam heating.
- Rod0 -
main vents
As Rod said earlier it appears you have a counterflow system where the main slopes up and away from the boiler. The steam flows up the main while any condensing steam flows back along the same pipe to return to the boiler.
In that kind of system the main vent is usually towards the end of each steam main. It was originally probably chrome, copper or green. It usually comes off the top of the pipe. take a picture of anything you find and tell us what model it is, that info is usually stamped into it's body. These vents can be anything from a 4" long torpedo shaped device to something the size of giant tuna can on it's side.
Also estimate the length of each steam main and the diameter of the pipe. With that information we can tell what kind of venting you should have. If your main vents are too small you are burning fuel to compress air instead of heating the house.
BobSmith G8-3 with EZ Gas @ 90,000 BTU, Single pipe steam
Vaporstat with a 12oz cut-out and 4oz cut-in
3PSI gauge0 -
venting information
I just looked EVERYWHERE downstairs to look for a main vent. I see nothing. I followed the pipes everywhere I can see (which is everything) and I do not see any vents. Guess I should mention this when they come back to fix the piping. I have learned a lot already and it seems like this heating system needs some TLC, the boiler replacement was just the beginning.
The mains are different lengths, the longest is about 11 ft, the other a tad shorter. That measurement is from where the main starts at the boiler to where the pipe takes a turn, one takes a right angle to the other side of basement, and the other splits in two directions, the first with a pipe going up at a 45 degree angle and then up at 90 degrees to meet the living room radiator, and the other at 90 degrees. When I follow that pipe, I see that at one point it changes sizes to a smaller pipe, but the same material. This pipe then goes upstairs and heats the master bedroom.
I insulated the pipes so hard to tell size but they are about 2.5 inches. That would be my best estimate.
0 -
one more thing
One other thing. In the original proposal (photo posted, scroll up to see), there clearly is 'new steam vent' listed. Well, so where the H is it? Am I wrong in thinking they did not do this if I don't see any vents off the mains? In a previous post, there was a comment that it could have been skipped and now all the venting is done through radiators. Sounds like this is my problem.0 -
Vents
When they come back to correct your piping have them show you where the vents are. There should be a vent towards the end of each 2-1/2" pipe, not the 1-1/4 or 1-1/2" radiator leader pipes.
If the mains are both about 11 ft of 2" ID (that would be 2.4" OD) pipe then each one contains about 41.5 cu in or 0.24 cu ft. If they are longer or there are more than 2 mains that would change. Each of those two 11 foot mains would need a Hoffman 4A (or it's equivalent) on it. The Hoffman 4A is rated for 0.216 cu ft at 2oz of pressure.
Just wanted to add that a Hoffman 4A would be the minimum size vent I'd like to see, bigger vents (on the mains) are always better!
Also make sure the boiler is set to a 1.5 PSI cutout on the pressuretrol. Most vents won't release till they get below 3 PSI so you really want to keep the pressure low. remember the Empire State building is heated with 2-3PSI steam - all 100+ floors of it.
BobSmith G8-3 with EZ Gas @ 90,000 BTU, Single pipe steam
Vaporstat with a 12oz cut-out and 4oz cut-in
3PSI gauge0 -
good advice
I am definitely going to ask them to show me where the vents are. Will be interesting to see what the response will be. I wonder if they will charge me. Clearly the proposal says vent but I dont see any. Hoping not to open a can of worms.
I assume adding these vents will also improve efficiency of the unit, right?0 -
Vents
Are inexpensive...go to pexsupply.com and look at gorton #2 vents. It will give you an idea. But, if it is in the quote, you already paid.0 -
insulation
The usual way of insulating pipes is with something like this:
http://expressinsulation.com/one_in_fb.html
Each piece is three feet long and has a built-in tape strip so you just open it up (the side with the tape is slit), fit it on, and tape it shut. I don't know how the price compares to an equivalent amount of fiberglass batt, but it's pretty easy and not all that expensive. Just make sure you measure carefully- 1, 1 1/4, and 1 1/2 inch pipes can be easy to confuse with the adjacent size.
You can also buy shaped pieces to go over the fittings (elbows, Ts), but they're more expensive for the amount of surface they cover so many people just use cut up batts and duct tape for them.0 -
Main Vent Location
Hi Julia- When speaking to the contractor about it, you don't want just "changes made to your piping", you want it "piped as it directs in the manufacturer's installation manual with the appropriate piping (drips) for a counterflow steam system".
Main Vents- I've attached a drawing of a typical steam system with branches showing where the main vents should go. If you can provide us with a sketch of your piping we can better recommend main vent location.
When one looks at an old steam system one has to try an figure out what the "Deadmen" originally had in mind and what has then been changed over the years. Some changes are beneficial but most are "Mickey Mouse" and have been done by people that didn't have a clue as to what they were doing. You'll see the term "Deadmen" referred to quite often on this website and this refers to the original steam system installers. These, for the most part, were very competent steam men and were experts in steam piping. A lot of restoring these old systems is figuring out what the "Deadmen" had in mind and then putting it back that way.
In your system's case there may have not been main vents fitted originally but they should have been when the boiler was changed from wood/coal to gas /oil. On the original system to get steam you build a fire and then kept it going 24 hours a day as long as you needed steam heat which in the winter may have been several months or more. The fire built slowly and it might take several hours to initially build steam. During this long period of time, air would be pushed very slowly out of the steam mains and through the radiator vents. As this was such a slow process, main vents weren't necessary. Today when the gas burner is turned on, there is instantly a huge hot fire under the boiler which in turn produces steam very quickly. This means there is a need to release the large volume of air quickly from the steam mains to allow the steam to get to the radiators. Hence the need for Main Vents. With the ON/OFF heat from a modern gas burner (rather than a steady continuous heat of a coal fire) you want to get the steam to the radiators as quickly as possible so they begin heating the house. Quickly heating the house to the set temperature on the thermostat means less time the burner is on and that saves fuel.
- Rod
0 -
hi again
Rod your sketch is extremely similar to the layout we have here, so I won't bother providing my own. Right now I am going over the installation manual to see any reference to 'venting.' So far all i am seeing is mention of a 'venting system,' which can be the chimney. I am not seeing anything called 'main vents.' I will keep reading though.
I read this article:
http://www.inspectapedia.com/heat/Steam_Vents.htm
I have those vents on all my radiators. We are replacing them all since they are all old and different types. Are these another venting mechanism?0 -
What I have learned, need feedback
Okay, so here is what I have learned and what I will relay to the installer.
1) We do not have a proper venting system. All air vents on radiators need to be replaced. We need main vents installed on both main pipes A and B.
2) This improper venting system is partially to blame for the lack of efficiency of this new model.
3) New piping organization will include the additon a hartford loop.
4) Installer also mentioned something about adding an additonal equalizer (can't remember if he said additional or what it was but he certainly mentioned a modification to the equalizer pipe).
I am hoping all of these modifications will leave us with the efficient system we were hoping for when we trashed our late 1940's gas conversion unit end of October. When I compared usage by day and temperature, I see not change with this new unit compared to our last.
In addition I am anticipating a decrease in all the noise from this new system. Banging, hissing, etc. LOUD LOUD LOUD.
Am i right?0 -
Piping and venting
That steam boiler will not work properly until all the noted defects have been corrected including, but not limited to -
1. The near boiler piping is done per page 17 of the installation manual. Everything above the waterline has to be in threaded steel (of the specified size), anything below the waterline can be in copper. the water supply will be in copper also. That diagram on pg 17 shows the equalizer pipe.
2 The boiler will have to be skimmed once the piping is changed, it may have to be skimmed more than once to get rid of all contaminants introduced by the piping.
3. The ends of all the mains must be vented quickly and completely. If no main venting exists now then they will have to cut into the piping.
4. The radiator air valves should be adjustable so you can balance the system, Hoffman 1A's would be a good choice.
If I recall your contract specified an air vent so you can expect to be charged for a second main vent.
Once all of that is done, you should experience a quiet and efficient steam system.
BobSmith G8-3 with EZ Gas @ 90,000 BTU, Single pipe steam
Vaporstat with a 12oz cut-out and 4oz cut-in
3PSI gauge0 -
Answers
Hi Julia-
Answers-
"Right now I am going over the installation manual to see any reference
to 'venting.' So far all i am seeing is mention of a 'venting system,'
which can be the chimney. I am not seeing anything called 'main vents.' I
will keep reading though." I doubt if you'll find a reference about steam venting in a boiler installation manual as it has to do with the install and piping the boiler and doesn't address steams system design. Off hand I can't think of any boiler manual that I have read that mentioned main vents.
The Inspectipedia article is a little bit confusing as they don't differentiate well between "Main Vents" and "Radiator Vents". Look at the article- the last picture in the article, the vent up near the ceiling mounted on a pipe is a Main Vent (It's also a very poor example of how to mount a main vent.)
Main Vents look very similar to radiator vents. Main vents can easily be recognized as they have a big pipe (normally 1/2 to 3/4 inch MPT) to connect then to the system. Radiator vents are all 1/8 inch MPT pipe (MPT = Male Pipe Thread) While looking somewhat similar, the venting capacities of a main vent are much greater than that of a radiator vent. For example- The Gorton # 2 Main Vent has tens times the venting capacity of a Hoffman 1A Radiator vent.
The 3 most popular standard main vents are: Gorton #1, Gorton #2 and Hoffman #75.
Venting Capacity: The Gorton #2 has 3 times the capacity of a Gorton #1. The Hoffman #75 is about half the venting capacity of a Gorton #2
Having a high main venting capacity on each of your steam mains makes a big difference in the system's efficiency.
- Rod0 -
Additions
Just to take Bob's recommendations further- You have to divide the boiler installation into two parts-
1. One part is the boiler piping as per the drawing on Page 17 in the manual, the risers coming out of the boiler, the header, the equalizer pipe, the Hartford Loop and the Wet Return. Compare the boiler installation drawings on page 17 to the drawing I attached earlier and you'll see both drawings outline similar piping. This piping is common to different boiler system configurations.
2. The second part of the installation is the piping that is uniquely required by a counterflow system. This is the drip lines sloping from the boiler end of the steam mains to the Wet Return. (See earlier attached drawing) The "drip lines" are required to keep condensate (water) from interferring with the steam stream coming up the riser pipes from the header to the mains.
Bob has already covered main vents and radiator vents so I don't need to.
Installing these and/or replacing them is common in all new boiler installations.
Here is a link to a video on near boiler piping that might help explain boiler piping better.
http://www.heatinghelp.com/article/107/Steam-Heating/118/Steam-boiler-near-boiler-piping
- Rod0 -
thanks everyone
Thanks everyone for your comments. Rod, the video was especially helpful.
I am going to show the installer the diagram and just mention that my expectation is that it should mimic the drawing once the work is complete.
Back to those main vents, since we don't have any, and the proposal mentioned a new 'steam vent,' is there another type of vent they would have meant?0 -
the only thing ...
that terminology can possibly confuse is the "pressure relief valve" located on the actual boiler which is not really a cheap part and required for safety and code. see a few examples in this link: http://is.gd/j2EOk ..
one could stretch their imagination to believe that a safety relief valve is there to "vent steam" in the event of an overpressure emergency .. maybe nomenclature in your region calls this a "vent" .. but then again, mine was included with a new boiler (and I didn't even get a packaged boiler).1-pipe Homeowner - Queens, NYC
NEW: SlantFin Intrepid TR-30 + Tankless + Riello 40-F5 @ 0.85gph | OLD: Fitzgibbons 402 boiler + Beckett "SR" Oil Gun @ 1.75gph
installed: 0-20oz/si gauge | vaporstat | hour-meter | gortons on all rads | 1pc G#2 + 1pc G#1 on each of 2 mains
Connected EDR load: 371 sf venting load: 2.95cfm vent capacity: 4.62cfm
my NEW system pics | my OLD system pics0 -
Main & Radiator vents only
To answer your question- Main and radiator vents are the only types that are normally found on a residential steam system.
I don't know whether you have seen them yet but there are some very good books on steam heating available in the "Shop" section on this site. Start with "We Got Steam Heat!" as it is a very good introductory book and will give you the knowledge that will save you a lot of money in the long run.
http://www.heatinghelp.com/products/Books/5/61/We-Got-Steam-Heat-A-Homeowners-Guide-to-Peaceful-Coexistence
It's written for the homeowner, is easy, humorous reading and is packed full on pictures diagrams and info on steam heating.
- Rod
Edit: Good point jpf ! We get some weird uses of terminology in steam heating.0


This discussion has been closed.
Categories
- All Categories
- 87.3K THE MAIN WALL
- 3.2K A-C, Heat Pumps & Refrigeration
- 61 Biomass
- 429 Carbon Monoxide Awareness
- 120 Chimneys & Flues
- 2.1K Domestic Hot Water
- 5.8K Gas Heating
- 115 Geothermal
- 166 Indoor-Air Quality
- 3.7K Oil Heating
- 77 Pipe Deterioration
- 1K Plumbing
- 6.5K Radiant Heating
- 395 Solar
- 15.7K Strictly Steam
- 3.4K Thermostats and Controls
- 56 Water Quality
- 51 Industry Classes
- 50 Job Opportunities
- 18 Recall Announcements