Welcome! Here are the website rules, as well as some tips for using this forum.
Need to contact us? Visit https://heatinghelp.com/contact-us/.
Click here to Find a Contractor in your area.
If our community has helped you, please consider making a contribution to support this website. Thanks!
one or two pipe riser
Options

fjcruiser105
Member Posts: 29
Is it better to use a singler or use dual risers off the boiler. The boiler company schematic shows a single riser but since I'm repiping anyway, should I use both.
0
Comments
-
Multiple Boiler Risers
If there is a second boiler riser port available I would use it. The more, the merrier as it slows down the velocity of the steam exiting the boiler. Slower velocity means less water dragged along and less water = dryer steam.
- Rod0 -
one or two pipe riser
I have a follow-up to your post. Again, dont know if I should change it but my house is a two-pipe system with two feeds and two returns. The boiler's near piping looks adequate(comparing it to the boiler schematic) but the riser from the boiler runs vertical into a tee that goes to the front and rear of the house. Will that cause wet steam, which I read is bad. should I run two seperate vertical feeds, one for the front and one for the rear.0 -
Boiler Piping
Hi- Pictures of the boiler and near boiler piping would really help. Take them far enough back so they get in the piping around the boiler. we can blow them up if we need to see detail.
The steam risers coming out of the boiler should go into a header with an equalizer at the lower end. The steam riser then go from the header to the main(s). The idea of the header is that is separates out water that is picked up by the steam leaving the boiler. The water then returns to the boiler by way of the equalizer and the drier steam goes up into the steam mains.
- Rod0 -
I had a similar setup
we decided to send 2 system risers up and cut the main to form 2 separate loops. Also, my boiler manual required 2 risers. Dual system and boiler risers take up a lot of space. Heres a pic of how we ended up. Can you post some pictures of your current setup? What kind of boiler do you have? I drooled on that second pic for 6 months.0 -
Pictures
This boiler was put in a year ago when I bought the home. The old boiler was leaking so I had the sellers install a new one. It passed a home inspection so I figured all was good. Last winter I noticed it took a long time to heat my house so I posted about that and was told about checking main air vents which I corrected. I have a 187,500 BTU Williamson gas boiler and now I'm thinking the near piing is incorrect. Also there is only one air vent near the boiler which I changed , it vents almost the whole time the boiler runs and for about five minutes after it shuts off. Is that okay? Here are some pictures. Help will be appreciated0 -
You are right
Looks like it needs some piping redone. Looks like the same installer we had back in 1980.0 -
Pictures.
Hi-
If you would could you please post some new pictures of your boiler. Take them from farther back and try to get all the piping in. Take them from different sides so we can trace out the piping. We can blow up the pictures if we need to see more detail.
- Rod
Edit- I 've attached one of your pictures with labels. I'm trying to get an mental picture of you system and have a few questions
It would seem "A" and "B" are mains.
1. Is "C" the dry return for "A" ?
2, Does "B" have a Dry Return?
3, Do "A" and "B" slope away from above the boiler?
4, I see a vent for I believe is Main "A" on the pipe "C".
5.Does Main "B" have a main vent installed on it?
6.How many radiators are there attached to main "A" ?
7. How many radiators are attached to main "B"?
8 What is pipe "G" ?
9. What is the make and model # of your main vent(s) ?
Once we can get a better idea of your piping layout we should have a better idea of things that might help you improve its operation.. Also do you have the Installation manual for the boiler?
- Rod0 -
pics
A and B are Main lines... A has 8 Rads...B has 5 Rads
C is dry return for Main A..there is a dry return for Main B..it tees into C right before it drops down to the boiler.( the pipe turns white) that has a (made in china) air vent that services both dry returns
G is a pipe that is capped about two feet away. It used to go to an elaborate condesate trap that was below the ground which was removed during new install(was told it was not needed)
The mains pitch down away from boiler...except when the riser tees towards Main B, because it 45's up and into that main
Picture 4 shows the dry return teeing into Pipe C
Picture 5 is a condesate return that attaches to the equalizer. There is a tee with a 6 inch piece of copper that is capped before it goes into the boiler(assuming clean out). There is also a hot water zone for the basement attached so thats the other copper pipe going into the boiler
Picture 6 shows pipe G capped0 -
Piping
Hi- Thanks for the pictures . They're a big help. I've attached a labeled picture #4. Is it labeled correctly? Having the both the returns connect above the water line is a problem.
Each Main should also have it's own main vent. As it is now both lines are competing for the same vent and they also cross flow into each other.This is a simple fix and just changing this should make a lot of difference. I haven't had a chance yet to look at the rest of the piping. I'll try to get to that and draw up something tomorrow (today) to show this better.
- Rod
Edit: Added two labeled more pictures.
What is the stub labeled "X"?
I need a picture of the piping at the base of the boiler so i can see where the return and other pipes lead. Thanks!0 -
that was the old condestae
# 4 is marked correctly. X was where the old condensate returned to the boiler. After a couple of months running the boiler last year, realized there was leak in the return. Basement has finished hardwood flooring, so was trying to avoid major damage. I cut out a section of the floor about two to four feet away from boiler (had only one return) and found the leak. Cut out old section, and replaced it with copper pipe back to boiler. But after hooking it all up, realized most of the return pipe was rotted and would have to be changed. After a sleepless night, I took a chance and due to the fact that there hot water baseboard running the perimeter of the basement as a heating zone. I cut the condensate vertical lines on the opposite side of the basement and teed them into the baseboard using that as my new return. Disconnected the old return and capped it. The copper pipes you see below X are just the remainder of the first attempt of trying to replace that section of the return before realizing the whole thing needed to be replaced. So the copper pipe that goes into the 2x1x2 heel tee is the old baseboard feed, and on the opposite side of boiler where the circulator is attached was the old baseboard return, now becoming the condensate returns. The dry return runs vertically down where I connected to copper and that is the pipe you see that attaches to the 2x1 tee above the heel tee. Never had a problem with low water so I assumed the new return worked fine. Hope that's not a problem.0 -
Confusion
Hi - Maybe it's that I didn't get my normal cup of coffee and donut this morning, I thought I had your main and return system clear in my head but your latest post has me bit confused.
I read quote: "I cut the condensate vertical lines on the opposite side of the basement
and teed them into the baseboard using that as my new return." Does this mean there are more steam returns than shown in labeled picture # 4 ? (Return pipe for Main "A" which is labeled "C" and the return pipe from Main 'B" which is labeled "Return for "B". Both of which go into the "white" pipe labeled "Dry Return")
Since the "white pipe" drops down so close to the boiler having a wet return run around the perimeter has me confused.
You said you system was a 2 pipe system. Do the radiators have traps on the outlet pipe?
If it has traps have they been serviced recently and are they all working properly?
- Rod0 -
dry and wet returns
Its a two pipe system with traps on the outlet side that were serviced last year when I serviced the main air vents. The main lines A & B travel from one side of the basement to the other feeding each radiator, while continuing to the opposite side of the house where they elbow down vertically which I teed into the baseboard last year forming a new condensate return. The outlet side of the each radiator all drop down and tee into the dry return which pitches back to the boiler. Never got a chance to tie the wet returns into the dry return "X" which I'm planning on doing this weekend eliminating the basement hot water zone and using the condensate return water to heat the baseboard slightly since it stays pretty warm down there anyway.0 -
Piping
Hi- Okay,thanks! That helps clear things up a bit.
I would be a bit concerned with using the baseboard as a wet return as:
1. It maybe too small pipe diameter wise (what size is the pipe)
2. Being a wet return (where all the sludge settles) may clog up easily.
Let's discuss the mains "A" & "B".
Questions:
1.Are there any main vents on the steam mains "A" & "B" ? (After the last radiator on the each main is there a main vent before they drop down vertically ?
2. If no main vent as in question #1, is there any connection (other than through the radiators) from the steam mains "A" & "B" to the Dry Return "C" and "Return from "B" " ?
3. Where the verticals drop down from the end of "A" and "B" do they join the baseboard below the level of the boiler's waterline?
- Rod0 -
return
the baseboard is only 3/4 copper and I'm afraid it will clog, but I'm hoping not for a few years until I can renovate and redo the return line.
1.Main A & B have main air valves that sit at the end of each main, right where it drops vertically.
2.There is no connection other then through radiators from main to dry return
3. The connection is below the water line0 -
Piping (cont.)
Being on the opposite sides of the house I'm assuming each return off the main has its own 3/4 return through the baseboard (?) If each main has it's own baseboard 3/4 return this should be okay as it just has to deal with the condensate of one steam main and not that of the radiators.
I'm not sure it this is practical considering your wood floors, but perhaps it might not be a bad idea if on the verticals from the mains, you installed a ball valve and below that a "Y" with a setup so you could attach a garden hose and occasionally blow out the baseboard wet return.
Questions:
1 If I have this right, there are 3 mains vents. One each on the ends of each steam main ("A"& "B") and one other extended off the tee on the "white pipe" return next to the boiler ?
2. What Make and Model are the main vent valves? Are they all the same?
Glad to hear that the traps have been rebuilt as that eliminates a large area of concern.
- Rod0 -
air vents
Thanks Rod for your posts.
The blowout tees are a good idea since one return is in a closet and the other I boxed out. I posted pictures of the main air valves last year to get the info but cant retrieve them now. I was told the vents were Trane Vacuum Vents, one on each main. I removed them last year and blew through them and they were clear but I don't know if I should change them. Each main line runs approximately 50 feet with a 2" diameter. The one vent near my boiler is a (made in china) cheap looking valve.0 -
Venting Solutions
Hi- You mentioned that your system takes a long time to heat. From the information you provided and what i can see in the pictures, the main concerns with your system are the vents and the return configuration. From what I can see, your near boiler piping, while not absolutely ideal, is quite reasonable.'
1.Main Vents on the ends of steam mains "A" & "B" - I would replace each of these vents with at least a Gorton #1 main vent.(you may want to add more later but let's start with a Gorton #1).
The idea is to get the air out of the steam mains and steam to the radiators as quickly as possible. You mentioned that the present vent might be a vacuum vent. Vacuum vents are notoriously slow as they come from the days when boilers were coal fired and steam built slowly so there was no need for speedy venting.
2. Return Venting.- You need to separate the returns and give each its own drop to the wet return and each its own vent.
The vents on the steam mains allow steam to get to the entrance to the radiators and now the problem is how to get the air out of the radiators. This is is the function of the vents on the returns. Right now you have only one vent doing this and therefore radiators on both mains have to compete for the use of this one vent. Having the returns connected together (above the boiler's waterline) causes cross feeding which cancels out the venting of the less dominate return. I would put a couple of Gorton #1s on each return (put them on a tee or "antler".and you might want to even use a Gorton #2 - A Gorton #2 has 3 times the venting capacity of a Gorton #1)
Attached Diagram - Hopefully this is self explanatory. The new vent position is on short new piping leading off tee where "G" joined Main "A". I put a "notes" section on the diagram which cover most other things. Let me know if you have questions.
The improved venting will speed up the radiators and should make the system much more comfortable and efficient.
- Rod
0 -
cont
Thanks Rod, This is a great solution that I will tackle this weekend.0 -
Boiler Piping
While I understand the theoretical side of steam reasonably well, I completely lack the experience to make a judgment on how well a certain system will work especially when it comes to marginal systems. Your system isn't any where near marginal and with improvements to the return and venting I think you'll be quite pleased with its operation.
As you mentioned there are improvements that could be made to the boiler piping but how much benefit you would gain is questionable. Do you have the installation manual and do they recommend a second boiler riser going to the header? Looking at one of your pictures I was a bit concerned wih the height of your Hartford Loop. It looks low but I think it's caused by the camera angle. In any case I'd would just do the vents and returns now and decide on the boiler piping next summer.
- Rod0 -
Crash
Who did the work on your system? Being from the Detroit area, I wouldn't mind having another pro in my phone book. Thanks.0 -
Hartford Loop
The loop tee can be as low as you want, so long as it isn't lower than the boiler's return tapping. I usually tend to go a minimum of 4", and sometimes more, below the water line. Most people take the 2-4" dimension very conservatively because it's in the instructions. I would never argue with the manufacturer's recommendations...I will, however, interpret their idea of what is correct. It's the same idea as piping the header 24" above the water line. That dimension is also a minimum distance. The higher the better.0 -
not so low
I believe the purpose of the hartford loop is to keep water in should the return leak empty.if this is correct, then the height of the tee is crucially important.1-pipe Homeowner - Queens, NYC
NEW: SlantFin Intrepid TR-30 + Tankless + Riello 40-F5 @ 0.85gph | OLD: Fitzgibbons 402 boiler + Beckett "SR" Oil Gun @ 1.75gph
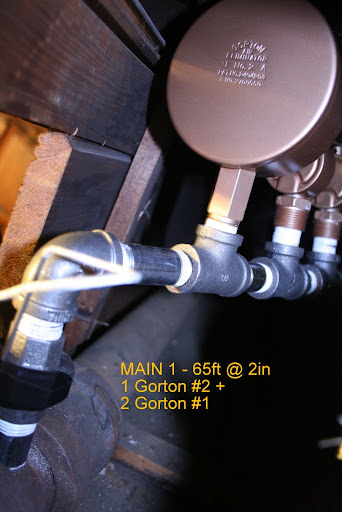
installed: 0-20oz/si gauge | vaporstat | hour-meter | gortons on all rads | 1pc G#2 + 1pc G#1 on each of 2 mains
Connected EDR load: 371 sf venting load: 2.95cfm vent capacity: 4.62cfm
my NEW system pics | my OLD system pics0 -
Loop
0 -
Hartford Loop
The near boiler piping is exactly the way it looks it the boiler manual (Williamson GSA 175) and the tee for the Hartford loop is 2 inches below water level, also as stated in manual. I was more concerned about the one riser attaching to Mains A & B. with a tee. Should I remove the tee and run separate risers to each main.0 -
Dual or not
I was faced with that same decision prior to having mine re-piped. The old way it was hooked up was very bad as you can see from the before picture. The way it was working before was that some steam actually made it to the main. Then once it got there it either went to the right or to the left, but it NEVER went both ways at the same time. The symptoms we were having were that only half of the house got heated at a time. We had this big invisible cloud of cold air in the house and all we did was move it from 1 side to the other, over and over, all winter. The house never really warmed up, ever.
Now things are quite different. (same boiler by the way) The boiler comes on, makes steam in about 3 minutes, sends it up and over the header to the system risers, starts filling the first system riser, then the second, pressures up, and clinks both Hoffmans at about the same time. Ocasionally they clink exactly at the same time. This tells me that the steam has filled both mains(150 LF combined) and is on its way to all the radiators (14) in the whole house at the same time.
I was hesitant to chop that 1 main, there was a lot of resistance, respect for the deadmen and all that, but I kept telling myself that deadmen didn't have natural gas. I do not regret my decision to chop it and form 2 mains, 2 returns, 2 sets of vents, tied into the other side of The Hartford. Gerry Gill was the final deciding factor for me when I asked "Should I?" You need to decide for yourself if the cost involved is worth it to you. It was to me, and thats all I got.....0 -
Header
I think I'd just wait and see how it worked first. There are a lot of steams systems out there that are working fine with the exact same configuration,. I'm a great believer in not making too many changes at one time as you then don't know which changes were beneficial and which ones weren't. It's also late October now and we could get a possible cold snap at any time so I'd see how the proposed changes work out and as I mentioned before wait until the heating season is over and make a decision about the header then. I'm glad you hartford loop connection is where it should be.
- Rod0 -
I am with ya on that Rod
Now is not the time for a complete teardown.0 -
split the dry returns
last night and installed a gorton # 2 on each one. Replaced my old main air valves with gorton # 1(didnt have room for #2). Ran boiler this morning. From time boiler riser got hot, it took 4-5 minutes before each main was completeley heated. 3- 4 minutes later all first floor rads were getting heated and 1-2 minutes more before 2nd fllor rads were getting heat. 18-19 minutes from when the riser got hot all first floor rads were fully heated and 3 minutes later all 2nd floor rads were fully heated. Dont know if the times are average or good but thats about half the time it usually took, so I'm psyched about that. I know it was the first time I put boiler on and my house had to heat up 4 degrees to satisfy thermostsat, but boiler ran for additional 31 minutes even though all radiators were smoking hot and boiler ran for 102 minutes from startup to when thermostat shut it off. Is that normal, does the boiler need to run after all rads are hot, its not like the rads could get any hotter? Should I let it cycle a few times over the next couple days and keeep checking times or is there someting else I should do?0 -
great testimonial...now
think about a vaporstat and a low pressure gauge. your right the boiler should have shut down on pressure after all radiators were fully hot.1-pipe Homeowner - Queens, NYC
NEW: SlantFin Intrepid TR-30 + Tankless + Riello 40-F5 @ 0.85gph | OLD: Fitzgibbons 402 boiler + Beckett "SR" Oil Gun @ 1.75gph
installed: 0-20oz/si gauge | vaporstat | hour-meter | gortons on all rads | 1pc G#2 + 1pc G#1 on each of 2 mains
Connected EDR load: 371 sf venting load: 2.95cfm vent capacity: 4.62cfm
my NEW system pics | my OLD system pics0 -
Congratulations!
Hi- Great to hear that the modifications are working well for you.
Once the radiators get hot and the rooms heat up, the condensing in the radiators should slow down causing the steam pressure should then build and if it reaches the shutoff point on the pressuretrol, burner should shut off. Possible reasons why this isn't happening could be that the boiler is undersized for the system or there maybe a steam leak in the somewhere in the system. You might -(Carefully! they could be very hot!)- check and see if one return vent is hotter than the other. This may be an indication that a radiator trap is leaking steam.
While I think about it, if you're making out your list for Santa, I might suggest the following. He brought me a great present last year, an infrared digital thermometer. (Ryobi Tec 4 Model # RP4030 from Home Depot) They are really handy for checking traps! I just measure the temp on both sides of the trap and it there isn't a temperature drop that shows a bad trap. The infrared is also handy for checking mains and vents as you can tell when the steam reaches them.
Testing steam pressure- You could shut off all the radiators to test whether the pressure control is working properly. With all the radiators closed, just the mains should fill with steam and the pressure should quickly rise, shutting off the burner. I would then start opening radiators one at a time and wait till the burner shut off again, then open (add) one more radiator. The pressure should drop and the burner fire, wait until pressure builds and the burner shuts off and then bring another radiator on line. You might want to test the radiators on each main separately. That is, test one main and then the other.
Are some rooms getting too hot? Maybe before you do the above testing, you might just partially close the valves on the overheating radiators. This would free up more steam if the system was slightly undersized.
Thermostat- I found it is beneficial to use a few cheap thermometers ( the bulb/liquid type) and place them in other rooms so you can monitor the temperature there. You can also put them in the same room as the thermostat to check its operation.
Playing around and doing a little testing should give you a better idea of what your system is doing. If you don't have one it's a good idea to get a low pressure gauge as http://www.gaugestore.com/prodinfo.asp?number=33020
as the 0-30 PSI is practically useless. (Leave the 0-30 PSI attached to the boiler as it is a code requirement.)
Let us know what you find out.
- Rod0 -
Santa
brought me the infrared temp thermometer last year, figured that was an easier way to test if my steam traps were working instead of boiling each one. The (very hot)return vent your talking about, is that the Gorton # 2, because mine were not hot at all. None of my dry return was hot but the vertical condensate pipe was burning hot. I keep reading on different posts about undersized boilers, so its got me thinking. I measured each radiator Sq. Ft. EDR, got info from Colonial supply Website. Measured all radiators, I have 465.08 Sq. ft. EDR. Looked at my boiler's manual and it said 454 Sq Ft Steam. Is that worrisome.0 -
The system sounds balanced.
Great! You already have an infrared! They're neat! I keep finding new uses for it. Before IR I had to stand on a ladder and feel the return piping to check the traps. Collected a few spider bites that way.
Good! You've already sized the EDR radiator load. Does the 454 square ft, include the pickup factor? It sounds as though your system is pretty well balanced to the boiler. Are there some rooms getting too hot? Perhaps you can throttle back a little on the radiators in those rooms and free up a little steam. If your radiators are getting hot all the way across it doesn't get any better.
Gortons- If the Gorton #2s were getting hot it would probably be a sign that one of the traps is leaking steam. The vertical pipe being hot is normal as the condensate is heating it up as it passes through.
Thermostat- If it doesn't have a cycle feature already you'll probably want to get a thermostat with a cycle setting. Usually for steam this is set to one cycle per hour. That means when the thermostat reaches the desired set temperature it won't turn back on again for an hour and this allows the radiators to "coast" a bit. If that appears to be too long a period you can change the cycles to 2 per hour.
Set back -There is some thought that with a steam system thermostat setback doesn't save much as it takes as much or more fuel to make up the temperature difference than just maintain a steady temperature.
- Rod0


This discussion has been closed.
Categories
- All Categories
- 87.6K THE MAIN WALL
- 3.3K A-C, Heat Pumps & Refrigeration
- 59 Biomass
- 430 Carbon Monoxide Awareness
- 124 Chimneys & Flues
- 2.2K Domestic Hot Water
- 5.9K Gas Heating
- 120 Geothermal
- 168 Indoor-Air Quality
- 3.8K Oil Heating
- 78 Pipe Deterioration
- 1K Plumbing
- 6.6K Radiant Heating
- 396 Solar
- 16K Strictly Steam
- 3.5K Thermostats and Controls
- 56 Water Quality
- 51 Industry Classes
- 51 Job Opportunities
- 18 Recall Announcements