Welcome! Here are the website rules, as well as some tips for using this forum.
Need to contact us? Visit https://heatinghelp.com/contact-us/.
Click here to Find a Contractor in your area.
If our community has helped you, please consider making a contribution to support this website. Thanks!
DROP HEADER MOCK-UP
Options

Luv'nsteam
Member Posts: 278
Hello all.
Here is picture of the header I am building for my steam boiler. It is my first, so I wanted some feed-back in case I have broken a rule or two (or more?). Some of the fittings are used (this is why you can see Teflon tape on some joints) and all pieces will be cleaned prior to final assembly. The bottom of the manifold with take-offs is at about 22" above the water line. The bottom of the first 90* on the riser out of the boiler is about 30" above the water line.
1) Does this assembly provide adaquate flex?
2) Does the coupler attaching the two nipples comprising the tall riser present any issues?
3) Is it high enough above the water line?
Thank you,
Mike
0
Comments
-
Are thos fittings
Galvanized?0 -
-
You may
have a corrosion problem in the distant future.0 -
Corrsion?
Can you explain what kind of corrosion? Ie: thread to thread area, external, internal? However, I will replace the fittings with un-coated iron. Thanks for the heads-up.
Do you see any other problems with the flexing of the header at any point along the assembly?
Are above-the-water-line distances ok?
Any other foreseeable problems/issues with the way this header is assembled?
Mike0 -
That's a pretty nice mock-up
The riser from the boiler to the first elbow at the top of the header can be 2" or whatever the steam outlet tapping size is, but the larger pipe (4"?) you're using won't hurt anything. Just be sure to insulate it!
It's possible for the galvanizing to flake off when used for steam, which can clog air vents if it goes too far. But given those big pipes, I wonder if there will be enough velocity for this to happen?
Looking forward to the finished job pics.All Steamed Up, Inc.
Towson, MD, USA
Steam, Vapor & Hot-Water Heating Specialists
Oil & Gas Burner Service
Consulting0 -
I Wouldn't
I wouldn’t use malleable fittings, or galvanized. You should use steam fittings, from a professional standpoint. I also suggest staying away from bushings, on the drop off the equalizer into the Hartford loop. You should use reducing fittings, again just a suggestion not a necessity. Might also want to swap that running coupling out with a union, or just have a union in general. And why the heel tees on the header? The header also looks huge, what model is the boiler?
-All constructive though, awesome first pipe. Keep the pictures coming!0 -
4" header
The tapping in the boiler is 2". The header is 4". When calculating the diameter to slow steam velocity, at 3" it was around 17+ fps. I know this is only 2+ over the desired max of 15fps, but I wanted it to be correct and my steam dry. At 3.5" the steam velocity is below 15 fps- great. When getting estimates for 3.5" I discovered 4" actually costs less for most components. At 4" the velocity is below 1 fps. The average cost of pieces for the header, even in 4" was $575.00 from three suppliers. I discovered a place that has, among other things, pipe, nipples, fittings, etc and they sell by weight (new and used-all the same price, you just scrounge for what you need). The header you see cost me only $140.00 which is I why I do not mind spending a little time cleaning them up. This is also why two 90*s have those fittings (you called them a heel tee?).
Referancing the coupler on the tall riser and the bushings at the end of the equalizer, I had thought about them gathering moisture and a potential cure: after tight assembly, smooth the inside gaps where water can gather with JB Weld. This stuff works to repair valve seats on automotive engines and I know someone who actually recoated the inside of discontinued brake drums, so I am confident it will survive well against high temp steam. Note also: I currently have more time than cash (that's all going to college with my daughter :~ ) ) and we use our wood stove for heating the house.
Are all galvanized fittings malleable steel? Other then future disassembly, what is the issue with malleable steel? Just for the record, the gentlemen who built my system did NOT read TLAOSH. There are several violations of the Dead Men's rules, but it all works, including other galvanized steel pipe and fittings (mostly wet returns and some dry returns).
The boiler is a Peerless, model WBV03, with net IBR rating of 98k btu.
I fully intend to insulate every pipe, fitting and riser, after all pics. This brings me to another question, for which maybe another thread would better? But that question is what do you call the kind of insulation that is firm to the touch and has no apparent joints or section parts? Like many insulated pipe pics on Gerry Gills site? And is this stuff paintable (for risers traveling through living areas)?
Thank you, for the words of encouragement and all of your help. More pictures will come as I make progress.
Mike0 -
pipe by the pound?
where did you find the place that sells pipe by the pound? others here may consider that a useful resource. thx.1-pipe Homeowner - Queens, NYC
NEW: SlantFin Intrepid TR-30 + Tankless + Riello 40-F5 @ 0.85gph | OLD: Fitzgibbons 402 boiler + Beckett "SR" Oil Gun @ 1.75gph
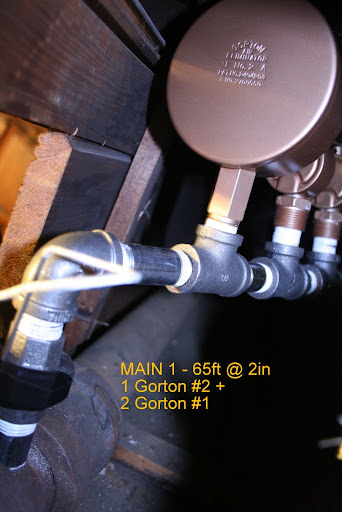
installed: 0-20oz/si gauge | vaporstat | hour-meter | gortons on all rads | 1pc G#2 + 1pc G#1 on each of 2 mains
Connected EDR load: 371 sf venting load: 2.95cfm vent capacity: 4.62cfm
my NEW system pics | my OLD system pics0 -
looks good
That's a nice setup. You obviously put some thought into it. I wouldn't change a thing other than maybe add a union to riser like someone else mentioned.
Other then future disassembly, what is the issue with malleable steel?
You're using teflon tape, so the pipes can be unscrewed easily. I don't know of any other issues.
Some people say galvanized corrodes faster. I'd still stick with what you have. In this case, watching and waiting is cheaper than trying to preempt a problem that may never occur. Same thing with the bushings. You could try to smooth the inside with JB weld, but every steam system has little nooks and crannies at the fittings that have no detrimental effect.0 -
Pipe by the pound
Mose's B Glick, on Hartz Rd, in Blandon, PA, outside Reading, off Rt. 73. They are a fabricators/American inventors dream supply. They have SO MUCH metal and machinery. If you go, you'll want to have several hours, boots and if it is cold, not-so-nice- looking cold weather gear- it is outside.
Another place I heard about, but have not yet visited, is called Fazio's. This place is in NJ and was described to me as being like Glick's, but 20 acres under roof. If anyone has been there or goes, please share you findings.
Thank you,
Mike0 -
looks good
Thank you for the kind words from all everyone. Yes, I did put time into the lay out (I tried to follow all of the Dead Men's rules). Next time I go to Glick's for the remainder of my system needs (I am replacing some of the dry & all of the wet returns), I will try and locate a 4" (non-galvanized) union.
Thank you,
Mike0 -
Nice Job
Nice Job! You're going to end up with nice dry steam! The union is a good idea as you never know when you might want to detach your boiler for something like a major servicing. I'm sure you had planned this farther along but I'd also use some hangers to take the weight of the 4 inch piping off the boiler. You might want to use plugged tees for elbows on the lower boiler piping /.wet return as this really helps out when you are flushing the system out. Use "never seize" or something similar on the plugs as this helps getting them out later.
- Rod0 -
Header hangers
Indeed, I do have hangers, also from Glick's and a 12 foot piece of all thread. The header weighs in around 155 lbs!!!! I also bought a hand truck while I was there to tote it all. : )
Mike0 -
re: insulation...
I have Johns-Mansville Abestoscell insulation on most of the steam pipe in my basement. I just replaced the boiler and used fiberglass insulation on the new piping. To help seal the existing asbestos and the seams and fittings on the new fiberglass insulation, I'm wrapping it all with a plaster-impregnated fiberglass tape (the stuff medical people use to make casts of when you break an arm or leg, etc.). This will "encapsulate" the asbestos as per EPA requirements and provide a hard, protective barrier to both the asbestos and fiberglass insulation. Also, it's cheap, a bit messy, but very durable and paintable if you want to paint it. The best price I found was from "Blick Art Supply". $1.61 a roll. By the way, I found the EXACT SAME tape, same mfg., same brand on a medical supply web-site selling for $54.85 a roll! Now you know why medical costs are sky-hi.......good luck with your project.0 -
Aesthetic
Most of my criticisms were aesthetic issues. I am not saying you’ll run into major problems using malleable fittings, however, from the appearance of it you might not want a steam fitting followed by a malleable fitting followed by a galvanized fitting. That’s all; these issues will NOT affect your boilers performance. Moreover, I completely understand that a working boiler is more important than a da Vinci, so to speak. The union, on the other hand, is just good practice. As people have mentioned, it’s important to place a union somewhere within the piping in case of a future re-pipe, or even worse, a leak. And the 90*s on your header with the plugs in them are referred to heel tees, 4 x 1 heel tee. This is where the run and the bull are one size, while the remaining run is a reduced size: (4 x 1 x 4). Awesome work though, very impressive first time…can’t imagine what mine looked like ha!0 -
Insulation
Thank you for the info R. Perry.
Mike0


This discussion has been closed.
Categories
- All Categories
- 87.3K THE MAIN WALL
- 3.2K A-C, Heat Pumps & Refrigeration
- 61 Biomass
- 429 Carbon Monoxide Awareness
- 120 Chimneys & Flues
- 2.1K Domestic Hot Water
- 5.8K Gas Heating
- 115 Geothermal
- 166 Indoor-Air Quality
- 3.7K Oil Heating
- 77 Pipe Deterioration
- 1K Plumbing
- 6.5K Radiant Heating
- 395 Solar
- 15.7K Strictly Steam
- 3.4K Thermostats and Controls
- 56 Water Quality
- 51 Industry Classes
- 50 Job Opportunities
- 18 Recall Announcements