Welcome! Here are the website rules, as well as some tips for using this forum.
Need to contact us? Visit https://heatinghelp.com/contact-us/.
Click here to Find a Contractor in your area.
If our community has helped you, please consider making a contribution to support this website. Thanks!
two equalizers?
Options

steamcurious
Member Posts: 12
Hello everyone,
I am new to this so I hope I am not asking something totally stupid.
I have been trying to understand my house's steam heating with the help of Mt. Holoran's<em> The Lost Art</em> ...book. One thing I have not been able to figure out is that the boiler appears to have two equalizers. I am including a photo of the boiler and a diagram (red arrow=equalizers). The two Hartford loops are connected (dashed line in diagram).
Is this standard in some installations? any ideas? My best uneducated guess is that they may have been trying to match the cross-section of the returns.
0
Comments
-
more pics please...
since this is really a question about your piping, please take a few more pics of all sides and angles of boiler including the pipes above the boiler at the ceiling level .. my guess is that as long as the steam is all travelling in the same direction, your setup is ok and they simply used the symmetric approach .. more pics will help more qualified folks comment.1-pipe Homeowner - Queens, NYC
NEW: SlantFin Intrepid TR-30 + Tankless + Riello 40-F5 @ 0.85gph | OLD: Fitzgibbons 402 boiler + Beckett "SR" Oil Gun @ 1.75gph
installed: 0-20oz/si gauge | vaporstat | hour-meter | gortons on all rads | 1pc G#2 + 1pc G#1 on each of 2 mains
Connected EDR load: 371 sf venting load: 2.95cfm vent capacity: 4.62cfm
my NEW system pics | my OLD system pics0 -
Two Equalizers
Hi - First of all there is no such thing as a stupid question. That's how we all learn. When you first start out learning steam it can be a bit confusing as some steam concepts defy normal logic.
Interesting setup! I guess the first question is : How well does it work? Are you having any problems with your system?
In your drawing after the two side risers joint together in one riser above the boiler, I'm assuming that next there must be a bullheaded tee (Page 54-55 in "The Lost Art...") supplying two mains. I'm assuming two steam mains since you have two returns in the drawing. Bullheaded tees should be avoided though how much this would actually affect your system is an unknown.
Looking at the picture of your boiler-
You need to have an additional pipe added to the safety valve so exhausts nearer floor.
It maybe distortion in the photo but it would seem on the "visible" Hartford Loop where the Wet Return enters, it is a little high.
You may also want to raise your gauge and pressuretrol higher as they are now very close to the waterline level which can cause problems.
As was mentioned more pictures would be a big help especially some showing the riser connection to the two steam mains. There are some really experinced steam pros on here and I for one, would be very interested in their comments.0 -
That's an older Utica or Columbia
and it's not the first time I've seen one installed that way. Not the usual, but from what I can tell it looks like it should work OK. How about a pic of where the boiler piping meets the system piping so we can see that part better?All Steamed Up, Inc.
Towson, MD, USA
Steam, Vapor & Hot-Water Heating Specialists
Oil & Gas Burner Service
Consulting0 -
follow up
Thank you all for the replies. I am including more pictures
below. But first I would like to add a little background.
This is a old house, built around 1920 or so, in one of the Detroit
suburbs - that is to say, we have long and relatively cold winters. The house had
originally a two pipe steam heating system that, sometime in the last 90 years,
was converted into a one pipe system (except for one radiator that seem to
still be piped for a two steam system ??). Most of the piping is probably
original, with the exception of one run. The heating system has been producing
large energy bills but not so very good heating. This is partly due to my
ignorance and resulting neglect (big sign of embarrassment here). I am now
trying to understand how it all works so I can make it run properly.
First, the easy part:
Thanks for the comments Rod. I had taken the pipe extension out
of the safety valve a few days ago, I reinstalled right after your message.
Wow, I am very impressed Steamhead recognized the boiler by the
installation! It is in fact a Utica
model PEG300AS that was built in the early 1980s.
How does it run? Not
so well, but better than a few weeks ago. Since then I have changed the main
air vents and skimmed the boiler, which stopped the surging (thank you, thank
you, thank you Mr. Holoran). The boiler now runs at a low pressure (0.5-1.5)
and the returns heats quite fast. Running at low pressure there are only very
slight noises from the pipes, which I attribute to pipe expansion rather that
steam banging. The wet returns are
clean, but the overall system is out of balance. I am working on that, but I still need to
learn more about how the system is currently configured, so I can figure out
what are the most important problems to address.
From what I understand up to now, it seems like the boiler
and the near piping are a part of the problem. First, the boiler is probably on
its last legs - it seems to develop leaks (cracks?) every year, which I have
been patching using powdered boiler leak sealant. Perhaps more important, the
near piping is a messy tangle of pipes that I fear is probably making things
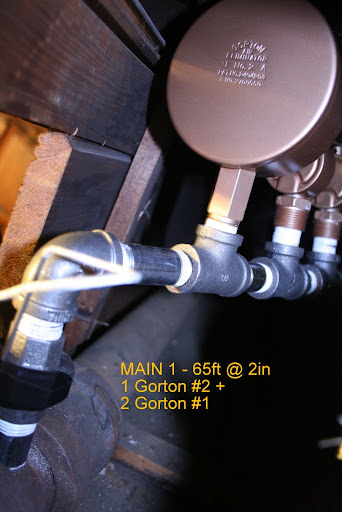
pretty inefficient. Here is a diagram and some pictures
Image 1 – diagram with pipe diameters
Image 2 - boiler piping from the right
Image 3 – boiler piping from the left-rear
Image 4 – boiler piping from below
Image 5 – boiler piper from the front
The two large mains serve the house itself, while the
smaller branch takes a long run to heat an addition along the back of the house.
This run is quite long (~30 feet) but uses mostly 2” pipe, which may be too
small.0 -
Ideas
Hi - I took a quick look at your new pictures. The piping is complicated!
I think if I was in your situation I'd just continue what you're doing now. That is learned more about steam and as you would seem to be soon needing a new boiler start planning in that direction. I would continue to improve you system though I don't think you can do much with yoiur present near boiler piping so you might as well wait on improvements to that area to when you replace the boiler.
I think I'd completely survey your piping and draw up a piping diagram with sizes and lengths. I've attached a pipe measuring table which shows the outer circumference of different size pipe. I;ve found the easiest way to figure out the pipe size is to put a strip of paper around the pipe mark it and then measure the marked length of the paper with a tape measure. Then consult the pipe table to determine the pipe size.
You will also want to determine the EDR (Page 14 -The Lost Art..") of each radiator, I've attached a chart to help you with that. You wiill need these figures to help you calculate the proper size of your new boiler. (Just a suggestion- you might want to get a large 3 ring binder and some clear 3 hole sheet protectors to put print out into. that way you'll be able to reference the items you've collected when you need them)
I've also found that it really helps if you time your system. Take measurements for how long it takes to make steam from when the boiler is cold till when you feel heat beginning to enter the risers. The next thing is to time how long it takes steam to get to each main vent. (You should have a main vent (s) at the end of each steam main.) then time how long it takes steam to get to each radiator (you'll be able to feel it on the inlet pipe going into the radiator)
The whole idea of doing timing is that when you make a change ,by retiming it you can immediately see if the change made an improvement to your system
Main vents - Do you have a main vent at the end of each main? What type and model are they? You might want to take a look at Gerry Gill's website . He has some good info on venting. [url=http://www.gwgillplumbingandheating.com/webapp/GetPage?pid=415]http://www.gwgillplumbingandheating.com/webapp/GetPage?pid=415
He also wrote the book on balancing your steam system. I highly recommend it . I probably refer to it as much as I do to "The Lost Art.." [url=http://www.heatinghelp.com/products/Books/5/146/Balancing-Steam-Systems-Using-a-Vent-Capacity-Chart-by-Gerry-Gill-and-Steve-Pajek]http://www.heatinghelp.com/products/Books/5/146/Balancing-Steam-Systems-Using-a-Vent-Capacity-Chart-by-Gerry-Gill-and-Steve-Pajek
I've also have attached a picture of a boiler similar to yours which has a nice dropheader and piping setup done by Gerry Gill. I wasn't surprised that Steamhead recognized your boiler. He's one of the super steam pros on here. I would recommend you read his posts I do and always learn something from them.
- Rod0 -
Powdered Leak Sealant
What brand of leak sealant are you using? It appears you will need a new boiler soon.All Steamed Up, Inc.
"Reducing our country's energy consumption, one system at a time"
Steam, Vapor & Hot-Water Heating Specialists
Oil & Gas Burner Service
Baltimore, MD (USA) and consulting anywhere.
https://heatinghelp.com/find-a-contractor/detail/all-steamed-up-inc0 -
follow up 2
Thanks for the information and advice! I will get the book you suggest and, when I change the boiler, I will definitively get efficient near-boiler piping installed. As for the venting, the two mains have Dole vents (model 1933, 1/8' - there is minimal clearance above the vents), I see steam arriving at the vents relatively quickly after firing the boiler, so that seems not to be a disaster.0 -
Main Vents
Hi- The Dole 1933 is a radiator vent (the 1/8 inch is a dead give away) The most commonly used main vents are the Gorton #1, the Hoffman 75 and the Gorton #2, A Gorton #1 has about 10 times more venting capacity than the Dole 1933, the Gorton #2 has 3 times the venting capacity of the Gorton #1 and the Hoffman 75 is about midway between a Gorton #1 and a Gorton #2. The venting capacities for the above vents (plus many more) are from Gerry Gill & Steve Pajek's balancing/venting book.
Your drawing shows 3 (?) steam mains though you mention only two main vents .There should be a main vent on the end of each main. The idea of large main venting capacity is to clear all the air in the steam mains out quickly so the steam can get to the radiators and start heating the rooms.
The longer it takes steam to get to the radiators, the longer the burner is on, so good main venting can make a difference on your fuel bill. Take a look at the signature picture at the end of Steamhead's post .Those are multiple Gorton #1s used as main vents. BTW you may have missed it there is a post from Gordo who is good steam pro and works with Steamhead.
- Rod0 -
vents
Yes, the vents are probably undersized. The pipe to the vent is 3/4" and ends in a 3/4" to 1/8" reducing pipe fitting. I have not been able to remove the terminal fitting, so that is why I have (temporarily) the Dole 1933 there (it was the largest vent I could find at our local plumbing supply store). The fitting is probably original and is painted shut with heat resistant paint. These factors make it difficult to remove it even with the help of a torch and liquid wrench. I will start taking more chances on the torque when the heating season is over and we are not dependent on having heat.
Frankly, I do not understand the logic of the piping in the house. Obviously it was once a two pipe system, possibly a vapor system with a separate return for the condensate. Most easily accessible radiators are now piped for a one pipe system and I see the now disconnected return pipes. However at least one radiator seem to still be connected as for a two pipe system, and others, which are not easily accessible (they are in hard-to-open enclosures) may be as well. The easiest way to figure this out is to to do spelunking in a large crawl space underneath the house, which is something I will need to do to really map and understand the heating system.
Thanks for the advice!0 -
sealant
Hi Gordo,
I have tried various sealants, with about the same results. The last one was "Black swan". Any recommendations?
I assume that the fact that these cracks appear means that this boiler is at the end of the line. Is that correct?0 -
Vents
If you need main vents most of the people on here get Gortons from Pex Supply http://www.pexsupply.com/ . Your steam system's history would seem hard to figure out. You rarely see 2 pipe steam being switched over to 1 pipe steam because 1 pipe was the "earlier" version and 2 pipe has a lot of advantages over 1 pipe systems. Most two pipe systems are easy to identify as they usually have the supply valve entering at the top of the radiator. (Page 122- TLAOSH - as always there are exceptions to this rule") )
)
Since you are new to steam I would encourage you to look around in what is known as "Off the Wall". Look in "Resources" at the top of this page. Look in the "Library" and "Dan's Article Archive" as there is a lot of good information on steam there.
- Rod0 -
messy system
The input into the radiators is along the bottom, as in a one-pipe system. I think the heating system in the house was originally a "vapor" system that was converted to a one pipe system at a later date. That would make sense since this area was built in the late 1910s and early 1920s, which is about the time frame when vapor systems were in vogue (as per TLAOSH). I have been told by one of the local heating guys that it is not unusual in the area to see systems that were converted from vapor to one pipe. I guess I have the work cut up for myself figuring this out!0 -
Pipe Size
One of the benefits of two pipe /vapor systems is that they could use small diameter pipes as one pipe carried the steam and the other pipe the condensate. The pipe has to be larger on a one pipe system as it has to carry both the steam and the condensate.
When you survey your system you might want to keep an eye open for undersized piping left over from the two pipe days as this can really affect the efficiency of your system.
- Rod0 -
pipe sizing
Good point, I will pay special attention to that as I map the piping. Thanks!0 -
Just Want to be Clear on This
The sealant you're talking about...are you using it to seal the fire-side between the sections of the boiler, or are you adding the sealant to the boiler water to seal steam/water leaks?All Steamed Up, Inc.
"Reducing our country's energy consumption, one system at a time"
Steam, Vapor & Hot-Water Heating Specialists
Oil & Gas Burner Service
Baltimore, MD (USA) and consulting anywhere.
https://heatinghelp.com/find-a-contractor/detail/all-steamed-up-inc0 -
sealant
I am adding it to the water to seal the leaks/cracks. It is a power, the instructions in the can say to add it to the water, let it boil for a couple of hours, change the water. I have done that a few times over the last 3 or 4 years and after treating the boiler it invariably stops losing water and seem to work fine for a while. However the leaks always return within a few months (sometimes i see water drops fall, other times I hear hissing, mostly it starts requiring more and more water). I got the idea for this from a heating service contractor I called because the boiler was loosing water way too rapidly (I had to add water every day). He did exactly what I described.0 -
Your Boiler
from what you describe, may be what I call a "zombie" boiler.
What is also concerning me are the chemicals in the sealant you've been adding. They may effect the quality of the water in a negative way in the new boiler that you may be installing soon. I am given to understand that these sealant chemicals, once added to a steam system, are very difficult to remove. As to these negative effects, that is not 100% certain, however.
Sorry to be the bearer of such unwelcome news.All Steamed Up, Inc.
"Reducing our country's energy consumption, one system at a time"
Steam, Vapor & Hot-Water Heating Specialists
Oil & Gas Burner Service
Baltimore, MD (USA) and consulting anywhere.
https://heatinghelp.com/find-a-contractor/detail/all-steamed-up-inc0 -
sealant
Yes, I was worried about that, especially with the liquid type that seems to seal by reacting with oxygen (If I understood the package insert correctly). That is why have been using the particulate type sealant. If I understand the way these sealants work correctly, the particles are coated with a high melting point polymer that reacts with the high temperature of the metal and thus, when the particles get trapped in the crack as they try to exit the boiler chamber, they melt within the crack and seal it. I guess, in theory at least, these powders work a little bit like blood particles that clot at cut surfaces and stop the bleeding. In any case, what gives me a little piece of mind is that the particles are relatively heavy (denser than water)- you can see this as you mix the powder in water- and thus they are unlikely to move very far up the system. I suppose some particles would travel a few feet up with the steam, but I hope it will not be very far up. The near-boiler piping is coming down anyway in the next few months, and that should take care of that. The main fear I have about this type of sealant is that it coats the inside of the boiled since it will adhere to any hot metal surface. That cannot be good for the boiling chamber. I guess it is like a form of non-removable scaling on steroids!.so it is clearly a measure of last resort to keep the boiler going just a little longer (I know I overdid it,.... bad, bad homeowner!).
Thanks for the help, the people of this forum are truly great!0 -
Glad to Read
You are maintaining your sense of humor ( i.e. "....bad, bad homeowner" ). Thanks for the chuckle!All Steamed Up, Inc.
"Reducing our country's energy consumption, one system at a time"
Steam, Vapor & Hot-Water Heating Specialists
Oil & Gas Burner Service
Baltimore, MD (USA) and consulting anywhere.
https://heatinghelp.com/find-a-contractor/detail/all-steamed-up-inc0


This discussion has been closed.
Categories
- All Categories
- 87.3K THE MAIN WALL
- 3.2K A-C, Heat Pumps & Refrigeration
- 61 Biomass
- 427 Carbon Monoxide Awareness
- 119 Chimneys & Flues
- 2.1K Domestic Hot Water
- 5.8K Gas Heating
- 115 Geothermal
- 165 Indoor-Air Quality
- 3.7K Oil Heating
- 76 Pipe Deterioration
- 1K Plumbing
- 6.5K Radiant Heating
- 395 Solar
- 15.6K Strictly Steam
- 3.4K Thermostats and Controls
- 56 Water Quality
- 51 Industry Classes
- 50 Job Opportunities
- 18 Recall Announcements