need to replace main boiler vent

I recently purchased a 100-year old house and I am new to steam. This appears to be a one-pipe system. We replaced some individual radiator vents to get them working, but noticed that some still take a very long time to get hot. After doing a bit of reading here, I found that my main vent near the boiler appears to be old and corroded and not doing any venting. Again, after reading some threads here, I thought it will make sense to replace it with a Gorton #2 vent.
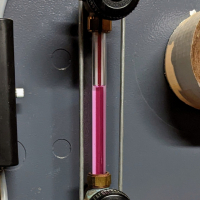
I'm not sure how hard or easy it should be to remove the current vent. Attached is a photo of what it looks like. It looks to be sized down quite a bit as well. I don't own plumbing wrenches - so I'm not sure if I can get enough leverage from relatively short wrenches. My main concern is I don't want to crack any existing pipe, but I'm not sure how sturdy or brittle this type of pipe typically is. I'm not opposed to calling my plumber to do it, but he usually shows up about a month later ... (literally) ... and if it's easy enough to swap it out, I like being DIY where I can.
This system powers six large radiators and two small ones.
I expect I would also need an elbow and nipple to add the Gorton 2 here, but not sure what type of pipe must be used.
Any guidance is appreciated.
Thanks.
Mike

Comments
-
That isn't a terribly good position for a vent- the water coming down the main can slam right into it. If I were doing that, I'd either drill and tap for 1/2" pipe in a suitable place (assuming there is one) or take the pipe apart and replace that tee with a more-suitable one. Also, those bushings (reducers) screwed in there will probably self-destruct if you try to wrench them out.
The Gorton #2 will vent a lot of air, but in order to know if it's the right size, measure the length and diameter of your main and post the result here. Also, is this the only steam main your system has?All Steamed Up, Inc.
Towson, MD, USA
Steam, Vapor & Hot-Water Heating Specialists
Oil & Gas Burner Service
Consulting0 -
Thanks for the responses.
Steamhead - I'm not yet sure how to know what would be a more suitable venting location and if there actually is one easily available to me. Although I am typically a perfectionist, at the moment my goal is just to make things work reasonably well with minimal cost/effort so I can move onto the other items on our very large to-do list. I can always add additional vents/venting locations at a later date. What would be a more suitable tee if I did want to replace it?
I'm also not sure how many mains I have or how to know the length of the mains. I've attached a couple more photos. One shows one large pipe coming out of the boiler, but it appears to tee off above it. So does that mean that I have two mains or just one? I'm assuming to measure the length of the main I'm just measuring the total length of all the largest size pipe?
If I use the Barnes & Jones vent recommended by Hatterasguy, it moves a lot of air - so shouldn't that at least do a reasonably good job? Is there such thing as oversizing the main vent?
Re: the reducers self-destructing, is that a problem? Would they get stuck in there, or they will break apart and come out? As long as I can get them out without destroying anything else, I'm good.
Hatterasguy - Thanks for breaking things into easy-step-by-step directions with parts links. Questions -
1. How about Liquid Wrench Penetrating Oil vs the two you recommended? I already have that on hand, but if your recommendations will work better, I will pick up one of those. How hard should I expect it to be to rotate the reducers after the 48+48-hour soak? Risk of breaking something else?
2. Pipe dope vs tape - is dope the preferred method over tape for this type of pipe?
3. It seems I will need a nipple and elbow to mount the vent vertically. What type of pipe do I need to use for those, and it seems I will need 3/4" if I go with the Barnes & Jones you recommend?
Thanks again - I really appreciate the help.
Mike


0 -
Au Contraire- if that main is, for example, only 20 feet long, there's no sense in paying extra for a Big Mouth when a Gorton #1 will do.Hatterasguy said:No, there is no such thing as oversizing a main vent. Just procure that vent and no further calculations are necessary. Waste of time.
Measuring is never a waste of time.
If I were doing that job- and I've done hundreds of these- I'd drill and tap the last tee before the elbow in question (now that I've seen it). That would keep water from slamming into the vent and shortening its life, and also sidestep the issue of broken bushings.Hatterasguy said:You can fracture them and leave the threaded portion in the elbow. That's the reason for time and patience with the penetrating oil. No personal experience with Liquid Wrench. Both PB and Kroil work very well if given sufficient time.
One additional tidbit is heat. Heat the innermost bushing as hot as you can possibly get it and let it cool back down. Then add the penetrating oil and let it sit for a few days. Repeat the application after a day or so.
Pay attention to the feel of the wrench. It will be difficult to move them (actually you only need to move the largest one). You're looking for the entire bushing to rotate without shearing the hex flats off.
There is no risk of breaking anything else. If the worst happens and you twist the hex off, we have methods of removing the remainder but you need a sawzall and it's definitely a PITA.All Steamed Up, Inc.
Towson, MD, USA
Steam, Vapor & Hot-Water Heating Specialists
Oil & Gas Burner Service
Consulting 1
1 -
Hatterasguy - Which PB Blaster are you recommending? It looks like there are a couple of versions. I notice Kroil is way more expensive - but it gets five stars on Amazon (PB Blaster is 4.5 or 4 and Liquid Wrench is 4 stars.) Is the Kroil way more effective and worth the extra bucks?
Re: heating up the innermost bushing as much as possible before applying the penetrating oil - is this important? I suppose it's the expansion and contraction that helps loosen stuff up? If so, I need to pickup a new torch & tank. Which do you recommend, and how do I know how hot to go? Isn't there such thing as too hot?
Thanks.0 -
Hatterasguy, once again I speak from experience. Years ago I put a brand-new Gorton #2 on a tee just like that one. It vented so fast that some of the water followed the escaping air around the 90, up the pipe nipple and into the vent, which made it spit and bang.Hatterasguy said:And, no, water will not splash into the vent if he uses two nipples and an elbow. BTW, the amount of water in question is probably not more than one quart per minute and it's not going to do any "slamming". It will simply fall down the return.
That was the last time I installed a vent that way.
How many times have you installed a vent in that position? What were the results?
And believe it or not, some homeowners are perfectly comfortable drilling and tapping. As Dan would say, it depends.All Steamed Up, Inc.
Towson, MD, USA
Steam, Vapor & Hot-Water Heating Specialists
Oil & Gas Burner Service
Consulting 2
2 -
Steamhead - If I simply go with longer nipples into the elbow, will that diminish any possibility of what you describe? I am not sure I'd be comfortable with drilling and tapping - I'd prefer to keep this as simple as possible ... if possible. I'm hoping to minimize my chances of breaking anything. I don't think I'll be equipped with the right tools for drilling and tapping either.
Previously you mentioned getting the length of the main - how do I measure this? Am I measuring just the length of the largest of all the pipes that runs horizontally? There seems to be pipe running from the boiler in two different directions. Does that mean that I need two vents, one in each direction? Or does the air simply take the path of least resistance either way?
Hatterasguy - should the pipe for the nipples, elbow and coupler be schedule 40 or schedule 80 black pipe?
Is it better to order these from Supply House or get them from my local plumbing supply, versus Home Depot?
Incidentally, I notice that a section of my main was replaced with copper. Is this bad?
Thanks guys.
0 -
The steam pipe that runs from the boiler to the vent in your picture is one steam main. That's what the main vent has to vent. So we'd need that length and diameter. If there is another such steam main from the boiler to a point where it turns down to go into the return line, we'll need to vent that too.
The objective is to use the first minute or so of steam production to fill the mains, and to have the steam reach the ends of all mains at about the same time. This way, when the main vents close, there is steam at each radiator takeoff, and the steam starts to rise to each radiator simultaneously. If you can accomplish this, the system will be far easier to balance.
For an extreme example of what good main venting will do, see our Find a Contractor ad.All Steamed Up, Inc.
Towson, MD, USA
Steam, Vapor & Hot-Water Heating Specialists
Oil & Gas Burner Service
Consulting1 -
It's not all bad. Copper is worth a lot these days. Take it off, sell it for scrap, and replace it with black pipe like it should have had in the first place.lbeachmike said:Incidentally, I notice that a section of my main was replaced with copper. Is this bad?
Just another DIYer | King of Prussia, PA
1983(?) Peerless G-561-W-S | 3" drop header, CG400-1090, VXT-240 -
I love an optimist, but why doesn't this make me feel better?Hap_Hazzard said:
It's not all bad. Copper is worth a lot these days. Take it off, sell it for scrap, and replace it with black pipe like it should have had in the first place.lbeachmike said:Incidentally, I notice that a section of my main was replaced with copper. Is this bad?
") Is it bad to leave it in place if it's been there already for at least a few years? Or is it destroying my furnace? This one will be a whole new thread if I have to take this one too .... 0
Is it bad to leave it in place if it's been there already for at least a few years? Or is it destroying my furnace? This one will be a whole new thread if I have to take this one too .... 0 -
-
Thanks - I'll give that a read ... but after I replace my vent firstKoan said:
Can anybody tell me if I need schedule 40 or schedule 80 black pipe for the nipples and elbow I'm using for the vent? And does it matter where I get them or what brand I get (in terms of quality/longevity)? Thanks!0 -
Hey guys - it seems that I have a second main vent 65 feet out from the boiler (2" main) which looks like only a 1/8" radiator vent. I think this may be my bigger issue. The other vent is only about 15 feet out from the boiler.
The OD of the skinny pipe here is slightly less than 1/2" and it's been painted. It seemed to be about 11mm, so assuming schedule 40, it seems it would be just 1/8" - but I'm not sure of the size of the threads going into the elbow. It seems the connection there measures at about 1" when I put my wrench on it. Does that give me a clue of that opening size?
Does this one look any easier to disconnect from the elbow?
If it is smaller than 3/4", would it still make sense to add a bushing to 3/4" and put a big mouth there?
Also, I'm sort of confused about how things are configured. Both mains tie together at the junction in the second photo.
The main on the left runs to the first vent (original topic of this thread) and the next pipe to the right runs to the top of the boiler from the downward part of the tee. The other pipe in the photo is for a separate system, so disregard that one (it's a two-family home.)

0 -
in the first pic that main elbow is bushed down to that vent size,
you want to remove the bushing at the elbow and repipe the same configuration in 1/2 or or whatever that elbow hub is, and add your bigmouth vent there,
make sure you have pitch up to the vent.known to beat dead horses0 -
I thought we'd find another vent....................
From what I can see, it's either 1/4" or 1/8" pipe. Can't say for sure, but it might slope down from the steam pipe before elbowing out to the vent. This will trap water and kill the vent in no time. You'll want to check it with a level- it should slope up from the steam main.
And again, that's not a good way to install a vent.All Steamed Up, Inc.
Towson, MD, USA
Steam, Vapor & Hot-Water Heating Specialists
Oil & Gas Burner Service
Consulting0 -
Thanks guys. I will definitely make sure it is sloped upward when replacing with bigger stuff.
Given this looks painted over, I'm not sure if that makes it easier or harder to remove the bushing from that elbow.
Should I be putting a wrench on there and just testing to see if it budges at all before resorting to heat + penetrating oil? Actually, I'm not sure if I can safely apply a torch to the joint because I don't know anything about the type of paint on those parts.0 -
your health concerns are valid,
I'ld be more concerned about that seasoned fire wood framing and such thoughknown to beat dead horses0 -
Well now that's an excellent point! I confirmed the.existing pipe is sloped upward, so they got something right.
So what's my risk level of putting a wrench on that bushing with not a lot of force to see if it may budge?0 -
There's always a rick of "Murphy's Law" coming into play but I would take a razor knife and cut through all the paint between the bushing and the elbow and give it a try. You may get lucky and it may turn out.lbeachmike said:Well now that's an excellent point! I confirmed the.existing pipe is sloped upward, so they got something right.
So what's my risk level of putting a wrench on that bushing with not a lot of force to see if it may budge?0 -
Ah - interesting suggestion ... the benefit of experience : )Hatterasguy said:
You probably can just unthread all the 1/4" pipe all the way to the bushing.lbeachmike said:
Should I be putting a wrench on there and just testing to see if it budges at all before resorting to heat + penetrating oil? Actually, I'm not sure if I can safely apply a torch to the joint because I don't know anything about the type of paint on those parts.
Once you do that, and want to make an attempt on the bushing without heat and without penetrating oil (not recommended), you can be successful if you can find a suitable six point socket in 3/4" drive with a two foot (minimum) breaker bar. That bushing will not likely round over if you use all six flats for the load.
Heat and penetrating oil are definitely your friends.
So, if I just cut away the paint by the threads and use penetrating oil there (but omit the torch step), would there be reasonable odds of turning the bushing without too much trouble? Given that this is sealed with paint, it may actually not be rusted underneath.
I'm curious to understand better - why do you expect that all of the 1/4 pipe would unthread easily, but that the bushing would not? Or is it just that the damage-risk is lower for unthreading the 1/4" stuff?0 -
I guess I need paint stripper, then penetrating oil I figured penetrating oil would rip right through any paint ...
Given my mains of 15' x 2" and 65' x 2", are you still recommending one big mouth for each? I'm not really sure actually if what I have is considered to be two mains, or just one main 80' x 2" with vents at both ends.0 -
Incidentally, which end is of greater value to get proper venting in place first? The end that's very close to the boiler, or the end that's very far from the boiler?0
-
Vent the long main first. I'd start with one Gorton #2 and add another if it takes longer than 1-2 minutes to vent on a cold start. The shorter main won't need such a big vent- you want the steam to reach the ends of both mains about the same time. I have a couple short mains like that running Hoffman #4A vents- anything bigger unbalances the system. A lot depends on how the system reacts to the various vents.All Steamed Up, Inc.
Towson, MD, USA
Steam, Vapor & Hot-Water Heating Specialists
Oil & Gas Burner Service
Consulting0 -
Great. Anybody know what happens if you apply a torch to pipes covered in lead-based paint? (I'm assuming it's old lead-based paint.)0
-
If you are that concerned about the lead you could use a heat gun and putty knife to scrape the paint off first then do the torch. Heat guns operate below the vaporization point of the lead and the paint generally scrapes off long before you could even get to that temperature.
 1
1 -
I'm currently using five Gorton #1's on a 29' main.
Will be swapping one out for a Big Mouth shortly.
Some would say this is too much venting and a waste of money. However, I can get steam to the end of that main in under a minute at times using what many have called an undersized boiler.
My objective, was to reduce backpressure to as close to zero as possible during a hot startup (boiler off for only 4 or 5 minutes so pipes are still cooking) so timing had nothing to do with my methods. Low back pressure from the main vents means less steam wandering down runouts before it's time even with fast vented radiators.
This is a real scenario in my home when it's near or below zero out and I'm running 3 cycles per hour. Off times are short and my vents need to handle a lot of air, fast. If the vents make audible noise, I consider that restrictive.
Single pipe quasi-vapor system. Typical operating pressure 0.14 - 0.43 oz. EcoSteam ES-20 Advanced Control for Residential Steam boilers. Rectorseal Steamaster water treatment0 -
Hey guys -
Some higher priority and likely expensive electrical issues just turned up. Overall we've found more issues with this house then we are able to get caught up with quickly enough.
It appears that the vent on the 1/4" pipe is currently not doing any venting at all. But it looks to be the simplest/quickest/lowest risk to replace. From a time and money budget perspective, if I just changed out that 1/4" vent with a new 1/4" vent, would I realize a noticeable improvement in steam delivery time and the air clanking, given it seems that everything is currently being vented at the radiators?
Then again, the way things are going, it should be a certainty that the 1/4" pipe will snap on me while trying to remove the current vent.0 -
A 1/4" pipe will vent about 3CFM at 3 ounces of pressure. If you can't replace the pipe and bushing right now, I'd just replace that elbow that vent is mounted on with a 3/4" elbow, bushed down to 1/4" on the pipe side and mount your Bigmouth on that. You'll get about 80% of the rated capacity out of the Bigmouth. That's not to shabby, until you can replace that piping.0
-
That sounds good. Though the vent looks easiest to rotate off. Removing the elbow gives me similar concerns about snapping something ... particularly with the skinnier pipe, though I probably have more suitable tools for working with the skinnier pipe.
It won't matter if the other end loosens, because I can just thread it back in - but is it low risk for snapping something?0 -
Put a small pipe wrench on the 1/4" pipe to keep it from turning and another one on the elbow. Turn the one on the elbow counter clockwise. It won't take much torque to break it loose. isk of breaking the pipe is very small. There's usually more apprehension about all the possible problems than when you actually start and get it done.1
-
Hey Fred - You're absolutely right. I get nervous about stuff I've not tackled before until I actually get started. I'm hoping to get this done at the end of this week.
Thanks for the encouragement!0 -
We all do,even when we've done it numerous times. Completing each new challenge seems to be over-coming 80% apprehension and 20% the task at hand.lbeachmike said:Hey Fred - You're absolutely right. I get nervous about stuff I've not tackled before until I actually get started. I'm hoping to get this done at the end of this week.
Thanks for the encouragement!1 -
Hey guys -
I was going to try to tackle this tonight and took the existing vent off of what was thought to be 1/4" pipe. But a couple of surprises and I'm unsure how to proceed.
1. It does not appear that this is the needed venting location. Although at the far end of the piping from my boiler, this does not appear to come directly off my 2" main and I guess it must be some sort of return. What I observed was that the radiators that this system feeds on the 2nd floor were venting well before anything was venting at this location (basement level, slightly lower than 2" main, which runs through a dropped section of ceiling.
2. What was thought to be 1/4 pipe here appears to be smaller than 1/4" - the vent that directly connects to it is a 1/8" vent. The 1/2" pipe I picked up has a substantially larger OD. But #1 is more important if this is not a useful venting location.
I'm not sure where to go from here. What happens if I install the big mouth at the other end of the main which is 15 feet away from the boiler instead of at the 65-feet away location?
Thanks.
Mike0 -
The goal is to put adequate venting someplace after the last radiator run out. That can be directly on your main or it can be on the return. Your second floor rads may be heating up before this vent because steam is going to take the path of least resistance and those rads may be venting faster than that slow vent you have on the main/return.
It is hard to say if the 15ft location or the 65 ft location is best since the main and/or dry return could loop around the basement and head back towards the boiler before it drops down into a wet return. Follow the pipe around and find a location after the last radiator run out and that is where you want the vent. You really don't need to vent air out of the dry return but you can if that is the most convenient location for your vent(s).
A 1/8" pipe will only vent 2.5 CFM of air which is about 66% of the capacity of the bigmouth. Ideally you will want a 1/2" tapping/pipe but a 1/4" tapping/pipe will get you 80% to 90% of the capacity of the bigmouth.0 -
I just made up a custom 1/4" NPT vari vent for a heating help member and made an extra if that would be helpful.Peter Owens
SteamIQ 2
2 -
Gotta love the way Barnes & Jones bends over backwards for customers gwgillplumbingandheating.com
Serving Cleveland's eastern suburbs from Cleveland Heights down to Cuyahoga Falls.
 2
2 -
He said please... Peter Owens
SteamIQ2 -
If only Barnes and Jones could make new needle and seats for our Monitor Top float valves so we didn't have to convert them to capillary tubes. I believe it's a Monel needle and an Everdur bronze seat.Sailah said:He said please...
Please............. Single pipe quasi-vapor system. Typical operating pressure 0.14 - 0.43 oz. EcoSteam ES-20 Advanced Control for Residential Steam boilers. Rectorseal Steamaster water treatment0
 -
I agree with @gerry gill , Peter ( @Sailah ) has been a huge help to me as well. . As soon as I install his new crossover traps on the mains this upcoming weekend I may actually have heat! 0
-
Hi there Sailah -Sailah said:I just made up a custom 1/4" NPT vari vent for a heating help member and made an extra if that would be helpful.
That's super-nice of you to offer! I believe it would indeed be helpful. Should I PM you to discuss further?
Thanks!
Mike0 -
Sure Mike or can give me a call.
781-963-8000 x214
PeterPeter Owens
SteamIQ0


Categories
- All Categories
- 85.2K THE MAIN WALL
- 3.1K A-C, Heat Pumps & Refrigeration
- 55 Biomass
- 424 Carbon Monoxide Awareness
- 73 Chimneys & Flues
- 1.9K Domestic Hot Water
- 5.2K Gas Heating
- 129 Geothermal
- 160 Indoor-Air Quality
- 3.3K Oil Heating
- 61 Pipe Deterioration
- 884 Plumbing
- 5.9K Radiant Heating
- 376 Solar
- 14.7K Strictly Steam
- 3.2K Thermostats and Controls
- 58 Water Quality
- 49 Industry Classes
- 89 Job Opportunities
- 28 Recall Announcements