Welcome! Here are the website rules, as well as some tips for using this forum.
Need to contact us? Visit https://heatinghelp.com/contact-us/.
Click here to Find a Contractor in your area.
Varivalve vents/steam radiators

Pilar
Member Posts: 3
Okay, I'm in need of some real help and am not afraid to admit I'm clueless!
I've got steam heat with radiators. Each of the radiators has a HeatTimer VariValve on it. Usually the house is comfortable. Recently I've noticed that two radiators are staying cold. If I take the varivalve off, shake water out and put it back, the radiator will heat up. I think I remember hearing that these valves should not collect water? (Its only a little bit that comes out). But this seems to be only a quick fix because the radiators usually wind up cold again within a day.
I'm not even sure how these valves work or what they're there for. The only option they have is to be open, closed, or somewhere inbetween.
Can anyone give me a quick lesson, and maybe suggest why those radiators are staying cold and what I should really be doing to help them?
Thanks!!
0
Comments
-
check your pressure & check your pitch
PITCH: the radiator should be slightly pitched (tilted) toward the end with the floor valve. now this means slightly, not noticeably. use a carpenter level if you have one available .. see Rod's post on pitch here: http://www.heatinghelp.com/forum-thread/129570/One-pipe-Gorton-Bding-Bdang-Its-in-the-clink#p1187302
PRESSURE: this will likely be a bit more difficult since there are a few unknown factors on any "let notice the pressure for the first time in ages" inspection .. if you have a pressure gauge that has a scale from 0-30psi .. it should never be above 2. if it is, then come back and tell us and we can help you proceed .. pictures would also be helpful of all boiler controls/gauges with closeups
but check your pitch first as per Rod's instructions.1-pipe Homeowner - Queens, NYC
NEW: SlantFin Intrepid TR-30 + Tankless + Riello 40-F5 @ 0.85gph | OLD: Fitzgibbons 402 boiler + Beckett "SR" Oil Gun @ 1.75gph
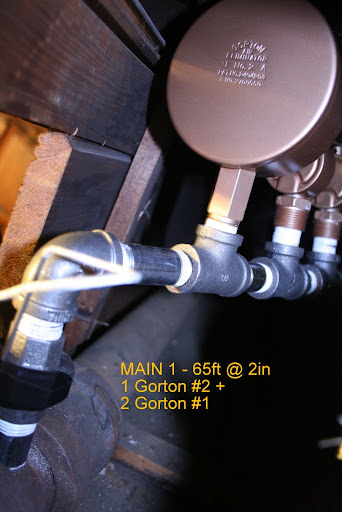
installed: 0-20oz/si gauge | vaporstat | hour-meter | gortons on all rads | 1pc G#2 + 1pc G#1 on each of 2 mains
Connected EDR load: 371 sf venting load: 2.95cfm vent capacity: 4.62cfm
my NEW system pics | my OLD system pics0 -
pitch
Why slightly? If its more than "slightly" does it cause issues? Reason I ask....one of my radiators has watter hammer, and I pitchhed it some more and I could swear the water hammer/banging has gotten worse (louder/more violent), but same duration.0 -
Radiator Venting
Hi- Maybe first we should discuss basic radiators venting
Radiator vents- In a one pipe steam system the air vent/valve on the radiator allows air but not steam to exit the radiator. When the burner turns on and boiler begins to make steam, the steam pushes the air out through the vent but when the steam reaches the vent, the vent senses the heat of the steam and closes which keeps the steam in the radiator. Radiator vents are made with different sized orifices. A large orifice vent which allows the air to escape quickly is called a "fast vent" and like wise a small orifice vent is a "slow vent" There are also adjustable orifice vents made and while this initially seems like a good idea they aren't generally as reliable as fixed orifice vents.
The Heat Timer Vari Valve is a bit different from most radiator vents as it doesn't have a internal float which means it can have problems with water. It is also a very "aggressive" valve which means though it is adjustable, it has a very large orifice. While it might seem like a large orifice would be a good idea as it would allow the air to escape quicker, the air rushing out of the radiator can pickup a lot of moisture. I would set your Vari Valve at the minimum setting and see how that works. (The Vari Valve's minimum setting is similar to a medium setting on most other vents)
Try the minimum setting first and if that doesn't work come back and we can try something else.
Jpf has already mentioned adjusting pitch. You have to keep in mind what is happening in the radiator and piping. In a one pipe system, the steam pipe is shared. The steam goes one way, in the top half of the pipe and the condensate (water) goes the opposite way, in the lower half of the pipe. When the radiator is cold, the steam touching the inner cold walls of the radiator condenses very quickly . This produces a lot of condensate (water). It also produces a big vacuum which the steam then tries to rush in and fill. The large volume of water going out of the radiator meets the large volume of steam coming into the radiator and if they collide, we get water hammer.
Too much slope- If we have too much slope the condensate forms a large pool at the pipe end of the radiator and this collides with the steam. You want just enough slope to "encourage" the condensate (water) to leave by the pipe end of the radiator.
Too Fast a Vent - If the vent is too fast then a large volume of steam enters the radiator at once and produces a large volume of condensate (water) If we slow down the venting (smaller vent orifice) this allows the steam to enter more slowly with less volume of condensate being produced initially. As mentioned above, fast air venting and rushing steam picks up water and cause the vents to "spit". I've attached a diagram of a one pipe radiator as it find it helps visualize what is happening inside the radiator. You can also see why on a one pipe system the valves on the pipe going into the radiator must be fully open when operating otherwise the steam and condensate would collide in the partially open valve.
Again try the minimum vent setting and adjust the radiator slop if necessary. If that doesn't work let us know as then we can try "Plan B"")
- Rod
 1
1 -
making progress
Okay, thank you all for the comments.
I did two things suggested: first slipped two nickels to pitch the radiator very slightly...I don't think I can fit much more b/c I can't move the stinkin thing. I also shook the water out of the valves, moved the control to almost all the way closed and put them back in. Still in wait and see mode. The temp has increased a bit, which is good, but it also warmed up a bit outside. It has been cold here, in the 20's, and the temp inside wasn't getting much above 64...which is why I started poking around with the rads. The real test will be overnight tonight.
Thanks for the help and i'll give results tomorrow.0 -
Lifting Radiators
Radiators are heavy! Lifting them isn't fun! I've found it best to use a short (4 ft) piece of 2 by 4 and block(s) as a lever and have someone lift the radiator very slightly while I add shims. (I stack quarters first till I get the slope where I want it and then cut permanent shim the same height) You can by a 6 ft. 2 x4 at Home Depot for a couple of bucks and get the guy there (smile nicely) to cut it down to 4 ft and two 1 ft blocks.
You may want to use a carpenter's level (the kind with a bubble) to check the slope as in some house the floors have sagged quite a bit.
- Rod0


This discussion has been closed.
Categories
- All Categories
- 85.2K THE MAIN WALL
- 3.1K A-C, Heat Pumps & Refrigeration
- 55 Biomass
- 424 Carbon Monoxide Awareness
- 73 Chimneys & Flues
- 1.9K Domestic Hot Water
- 5.2K Gas Heating
- 129 Geothermal
- 160 Indoor-Air Quality
- 3.3K Oil Heating
- 61 Pipe Deterioration
- 884 Plumbing
- 5.9K Radiant Heating
- 375 Solar
- 14.7K Strictly Steam
- 3.2K Thermostats and Controls
- 58 Water Quality
- 49 Industry Classes
- 89 Job Opportunities
- 28 Recall Announcements